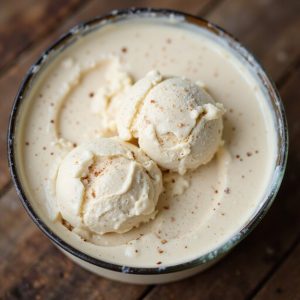
Imagine a scoop of eggnog ice cream, its creamy texture melting slowly on your tongue, releasing a cascade of rich flavors infused with a dash of nutmeg and cinnamon that evokes the warmth of holiday gatherings.
The delicate aroma fills the air, reminiscent of cozy evenings by the fireplace, a comforting embrace in every bite. This dessert is more than just a treat; it’s a nostalgic journey to festive memories.
Once, after a particularly hectic holiday season, this recipe was a lifesaver, offering a sweet escape and a moment of tranquility amidst the chaos.
Whether you’re looking to impress guests at a Sunday supper or simply craving a delightful indulgence after a busy weeknight, eggnog ice cream is the perfect solution.
Ready? Let’s cook up some creamy delight and make memories that linger long after the last bite is savored.
Why You’ll Love It
- Delivers bold flavor with a classic holiday twist.
- Freezes beautifully for a smooth and creamy texture.
- Uses pantry staples for convenient and easy preparation.
- Offers a rich, indulgent dessert option for festive occasions.
- Incorporates traditional spices for authentic eggnog taste.
Ingredients
- 2 cups heavy cream — opt for high-fat content for creaminess
- 1 cup whole milk — guarantees a rich texture
- 3/4 cup granulated sugar — adjust to taste preference
- 6 large egg yolks — free-range eggs recommended
- 1 teaspoon vanilla extract — use pure extract for best flavor
- 1/2 teaspoon ground nutmeg — freshly grated for aroma
- 1/4 teaspoon ground cinnamon — enhances warmth
- 1/4 teaspoon salt — balances sweetness
Step-by-Step Method
In a saucepan, combine heavy cream, whole milk, and granulated sugar over medium heat. Stir until the sugar dissolves completely.
Confirm the mixture is smooth and well-integrated. This forms the base of your ice cream, so a consistent blend is essential for the desired creamy texture and flavor.
Whisk Egg Yolks
In a mixing bowl, whisk together the egg yolks until smooth and consistent. This step is significant to confirm that the yolks integrate well with the cream mixture.
Keep the movement steady to avoid any lumps, as this will affect the texture of your ice cream.
Temper the Egg Yolks
Gradually add the hot cream mixture to the egg yolks, whisking constantly. This process is called tempering, and it prevents the yolks from curdling.
Pour slowly and keep whisking to confirm a smooth change from hot to warm, blending the ingredients seamlessly.
Thicken the Mixture
Return the mixture to the saucepan and cook over low heat. Stir continuously until the mixture thickens and coats the back of a spoon.
This step confirms the ice cream base achieves the right consistency. Avoid overheating to prevent curdling or scorching.
Add Flavorings
Remove from heat and stir in vanilla extract, nutmeg, cinnamon, and salt.
Mix well to distribute the flavors evenly throughout the base. These ingredients give the ice cream its signature eggnog flavor, adding warmth and depth to the taste.
Cool and Refrigerate
Cool the mixture to room temperature, then refrigerate for at least 4 hours.
This chilling process is necessary for achieving a creamy texture when churning. Confirm the mixture is fully cooled, as a warm base can impede the freezing process.
Churn the Ice Cream
Pour the chilled mixture into an ice cream maker and churn according to the manufacturer’s instructions.
The churning process incorporates air, enhancing the ice cream’s texture. Confirm your ice cream maker bowl is pre-frozen to facilitate proper churning.
Freeze Until Firm
Transfer the churned ice cream to an airtight container and freeze until firm, about 2 hours.
This step solidifies the ice cream and allows the flavors to meld further. Confirm the container is sealed properly to prevent ice crystals from forming.
Ingredient Swaps
- To make the eggnog ice cream dairy-free, substitute the heavy cream and whole milk with coconut milk or almond milk.
- For a lower-sugar version, replace granulated sugar with a sugar substitute like stevia or erythritol.
- If you need an egg-free option, consider using a custard mix or thickening agent like cornstarch instead of egg yolks.
You Must Know
- Pre-freeze Your Equipment: Verify your ice cream maker’s bowl is pre-frozen as per the manufacturer’s instructions for best results.
- Constantly Whisk: When combining the hot cream mixture with the egg yolks, whisk constantly to prevent the eggs from curdling.
- Chill Thoroughly: Refrigerate the mixture for at least 4 hours before churning to achieve the creamiest texture possible.
- Add a Splash of Rum: For a more traditional eggnog flavor, consider adding a splash of rum or bourbon to the mix.
- Use Fresh Spices: Freshly ground nutmeg and cinnamon will enhance the flavor profile of your eggnog ice cream considerably.
Serving Tips
- Serve eggnog ice cream with a sprinkle of cinnamon or nutmeg on top for extra flavor.
- Pair with warm holiday desserts like apple pie or gingerbread cookies for a festive treat.
- Garnish with a cinnamon stick or a sprig of mint for an elegant presentation.
- Drizzle with caramel or chocolate sauce for added sweetness and richness.
- Offer alongside a hot cup of coffee or spiced cider for a delightful contrast.
Storage & Make-Ahead
Eggnog ice cream can be stored in the freezer for up to two weeks in an airtight container. It maintains its creamy texture and rich flavor during this time.
For make-ahead convenience, prepare the custard base in advance and refrigerate for up to 24 hours before churning. This guarantees peak freshness and taste.
Reheating
Eggnog ice cream shouldn’t be reheated using a microwave, oven, or stovetop as it alters the texture and flavor.
Instead, allow it to soften naturally at room temperature.
Eggnog’s Holiday Traditions
Although the chill of winter may seem intimidating, it provides the perfect backdrop for savoring holiday traditions that warm the heart and soul.
One of my favorite traditions centers around a comforting glass of eggnog. The creamy texture, spiced with nutmeg and cinnamon, instantly evokes memories of festive gatherings by the fireplace.
Each sip feels like a hug in a mug, amplifying the joy of the season.
I remember bustling kitchens filled with laughter, the aroma of nutmeg wafting through the air, mingling with the sound of carols.
It’s a tradition that connects generations, from the little ones keenly awaiting their first taste to grandparents sharing stories of holidays past.
Eggnog isn’t just a drink; it’s a cherished ritual that celebrates togetherness.
Final Thoughts
Give this delightful Eggnog Ice Cream recipe a try for a festive twist on a classic treat!
Feel free to tweak the spices or add a splash of rum for that traditional holiday flavor.
Frequently Asked Questions
Can I Use a Hand Mixer Instead of an Ice Cream Maker?
I’d suggest using a hand mixer with caution. While it can whip air into the mixture, it won’t replicate an ice cream maker’s churning. You might get a denser, less creamy texture, but it’s worth experimenting!
How Long Does Homemade Eggnog Ice Cream Last in the Freezer?
In my experience, homemade ice cream should last about two weeks in the freezer. However, I’d recommend enjoying it sooner for the best texture and flavor. Over time, it might develop ice crystals or lose its creamy consistency.
Is There a Non-Dairy Alternative for This Recipe?
I’ve swapped heavy cream and whole milk with coconut milk and almond milk for a luscious non-dairy twist. The creamy texture remains, while the nutty undertones add a delightful depth. You’ll love this indulgent, dairy-free version!
Can I Add Chocolate Chips or Other Mix-Ins?
Absolutely, you can toss in chocolate chips or your favorite mix-ins. Just fold them gently into the ice cream after churning. This adds delightful texture and bursts of flavor, elevating your creation to new festive heights!
How Can I Prevent Ice Crystals From Forming in the Ice Cream?
To prevent pesky ice crystals, I make certain the mixture is thoroughly chilled before churning and use airtight containers for storage. I also add a splash of alcohol, which lowers the freezing point, resulting in smoother, creamier ice cream.
Eggnog Ice Cream
Equipment
- 1 Saucepan
- 1 Whisk
- 1 Mixing bowl
- 1 Ice cream maker
- 1 airtight container
Ingredients
- 2 cups heavy cream
- 1 cup whole milk
- 3/4 cup granulated sugar
- 6 large egg yolks
- 1 teaspoon vanilla extract
- 1/2 teaspoon ground nutmeg
- 1/4 teaspoon ground cinnamon
- 1/4 teaspoon salt
Instructions
- In a saucepan, combine heavy cream, whole milk, and granulated sugar over medium heat until sugar dissolves.
- In a mixing bowl, whisk together egg yolks until smooth.
- Gradually add the hot cream mixture to the egg yolks, whisking constantly.
- Return the mixture to the saucepan and cook over low heat until the mixture thickens and coats the back of a spoon.
- Remove from heat and stir in vanilla extract, nutmeg, cinnamon, and salt.
- Cool the mixture to room temperature, then refrigerate for at least 4 hours.
- Pour the chilled mixture into an ice cream maker and churn according to the manufacturer’s instructions.
- Transfer the ice cream to an airtight container and freeze until firm, about 2 hours.
Notes