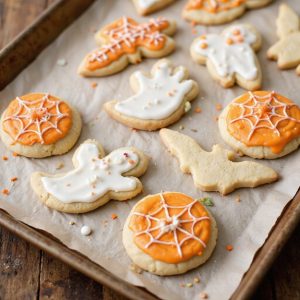
Picture a tray of moon-bright cookies edged in soft golden halos, their glossy royal icing gleaming like freshly carved pumpkins—crisp on the bite, tender within, and perfumed with warm vanilla and a whisper of almond.
Imagine the gentle tap of a whisk, the rustle of parchment, and the sweet, buttery aroma that turns any kitchen into a cozy refuge on chilly October evenings.
These Halloween sugar cookies aren’t just treats; they’re little canvases for creativity and calm, perfect for family decorating nights, class parties, or make-ahead desserts for busy weeknights and relaxed Sunday suppers.
One October, a rainy birthday derailed our plans—these easy, no-spread cookies saved the day, becoming a spontaneous decorating party that kept spirits high and hands busy.
We’ll keep the dough chilled for crisp edges, mix up foolproof royal icing, and decorate with simple techniques that look impressively festive.
Ready? Let’s cook!
Why You’ll Love It
- Delivers crisp edges and tender, buttery centers
- Holds shape perfectly for clean Halloween designs
- Uses simple pantry staples and basic equipment
- Customizes easily with colors, sprinkles, and candy eyes
- Freezes and stores well for make-ahead decorating
Ingredients
- 3 cups all-purpose flour — sifted for lighter dough
- 1 teaspoon baking powder — aluminum-free preferred
- 1/2 teaspoon fine salt — don’t skip; balances sweetness
- 1 cup unsalted butter — softened to room temp
- 3/4 cup granulated sugar — superfine dissolves best
- 1/4 cup powdered sugar — adds tenderness
- 1 large egg — room temperature
- 2 teaspoons vanilla extract — pure, not imitation
- 1/2 teaspoon almond extract — optional; adds bakery flavor
- 1 tablespoon milk — just to bring dough together
- 2 cups powdered sugar — sifted for smooth icing
- 2–3 tablespoons meringue powder — for stable royal icing
- 4–6 tablespoons water — add gradually to adjust consistency
- 1/2 teaspoon vanilla extract — for icing flavor
- Gel food coloring assorted Halloween colors — gel won’t thin icing
- Sprinkles and candy eyes — add while icing is wet
Step-by-Step Method
Chill the Dough
Cream butter and sugars until fluffy. Beat in egg and extracts. Mix in dry ingredients just until a soft dough forms. Add milk if dry.
Divide into two disks, wrap, and chill 45–60 minutes until firm. Keep dough cold to prevent spreading and guarantee sharp edges when cutting shapes.
Preheat & Prep Pans
Preheat oven to 350°F (175°C). Line two baking sheets with silicone mats or parchment.
Clear and lightly flour your work surface. Gather rolling pin, cutters, and extra flour for dusting. Have a wire rack ready for cooling to keep cookies crisp and prevent soggy bottoms.
Roll to Even Thickness
Dust the surface and rolling pin lightly. Roll one dough disk to 1/4 inch thickness. Rotate dough occasionally and lift to prevent sticking. Add minimal flour to avoid tough cookies.
Aim for uniform thickness so cookies bake evenly. Return dough to the fridge if it softens.
Cut Halloween Shapes
Press cutters straight down for clean edges. Wiggle minimally to avoid distortion.
Transfer shapes to prepared sheets, spacing about 1 inch apart. Gather scraps, press together gently, and re-roll once. Keep trays chilled 10 minutes if dough gets warm to minimize spreading.
Bake Until Set
Bake 8–10 minutes, watching closely. Look for set edges and barely golden bottoms. Avoid overbaking to keep cookies tender and pale.
Cool on the sheet 5 minutes to firm up. Transfer carefully to a wire rack and cool completely, 20–30 minutes, before icing.
Mix Royal Icing
Whisk powdered sugar, meringue powder, vanilla, and 4 tablespoons water until thick peaks form. Add water by teaspoons to reach piping consistency.
Keep bowls covered with damp towels to prevent crusting. Separate a portion to remain stiff for details, if desired.
Tint & Thin to Consistencies
Divide icing into bowls and tint with gel colors. Leave some at piping consistency for outlines and details.
Thin portions with drops of water to create flood icing that ribbons smoothly and disappears in 10–15 seconds. Adjust with powdered sugar if it becomes too thin.
Outline the Cookies
Fill piping bags fitted with small round tips. Pipe clean outlines around each cookie, holding the tip slightly above the surface for smooth lines.
Let outlines set a few minutes to create a barrier for flooding. Work in batches to maintain control and consistency.
Flood Smoothly
Fill outlined areas with flood icing. Use a toothpick or scribe to nudge icing into corners and pop bubbles.
Gently shake the cookie to level the surface. Avoid overfilling edges. Allow the base layer to crust for 20–30 minutes before adding additional colors or details.
Add Spooky Details
Pipe webs, stitches, borders, and faces with piping-consistency icing. Add sprinkles or candy eyes while icing is wet so they adhere.
Layer colors after crusting to prevent bleeding. Use stiff icing for tiny elements that need definition. Clean tips often for crisp lines.
Dry Completely
Let decorated cookies dry uncovered at room temperature until the icing fully sets, 6–8 hours or overnight. Avoid stacking or covering during this time to prevent smudging.
Once dry, store in an airtight container at room temperature for up to a week. Freeze undecorated cookies if needed.
Ingredient Swaps
- Gluten-free: Use a 1:1 gluten-free all-purpose flour blend (with xanthan gum) in place of wheat flour.
- Dairy-free: Swap butter with vegan butter sticks or refined coconut oil; use plant milk instead of dairy milk.
- Egg-free: Replace the egg with 3 tablespoons aquafaba or a flax egg (1 tbsp ground flax + 3 tbsp water, rested 5–10 minutes).
- Nut-free: Omit almond extract; add more vanilla or use orange extract for a festive twist.
- No meringue powder: Make simple icing (powdered sugar + milk/water + vanilla) or use pasteurized liquid egg whites in place of meringue powder per package directions.
- Lower cost/availability: Use only granulated sugar (omit powdered in dough) and increase to 1 cup; vanilla-only extract is fine.
- Flavor swaps: Try cinnamon or pumpkin pie spice in the dough; cocoa powder for chocolate cookies (reduce flour by equal weight).
You Must Know
Doneness • If edges look pale and centers feel slightly soft when touched, remove from heat; carryover sets them in 5–7 minutes on the sheet. Why: overcoloring leads to dry, spread cookies; visual cue is bottoms just turning light golden.
Troubleshoot • When dough cracks while rolling, knead in 1–2 teaspoons milk per half-batch and chill 10 minutes. Why: low moisture causes fissures; feel for a smooth, pliable surface that doesn’t stick but bends without tearing.
Flavor Boost • For deeper “bakery” aroma, swap 2 tablespoons of flour with dry milk powder and add 1/4 teaspoon fine salt extra. Why: milk sugars brown and boost vanilla notes; aim for faintly golden bottoms in 8–10 minutes.
Scale • For 12 cookies, use 1 1/2 cups flour, 1/2 teaspoon baking powder, 1/4 teaspoon salt, 1/2 cup butter, 6 tablespoons granulated sugar, 2 tablespoons powdered sugar, 1/2 large egg (about 25 g beaten), 1 teaspoon vanilla, 1/4 teaspoon almond, 1 1/2 teaspoons milk; icing: 1 cup powdered sugar, 1–1 1/2 tablespoons meringue powder, 2–3 tablespoons water. Why: keeps thickness and spread identical.
Make-Ahead • To hold decorated cookies crisp, dry icing 8–12 hours, then transfer to airtight layers with parchment; add a silica gel packet if humid. Why: moisture softens royal icing; check that surfaces feel glassy and no longer tacky.
Serving Tips
- Arrange on a black platter with cobweb cotton and candy eyeballs scattered around.
- Pair with hot apple cider, pumpkin spice lattes, or cold milk shooters.
- Create a DIY decorating station with extra icing bags and Halloween sprinkles.
- Package singles in clear bags with ribbon for party favors or trick-or-treaters.
- Serve mixed shapes by theme on labeled trays: ghosts, pumpkins, bats, spiders.
Storage & Make-Ahead
Store decorated cookies in an airtight container at room temperature up to 1 week.
In the fridge, they keep 10–14 days but may soften.
Make dough 2–3 days ahead, chilled.
Baked, undecorated cookies freeze well up to 2 months.
Thaw wrapped, then decorate.
Royal icing can rest 1–2 days refrigerated.
Reheating
Reheat gently.
Microwave 5–10 seconds to soften icing slightly.
Oven at 275°F for 3–5 minutes to refresh crispness.
Stovetop skillet on low, a minute per side, briefly, to revive texture.
Trick-Or-Treat Lore Origins
As the last cookie warms and the icing softens just enough to shine, I can’t help hearing echoes of doorbells and rustling costumes—the soundtrack to a tradition older than candy wrappers.
I trace a spiderweb with steady pressure, thinking of how trick-or-treating stitched itself together from ancient thresholds to modern sidewalks.
1) From Samhain’s door-lit nights: villagers offered soul cakes to wandering spirits and costumed mummers—hospitality as protection. I picture warm loaves, steam meeting cold air, much like these cookies cooling on the rack.
2) Medieval souling: children traded prayers for treats, a soft barter of blessings, like swapping piping for sugar pearls.
3) Scottish and Irish guising: jokes, songs, and masked knocks earned coins and sweets. I hear that playful dare in every tap of my scribe tool.
Final Thoughts
Ready to bake up some spooky fun? Give these Halloween sugar cookies a try, and feel free to tweak the flavors and designs to make them uniquely yours!
Frequently Asked Questions
Can I Make These Cookies Gluten-Free Without Compromising Shape?
Yes—you can. I swap in a high-quality 1:1 gluten-free flour with xanthan gum, chill the dough well, roll gently, and bake just until edges set. Shapes hold, edges stay crisp, icing flows like satin.
How Do High-Altitude Bakers Adjust Time and Temperature?
I raise oven temp 15–25°F, bake slightly shorter, and watch edges set like pale gold. I add a tablespoon more flour, a splash more liquid, and chill dough firm so shapes hold in thin, mountain air.
What’s the Best Way to Ship These Without Breakage?
I nestle each cookie in bubble wrap cocoons, double-box with crinkled paper, and pad all corners. I let icing dry overnight, stack with parchment, add fragile labels, ship priority—your treats arrive crisp, unbroken, and celebratory.
Are There Egg-Free Royal Icing Alternatives That Still Harden?
Yes—use aquafaba or a cornstarch-glucose glaze. I whip aquafaba with powdered sugar and vanilla; it dries glossy and firm. Or simmer cornstarch, sugar, water—silky, glassy set. Both pipe clean lines, hold sprinkles, crunch gently.
How Can I Prevent Icing Colors From Bleeding Overnight?
I prevent color bleed by drying layers fully, using gel colors sparingly, and keeping icing on the thicker side. I work in low humidity, avoid darks touching lights, and let cookies dry uncovered, cool, and undisturbed overnight.
Halloween Sugar Cookies with Royal Icing
Equipment
- 2 Mixing bowl
- 1 stand mixer or hand mixer
- 1 Whisk
- 1 Rubber spatula
- 1 Rolling Pin
- 2 Baking sheet
- 2 silicone baking mat or sheet of parchment paper
- 3 Cookie cutter Halloween shapes
- 1 wire cooling rack
- 3 piping bag
- 3 small round piping tip
- 3 toothpick or scribe tool
- 1 measuring cup set
- 1 measuring spoon set
- 1 plastic wrap
Ingredients
- 3 cup all-purpose flour sifted
- 1 teaspoon baking powder
- 1/2 teaspoon fine salt
- 1 cup unsalted butter softened
- 3/4 cup granulated sugar
- 1/4 cup powdered sugar
- 1 large egg room temperature
- 2 teaspoon vanilla extract
- 1/2 teaspoon almond extract optional
- 1 tablespoon milk
- 2 cup powdered sugar sifted (for icing)
- 2 tablespoon meringue powder for icing (use up to 3 tablespoons, as needed)
- 4 tablespoon water plus more as needed (for icing, up to 6 tablespoons total possible)
- 1/2 teaspoon vanilla extract for icing
- gel food coloring assorted Halloween colors (for icing)
- sprinkles optional (for decorating)
- candy eyes optional (for decorating)
Instructions
- Whisk together flour, baking powder, and salt in a bowl and set aside.
- Cream butter, granulated sugar, and powdered sugar in a mixer on medium until light and fluffy, 2–3 minutes.
- Beat in egg, vanilla, and almond extract until combined, scraping the bowl.
- Mix in the dry ingredients on low just until a soft dough forms, then add milk if dough seems dry.
- Divide dough in half, flatten into disks, wrap in plastic, and chill for 45–60 minutes until firm.
- Preheat oven to 350°F (175°C) and line baking sheets with silicone mats or parchment.
- Roll dough on a lightly floured surface to 1/4 inch thickness, dusting the pin as needed.
- Cut out Halloween shapes, re-rolling scraps once, and transfer cookies to prepared sheets 1 inch apart.
- Bake 8–10 minutes until edges are set and barely golden, then cool on sheets 5 minutes.
- Move cookies to a wire rack and cool completely, about 20–30 minutes.
- Make royal icing by whisking powdered sugar, meringue powder, vanilla, and 4 tablespoons water to thick peaks, adding more water by teaspoons to reach piping consistency.
- Divide icing into bowls, tint with gel colors, and adjust some portions to flooding consistency by adding a few drops of water at a time.
- Fill piping bags with piping-consistency icing fitted with small round tips and outline cookie shapes.
- Flood outlined areas with thinner icing, using a toothpick to nudge and pop bubbles for a smooth surface.
- Add details like eyes, webs, stitches, and borders with piping-consistency icing, and apply sprinkles or candy eyes while icing is wet.
- Let decorated cookies dry uncovered at room temperature until the icing fully sets, 6–8 hours or overnight.
Notes