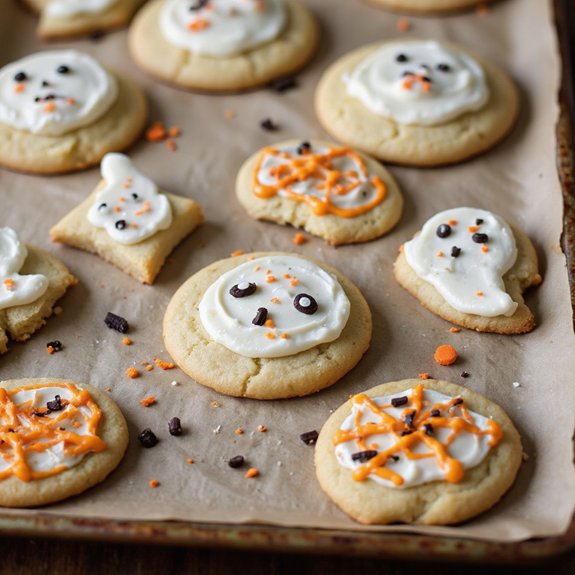
Picture a platter of jack-o’-lanterns and ghosts shimmering in shades of pumpkin orange, moonlit purple, and midnight black—their buttercream swirls glossy and satiny, the scent of vanilla and sugar warming the kitchen like a cozy blanket.
Imagine the first bite: tender, just-set edges giving way to a soft crumb, topped with creamy frosting that melts into sweet, buttery comfort.
These cookies matter to me because they turn an ordinary October evening into a small celebration—an activity that gathers everyone around the table, laughing over sprinkles and comparing crooked smiles.
They’re practical, too: the dough chills while you tidy up, bakes fast, and decorates beautifully—perfect for busy weeknights, school parties, or leisurely Sunday suppers when you want a simple project with festive payoff.
Once, a last-minute class treat request turned from panic to applause thanks to this reliable dough and quick-setting buttercream.
Ready? Let’s cook!
Why You’ll Love It
- Delivers classic bakery-style soft, tender sugar cookies
- Pipes smoothly with creamy, fluffy vanilla buttercream frosting
- Uses simple pantry staples and basic kitchen tools
- Holds crisp edges thanks to chill-and-roll method
- Perfect for festive decorating with vibrant gel colors and sprinkles
Ingredients
- 2 1/2 cups all-purpose flour — spooned and leveled (avoid packing)
- 1/2 teaspoon baking powder — fresh/active for best lift
- 1/2 teaspoon fine sea salt — balances sweetness
- 3/4 cup unsalted butter — softened to room temp
- 3/4 cup granulated sugar — standard white works best
- 1 large egg — room temperature for easier mixing
- 2 teaspoons vanilla extract — pure vanilla if possible
- 1 tablespoon milk — add only if dough is crumbly
- 1 cup unsalted butter — softened (for buttercream)
- 2 3/4 cups powdered sugar — sifted to remove lumps
- 1 teaspoon vanilla extract — for buttercream flavor
- 1/8 teaspoon fine sea salt — rounds out buttercream
- 1–2 tablespoons heavy cream — adjust for spreadable texture
- 1/4 teaspoon gel food coloring — Halloween shades (gel won’t thin frosting)
- 2 tablespoons Halloween sprinkles — optional festive crunch
Step-by-Step Method
Make the Dough Base
Whisk flour, baking powder, and salt in a bowl.
In a separate bowl, beat butter and sugar on medium until light and fluffy, about 2 minutes.
Beat in the egg and vanilla until combined.
Add dry ingredients in two additions on low speed.
Mix just until a soft dough forms.
If crumbly, add up to 1 tablespoon milk.
Chill for Clean Cuts
Divide dough in half and flatten into discs.
Wrap each disc tightly and chill for 45 minutes.
Chilling firms the butter and relaxes gluten, preventing spread.
Meanwhile, line two baking sheets with silicone mats or parchment.
Preheat oven to 350°F (175°C) so it’s ready when shaping.
Roll to Even Thickness
Lightly flour your surface and rolling pin.
Roll one dough disc to 1/4-inch thickness with steady, even pressure.
Use guides if you have them to keep thickness consistent.
Dust the dough and pin sparingly to prevent sticking.
Avoid overworking the dough to keep cookies tender.
Cut Festive Shapes
Cut shapes with Halloween cookie cutters, pressing straight down for clean edges.
Gather scraps, gently press together, and reroll once.
Transfer shapes to the prepared sheets, spacing about 1 inch apart.
Keep the second dough disc chilled until you’re ready to roll it.
Bake Until Just Set
Bake cookies for 8-10 minutes, rotating sheets halfway if needed.
Look for set edges and matte centers with minimal browning.
Remove from the oven promptly to prevent dry cookies.
Cool on the sheet for 5 minutes to firm up, then move to a rack.
Cool Completely
Let cookies cool on the rack for about 25 minutes more, until fully cool to the touch.
Decorating warm cookies will melt the buttercream and blur details.
Make certain all cookies are completely cooled before mixing icing colors and filling piping bags.
Whip the Buttercream
Beat softened butter until smooth and creamy.
Gradually beat in sifted powdered sugar, vanilla, and salt.
Add 1-2 tablespoons heavy cream as needed for a spreadable consistency.
Whip on medium-high for 1-2 minutes until light and fluffy.
Adjust with more sugar to thicken or cream to loosen.
Tint Spooky Colors
Divide buttercream into separate bowls.
Add gel food coloring in small amounts and mix until you reach bold Halloween shades.
Use gel to avoid thinning.
If the buttercream softens from mixing, chill it 5-10 minutes.
Load colors into piping bags fitted with small round tips (#2–#4).
Outline and Flood
Pipe a thin outline around each cooled cookie to define edges.
Soften a portion of the same color with a few drops of cream and stir.
Pipe or spread to flood inside the outline, nudging to the edges with a toothpick.
Work in batches so icing stays manageable.
Add Details and Sprinkles
Pipe faces, webs, and accents with contrasting colors using steady pressure.
Add Halloween sprinkles while the buttercream is still tacky so they adhere.
Wipe tip ends as needed for clean lines.
If buttercream warms, chill briefly to restore precision.
Set and Serve
Let decorated cookies sit at room temperature for 20-30 minutes to set the buttercream surface.
For sharper details, allow longer.
Serve once set, or layer between parchment in an airtight container.
Store up to 4 days at room temperature, or freeze undecorated cookies for up to 2 months.
Ingredient Swaps
- Gluten-free: Use a 1:1 gluten-free all-purpose flour blend with xanthan gum; chill well and roll slightly thicker to prevent cracking.
- Dairy-free/vegan: Replace butter with plant-based buttery sticks, milk/cream with oat or almond milk, and egg with 1 tablespoon ground flax + 3 tablespoons water (rest 10 minutes).
- Budget/availability: Swap vanilla with equal almond or imitation vanilla; heavy cream with milk; gel colors with cocoa (black/brown), matcha or spinach powder (green), turmeric (yellow), or beet powder (pink/red).
- Flavor twists: Add 1/2 teaspoon pumpkin pie spice to dough; citrus lovers can replace 1 teaspoon vanilla with 1 teaspoon orange zest + 1/2 teaspoon orange extract.
You Must Know
- Doneness • If edges look pale and centers still glossy, pull them now; carryover heat will finish them in 3–4 minutes on the sheet. Why: prevents dryness. Visual cue: edges just matte with a faint blonde ring, no browning.
- Troubleshoot • When dough crumbles or cracks while rolling, knead in 1–2 teaspoons milk with fingertips for 10–15 seconds. Why: a touch more moisture improves cohesion. Sensory anchor: dough should feel pliable like cool playdough, not sandy.
- Scale • For 12 cookies, use 1 1/4 cups flour, 3/8 cup butter, 3/8 cup sugar, 1/2 egg (25 g beaten), 1 tsp vanilla; bake time unchanged (8–10 min). Why: keeps thickness and spread consistent. Tip: weigh 25 g egg from a beaten whole egg.
- Flavor Boost • For deeper “bakery” notes, swap 1 tsp vanilla with 1/2 tsp vanilla + 1/4 tsp almond extract and add orange zest (1 tsp) to dough. Why: lifts sweetness and complements Halloween spices. Sensory: dough should smell citrusy–nutty before chilling.
- Make-Ahead • To stage decorations, keep tinted buttercream covered at cool room temp up to 6 hours or refrigerated 3 days; re-whip 15–30 seconds if it firms. Why: restores spreadability. Texture target: smooth peaks that hold, not stiff ridges.
Serving Tips
- Arrange on a dark slate board with candy eyeballs and plastic spiders.
- Pair with hot cocoa or pumpkin spice lattes for cozy contrast.
- Pipe names on cookies and place as edible place cards.
- Serve in a tiered stand with orange, purple, and black napkins.
- Offer a DIY decorating station with extra buttercream and sprinkles.
Storage & Make-Ahead
Store decorated cookies airtight at room temperature up to 4 days.
Refrigerate for 1 week if your kitchen is warm.
Bake cookies ahead: plain cookies keep 1 week airtight.
Buttercream can be made 1 week ahead and chilled.
Rewhip before using.
Both undecorated cookies and buttercream freeze well up to 2 months.
Reheating
Reheat gently: microwave cookies 5–10 seconds, covered with a damp towel to soften.
In oven, 275°F for 3–5 minutes.
For buttercream, warm briefly near residual stovetop heat, avoiding melting.
Trick-Or-Treat TV Cameos
Curl up on the couch with a plate of buttercream-topped bats, and I’ll cue up a few irresistible TV cameos to match the mood—think guest stars who pop in like friendly ghosts, deliver a wink, then vanish before the credits.
I love a surprise appearance that pairs with a cookie: a neon-green swirl for the quirky comedian who barges into a Halloween party scene, midnight-purple rosettes for that iconic scream queen sweeping through a cobwebbed doorway.
Queue short Halloween episodes, then nibble between reveals. When the doorbell rings on-screen, I pause, pass a pumpkin cookie, and guess the face before it’s framed.
Keep the buttercream soft, the lighting low, and the cameos playful—little sugar-fueled jolts, perfect for a cozy, blink-and-you-miss-it marathon.
Final Thoughts
Ready to get spooky in the sweetest way? Give these Halloween buttercream cookies a try, and feel free to tweak the colors, shapes, and sprinkles to match your haunted party vibes!
Frequently Asked Questions
How Can I Make These Cookies Gluten-Free Without Compromising Texture?
Use a 1:1 cup-for-cup gluten-free blend with xanthan gum, add 1 tablespoon cornstarch, and chill thoroughly. I roll thicker, don’t overbake, and whip buttercream softly—your cookies stay tender, edges neat, and flavors warmly intact.
What Altitude Adjustments Are Needed for Baking These Cookies?
At high altitude, I reduce sugar 1–2 tablespoons, increase flour 2–3 tablespoons, add an extra tablespoon milk, raise oven to 365°F, and shorten bake by a minute; cookies set tender, like warm mountain air hugging edges.
Can I Make Dairy-Free Buttercream With Similar Consistency?
Yes—you can. I’d use vegan butter and powdered sugar, add vanilla, a pinch of salt, and coconut cream until fluffy. Keep it cool, whip patiently, and you’ll pipe velvety swirls that hold like moonlit clouds.
How Do I Package Decorated Cookies for Mailing Safely?
I nestle each cookie in bubble wrap, slip it into a snug cello bag, then stack in a tin with parchment layers. Cushion the tin in a sturdy box. Mark “Fragile.” Ship fast, avoid heat.
Which Natural Food Colorings Work Best for Vibrant Halloween Shades?
Use spirulina/charcoal for black, beet or hibiscus for crimson, turmeric with spirulina for eerie green, butterfly pea plus lemon for violet, and annatto for pumpkin orange. I test intensity, strain powders, and chill buttercream; colors bloom beautifully.

Halloween Buttercream Cookies
Equipment
- 2 Mixing bowl
- 1 hand mixer or stand mixer
- 1 Whisk
- 1 Silicone spatula
- 1 Measuring cups set
- 1 Measuring spoons set
- 2 Baking sheet
- 2 silicone baking mat or sheet parchment paper
- 1 Cooling rack
- 1 Rolling Pin
- 2 Cookie cutter Halloween shapes
- 3 piping bag
- 3 small round piping tip
Ingredients
- 2 1/2 cup all-purpose flour spooned and leveled
- 1/2 teaspoon baking powder
- 1/2 teaspoon fine sea salt
- 3/4 cup unsalted butter softened
- 3/4 cup granulated sugar
- 1 large egg room temperature
- 2 teaspoon vanilla extract
- 1 tablespoon milk as needed
- 1 cup unsalted butter softened (for buttercream)
- 2 3/4 cup powdered sugar sifted (for buttercream)
- 1 teaspoon vanilla extract for buttercream
- 1/8 teaspoon fine sea salt for buttercream
- 1-2 tablespoon heavy cream as needed (for buttercream)
- 1/4 teaspoon gel food coloring assorted Halloween colors
- 2 tablespoon Halloween sprinkles optional
Instructions
- Whisk the all-purpose flour, baking powder, and fine sea salt in a mixing bowl and set aside.
- Beat softened unsalted butter and granulated sugar with a mixer on medium speed until light and fluffy, about 2 minutes.
- Mix in the egg and vanilla extract until fully combined, scraping the bowl as needed.
- Add the dry ingredients to the wet in two additions, mixing on low just until a soft dough forms.
- If dough seems crumbly, mix in up to 1 tablespoon milk until it comes together and is smooth.
- Divide dough in half, flatten into discs, wrap, and chill for 45 minutes.
- Preheat oven to 350°F (175°C) and line baking sheets with silicone mats or parchment.
- Roll one dough disc on a lightly floured surface to 1/4-inch thickness.
- Cut Halloween shapes with cookie cutters, rerolling scraps once, and transfer to prepared sheets spacing 1 inch apart.
- Bake cookies for 8-10 minutes until edges are set and just barely golden.
- Cool cookies on the sheet for 5 minutes, then transfer to a cooling rack to cool completely for about 25 minutes more.
- For buttercream, beat softened butter until creamy, then gradually beat in sifted powdered sugar, vanilla, and salt.
- Add 1-2 tablespoons heavy cream as needed and whip on medium-high for 1-2 minutes until light and spreadable.
- Divide buttercream into bowls and tint with gel food coloring to desired Halloween shades.
- Fill piping bags fitted with small round tips and decorate cooled cookies with colored buttercream.
- Add Halloween sprinkles if using and let the buttercream set for 20-30 minutes before serving.
Notes