Picture a slice of deep-crimson velvet, its tender crumb hugging a cool, creamy cheesecake center, all cloaked in billowy vanilla frosting.
Imagine the first forkful: cocoa-kissed cake giving way to tangy, silk-smooth cheesecake, a whisper of butter and sugar perfuming the air—comfort and celebration in one bite.
This cake matters to me because it turns ordinary moments into milestones; it’s the dessert I reach for when I want a showstopper that still feels like home.
Once, after a long week and a last-minute family gathering, this layered beauty saved the day—assembled ahead, sliced like a dream, and met with instant, quiet smiles around the table.
It works for busy weeknights when you need to prep in stages, for Sunday suppers that deserve a finale, and for birthdays where every layer tells a little love story. Ready? Let’s cook!
Why You’ll Love It
- Delivers bold flavor: tangy cheesecake meets classic cocoa red velvet
- Impresses visually: striking layers perfect for celebrations and holidays
- Slices cleanly: sturdy, chilled layers give bakery-worthy portions
- Balances textures: creamy center, tender cake, fluffy frosting
- Make-ahead friendly: cheesecake component can be baked the day before
Ingredients
- 16 ounces cream cheese, softened — for cheesecake base (use full-fat for best texture)
- 1/2 cup granulated sugar — for cheesecake sweetness (fine granules dissolve better)
- 1/4 cup sour cream, room temperature — adds tang and silkiness (don’t skip)
- 1 teaspoon vanilla extract — cheesecake flavor (pure, not imitation)
- 1 large egg, room temperature — binds cheesecake (don’t overbeat)
- 2 1/2 cups all-purpose flour, spooned and leveled — cake structure (avoid packing)
- 1 3/4 cups granulated sugar — cake sweetness (balances cocoa)
- 1 teaspoon baking soda — leavening for cake (fresh, not expired)
- 1 teaspoon fine salt — enhances flavor (use fine, not coarse)
- 2 tablespoons unsweetened natural cocoa powder — classic red velvet taste (not Dutch-process)
- 1 cup vegetable oil — keeps cake moist (neutral flavor)
- 2 large eggs, room temperature — cake structure (room temp mixes evenly)
- 1 cup buttermilk, room temperature — tender crumb (real cultured if possible)
- 2 tablespoons red liquid food coloring — vivid hue (adjust if using gel)
- 2 teaspoons vanilla extract — cake flavor (pure vanilla)
- 1 teaspoon white vinegar — reacts with soda for lift (distilled)
- 1 cup unsalted butter, softened — frosting base (slightly cool, not melty)
- 4 cups powdered sugar, sifted — frosting sweetness (sifting prevents lumps)
- 12 ounces cream cheese, chilled and cubed — frosting tang (use block style)
- 1 teaspoon vanilla extract — frosting flavor (pure vanilla)
- 1/8 teaspoon fine salt — balances sweetness (a pinch goes far)
Step-by-Step Method
Make the Cheesecake Base
Preheat oven to 325°F. Line a 9-inch springform pan with parchment and grease the sides.
Beat softened cream cheese with 1/2 cup sugar until smooth.
Mix in sour cream and 1 teaspoon vanilla.
Beat in the egg just until combined.
Pour into the pan, smooth the top, and bake 30–35 minutes until set at edges and slightly jiggly in center.
Cool & Chill the Cheesecake
Cool the cheesecake in the pan on a wire rack for 1 hour.
Cover and chill until firm, at least 3 hours or overnight.
For cleaner stacking later, freeze the chilled cheesecake for 30 minutes before assembly.
Keep it in the springform until ready to layer to prevent cracking and to maintain a neat shape.
Prep the Cake Pans
Increase oven temperature to 350°F.
Line two 9-inch round cake pans with parchment and lightly grease the sides.
Assure pans are the same type for even baking.
If available, use baking strips around the pans to minimize doming.
Set prepared pans aside while mixing the red velvet batter.
Whisk the Dry Ingredients
In a large mixing bowl, whisk together 2 1/2 cups all-purpose flour, 1 3/4 cups granulated sugar, 1 teaspoon baking soda, 1 teaspoon fine salt, and 2 tablespoons natural cocoa powder.
Break up any lumps.
Keep the mixture light and aerated.
Set the bowl aside for combining with the wet ingredients.
Combine the Wet Ingredients
In another bowl, whisk 1 cup vegetable oil, 2 large eggs, 1 cup room-temperature buttermilk, 2 tablespoons red liquid food coloring, 2 teaspoons vanilla, and 1 teaspoon white vinegar.
Whisk until homogeneous and vibrantly red.
If using gel coloring, start with 1 tablespoon and adjust.
Aim for smooth consistency without streaks.
Mix the Batter Gently
Pour the wet mixture into the dry ingredients.
Stir with a whisk or spatula just until smooth.
Don’t overmix to avoid tough cake.
Scrape the bowl’s sides and bottom to incorporate flour pockets.
The batter should be fluid and evenly colored.
Proceed immediately to pan division for even rising.
Bake the Red Velvet Layers
Divide the batter evenly between the two prepared pans.
Weigh for accuracy if possible.
Smooth tops with an offset spatula.
Bake 24–28 minutes until a toothpick inserted in the center comes out with a few moist crumbs.
Rotate pans once if needed.
Don’t overbake to keep layers tender and moist.
Cool the Cake Layers
Place pans on a cooling rack and rest 10 minutes.
Run a knife around edges, then invert layers onto racks.
Peel off parchment and cool completely.
Level domes with a serrated knife if needed.
Keep layers wrapped once cool to prevent drying while you prepare the frosting and assemble.
Beat the Buttercream Base
In a mixer, beat 1 cup softened unsalted butter until creamy and pale.
Gradually add 4 cups sifted powdered sugar on low to prevent puffing.
Increase speed and beat until fluffy.
Scrape the bowl as needed.
This creates a stable base before adding cream cheese, guarantee a smooth, pipeable frosting.
Finish the Cream Cheese Frosting
Add 12 ounces chilled, cubed cream cheese to the buttercream.
Beat until smooth and thick.
Mix in 1 teaspoon vanilla and 1/8 teaspoon fine salt.
Don’t overbeat to avoid thinning.
If warm, chill frosting briefly to firm.
Aim for a spreadable consistency that holds soft peaks for clean coating.
Layer the Base & Cheesecake
Place one red velvet layer on a board.
Spread a thin layer of frosting over the surface to act as glue.
Release the chilled cheesecake from the springform and remove parchment.
Center the cheesecake on the frosted layer.
Press gently to secure without cracking.
Ensure edges align for even sides.
Cap with Second Layer
Spread a thin layer of frosting over the cheesecake to fill gaps.
Place the second red velvet layer on top, bottom-side up for a flat surface.
Check for level and adjust gently.
Fill any side gaps with frosting using an offset spatula, keeping layers aligned for a tidy, cylindrical profile.
Apply a Crumb Coat
Cover the entire cake with a thin, even crumb coat.
Seal in all loose crumbs.
Smooth sides and top with an offset spatula or bench scraper.
Chill the cake for about 20 minutes to set the coat.
This step guarantee a clean final finish and sharp edges during the last frosting application.
Finish & Decorate
Apply a final, thicker coat of frosting.
Smooth the top and sides with long strokes.
Add simple swoops or crumbs for decoration if desired.
Chill the assembled cake 30–60 minutes for cleaner slices.
Use a warmed serrated knife to cut.
Wipe between cuts for neat, defined red and white layers.
Ingredient Swaps
– Buttermilk: Mix 1 cup milk with 1 tbsp white vinegar or lemon juice; rest 5–10 minutes.
Dairy-free: use unsweetened almond/soy milk + 1 tbsp acid.
- Red food coloring: Use gel (start with 1 tbsp) or 2–3 tbsp beet powder; for natural liquid, use hibiscus concentrate or pomegranate reduction.
- Cream cheese: Neufchâtel for lower fat;
Dairy-free: vegan cream cheese (firm style) for both cheesecake and frosting.
– Sour cream: Greek yogurt 1:1;
Dairy-free: coconut yogurt.
– Vegetable oil: Any neutral oil (canola, grapeseed);
budget: blend half oil + half melted butter;
dairy-free remains with oil.
- Flour: Use cake flour for softer crumb (swap by weight) or gluten-free 1:1 baking blend with xanthan.
- Cocoa: Natural cocoa as written;
if using Dutch-process, add 1/4 tsp extra vinegar to keep color and lift.
– Butter in frosting: Use all butter or half butter/half shortening for warmer kitchens;
dairy-free: vegan stick butter.
- Vinegar: White or apple cider vinegar interchangeable.
- Sugar: Granulated can be subbed with superfine;
for less refined, use organic cane (note slightly coarser texture).
You Must Know
Doneness • If the cheesecake edge looks set but the center has a 2–3 inch wobble, stop heat; carryover cooking will finish setting and prevents cracks or a dry, crumbly texture.
Troubleshoot • When red velvet layers dome or sink, level high spots only and check doneness at 24 minutes; a toothpick with a few moist crumbs (not wet batter) prevents underbaked centers and overbaked edges.
Flavor Boost • For deeper cocoa notes without bitterness, swap 1 tablespoon of the 2 tablespoons red liquid color for 1 tablespoon strong cooled espresso; it sharpens chocolate flavor while keeping moisture and color vivid.
Scale • For 8-inch pans, reduce cake batter to 85% (about 2.1 cups flour, 1.5 cups sugar, 0.85 cup oil, etc.) and start checking 3–5 minutes earlier; cheesecake stays full recipe but bake until the same 2–3 inch jiggle.
Make-Ahead • To streamline assembly and clean slices, chill the baked cheesecake at least 4 hours then freeze 30–45 minutes before stacking; a slightly firm edge resists squishing and yields sharp layers when cut.
Serving Tips
- Serve chilled slices with a drizzle of warm chocolate or caramel sauce.
- Add a scoop of vanilla bean ice cream and fresh raspberries for contrast.
- Plate with a dollop of whipped cream and a sprinkle of cocoa powder.
- Pair with hot coffee, black tea, or a glass of cold milk.
- Garnish edges with red velvet crumbs and white chocolate shavings.
Storage & Make-Ahead
Refrigerate the assembled cake, covered, for up to 4 days.
Slice cold for clean layers.
Make the cheesecake a day ahead and chill overnight.
Bake cake layers up to 2 days ahead, wrap airtight.
The whole cake or individual slices freeze well for 2 months—double-wrap.
Thaw overnight in the fridge.
Reheating
Reheat slices gently: microwave at 50% power in 15–20-second bursts.
Or warm in a 275°F oven, loosely tented, 8–10 minutes.
For sauces, use a stovetop double boiler on low.
Juneteenth Bake-Sale Favorite
Though the colors don’t match the flag, this red velvet cheesecake cake shines at a Juneteenth bake sale because it delivers pure celebration on a plate.
I bring it chilled, slice it thick, and watch eyes light up at the ruby crumbs hugging a silky cheesecake center. The cocoa’s whisper, the tang of buttermilk, and the cool cream cheese frosting create a joyful bite—rich, tender, and bright.
It’s easy to portion, sturdy on a hot day, and irresistible beside lemonade and grilled peaches. I price fairly, share the story of the recipe, and let the cake do the rest.
- Slice cold for clean layers
- Use sturdy plates and forks
- Offer small and large portions
- Label allergens clearly
- Pair with lemonade or iced tea
Final Thoughts
Ready to bake? Give this Red Velvet Cheesecake Cake a try, and feel free to tweak the frosting sweetness or food coloring to make it perfectly yours.
We’d love to hear how you make it your own!
Frequently Asked Questions
Can I Bake This at High Altitude Without Sinking Layers?
Yes—you can. I’d reduce leavening slightly, add 1–2 tablespoons flour, increase oven temp 15–25°F, and decrease sugar a tablespoon. Bake a bit shorter, keep batters thicker, and cool gradually to prevent dramatic sinkholes.
How Do I Convert to Cupcakes or Minis?
Bake cupcake batter in lined tins, 350°F, 18–22 minutes; minis 10–12. I’d fill 2/3 full, add a cheesecake dollop or disk, frost generously. You’ll smell cocoa, see ruby crowns, and bite creamy, tender crumbs.
What’s the Best Way to Ship This Cake Safely?
Ship it chilled. I freeze slices, wrap them snugly, double-box with cold packs, and cushion every side. I choose overnight shipping, mark “fragile,” and tape seams tight. You’ll open the box to cool, intact layers and creamy perfume.
Can I Make It Gluten-Free and Still Stack Securely?
Yes—you can. I swap in a 1:1 gluten-free blend with xanthan gum, weigh batter, bake slightly longer, and chill layers firm. I stack with bubble tea straws, crumb-coat cold, and slice—clean, sturdy, luscious.
How Do I Fix Frosting That Turned Grainy or Split?
Gently warm the bowl’s sides with my hands, then beat slowly; I add a spoonful of room‑temperature cream cheese or a splash of cream. If it’s still split, chill 10 minutes, then whip until silky and plush.
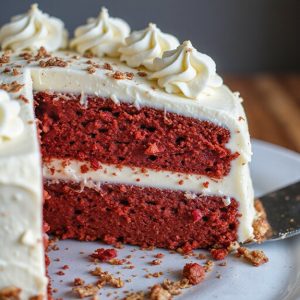
Red Velvet Cheesecake Cake
Equipment
- 1 9-inch round cake pan 3 pans total
- 1 9-inch springform pan
- 1 stand mixer or hand mixer
- 4 Mixing bowl
- 1 Whisk
- 1 Rubber spatula
- 1 Wire rack
- 1 offset spatula
- 3 parchment paper sheet pan-sized
- 1 Cooling rack
- 1 Serrated knife
- 1 Measuring cups set
- 1 Measuring spoons set
Ingredients
- 16 ounce cream cheese softened
- 1/2 cup granulated sugar
- 1/4 cup sour cream room temperature
- 1 teaspoon vanilla extract
- 1 large egg room temperature
- 2 1/2 cup all-purpose flour spooned and leveled
- 1 3/4 cup granulated sugar
- 1 teaspoon baking soda
- 1 teaspoon fine salt
- 2 tablespoon unsweetened cocoa powder natural
- 1 cup vegetable oil
- 2 large egg room temperature
- 1 cup buttermilk room temperature
- 2 tablespoon red liquid food coloring
- 2 teaspoon vanilla extract
- 1 teaspoon white vinegar
- 1 cup unsalted butter softened
- 4 cup powdered sugar sifted
- 12 ounce cream cheese chilled and cubed
- 1 teaspoon vanilla extract
- 1/8 teaspoon fine salt
Instructions
- Preheat oven to 325°F, line the springform pan and two round cake pans with parchment, and lightly grease the sides.
- Beat softened cream cheese with 1/2 cup sugar until smooth, then mix in sour cream, 1 teaspoon vanilla, and finally the egg just until combined.
- Pour cheesecake batter into the springform pan, smooth the top, and bake 30–35 minutes until set at the edges and slightly jiggly in the center.
- Cool cheesecake in the pan on a rack for 1 hour, then chill until firm.
- Increase oven temperature to 350°F and line and grease the two 9-inch round cake pans.
- In a large bowl whisk flour, 1 3/4 cups sugar, baking soda, salt, and cocoa.
- In another bowl whisk oil, 2 eggs, buttermilk, red food coloring, 2 teaspoons vanilla, and vinegar until homogeneous.
- Combine wet and dry mixtures, stirring just until smooth without overmixing.
- Divide batter evenly between the two pans and bake 24–28 minutes until a toothpick comes out with a few moist crumbs.
- Cool red velvet layers in pans 10 minutes, then turn out onto racks to cool completely.
- For frosting, beat butter until creamy, add powdered sugar gradually, then beat in chilled cream cheese cubes, 1 teaspoon vanilla, and salt until smooth and fluffy.
- Level cake layers if needed and remove the chilled cheesecake from the springform pan.
- Place one red velvet layer on a board, spread a thin layer of frosting, and center the cheesecake on top.
- Add a thin layer of frosting over the cheesecake and top with the second red velvet layer.
- Apply a crumb coat of frosting over the entire cake, chill 20 minutes, then finish with a smooth final coat and decorate as desired.
Notes