Introduction
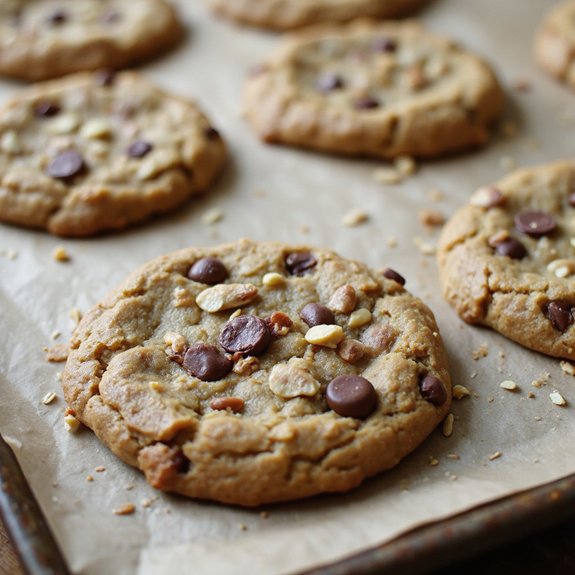
Picture a tray of golden, craggy cookies, edges laced with caramelized crunch and centers soft as a hug, the air warm with roasted peanut aroma and notes of brown sugar.
Imagine flecks of hearty oats catching the light, a hint of chocolate melting into glossy puddles—comfort you can hold, perfect for lunchbox surprises, busy weeknights, or lazy Sunday suppers when the house needs a little sweetness.
These Peanut Butter Oatmeal Cookies are my reliable bridge between nostalgic bake-sale flavor and real-life practicality: one bowl for wet, one for dry, a quick scoop, and they’re in the oven.
When my kids’ team practice ran late and dinner felt scattered, a fresh batch of these cookies turned the evening around—quieting grumbles and gathering everyone at the counter with glasses of milk and grins.
They’re unfussy, deeply satisfying, and ready in minutes.
Ready? Let’s cook!
Why You’ll Love It
- Delivers bold, nutty flavor with irresistible oatmeal chew
- Uses pantry staples you likely already have on hand
- Mixes quickly; no chilling needed for easy weeknight baking
- Bakes soft centers with lightly crisp, golden edges
- Freezes beautifully for fresh, on-demand cookie cravings
Ingredients
- 1/2 cup unsalted butter, softened — room temp makes for easy creaming
- 3/4 cup creamy peanut butter — choose conventional for consistent spread
- 3/4 cup light brown sugar, packed — adds moisture and chew
- 1/4 cup granulated sugar — helps edges caramelize
- 1 large egg, room temperature — binds and lifts
- 1 teaspoon vanilla extract — pure extract for best flavor
- 1 cup all-purpose flour — measure with spoon-and-level
- 1/2 teaspoon baking soda — aids spread and browning
- 1/2 teaspoon baking powder — boosts lift and softness
- 1/2 teaspoon fine salt — balances sweetness and peanut butter
- 1 cup old-fashioned rolled oats — best for hearty texture
- 1/2 cup semi-sweet chocolate chips (optional) — choose good-melt chips
- 1/2 cup roasted peanuts, chopped (optional) — use lightly salted for pop
Step-by-Step Method
Preheat and Prep Pans
Preheat oven to 350°F (175°C). Line two baking sheets with parchment paper to prevent sticking and promote even browning. Gather equipment and measure all ingredients for a smooth workflow. Make certain butter is softened and egg is at room temperature for proper creaming and emulsification. Set a cooling rack nearby for post-bake transfer.
Cream the Fats and Sugars
Beat softened butter, peanut butter, brown sugar, and granulated sugar until light and fluffy, about 2 to 3 minutes. Start on low speed to avoid sugar dust, then increase to medium. Aerate the mixture to build structure and improve cookie texture. Scrape the bowl as needed to ensure even mixing and consistent results.
Add Egg and Vanilla
Beat in the egg and vanilla extract until fully incorporated. Mix on medium speed until the batter looks smooth and cohesive, about 30 to 45 seconds. Avoid overmixing to prevent excessive gluten development later. Scrape down the bowl to capture any unmixed bits and to maintain a uniform dough.
Combine Dry Ingredients
Whisk flour, baking soda, baking powder, and salt in a separate bowl. Break up any flour clumps for predictable mixing. This step evenly disperses leaveners and salt, preventing pockets of bitterness or uneven rise. Keep the dry mix nearby so you can add it directly to the wet mixture without delay.
Mix Wet and Dry
Add the dry ingredients to the wet mixture. Mix on low just until the flour disappears, about 20 to 30 seconds. Stop as soon as no streaks remain to avoid tough cookies. Scrape the bowl once to ensure no dry pockets remain at the bottom. The dough should be soft and slightly sticky.
Fold in Oats and Mix-Ins
Gently fold in rolled oats with a spatula until evenly distributed. Add chocolate chips and chopped peanuts if using. Use broad, sweeping motions to maintain dough tenderness. Avoid overmixing to preserve a chewy texture. If the dough feels too sticky or warm, chill it for 15 to 20 minutes before scooping.
Scoop and Space Dough
Scoop tablespoon-sized portions of dough onto prepared baking sheets. Space mounds about 2 inches apart to allow spreading. Use a cookie scoop for uniform size and even baking. Lightly flatten the tops with fingers or the back of a spoon to encourage a consistent thickness and controlled spread.
Bake to Doneness
Bake cookies for 9 to 11 minutes. Look for set, lightly golden edges and slightly soft centers. Rotate sheets halfway if your oven has hot spots. For chewier centers, pull at the first sign of doneness. For crisper edges, add up to 1 extra minute. Avoid overbaking to prevent dryness.
Cool and Set Texture
Cool cookies on the baking sheet for 5 minutes to finish setting with carryover heat. Transfer to a cooling rack for an additional 5 minutes. This firms the edges while keeping centers moist. Let cool fully for crispier texture. Store in an airtight container, adding a slice of bread to maintain softness.
Ingredient Swaps
- Gluten-free: Use a 1:1 gluten-free all-purpose flour blend and certified gluten-free oats.
- Dairy-free/vegan: Swap butter for vegan butter or refined coconut oil; replace egg with a flax egg (1 tbsp ground flax + 3 tbsp water) or 3 tbsp aquafaba.
- Nut-free: Replace peanut butter with sunflower seed butter (note: may green slightly when baked—harmless).
- Lower sugar/budget: Use only brown sugar (1 cup total) for moisture and simpler pantry needs; skip chocolate chips and peanuts.
- Regional availability: Use quick oats if old-fashioned aren’t available (softer texture); substitute peanuts/chips with raisins, chopped dates, or local nuts/seeds.
You Must Know
Doneness • If edges look set but centers still glisten and feel puffy-soft on a gentle tap, pull them; they’ll firm up on the sheet in 5 minutes from carryover heat for a chewier texture.
Troubleshoot • When dough feels greasy or spreads too much in the first batch, chill remaining dough 20–30 minutes until scoop holds a rounded dome; cooler fat slows spread for thicker cookies.
Scale • For 12 larger bakery-style cookies, portion 2 tablespoons (about 40–45 g) each and extend oven time by 2–3 minutes; look for light golden rims and matte tops with slight center give.
Flavor Boost • To deepen nutty notes, toast rolled oats and chopped peanuts on a sheet at 325°F for 8–10 minutes until fragrant; cooled add-ins bring roasted flavor without changing moisture.
Make-Ahead • For freeze-and-bake convenience, scoop dough balls, flash-freeze 1 hour, then bag; bake from frozen at 350°F adding 1–2 minutes, pulling when edges are lightly golden.
Serving Tips
- Serve warm with cold milk or a scoop of vanilla ice cream.
- Drizzle melted chocolate and sprinkle flaky sea salt before serving.
- Sandwich two cookies with peanut butter or chocolate ganache.
- Plate with fresh sliced bananas and a honey drizzle.
- Crumble over yogurt parfaits for a crunchy dessert topping.
Storage & Make-Ahead
Store cookies airtight at room temp 3–4 days.
In the fridge, they keep up to 1 week.
For make-ahead, chill dough 24–48 hours to deepen flavor.
Portion dough balls, freeze on a sheet, then bag.
Bake from frozen, adding 1–2 minutes.
Baked cookies also freeze well up to 2 months.
Reheating
Reheat gently: microwave 1 cookie 8–12 seconds wrapped in a damp paper towel.
Oven 300°F, 5–7 minutes on a sheet.
Stovetop skillet low heat, covered 2–3 minutes, flip once.
Grandma’s Lunchbox Staple
Sometimes I tuck these peanut butter oatmeal cookies into a lunchbox and feel like I’m channeling Grandma’s simple magic—soft centers, toasty edges, and a hint of oat nuttiness that holds up till afternoon.
She taught me to bake them small, just a tablespoon, so they fit beside apple slices and a thermos. I keep the texture chewy by pulling them at the first kiss of gold on the edges, then letting them rest five minutes on the sheet.
For that unmistakable “from home” comfort, I use creamy peanut butter, old-fashioned oats, and a pinch of cinnamon. Want extra crunch? Fold in chopped roasted peanuts.
Packing ahead? Slip two cookies into wax paper, then tuck in an airtight tin. They stay tender, fragrant, and lunchbox-ready.
Final Thoughts
Ready to bake a batch? Give these peanut butter oatmeal cookies a try as-is, or tweak them with cinnamon, raisins, or extra chocolate chips to make them your own!
Frequently Asked Questions
Can I Make These Cookies Gluten-Free?
Yes—you can. I swap in a cup-for-cup gluten-free flour blend and certified gluten-free oats. I chill the dough 20 minutes, then bake normally. Expect tender centers, golden edges, and that cozy, nutty aroma filling your kitchen.
How Do I Prevent Cookies From Spreading Too Much?
Chill the dough 20–30 minutes, use parchment-lined cool sheets, and measure flour accurately. I’ll cream butter just until fluffy, avoid overmixing, and bake one test cookie. If it spreads, I’ll increase flour or shorten bake.
Are These Cookies Safe for Peanut Allergies?
No, they’re not safe for peanut allergies. I urge you to skip these and choose a peanut-free recipe. I’ll gladly suggest alternatives—sunflower butter cookies bake up golden, chewy, and wonderfully nutty without the allergens.
Can I Halve or Double the Recipe Successfully?
Yes—you can halve or double it. I scale every ingredient evenly, keep oven temp the same, and watch bake time closely. For double batches, rotate sheets midway; for half, beat gently to avoid overmixing.
What’s the Best Way to Ship These Cookies?
Pack cooled cookies in pairs, bottoms touching, wrapped in plastic. Nestle stacks in a snug tin with parchment and crumpled paper. Seal airtight, cushion in a sturdy box, label “Fragile,” and choose fast shipping to preserve freshness.


