Introduction
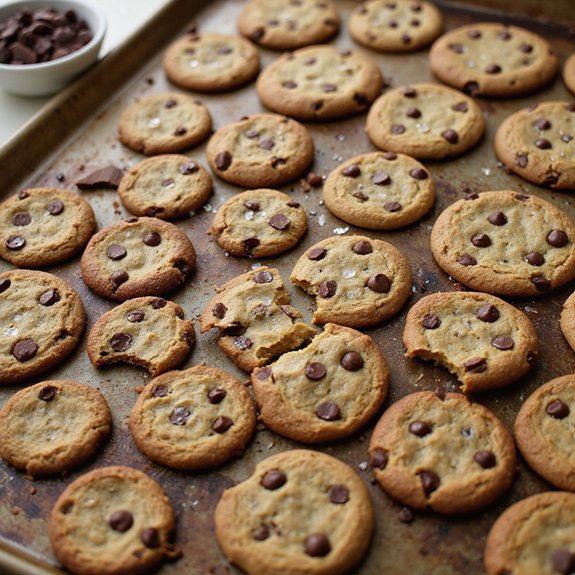
Imagine a tray of cookies emerging bronze at the edges, their centers flecked with glossy chocolate, the aroma of butter and vanilla wafting through your kitchen like a warm blanket.
Picture the first bite: a delicate snap yielding to thin, lacy pockets where chips melt into tiny pools—comfort you can hold in your hand. I love these because crisp cookies stay satisfying longer; they’re perfect for dunking, stacking, gifting, and, honestly, for restoring a bit of calm after a hectic day.
These are the cookies I rely on for busy weeknights or Sunday suppers, for school bake sales, office thank-yous, or a neighborly doorstep drop-off. Once, after a power outage delayed dinner, this quick dough saved our spirits—twelve minutes later, the house smelled like home and everyone was smiling.
You’ll get consistent crunch, balanced sweetness, and dependable results with simple pantry staples. Ready? Let’s cook!
Why You’ll Love It
- Delivers caramelized edges and a satisfyingly crunchy bite
- Uses pantry staples and simple, reliable techniques
- Mixes quickly with melted butter; no creaming needed
- Spreads evenly for thin, lacy, ultra-crisp cookies
- Stays crispy; re-crisps beautifully in minutes
Ingredients
- 1 cup unsalted butter, melted and cooled — promotes spread and crisp edges (use real butter, not margarine)
- 1 cup granulated sugar — boosts crunch (choose fine granules)
- 1/2 cup light brown sugar, packed — adds slight chew and flavor (fresh, soft pack)
- 1 large egg, room temperature — binds and enriches (set out 30 minutes)
- 1 large egg yolk, room temperature — extra richness without excess moisture (separate carefully)
- 2 teaspoons vanilla extract — rounds out flavor (pure vanilla, not imitation)
- 2 cups all-purpose flour, leveled — structure without toughness (measure accurately)
- 1/2 teaspoon baking soda — aids spread and browning (fresh, not clumpy)
- 1/2 teaspoon baking powder — lifts just enough (check freshness date)
- 3/4 teaspoon fine sea salt — sharpens sweetness (avoid coarse crystals)
- 1 cup semisweet chocolate chips — classic pockets of chocolate (60–65% cacao ideal)
- 1/2 cup mini chocolate chips — extra distribution in each bite (mix evenly)
- 1 tablespoon milk, optional — add only if dough is dry (1 tsp at a time)
Step-by-Step Method
Preheat & Prep Pans
Preheat the oven to 350°F (175°C). Line two light-colored baking sheets with parchment paper or silicone baking mats. Set a cooling rack nearby. If your kitchen is warm, plan to chill scooped dough briefly before baking. Gather all equipment and ingredients to streamline the process and guarantee consistent, quick mixing once you begin.
Combine Dry Ingredients
Whisk the flour, baking soda, baking powder, and fine sea salt in a medium bowl until evenly combined. Break up any clumps so leaveners distribute uniformly. Set the bowl aside.
Properly mixing the dry ingredients prevents uneven rise and guarantee crisp edges with tender centers in every cookie.
Beat Butter & Sugars
In a large bowl, beat melted, cooled unsalted butter with granulated sugar and light brown sugar. Mix for about 1 minute until thick, glossy, and cohesive. Don’t overbeat.
This creates a smooth base that encourages spread and crispness. Scrape the bowl’s sides and bottom to incorporate any unmixed sugar.
Add Egg, Yolk & Vanilla
Beat in the egg, egg yolk, and vanilla extract until the mixture looks smooth and slightly lightened. Mix just until combined to avoid incorporating excess air, which can puff the cookies.
Scrape down the bowl again to guarantee even texture. The extra yolk adds richness without sacrificing crisp edges.
Mix in Dry Ingredients
Add the dry ingredients to the wet mixture. Mix on low speed until only a few flour streaks remain. Avoid overmixing to prevent tough cookies.
Stop the mixer and finish with a rubber spatula, folding gently. This keeps the dough sturdy enough to bake thin and crisp with a balanced crumb.
Fold in Chocolate Chips
Fold in semisweet chocolate chips and mini chocolate chips until evenly distributed. Ensure no pockets of flour remain.
If the dough seems crumbly, add milk 1 teaspoon at a time until it holds together yet remains stiff. The combination of chip sizes creates even chocolate dispersal and crisp, lacy edges.
Scoop & Shape Dough
Use a 1.5-tablespoon cookie scoop to portion dough. Roll each portion into a smooth ball for uniform baking. Place balls 2 inches apart on prepared sheets to allow spread.
Gently press each ball to about 1/2 inch thick. Flattening helps achieve thin, crunchy edges and a well-set center.
Bake Until Deep Golden
Bake one sheet at a time for 10 to 12 minutes. Rotate the pan halfway through for even color. Look for deep golden edges and set centers.
A slightly darker edge boosts crispness. If your kitchen is warm, chill shaped dough 15 minutes before baking to prevent excessive spread.
Cool to Crisp
Let cookies cool on the baking sheet for 5 minutes to firm up and finish cooking. Transfer to a cooling rack and cool completely for at least 5 more minutes.
Allow steam to escape for maximum crunch. Store fully cooled cookies in an airtight container, or re-crisp in a 300°F oven for 3 to 4 minutes.
Ingredient Swaps
- Butter: Use vegan butter or refined coconut oil (measure solid, melt and cool) for dairy-free; or 50% butter + 50% neutral oil for extra crispness on a budget.
- Sugar: Keep the higher white sugar ratio for crispness; swap light brown sugar with granulated plus 1 teaspoon molasses per 1/2 cup, or use all white sugar for the crispiest (slightly less flavor).
- Flour: Substitute 1:1 gluten-free all-purpose blend (with xanthan gum). For extra snap, replace 2–3 tablespoons flour with cornstarch or rice flour.
- Eggs: For egg-free, use 3 tablespoons aquafaba for the egg and 1 tablespoon for the yolk, or 1 egg replacer + an extra 1–2 teaspoons water to reach stiff dough.
- Chocolate: Use any chips/chopped bars; dairy-free chips for vegan, or locally available couverture/coarsely chopped chocolate if chips aren’t common.
- Milk (optional): Any dairy-free milk or just water works to bind if dough is dry.
- Salt: If using table salt, reduce to 1/2 teaspoon; if using salted butter, cut added salt to 1/2 teaspoon total.
You Must Know
Doneness • If edges are golden-brown with a slightly deeper ring and centers look matte (no wet sheen), pull them at 10–12 minutes; they’ll firm as they sit 5 minutes on the sheet—this carryover crisping prevents over-drying.
Troubleshoot • When dough crumbles or won’t hold a ball, add milk 1 teaspoon at a time until it just clumps when squeezed; too dry dough won’t spread, yielding pale, tough cookies.
Avoid • If cookies are greasy and overly flat, your butter was too warm; chill portioned dough 10–15 minutes until cool to the touch and slightly firm—this controls spread for crisp edges.
Scale • For half-batch, use 1 egg only (skip extra yolk) and halve all other ingredients; for double, keep leaveners proportional (1 teaspoon each baking soda/powder) and portion to 1.5 tablespoons to maintain a 10–12 minute bake window.
Flavor Boost • For deeper caramel notes, swap 2–3 tablespoons of the white sugar with turbinado and toast chips on a sheet at 300°F for 6–8 minutes until fragrant; both add subtle toffee complexity without sacrificing crispness.
Serving Tips
- Serve with cold milk or vanilla ice cream for classic contrast.
- Pair alongside espresso or strong black tea to balance sweetness.
- Plate with a drizzle of warm caramel and a pinch of flaky salt.
- Crumble over yogurt or pudding for a crunchy topping.
- Create ice cream sandwiches using two cookies and softened ice cream.
Storage & Make-Ahead
Store fully cooled cookies in an airtight container at room temperature for 4–5 days.
In the fridge, they keep 1 week but may soften—re-crisp at 300°F for 3–4 minutes.
Make ahead: refrigerate dough balls up to 48 hours.
Freeze dough balls or baked cookies up to 2 months.
Reheating
To gently reheat cookies, try:
Microwave 10–15 seconds wrapped in a paper towel.
Oven at 300°F for 3–4 minutes on a sheet.
Stovetop covered skillet on low briefly.
Subway’s Cookie Legacy
Sometimes I think Subway’s real secret isn’t the bread—it’s the cookies that perfume the shop with warm butter and caramelized edges. I remember standing in line, hypnotized by trays sliding from the oven, hearing the soft crackle as sugars set. Those cookies taught me timing, contrast, and fragrance—the way a bakery smell can tug you closer than any sandwich ad.
- Heat: I bake until the rims turn deep amber, like Subway’s gleaming edges, then let them rest so the crackle locks in.
- Texture: I press the dough slightly, aiming for a thin halo of crispness around a just-set center—snap outside, sigh inside.
- Aroma: I lean on vanilla and melted butter; that rising plume of toffee-scented steam signals it’s cookie-o’clock.
Final Thoughts
Ready to bake? Give these crispy chocolate chip cookies a try, and feel free to tweak the mix-ins or bake time to nail your perfect crunch.
Frequently Asked Questions
How Can I Adapt This Recipe for High-Altitude Baking?
I’d adjust for altitude: reduce baking powder and soda by 25%, add 1 tablespoon flour, increase water or milk 1–2 teaspoons, lower sugar slightly, chill dough, flatten thinner, bake hotter briefly. Edges crackle, centers set.
What’s the Best Way to Ship These Cookies?
Ship them in an airtight tin, layers cushioned with parchment. I let cookies cool completely, freeze briefly, then nestle snugly. I add a slice of bread, bubble-wrap the tin, and choose fast shipping—crunch arrives singing.
Are There Gluten-Free Flour Brands That Keep Them Crispy?
Yes—use Bob’s Red Mill 1:1 or King Arthur Measure for Measure. I add a spoon of cornstarch and extra sugar. You’ll hear that glassy snap, buttery edges shattering, chocolate puddles sighing warm and sweet.
Can I Make Jumbo Bakery-Style Crispy Cookies?
Yes—you can. I’d scoop 1/4-cup mounds, flatten to 3/4 inch, and bake longer at 350°F. I’d crave deep golden edges, caramel-snap rims, and a chewy center, the kitchen smelling buttery-sweet and crackling as they cool.
How Do I Prevent Cookies From Spreading Into Odd Shapes?
Chill scooped dough, bake one sheet at a time, and use light-colored pans. I weigh flour, press tidy discs, and rotate halfway. I keep butter cooled—no greasy shine—so cookies puff, edges lace, and circles stay neat.


