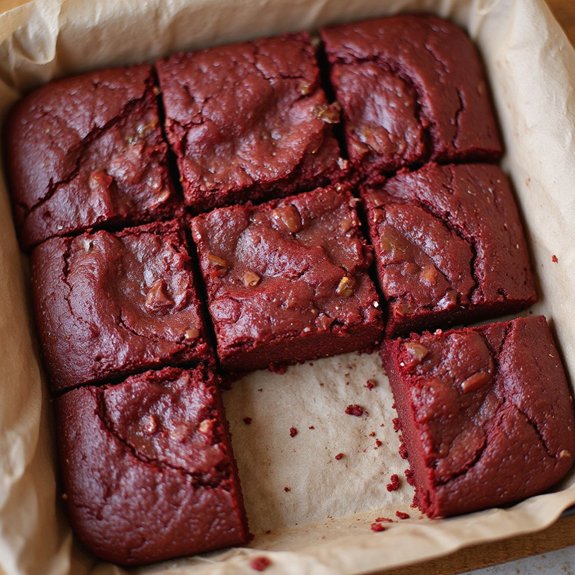
Picture a pan of crimson-tinged brownies emerging from the oven, the glossy, crackly top giving way to soft, chewy centers that breathe out cocoa warmth and buttery sweetness.
Imagine slicing into velvety squares that blush deep red, the aroma of chocolate and vanilla drifting through the kitchen like a hug after a long day.
This is my comfort sweet spot: part brownie, part red velvet cake, all nostalgia. It matters because it’s the treat I turn to when I want reliable joy—simple steps, big payoff—whether for busy weeknights, last‑minute potlucks, or unrushed Sunday suppers with coffee.
Once, when a school concert ran late and dinner felt impossible, this bake saved the evening—mixed in minutes, cooled as we ate, and served as our applause-worthy finale.
You’ll love how approachable and celebratory it feels in one bite. Ready? Let’s cook!
Why You’ll Love It
- Delivers bold red velvet cocoa flavor with fudgy brownie chew
- Uses simple pantry staples and one bowl for dry ingredients
- Bakes quickly; ready to slice in about one hour
- Slices cleanly; chills and freezes beautifully for make-ahead
- Stays moist and tender thanks to vinegar and slight underbake
Ingredients
- 1 cup granulated sugar — standard white sugar (choose fine granules for easy dissolving)
- 1/2 cup light brown sugar, packed — adds moisture and chew (fresh, soft-packed)
- 3/4 cup unsalted butter, melted and slightly cooled — richness and chew (use good-quality butter)
- 2 large eggs, room temperature — structure and gloss (bring to room temp)
- 1 large egg yolk, room temperature — extra fudgy texture (separate cleanly)
- 2 teaspoons vanilla extract — warmth and flavor (pure vanilla, not imitation)
- 1 tablespoon red liquid food coloring — classic red velvet hue (use gel for stronger color)
- 1 teaspoon white vinegar — subtle tang and color boost (distilled)
- 3/4 cup all-purpose flour, spooned and leveled — tender chew (measure accurately)
- 1/4 cup natural cocoa powder — mild cocoa backbone (not Dutch-processed)
- 1/2 teaspoon baking powder — light lift without cakiness (fresh, not expired)
- 1/2 teaspoon fine sea salt — balances sweetness (fine grind disperses well)
- 1/2 cup mini chocolate chips, optional — pockets of melt (choose good-quality chips)
Step-by-Step Method
Prep the Pan and Oven
Preheat the oven to 350°F (175°C). Line a 9×9-inch pan with parchment, leaving overhang for easy lifting. Lightly grease the parchment.
Gather equipment and ingredients. Set eggs to room temperature if chilled. Measure flour by spooning and leveling to avoid dense brownies.
Whisk the Sugars and Butter
Whisk melted, slightly cooled butter with granulated sugar and packed brown sugar until glossy and cohesive. Aim for a thick, satiny mixture with no butter separation.
This step dissolves sugar partially, promoting chewiness and a shiny top. Avoid overcooling the butter; it should be warm, not hot.
Blend in Eggs and Flavor
Add the eggs, egg yolk, vanilla, red food coloring, and white vinegar. Whisk until completely smooth and uniformly red.
Make certain no streaks of yolk remain. The vinegar balances sweetness, boosts cocoa notes, and enhances the classic red velvet hue. Keep mixing gentle to avoid incorporating excess air.
Combine Dry Ingredients
In a separate bowl, whisk flour, cocoa powder, baking powder, and fine sea salt until evenly distributed. Break up any cocoa lumps.
Proper blending of dry ingredients guarantees even leavening and consistent crumb. Keep the ratio precise for a chewy, brownie-like texture.
Fold Wet and Dry Mixtures
Sprinkle the dry mixture over the wet. Fold gently with a rubber spatula just until no dry streaks remain.
Scrape the bowl’s sides and bottom to catch pockets of flour. Stop as soon as it’s combined to prevent toughness. Fold in mini chocolate chips now, if using.
Spread and Smooth the Batter
Transfer the thick batter to the prepared pan. Spread evenly into corners using the spatula.
Smooth the surface for uniform baking. Tap the pan once on the counter to settle the batter and release larger air bubbles without deflating the mixture excessively.
Bake to Fudgy Doneness
Bake for 26 to 32 minutes. Start checking at 26 minutes.
Look for set edges and a center that jiggles slightly. Insert a toothpick; it should emerge with a few moist, fudgy crumbs, not wet batter. Pull promptly to preserve chewiness and prevent dry edges.
Cool and Lift Cleanly
Set the pan on a wire rack and cool for 20 minutes to allow structure to set. Use the parchment overhang to lift the slab from the pan.
Cool an additional 10 minutes out of the pan. This staged cooling keeps centers fudgy while making slicing neater.
Slice and Serve Neatly
Use a sharp knife to cut into 12 squares. Wipe or warm the blade under hot water and dry between cuts for clean edges.
Serve slightly warm or at room temperature. For tidier slices, chill briefly before cutting. Store airtight up to 3 days or freeze for 2 months.
Ingredient Swaps
- Butter: swap with 3/4 cup coconut oil or 3/4 cup vegan butter for dairy-free.
- Eggs: use 2 flax eggs + 1 extra flax yolk equivalent (2 tbsp ground flax + 5 tbsp water, plus 1 tsp extra flax + 1 tsp water) or 1/2 cup unsweetened applesauce for cakier texture.
- Flour: replace with 1:1 gluten-free baking blend; for chewier brownies, use 1/2 cup AP + 1/4 cup almond flour.
- Cocoa: Dutch-process works; for deeper color with less cocoa flavor, reduce to 3 tbsp and increase red color slightly.
- Sugar: sub coconut sugar for brown sugar and caster sugar for granulated; budget-friendly use all granulated sugar (1 1/2 cups total) and add 1 tsp molasses if you want brown sugar notes.
- Food coloring: use gel color (1–2 tsp), natural beet powder (1–2 tbsp, reduce flour by 1–2 tbsp), or omit for “cocoa blondie” vibes.
- Vinegar: white vinegar can be swapped with apple cider vinegar or 1 tsp lemon juice.
- Chocolate chips: omit, or use chopped bar chocolate, white chocolate, or nuts (1/2 cup).
You Must Know
Doneness • If the top looks shiny but the center jiggles like set jelly, pull the pan and tent loosely 5 minutes on the counter; residual heat finishes to fudgy crumbs. Why: carryover prevents dry edges. Anchor: toothpick with smears/crumbs at 26–32 minutes, center no longer liquid.
Troubleshoot • If the batter seems greasy or separates after coloring, beat in 1 tablespoon flour at a time (up to 2 tbsp) until it comes together. Why: extra starch emulsifies butter-sugar. Anchor: batter should ribbon thickly off spatula in 2–3 seconds.
Avoid • Avoid overbrowning edges by rotating once at the halfway mark and using light-colored metal. Why: dark pans run hotter. Anchor: edge temperature shouldn’t exceed ~210°F; visual cue is matte edges, still slightly glossy center.
Scale • For a 9×13-inch pan, use 1.5x ingredients and extend time by 6–10 minutes; for an 8×8-inch pan, keep the recipe but add 3–5 minutes. Why: thickness changes heat penetration. Anchor: same doneness cue—moist crumbs on tester, internal ~195–200°F.
Flavor Boost • For deeper “red velvet” tang and cocoa depth, add 1/4 teaspoon espresso powder and increase vinegar to 1 1/2 teaspoons. Why: acidity brightens color and balances sweetness, espresso amplifies chocolate. Anchor: aroma should read cocoa-forward; color remains vivid red.
Serving Tips
- Dust with powdered sugar and cocoa; add a dollop of whipped cream.
- Serve warm with vanilla ice cream and a drizzle of chocolate sauce.
- Plate with fresh berries and a spoonful of lightly sweetened mascarpone.
- Cut into small squares; arrange on a tiered stand for parties.
- Top each slice with cream cheese frosting and a sprinkle of mini chips.
Storage & Make-Ahead
Store cooled brownies airtight at room temperature up to 3 days or refrigerate 5–6 days for firmer, cleaner slices.
For make-ahead, bake, cool, and cut; chill 1 hour for neat edges.
Freeze individually wrapped squares (or the whole slab) tightly for up to 2 months; thaw overnight refrigerated.
Reheating
Reheat gently:
Microwave individual slices 10–15 seconds at 50% power.
Oven: 300°F, covered, 8–10 minutes.
Stovetop: steam slices in a covered pan 2–3 minutes for moist, fudgy texture.
Juneteenth Potluck Favorite
Sometimes a single bite can tell a story, and these soft, chewy red velvet brownies do just that at a Juneteenth potluck. I set them down between smoky ribs and vibrant collards, and the pan starts to gather fingerprints of curiosity.
The crimson crumb glows like a small celebration, cocoa whispering beneath vanilla, a ribbon of tang from vinegar brightening every bite.
I cut neat squares, edges set, centers fudgy. Warm spice in the air, laughter rolling like a drumline, and that first taste lands—buttery, tender, a hush before the nods.
Aunties ask for the recipe; kids angle for corner pieces with shiny chips. I love watching plates return with only red smudges, proof that memory and sweetness travel home together.
Final Thoughts
Ready to bake? Give these soft, chewy red velvet brownie bars a try and make them your own—add chips, swirl in cream cheese, or play with the color to match your vibe.
Don’t forget to share how you personalize them!
Frequently Asked Questions
Can I Make These Brownies Gluten-Free Without Gritty Texture?
Yes—you can. I swap in a 1:1 gluten-free flour with xanthan gum, sift it, and add a tablespoon cornstarch. I don’t overmix. The batter ribbons lushly, bakes dense, and cools into fudgy, non-gritty squares.
How Do Altitude Adjustments Affect Baking Time and Rise?
At higher altitudes, I bake longer and lower: reduce leavening slightly, add a splash more liquid, and extend time. You’ll see gentler rise, slower set—like batter breathing thinner air—yielding moist crumb without sudden collapse.
What Pan Material Yields the Chewiest Edges?
A dark, heavy metal pan gives the chewiest edges. I love how it drinks heat, caramelizing sugar into crackly rims. If you crave gentler chew, I’d skip glass and line metal with parchment, corners peeking like parchment sails.
Can I Halve the Recipe for a Loaf Pan?
Yes—you can. I halve everything, pour into an 8×4 loaf, line with parchment, and bake 28–36 minutes. I watch for glossy tops, set edges, fudgy crumbs. The narrow tin concentrates aroma and deepens chew.
How Do I Prevent a Sugary, Shiny Crust?
Avoid that shiny crust: I mix sugars just until dissolved, skip vigorous beating, and don’t overwhisk eggs. I fold gently after flour. Cooler butter, room‑temp eggs, and a few minutes’ rest calm the batter—yielding matte, tender tops.

Soft Chewy Brownie Red Velvet Cake
Equipment
- 2 Mixing bowl
- 1 Whisk
- 1 hand mixer or stand mixer
- 1 Rubber spatula
- 1 9×9 inch baking pan
- 1 parchment paper sheet
- 1 Measuring cups set
- 1 Measuring spoons set
- 1 Wire rack
- 1 toothpick
Ingredients
- 1 cup granulated sugar
- 1/2 cup light brown sugar packed
- 3/4 cup unsalted butter melted and slightly cooled
- 2 large eggs room temperature
- 1 large egg yolk room temperature
- 2 teaspoon vanilla extract
- 1 tablespoon red liquid food coloring
- 1 teaspoon white vinegar
- 3/4 cup all-purpose flour spooned and leveled
- 1/4 cup natural cocoa powder
- 1/2 teaspoon baking powder
- 1/2 teaspoon fine sea salt
- 1/2 cup mini chocolate chips optional
Instructions
- Preheat the oven to 350°F (175°C) and line a 9×9-inch pan with parchment with overhang for easy lifting.
- Whisk melted butter, granulated sugar, and brown sugar in a bowl until glossy and combined.
- Add eggs, egg yolk, vanilla, food coloring, and vinegar and whisk until smooth and uniformly red.
- In a second bowl whisk flour, cocoa powder, baking powder, and salt until evenly combined.
- Fold dry ingredients into wet with a spatula just until no dry streaks remain, then fold in chocolate chips if using.
- Spread the thick batter evenly in the prepared pan and smooth the top.
- Bake for 26 to 32 minutes until the edges are set and a toothpick comes out with a few moist crumbs.
- Place the pan on a wire rack and cool for 20 minutes, then lift out using the parchment.
- Cool an additional 10 minutes before slicing into 12 squares with a sharp knife.
Notes