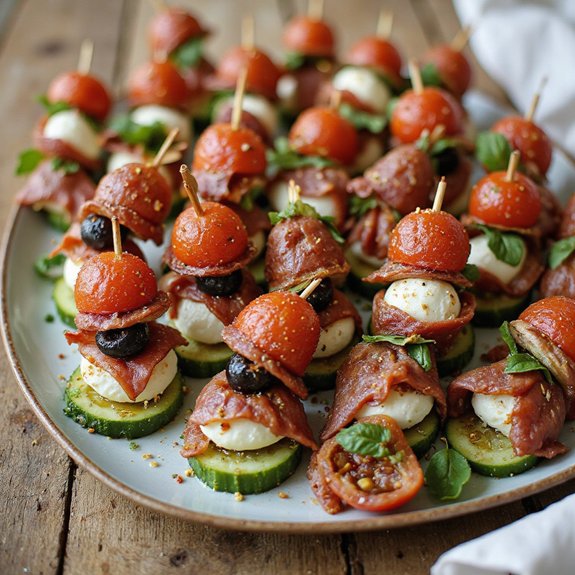
There’s something about a table dotted with colorful little skewers that makes everyone lean in a little closer.
Think glossy cherry tomatoes, crisp cucumbers, ribbons of cured meats, juicy melon cubes, and tiny mozzarella pearls—each bite-sized stack a different mix of crunch, creaminess, and bright, herby aroma.
These appetizers on a stick are light, fun, and endlessly adaptable, and most of them come together in 10–20 minutes with almost no cooking at all.
They’re perfect for busy hosts, beginners nervous about “real” appetizers, families with picky eaters, and anyone who loves to entertain without stress.
I still remember a Friday when unexpected guests texted, “We’re five minutes away.”
I raided the fridge, threaded whatever I’d onto skewers, and those little bites turned a near-panic into a relaxed, laughter-filled evening.
They shine at casual gatherings, potlucks, game nights, and last-minute plans. Ready to bring these appetizers on a stick to life?
Why You’ll Love It
- Delivers bold flavor in every bite-sized, perfectly layered skewer
- Requires no cooking, making prep fast and stress-free for hosts
- Serves beautifully at parties, buffets, or casual family gatherings
- Adapts easily with different meats, veggies, or cheeses you love
- Preps ahead up to 4 hours, saving time before guests arrive
Ingredients
- 12 each grape tomatoes — choose firm, bite-size ones
- 12 each fresh mozzarella balls, mini — use ciliegine or small bocconcini
- 12 each fresh basil leaves — pick unbruised, bright green leaves
- 12 each pitted black olives — well-drained so skewers don’t get soggy
- 12 each cucumber slices, 1/2-inch thick — from a crisp, seedless cucumber
- 12 each salami slices — foldable, not too thickly cut
- 2 tbsp olive oil, extra-virgin — good quality for better flavor
- 1 tbsp balsamic vinegar — use a moderately aged, not too sweet variety
- 1 tsp dried Italian seasoning — crumble between fingers to release aroma
- 1/4 tsp fine salt — adjust to taste after mixing dressing
- 1/4 tsp freshly ground black pepper — grind just before using
Step-by-Step Method
Rinse & Prep Veggies
Rinse grape tomatoes, basil leaves, and cucumber under cool water. Pat everything completely dry with a clean towel so excess moisture doesn’t dilute flavors.
Inspect basil and discard any wilted leaves. Leave tomatoes whole. Set prepped vegetables aside in separate small piles to make assembly faster and more organized later.
Slice the Cucumber
Place the cucumber on a cutting board and trim the ends. Slice it into 1/2‑inch thick rounds, aiming for even thickness so the skewers sit flat and sturdy.
Arrange the slices in a single layer on the board or a plate. Lightly pat dry again if needed to remove surface moisture.
Fold the Salami Neatly
Lay each slice of salami flat on the cutting board. Fold it in half, then fold again into quarters to create a compact fan shape.
Press gently so it holds together. Stack the folded slices on a plate. This method keeps the skewers neat and gives each bite a satisfying meaty layer.
Whisk the Dressing
Add olive oil, balsamic vinegar, dried Italian seasoning, salt, and freshly ground black pepper to a small mixing bowl. Whisk briskly until the mixture emulsifies and looks slightly thickened.
Taste and adjust seasoning if necessary. Keep the bowl nearby, as you’ll use this dressing to marinate the mozzarella and later drizzle over the skewers.
Marinate the Mozzarella
Place the mini fresh mozzarella balls into the bowl with the dressing. Gently toss with a small spoon until each piece is well coated.
Be careful not to tear the cheese. Let them sit and marinate for 10–15 minutes at room temperature. This step infuses flavor and keeps the cheese moist and tender.
Thread the First Base Layer
Take one wooden skewer and carefully thread on a single cucumber slice, pushing it down toward the bottom to create a sturdy base. Follow with one folded salami slice, piercing through the thicker side so it stays in place.
Keep the pieces snug but not crushed to prevent splitting or breaking the skewer.
Add Cheese, Basil & Olive
Spear one marinated mozzarella ball and slide it down to sit on top of the salami. Add a fresh basil leaf, folding it in half if large so it doesn’t tear.
Thread one pitted black olive above the basil. Keep ingredients centered and aligned so the skewer remains balanced and visually appealing.
Finish with the Tomato Topper
Crown the skewer with one grape tomato, pushing it gently but firmly so it secures the other ingredients beneath. Leave a small portion of the skewer tip exposed for easy handling.
Check that the layers are stable. Adjust spacing as needed so each piece is visible and the skewer looks full but not overcrowded.
Repeat & Arrange on Platter
Continue threading ingredients on the remaining skewers in the same order until you have 12 complete appetizers. Arrange them neatly on a small serving platter, alternating directions for a tidy presentation.
Leave a bit of space between skewers so guests can easily grab one without disturbing the others.
Drizzle & Rest Before Serving
Spoon or lightly drizzle any remaining dressing over the assembled skewers, focusing on the mozzarella and vegetables. Avoid soaking the platter.
Let the skewers rest for about 5 minutes at room temperature so the flavors meld. Serve promptly, or chill briefly if preparing slightly ahead of time.
Ingredient Swaps
- Meat swaps: Use prosciutto, pepperoni, turkey, or roast chicken instead of salami; for pescatarian, add cooked shrimp in place of meat.
- Dairy-free/vegan: Swap mozzarella for marinated tofu cubes, vegan mozzarella, or seasoned chickpeas; use extra veggies (roasted peppers, artichoke hearts) to bulk up.
- Gluten-free: The base recipe is naturally gluten-free; just confirm salami and seasonings have no added gluten.
- Budget-friendly: Replace fresh mozzarella with cubes of regular block mozzarella or mild cheddar, and use standard black olives instead of specialty varieties.
- Regional twists: Try feta and Kalamata olives with oregano (Greek), queso fresco and pickled jalapeños (Mexican), or paneer with cilantro and a squeeze of lime (Indian-inspired).
You Must Know
- Flavor Boost – If the skewers taste a bit flat, spoon 1–2 teaspoons of extra balsamic over the platter right before serving; a shiny glaze and a slightly sticky feel on the tomatoes is your cue the acid and sweetness are balanced.
- Avoid – Avoid cutting cucumbers thinner than 1/2 inch; if they bend or bow when you lift the skewer, they’re too thin and will crack or slide, making the whole stick unstable.
- Make-Ahead – For making more than 2 hours in advance, keep marinated mozzarella and sliced salami covered in the fridge and assemble skewers no earlier than 1–4 hours before serving; the basil should still look bright green and not dark or limp.
- Swap – For vegetarian guests, skip salami and add an extra olive or a marinated artichoke cube (about the same size as the mozzarella); the skewer should still feel evenly weighted from bottom to top when you pick it up.
- Scale – To scale for a crowd, count 2–3 skewers per person; for 20 guests that’s 40–60 skewers, or roughly 3–5 pints of grape tomatoes and 1–1½ pounds of mini mozzarella so you don’t run short on the “star” ingredients.
Serving Tips
- Arrange skewers in a circular “sunburst” on a white platter for contrast.
- Serve alongside a small bowl of extra balsamic drizzle or pesto for dipping.
- Pair with chilled prosecco, light pinot grigio, or sparkling water with citrus slices.
- Add height by standing skewers upright in a lined mason jar or narrow vase.
- Mix with fruit skewers on a tiered stand for a colorful appetizer display.
Storage & Make-Ahead
These skewers keep well in the fridge for up to 4 hours; cover tightly so they don’t dry out.
For best texture, drizzle extra dressing just before serving.
Avoid making them the day before, as tomatoes and cucumbers soften.
This recipe doesn’t freeze well—enjoy it fresh.
Reheating
Reheat gently: briefly microwave covered on low power.
Warm in a 300°F oven, or use a covered skillet on low.
Avoid overheating to prevent drying or melting delicate ingredients.
State-Fair Food-On-A-Stick
Sometimes when I’m threading together simple bites like these skewers, I can’t help but think of the over-the-top magic of state-fair food-on-a-stick—the sizzling corn dogs, gooey fried cheese, and towering kabobs dripping with sauce.
I picture that rush of hot fryer air, the chatter of the crowd, and paper boats balanced in every hand.
At home, I borrow the fun, not the deep-fryer. I think in bold, fairground colors: ruby tomatoes instead of neon slushies, ribbons of salami instead of funnel cake batter, glossy olives in place of caramel apples.
Each skewer becomes my mini midway—layered, generous, a little dramatic. When you pick one up and take that first crunchy, juicy, salty bite, it feels like winning a tiny prize.
Final Thoughts
Give these appetizers on a stick a try for your next gathering and see how quickly they disappear.
Don’t be afraid to tweak the ingredients and flavors to match your own taste or what you have on hand.
Frequently Asked Questions
Can I Make These Skewers Vegetarian or Vegan-Friendly Without Losing Flavor?
You absolutely can. I’d swap salami and mozzarella for marinated tofu cubes, roasted peppers, and herby olives. I’d drizzle garlicky balsamic on top—think glossy, tangy, smoky bites that still burst with juicy tomato and crisp cucumber.
What Are Some Kid-Friendly Variations That Encourage Picky Eaters to Try Vegetables?
You can swap olives and basil for sweet bell pepper stars, mild cheese cubes, and tiny broccoli “trees.” I’d drizzle a honey‑yogurt dip on the side so every colorful bite feels playful, crunchy, and gently sweet.
How Can I Safely Transport These Skewers to Picnics or Potlucks?
I nestle skewers flat in a shallow, lidded container, tips wrapped in foil. I tuck ice packs beneath, keep them upright in the cooler, and open just before serving so everything tastes cool, bright, and fresh.
Are There Gluten-Free Considerations When Choosing Meats or Seasonings for the Skewers?
Yes, there are. I’d scan labels for hidden wheat in salami, marinades, and Italian seasoning; choose clearly gluten-free meats and spices so each juicy, herb-scented bite stays safe, bright, and worry‑free for you.
Can I Scale This Recipe for Large Events or Catering, and How?
You can absolutely scale this recipe, and I’d treat each skewer as one bite. For big events, I’d batch‑marinate mozzarella, pre‑slice vegetables, then assemble assembly‑line style so colors stay vibrant and textures crisp.

Appetizers On A Stick
Equipment
- 12 wooden skewers (8–10 inch)
- 1 Small mixing bowl
- 1 Cutting board
- 1 Chef's knife
- 1 small serving platter
- 1 small spoon
Ingredients
- 12 each grape tomatoes
- 12 each fresh mozzarella balls mini
- 12 each fresh basil leaves
- 12 each pitted black olives
- 12 each cucumber slices thick
- 12 each salami slices folded
- 2 tablespoon olive oil extra-virgin
- 1 tablespoon balsamic vinegar
- 1 teaspoon dried Italian seasoning
- 1/4 teaspoon salt fine
- 1/4 teaspoon black pepper freshly ground
Instructions
- Rinse the grape tomatoes, basil leaves, and cucumber, then pat them dry with a clean towel.
- Slice the cucumber into 1/2-inch thick rounds.
- Fold each salami slice into quarters to create a neat fan shape.
- In a small mixing bowl, whisk together the olive oil, balsamic vinegar, Italian seasoning, salt, and black pepper.
- Add the mozzarella balls to the bowl and gently toss to coat them in the dressing.
- Let the mozzarella marinate in the dressing for 10–15 minutes while you prepare the skewers.
- Thread one cucumber slice onto a skewer, followed by one folded salami slice.
- Add one marinated mozzarella ball, one basil leaf, one black olive, and finish with one grape tomato on top.
- Repeat the skewering process with the remaining ingredients to make 12 skewers.
- Arrange the skewers neatly on a serving platter.
- Drizzle any remaining dressing from the bowl lightly over the assembled skewers.
- Let the skewers rest for 5 minutes to allow flavors to meld before serving.
Notes

Cynthia Weatherford is a seasoned chef and culinary enthusiast who serves as the Recipe creator of Somonday. With decades of experience in the kitchen and a passion for exploring diverse cuisines, Cynthia brings a blend of creativity and technique to every dish. Known for transforming simple ingredients into show-stopping meals, Cynthia believes that cooking is an art form anyone can master. Dedicated to inspiring home cooks, Cynthia shares approachable recipes, pro tips, and culinary wisdom to make every meal memorable.