There’s something about the smell of banana bread drifting through a kitchen that makes everything feel softer around the edges.
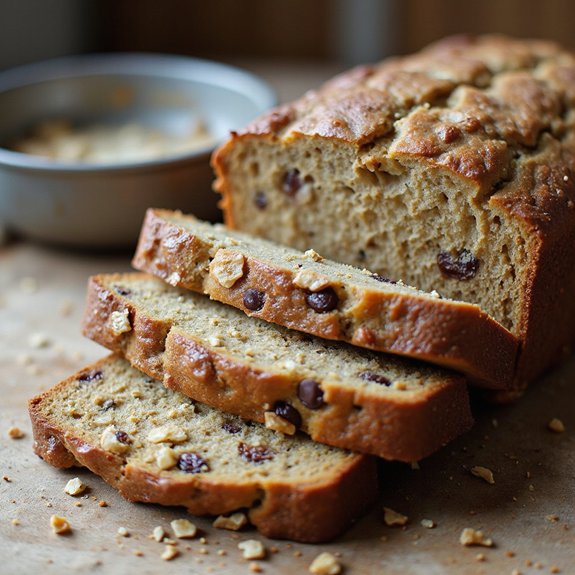
Picture a golden, crackly-topped loaf, still warm, the crumb moist and tender thanks to oil instead of butter.
This is a cozy, no-fuss dessert or snack that comes together quickly—perfect when you need something in the oven in about 15 minutes and on the table not long after.
It’s ideal for busy weeknights, beginner bakers, families with browning bananas on the counter, and anyone who craves comfort without a sink full of dishes.
I still remember a rainy Sunday when friends dropped by unexpectedly; that simple, oil-based banana bread saved the day.
No softened butter, no mixer—just a few bowls, ripe bananas, and the house soon smelled like a hug.
It shines for Sunday suppers, last‑minute cravings, casual gatherings, and easy entertaining.
Ready to bring this loaf to life?
Why You’ll Love It
- Stays incredibly moist for days thanks to oil instead of butter
- Uses simple pantry ingredients you probably already have on hand
- Mixes together in one bowl with no mixer required
- Adapts easily with nuts, chocolate chips, or your favorite add-ins
- Slices and freezes well for quick breakfasts or snacks
Ingredients
- 3 large bananas very ripe, mashed — very speckled/spotty for best sweetness and flavor
- 120 ml vegetable oil neutral — canola or sunflower keeps flavor light
- 150 g granulated sugar — adjust slightly based on banana sweetness
- 50 g light brown sugar packed — adds moisture and light caramel notes
- 2 large eggs room temperature — helps batter mix smoothly and rise evenly
- 60 ml milk room temperature — dairy or unsweetened non-dairy both work
- 1 tsp vanilla extract — real vanilla deepens the banana flavor
- 190 g all-purpose flour — measure accurately to avoid dense bread
- 1 tsp baking soda — key for rise and tender crumb
- 0.5 tsp baking powder — supports lift for a higher loaf
- 0.5 tsp fine salt — sharpens sweetness and overall flavor
- 1 tsp ground cinnamon (optional) — adds warm spice without overpowering
- 80 g chopped walnuts (optional) — toast lightly for extra flavor and crunch
- 80 g chocolate chips (optional) — use semi-sweet to balance overall sweetness
Step-by-Step Method
Preheat the Oven and Prepare the Pan
Preheat the oven to 175°C (350°F). Grease a 9×5-inch loaf pan with oil or non-stick spray. Line it with parchment paper if you want easier removal, letting the paper overhang the sides. Lightly grease the parchment as well.
Set the pan aside while you prepare the banana bread batter.
Mash the Bananas Thoroughly
Place the very ripe bananas in a large mixing bowl. Use a fork or potato masher to mash them until mostly smooth. Leave a few small lumps for texture.
Make certain there are no large chunks, which can cause uneven pockets of moisture. Set the mashed bananas aside, ready for the wet ingredients.
Whisk Together the Wet Ingredients
Add the vegetable oil, granulated sugar, light brown sugar, eggs, milk, and vanilla extract to the mashed bananas. Whisk until the mixture looks smooth and well combined.
Break up any streaks of egg or sugar. This step helps dissolve the sugars and make sure a consistent texture in the finished banana bread.
Combine the Dry Ingredients Separately
In another bowl, add the all-purpose flour, baking soda, baking powder, salt, and ground cinnamon if using. Whisk thoroughly to distribute the leavening agents and spices evenly.
Make sure there are no clumps of baking soda or baking powder. Proper mixing here helps the banana bread rise evenly in the oven.
Fold the Dry Ingredients into the Wet
Pour the dry mixture into the bowl with the wet ingredients. Use a spatula or wooden spoon to gently fold everything together.
Mix only until no visible dry streaks of flour remain. Avoid vigorous stirring. Overmixing can develop gluten and make the banana bread dense instead of soft and tender.
Add Nuts and Chocolate Chips Gently
Sprinkle the chopped walnuts and chocolate chips over the batter if you’re using them. Fold them in with a few gentle strokes of the spatula.
Distribute them evenly without overworking the batter. Scrape the sides and bottom of the bowl to catch any unmixed bits.
Transfer the Batter to the Prepared Pan
Pour the batter into the greased loaf pan, using a spatula to scrape the bowl clean. Spread the batter evenly, smoothing the top so it bakes uniformly.
Tap the pan lightly on the counter once or twice to release any large air bubbles. Place the pan on the center rack of the oven.
Bake Until a Toothpick Comes Out Clean
Bake the banana bread for 50–60 minutes. Check at the 50-minute mark by inserting a toothpick into the center.
It should come out mostly clean with a few moist crumbs. If the top browns too fast, tent it loosely with foil. Continue baking until the center is set and no wet batter remains.
Cool Briefly in the Pan
Remove the pan from the oven and place it on a wire rack. Let the banana bread cool in the pan for about 15 minutes.
This resting time helps the loaf firm up, making it easier to remove. Don’t slice immediately, or the bread may crumble and lose too much steam.
Finish Cooling and Slice to Serve
Carefully lift the banana bread from the pan, using the parchment overhang if you used it. Transfer the loaf directly to the wire rack.
Let it cool for at least 5 more minutes, preferably longer for cleaner slices. Use a sharp knife to cut into slices. Serve warm or at room temperature.
Ingredient Swaps
- Use any neutral oil (canola, sunflower, light olive, grapeseed) in place of vegetable oil, same amount: 120 ml.
- For dairy-free: swap milk with the same amount of almond, oat, or soy milk; use dairy-free chocolate chips.
- For less refined sugar: replace granulated sugar with coconut sugar or use all light brown sugar (same total weight: 200 g).
- For nut-free: omit walnuts or replace with seeds (pumpkin, sunflower) or extra chocolate chips.
- For whole grain: substitute up to half the all-purpose flour with whole wheat flour; if using 100% whole wheat, add 1–2 tsp extra milk if the batter seems too thick.
You Must Know
– Make-Ahead – *To* keep slices soft for up to 3 days, wrap the completely cooled loaf (about 1–2 hours after coming out of the oven) tightly in plastic or store slices in an airtight box with a piece of parchment between layers.
Minimizing air exposure slows staling and keeps the oil-rich crumb moist.
Serving Tips
- Serve warm slices with a pat of salted butter or a drizzle of honey.
- Pair with vanilla yogurt and fresh berries for a simple breakfast plate.
- Toast leftover slices and spread with peanut butter or almond butter.
- Dust with powdered sugar and serve alongside vanilla ice cream for dessert.
- Cut into cubes and layer with whipped cream for a quick banana trifle.
Storage & Make-Ahead
Banana bread with oil keeps moist for about 3 days at room temperature and up to 1 week in the fridge when tightly wrapped.
It’s great for make-ahead: freeze the whole loaf or slices, well wrapped, for up to 3 months.
Thaw at room temperature before serving.
Reheating
Reheat slices gently to keep them moist.
Microwave 10–20 seconds loosely covered, warm in a 150°C (300°F) oven for 8–10 minutes wrapped in foil, or toast lightly in a covered skillet.
Banana Bread in Pop Culture
Nothing beats biting into a warm slice you’ve just reheated and realizing you’re tasting the same cozy comfort that shows up in movies, TV shows, and novels whenever a scene needs real homey warmth.
When a character carries a foil-wrapped loaf through a doorway, I can almost smell that sweet banana aroma through the screen—soft crumb, glossy top, maybe a crack down the center like a smile.
I notice banana bread often signals safety after chaos: a storm passes, someone apologizes, a new neighbor arrives.
It’s rarely fancy; it’s the opposite of restaurant dessert drama. It’s the “come in, you’re okay now” food. Every time I see it on-screen, I want to hand you a slice and say, “You’re home here, too.”
Final Thoughts
Give this banana bread with oil a try and see how moist and flavorful it turns out—even the next day.
Feel free to tweak it with your favorite mix-ins, like nuts, chocolate chips, or spices, to make it your own.
Frequently Asked Questions
Can I Make This Banana Bread Gluten-Free Without Compromising Texture?
You can. I’d swap the flour for a good 1:1 gluten‑free blend with xanthan gum. Stir gently, don’t overmix. You’ll still slice into a moist, fragrant loaf, tender crumb steaming in your kitchen.
How Do I Prevent Banana Bread From Sinking in the Middle?
You prevent that sad sunken middle by not overmixing, baking fully, and trusting the toothpick. I’d also avoid opening the oven early and measure leaveners carefully so your loaf stands tall and proud.
What’s the Best Way to Measure Flour Accurately for Banana Bread?
I gently fluff the flour, spoon it into your measuring cup like soft snow, then level it with a knife’s edge. Don’t scoop directly; it packs too tightly and turns tender banana bread heavy.
Can I Safely Add Fresh Fruit Like Berries Without Making It Soggy?
Yes, you can, but keep it safe and not soggy by folding in firm, well-dried berries lightly tossed in a spoonful of flour; I’d use small amounts so pockets of juice swirl, not flood.
How Do Altitude Changes Affect Baking Time and Rise for Banana Bread?
Altitude makes your loaf rise faster, then fall flatter, and it often bakes quicker. I’d lower leaveners slightly, add a splash more liquid, and watch for that sweet banana scent and springy center.

Banana Bread With Oil Instead Of Butter
Equipment
- 2 Mixing bowls
- 1 Whisk
- 1 Wooden spoon or spatula
- 1 9×5-inch loaf pan
- 1 set measuring cups
- 1 set measuring spoons
- 1 Fork or potato masher
- 1 Wire rack
- 1 parchment paper sheet (optional
- 1 toothpick or cake tester
Ingredients
- 3 large bananas very ripe mashed
- 120 milliliter vegetable oil neutral such as canola or sunflower
- 150 gram granulated sugar
- 50 gram light brown sugar packed
- 2 large eggs room temperature
- 60 milliliter milk room temperature
- 1 teaspoon vanilla extract
- 190 gram all-purpose flour
- 1 teaspoon baking soda
- 1/2 teaspoon baking powder
- 1/2 teaspoon fine salt
- 1 teaspoon ground cinnamon optional
- 80 gram chopped walnuts optional
- 80 gram chocolate chips optional
Instructions
- Preheat the oven to 175°C (350°F) and lightly grease a 9×5-inch loaf pan, lining it with parchment paper if desired.
- In a large mixing bowl, mash the ripe bananas with a fork until mostly smooth with a few small lumps remaining.
- Add the vegetable oil, granulated sugar, brown sugar, eggs, milk, and vanilla extract to the mashed bananas and whisk until well combined.
- In a separate bowl, whisk together the flour, baking soda, baking powder, salt, and cinnamon until evenly mixed.
- Gently fold the dry ingredients into the wet mixture using a spatula or wooden spoon, mixing just until no dry streaks of flour remain.
- Fold in the chopped walnuts and chocolate chips, if using, being careful not to overmix the batter.
- Pour the batter evenly into the prepared loaf pan and smooth the top with the back of a spoon or spatula.
- Bake the banana bread for 50–60 minutes, or until a toothpick inserted into the center comes out mostly clean with a few moist crumbs.
- Remove the pan from the oven and place it on a wire rack, then let the bread cool in the pan for about 15 minutes.
- Carefully lift the banana bread out of the pan, transfer it directly to the wire rack, and let it cool for at least 5 more minutes before slicing and serving.
Notes

Cynthia Weatherford is a seasoned chef and culinary enthusiast who serves as the Recipe creator of Somonday. With decades of experience in the kitchen and a passion for exploring diverse cuisines, Cynthia brings a blend of creativity and technique to every dish. Known for transforming simple ingredients into show-stopping meals, Cynthia believes that cooking is an art form anyone can master. Dedicated to inspiring home cooks, Cynthia shares approachable recipes, pro tips, and culinary wisdom to make every meal memorable.


