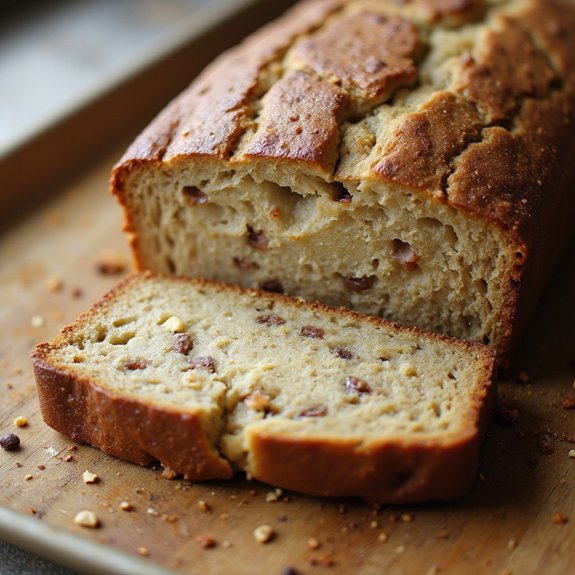
There’s something about the smell of banana bread drifting from the oven—warm, buttery, and sweet with a hint of vanilla—that instantly makes a house feel like home.
This cozy dessert (or anytime snack) comes together quickly with self rising flour, so you skip extra leavening ingredients and get a tender, lofty loaf in less time.
It’s perfect for beginners, busy families, and anyone who loves fuss-free baking that still feels special.
I remember one rainy Sunday when unexpected guests dropped by.
I’d overripe bananas on the counter, self rising flour in the pantry, and just enough time before coffee finished brewing.
In under an hour, we were slicing into a golden, crackly-topped loaf, the kitchen filled with laughter and that unmistakable banana aroma.
This recipe shines for Sunday suppers, last-minute cravings, easy entertaining, and cozy evenings in.
Ready to bring this dish to life?
Why You’ll Love It
- Uses self-rising flour for quick, fuss-free baking success
- Delivers ultra-moist texture from very ripe, naturally sweet bananas
- Mixes in one bowl—no mixer or special skills required
- Easily customized with nuts, chocolate chips, or dried fruit
- Stays tender for days and slices perfectly for snacking
Ingredients
- 3 large bananas, very ripe, mashed — lots of brown spots for extra sweetness
- 120 g unsalted butter, melted and cooled slightly — real butter, not margarine
- 150 g granulated sugar — standard white sugar works best
- 2 large eggs, room temperature — helps batter mix smoothly
- 1 tsp vanilla extract — use pure vanilla for better flavor
- 250 g self rising flour, sifted — aerates and removes lumps
- 0.5 tsp ground cinnamon (optional) — adds gentle warmth
- 0.25 tsp fine salt — balances sweetness and flavor
- 60 ml milk, room temperature — any dairy milk or similar substitute
- 80 g chopped walnuts (optional) — toast lightly for extra flavor
- 60 g chocolate chips (optional) — semi-sweet or dark work well
Step-by-Step Method
Prep the Pan and Preheat the Oven
Preheat your oven to 175°C (350°F). Prepare a 9×5-inch loaf pan by lightly greasing it with butter or nonstick spray, or line it with parchment paper for easy removal. Make sure the parchment overhangs the sides to lift the loaf out later. Set the pan aside while you mix the batter.
Mash the Ripe Bananas
Peel the very ripe bananas and place them in a medium mixing bowl. Use a fork or potato masher to mash them until mostly smooth, leaving a few small lumps for texture.
Aim for a thick, pourable consistency. Set the mashed bananas aside, as they’ll be added to the wet mixture later.
Combine Butter and Sugar
Pour the melted, slightly cooled unsalted butter into a large mixing bowl. Add the granulated sugar.
Whisk the mixture until it looks smooth and glossy. This helps the sugar begin dissolving in the fat. Make sure the butter isn’t hot, or it may scramble the eggs when added.
Add Eggs and Vanilla
Crack the eggs into the butter-sugar mixture. Add the vanilla extract.
Whisk steadily until the mixture is smooth, uniform, and slightly thickened. This step helps incorporate air and creates a stable base for the batter. Scrape down the sides of the bowl if needed to make sure everything is well combined.
Stir in the Mashed Bananas
Add the mashed bananas to the bowl with the wet ingredients. Stir with a whisk or wooden spoon until the bananas are evenly distributed throughout the mixture.
Make sure there are no large pockets of banana remaining. The batter will look loose, creamy, and speckled with small banana bits.
Mix the Dry Ingredients Separately
In a separate bowl, add the self rising flour, ground cinnamon, and fine salt. Use a whisk to combine them thoroughly and break up any lumps.
This step makes certain of even distribution of the leavening and seasoning. Sifting or whisking the flour creates a lighter texture and prevents dense patches in the finished banana bread.
Start Combining Wet and Dry Mixtures
Add about half of the dry ingredient mixture to the wet banana mixture. Gently stir with a spatula or wooden spoon until just combined.
Don’t beat or overmix. Stop as soon as you no longer see streaks of flour. Overworking at this stage can develop gluten and make the bread tough.
Loosen the Batter with Milk
Pour the room-temperature milk into the partially mixed batter. Stir gently to loosen and smooth it out.
The milk helps create a tender crumb and easier folding of the remaining flour. Make sure the milk is fully incorporated so the batter looks uniform before adding the rest of the dry ingredients.
Fold in Remaining Dry Ingredients
Add the remaining dry ingredients to the bowl. Switch to a gentle folding motion with a spatula.
Turn the bowl as you fold, scraping along the bottom to catch hidden flour. Stop mixing as soon as you no longer see dry spots. A slightly lumpy batter is fine and helps keep the texture tender.
Add Nuts and Chocolate (Optional)
If using, sprinkle the chopped walnuts and chocolate chips over the batter. Fold them in gently with a spatula, making just a few turns so they’re evenly dispersed.
Avoid heavy stirring, which can deflate the batter. Make certain the add-ins are spread throughout, not just sitting on top or bottom.
Fill the Pan and Smooth the Top
Pour the finished batter into the prepared loaf pan. Use a rubber spatula to scrape every bit from the bowl.
Gently spread the batter into an even layer, smoothing the top without pressing down too firmly. This helps the banana bread rise evenly and bake with a nice, domed top.
Bake Until Set and Golden
Place the filled loaf pan on the center rack of the preheated oven. Bake for 50–55 minutes.
Check doneness by inserting a toothpick into the center; it should come out clean or with a few moist crumbs. If the top browns too quickly, loosely tent the pan with foil for the final minutes.
Cool in the Pan Briefly
Remove the baked banana bread from the oven and set the pan on a cooling rack. Let it rest in the pan for 10–15 minutes.
This short cooling time helps the loaf firm up and release more easily. Avoid cutting into it now, as it’s still very soft and can crumble.
Transfer to Rack and Cool Completely
Carefully lift the banana bread out using the parchment overhang, or invert it gently from the pan. Place the loaf directly on the cooling rack.
Allow it to cool for at least another 15 minutes, preferably until completely cool. Slice with a sharp knife. The flavor and texture improve once the loaf has fully rested.
Ingredient Swaps
- No self rising flour? Use 250 g all-purpose flour + 2 ¼ tsp baking powder + ¼ tsp baking soda + ¼ tsp salt (then omit the salt in the recipe).
- Dairy-free: swap butter for equal amount of melted coconut oil or neutral oil; use plant milk instead of dairy milk.
- Lower sugar: reduce sugar to 100 g; very ripe bananas will still keep it sweet and moist.
- Nut-free: omit walnuts or replace with seeds (pumpkin or sunflower) or extra chocolate chips.
- No eggs: replace each egg with 60 g unsweetened applesauce or 60 g mashed banana (bread will be a bit denser).
You Must Know
– Flavor Boost – For deeper banana flavor, roast the peeled bananas on a tray at 180°C/355°F for about 12–15 minutes until they darken and smell intensely sweet, then cool and mash. This concentrates sugars and adds a caramelized note.
Serving Tips
- Serve thick slices warm with butter or cream cheese for a cozy treat.
- Pair with vanilla ice cream and a drizzle of caramel for dessert.
- Toast leftover slices and top with peanut butter or Nutella for breakfast.
- Plate with fresh berries and a dusting of powdered sugar for brunch.
- Cut into cubes and use in a trifle with whipped cream and chocolate chips.
Storage & Make-Ahead
Store banana bread tightly wrapped or in an airtight container in the fridge for up to 5 days.
It’s great for making ahead—flavor improves by the next day.
The loaf also freezes well for 2–3 months; wrap slices individually for easy thaw‑and‑toast breakfasts or snacks.
Reheating
Reheat slices gently: in the microwave at 50% power for 15–25 seconds.
In a 150°C (300°F) oven wrapped in foil for 8–10 minutes.
Or in a covered skillet over low heat.
Banana Bread in Pop Culture
You’ve probably spotted banana bread in:
- Movies and TV, where a steaming loaf on the counter quietly signals home, healing, or a mended relationship.
- Cookbooks and food blogs, where it’s the “beginner’s triumph” recipe everyone swears by.
- Social media trends, especially lockdown-era feeds overflowing with loaves and family stories.
- Coffee shops and bakeries, where a thick, rustic slice practically invites you to sit, breathe, and stay a while.
Final Thoughts
Give this banana bread with self-rising flour a try—you’ll be surprised how quick, easy, and tender it turns out.
Feel free to tweak it with your favorite mix-ins, like extra nuts, chocolate chips, or even a swirl of peanut butter to make it your own.
Frequently Asked Questions
Can I Make This Banana Bread Gluten-Free Using Self-Rising Gluten-Free Flour?
Yes, you can, and I’d swap in self-rising gluten-free flour 1:1. I’d add an extra tablespoon of milk, avoid overmixing, and let the batter rest 10 minutes so the starches hydrate fully.
How Do I Adjust Baking Time for Mini Loaves or Muffins?
Bake mini loaves about 25–30 minutes, muffins 18–22 minutes. I’d fill them 2/3 full, watch for domed golden tops, and pull them when a toothpick comes out with just a few moist crumbs.
What’s the Best Way to Freeze Individual Banana Bread Slices?
I freeze slices by wrapping each tightly in plastic, then foil, then tucking them into a freezer bag. Press out air, label, freeze flat. You’ll reheat in minutes, and the crumb stays tender and fragrant.
Can I Reduce the Sugar Without Affecting Texture Too Much?
You can, but I’d only cut the sugar by about 25–30%. Go further and the crumb dries out. If you crave less sweetness, I’d add extra mashed banana to keep it plush and tender.
How Can I Adapt This Recipe for a Dairy-Free Version?
You can. I’d swap butter for equal melted coconut oil or neutral oil, and use any plant milk. I’d pick oat or almond milk; they keep the crumb tender and the flavor soft, almost custardy.

Banana Bread With Self Rising Flour
Equipment
- 1 medium mixing bowl
- 1 large mixing bowl
- 1 Fork or potato masher
- 1 Whisk or wooden spoon
- 1 9×5-inch loaf pan
- 1 Rubber spatula
- 1 Cooling rack
- 1 Measuring cups set
- 1 Measuring spoons set
Ingredients
- 3 large bananas very ripe mashed
- 120 gram unsalted butter melted and cooled slightly
- 150 gram granulated sugar
- 2 large eggs room temperature
- 1 teaspoon vanilla extract
- 250 gram self rising flour sifted
- 1/2 teaspoon ground cinnamon optional
- 1/4 teaspoon fine salt
- 60 milliliter milk room temperature
- 80 gram chopped walnuts optional
- 60 gram chocolate chips optional
Instructions
- Preheat the oven to 175°C (350°F) and lightly grease or line a 9×5-inch loaf pan with parchment paper.
- In a medium bowl, peel and mash the bananas with a fork or potato masher until mostly smooth with a few small lumps.
- In a large bowl, whisk together the melted butter and sugar until well combined.
- Add the eggs and vanilla extract to the butter mixture and whisk until smooth and slightly thickened.
- Stir the mashed bananas into the wet mixture until evenly incorporated.
- In a separate bowl, whisk together the self rising flour, ground cinnamon, and salt.
- Add half of the dry ingredients to the wet mixture and gently stir just until combined.
- Pour in the milk and stir to loosen the batter, then add the remaining dry ingredients and fold until no dry flour remains.
- If using, fold in the chopped walnuts and chocolate chips gently with a spatula.
- Pour the batter into the prepared loaf pan and smooth the top with a spatula.
- Bake for 50–55 minutes, or until a toothpick inserted into the center comes out clean or with a few moist crumbs.
- Remove the pan from the oven and let the banana bread cool in the pan for 10–15 minutes.
- Carefully lift or turn out the loaf onto a cooling rack and let it cool for at least another 15 minutes before slicing and serving.
Notes

Cynthia Weatherford is a seasoned chef and culinary enthusiast who serves as the Recipe creator of Somonday. With decades of experience in the kitchen and a passion for exploring diverse cuisines, Cynthia brings a blend of creativity and technique to every dish. Known for transforming simple ingredients into show-stopping meals, Cynthia believes that cooking is an art form anyone can master. Dedicated to inspiring home cooks, Cynthia shares approachable recipes, pro tips, and culinary wisdom to make every meal memorable.


