Imagine opening your kitchen door to the sweet scent of honey and vanilla drifting from the oven, and spotting a tray of golden-topped bee cupcakes cooling on the counter.
These are cozy, whimsical desserts—soft, tender vanilla cakes crowned with honey-kissed frosting and adorable little “bees” on top—ready in about an hour from start to finish.
They’re perfect for beginners, busy parents, or anyone with a serious sweet tooth who wants something cute yet achievable for birthdays, classroom parties, or baby showers.
I still remember the first time I made them for a last-minute spring get-together; the decorations looked surprisingly impressive, and those playful bees instantly relaxed the mood and got everyone talking.
These cupcakes shine for weekend baking projects, easy entertaining, or those evenings when you just need a bit of cheerful comfort with your cup of tea.
Ready to bring this dish to life?
Why You’ll Love It
- Delivers light, fluffy cupcakes with a gentle honey-vanilla sweetness
- Creates adorable bee decorations perfect for parties, showers, or kids’ bakes
- Uses simple pantry ingredients and straightforward mixing steps
- Offers make-ahead friendly cupcakes that store well for days
- Provides customizable decoration colors, patterns, and frosting styles
Ingredients
- 1 1/2 cups all-purpose flour — spoon and level for accurate measuring
- 1 1/2 teaspoons baking powder — guarantees a light, fluffy crumb
- 1/4 teaspoon fine salt — balances sweetness and enhances flavor
- 1/2 cup unsalted butter, softened — room temperature for easy creaming
- 3/4 cup granulated sugar — use standard white sugar for best texture
- 2 large eggs, room temperature — mix in one at a time for smooth batter
- 1 teaspoon vanilla extract — pure vanilla gives better flavor
- 1/2 cup whole milk, room temperature — fat content keeps cupcakes tender
- 1/4 cup honey — a mild variety lets vanilla flavor shine
- 1/2 cup unsalted butter, softened (for frosting) — soft but not melted for structure
- 2 cups powdered sugar, sifted (for frosting) — sifting prevents lumpy frosting
- 2 tablespoons milk (for frosting) — adjust for spreadable consistency
- 1 teaspoon vanilla extract (for frosting) — rounds out the sweetness
- 2 to 3 drops yellow gel food coloring (for frosting) — gel won’t thin the frosting
- 1/4 cup chocolate chips, melted (for decoration) — cool slightly so it pipes neatly
- 12 yellow candy-coated chocolates (for bees) — choose uniform size for cute bees
- 24 sliced almonds (for wings) — pick unbroken slices for neat “wings”
Step-by-Step Method
Preheat the oven and prepare the tin
Preheat the oven to 350°F (180°C). Line a 12-cup muffin tin with paper cupcake liners.
Set the pan aside on a stable surface near your workspace. Preparing the pan first makes filling easier and guarantees the batter goes into a hot oven right away for even, consistent baking.
Combine the dry ingredients
Whisk together the flour, baking powder, and salt in a medium mixing bowl. Break up any clumps and guarantee everything looks evenly mixed. Set this bowl aside.
Keeping the dry ingredients separate until needed helps prevent overmixing once they’re combined with the wet ingredients.
Cream the butter and sugar
Beat the softened butter and granulated sugar in a separate medium bowl with a handheld or stand mixer. Mix on medium speed for 2 to 3 minutes until the mixture looks pale and fluffy.
Proper creaming incorporates air, which helps the cupcakes rise and gives them a tender texture.
Add eggs and vanilla
Crack the eggs into a small bowl, then add them to the butter mixture one at a time. Beat well after each addition so the mixture stays smooth and emulsified. Mix in the vanilla extract until fully incorporated.
Scrape down the sides of the bowl with a rubber spatula to guarantee even mixing.
Mix the milk and honey
Stir the whole milk and honey together in a small bowl or measuring cup. Mix until the honey is mostly dissolved into the milk.
This step helps distribute the honey evenly throughout the batter. Set the mixture aside so it’s ready to alternate with the dry ingredients.
Alternate dry mixture and milk-honey
Add half of the dry ingredients to the butter mixture and mix on low just until combined. Pour in half of the milk-honey mixture and mix again. Repeat with the remaining dry ingredients and then the rest of the milk-honey.
Stop mixing as soon as everything is incorporated to avoid a dense crumb.
Fill the liners and bake
Divide the batter evenly among the 12 cupcake liners, filling each about two-thirds full. Use a spoon or scoop for even portions.
Place the muffin tin in the preheated oven and bake for 16 to 18 minutes. The cupcakes are done when a toothpick inserted into the center comes out clean.
Cool the cupcakes completely
Remove the pan from the oven and place it on a wire cooling rack. Let the cupcakes cool in the tin for 5 minutes so they set. Carefully lift each cupcake out and transfer directly to the rack.
Allow them to cool completely before frosting to prevent the buttercream from melting.
Beat the butter for frosting
Place the softened butter for the frosting in a clean mixing bowl. Beat with a mixer until smooth, creamy, and slightly lighter in color. This should take about 1 to 2 minutes.
Properly beaten butter is the base for a fluffy frosting that spreads and pipes easily onto the cooled cupcakes.
Add powdered sugar gradually
Add the sifted powdered sugar to the butter a little at a time, mixing on low speed at first to avoid a sugar cloud. Once mostly incorporated, increase the speed to medium until smooth. Scrape the bowl as needed.
Continue until all the sugar is mixed in and the frosting looks thick and uniform.
Adjust frosting with milk and vanilla
Pour in the milk and add the vanilla extract. Beat on medium-high until the frosting becomes light and fluffy. If it seems too stiff, add a little more milk, a teaspoon at a time.
If it’s too soft, mix in a bit more powdered sugar. Aim for a consistency that holds soft peaks when lifted.
Tint the frosting yellow
Add 2 to 3 drops of yellow gel food coloring to the frosting. Beat on low speed until the color is evenly distributed. Adjust the shade by adding more gel a drop at a time if needed.
Gel coloring keeps the frosting thick and vivid, ideal for piping bright bee-colored swirls on the cupcakes.
Pipe frosting onto cupcakes
Fit a piping bag with a small round tip, then fill it with the yellow frosting. Hold the bag upright over each cooled cupcake. Pipe swirls or domes, starting from the center or outer edge as you prefer.
Apply even pressure for smooth results. Finish all cupcakes before moving on to decorations.
Melt the chocolate for details
Place the chocolate chips in a microwave-safe bowl. Heat in short bursts of 15 to 20 seconds, stirring between each interval, until smooth and fully melted.
Let the chocolate cool slightly so it thickens a bit but remains pipeable. Overheating can burn the chocolate and affect the final texture.
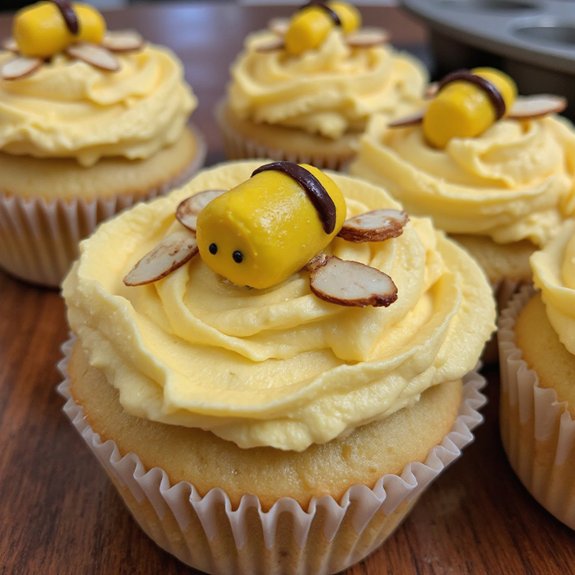
Pipe stripes and eyes on bees
Transfer the melted chocolate to a small piping bag or parchment cone with a tiny opening. Pipe stripes across each yellow candy-coated chocolate to create bee bodies. Add two tiny dots for eyes near one end.
Work carefully and steadily. Allow the chocolate to set slightly before handling.
Add almond wings to cupcakes
Gently press two sliced almonds into the frosting behind where each candy bee will sit. Angle them outward to resemble wings. Space them so the candy body will fit snugly in front.
The frosting should be soft enough to hold the almonds firmly without cracking or shifting.
Place bees and set decorations
Position one decorated candy bee on each cupcake, pressing lightly into the frosting just in front of the almond wings. Adjust the angle so the bees appear to be resting on top.
Chill the cupcakes in the refrigerator for 10 to 15 minutes to help the chocolate and frosting firm before serving.
Ingredient Swaps
- Use gluten-free all-purpose flour blend (1:1) in place of regular flour; add an extra tablespoon of milk if the batter seems thick.
- For dairy-free cupcakes and frosting, swap butter for vegan butter sticks and whole milk for oat, soy, or almond milk.
- Replace honey with maple syrup or agave for a different flavor or to make them fully vegan (if also using vegan sugar).
- No yellow candy-coated chocolates? Use yellow jelly beans, mini macarons, or small fondant balls shaped and painted with food coloring.
- If you don’t have sliced almonds, use white chocolate chips or small pieces of marshmallow for the wings.
You Must Know
- Doneness – If the cupcake tops feel springy and a toothpick shows a few moist crumbs (not wet batter) after about 16–18 minutes at 350°F (180°C), they’re done; pale but set edges are better than browned ones for a soft crumb.
- Troubleshoot – If cupcakes sink in the center as they cool, they were likely underbaked or the batter was overworked; next time check 2 minutes earlier and stop the mixer as soon as the flour disappears to keep structure strong.
- Flavor Boost – For deeper honey character, warm the honey to just lukewarm (no hotter than 100–110°F / 38–43°C) before combining with milk; this helps it dissolve fully so the sweetness tastes more rounded instead of sugary.
- Make-Ahead – To split the work, keep unfrosted cupcakes in an airtight container at cool room temp for up to 2 days, and refrigerate frosting separately up to 3 days; let both stand 20–30 minutes and re-whip frosting briefly so it pipes smoothly.
- Scale – For a smaller batch of 6, use half of every ingredient and keep oven temperature the same; start checking doneness at 14 minutes, since a slightly lower batter volume in the pan can cook a bit faster.
Serving Tips
- Serve on a wooden board with fresh flowers for a garden-party feel.
- Pair with chamomile or lavender tea to echo the honey notes.
- Arrange in a hive pattern on a large round platter.
- Add a drizzle of honey on the plate for extra shine and flavor.
- Present each cupcake in a pastel wrapper to highlight the yellow “bees.”
Storage & Make-Ahead
Bee cupcakes keep in an airtight container in the fridge for 4–5 days.
Bring to room temperature before serving for best flavor.
You can bake the cupcakes a day ahead and frost later.
Unfrosted cupcakes freeze well for up to 2 months.
Thaw fully, then decorate.
Reheating
Reheat bee cupcakes gently: microwave 10–15 seconds, unwrapped, just until slightly warm.
Or warm in a 300°F (150°C) oven for 5–8 minutes.
Avoid stovetop to protect frosting.
Bee-Themed Party Traditions
When I picture a bee-themed party built around these cupcakes, I see a table glowing in soft yellow and white, like a little sunlit garden indoors.
I love weaving small traditions through the day so everything feels connected, from the first “hello” to the last crumb of honeyed cake.
You might:
- Set a “Hive Table,” where your cupcakes form the center, surrounded by tiny jars of wildflowers and cloth napkins tied with striped ribbon.
- Start with a “Welcome to the Hive” toast: clink glasses of sparkling lemonade, then pass the cupcakes.
- Play a quick “Find the Queen Bee” game, hiding one special cupcake with extra decoration.
- Send guests home with a cupcake and a seed packet, a sweet reminder to keep feeding the bees.
Final Thoughts
Give these bee cupcakes a try and have fun making them your own—switch up the frosting colors, add sprinkles, or play with different candies for the bees.
However you customize them, they’re sure to create a buzz at your next celebration.
Frequently Asked Questions
Can I Make These Bee Cupcakes Gluten-Free Without Sacrificing Texture?
Yes, you can. I’d swap the flour for a good 1:1 gluten‑free blend, add ½ teaspoon xanthan gum, and bake. You’ll still bite into tender, honey‑soft crumbs beneath that velvety yellow frosting.
How Do I Scale This Recipe for a Large Classroom or Party?
I’d triple the recipe for about 36 treats, six times for a bustling classroom of 70–80, keeping batches separate so they bake evenly, frosting swirls tall and sunny, tiny chocolate bees marching in neat rows.
Are These Bee Cupcakes Safe for Kids With Nut Allergies?
They’re not safe as written because almond wings add nut allergens. I’d swap them for fondant or white chocolate shards, scrub utensils, and check every label so your little hive can snack without fear.
Can I Decorate the Bee Toppers Without Using Candy-Coated Chocolates?
Yes, you can. I’d pipe plump ovals of yellow frosting, then paint chocolate stripes and tiny eyes. As it sets, the “bees” glisten softly, perched on fragrant honeyed swirls, buzzing without a single candy shell.
How Do I Transport Decorated Bee Cupcakes Without Smudging the Frosting?
I chill the frosted cupcakes firm, nestle them in a snug cupcake carrier, and keep the box level. I tell you: drive gently, windows cracked, cool air swirling, sweetness intact, bees perched proudly.

Bee Cupcakes
Equipment
- 1 Muffin tin (12-cup)
- 12 paper cupcake liners
- 2 medium mixing bowls
- 1 Small mixing bowl
- 1 handheld or stand mixer
- 2 rubber spatulas
- 1 Whisk
- 1 measuring cup set
- 1 measuring spoon set
- 1 wire cooling rack
- 1 piping bag
- 2 small round piping tips
- 1 small offset spatula or butter knife
Ingredients
- 1 1/2 cup all-purpose flour
- 1 1/2 teaspoon baking powder
- 1/4 teaspoon fine salt
- 1/2 cup unsalted butter softened
- 3/4 cup granulated sugar
- 2 large eggs room temperature
- 1 teaspoon vanilla extract
- 1/2 cup whole milk room temperature
- 1/4 cup honey
- 1/2 cup unsalted butter softened for frosting
- 2 cup powdered sugar sifted for frosting
- 2 tablespoon milk for frosting
- 1 teaspoon vanilla extract for frosting
- 2 to 3 drops yellow gel food coloring for frosting
- 1/4 cup chocolate chips melted for decoration
- 12 yellow candy-coated chocolates for bees
- 24 sliced almonds for wings
Instructions
- Preheat the oven to 350°F (180°C) and line a 12-cup muffin tin with paper cupcake liners.
- In a medium bowl whisk together the flour, baking powder, and salt until well combined.
- In a separate bowl beat the softened butter and granulated sugar with a mixer until pale and fluffy, about 2 to 3 minutes.
- Add the eggs to the butter mixture one at a time, beating well after each addition, then mix in the vanilla extract.
- Mix the milk and honey together in a small bowl or measuring cup until the honey is mostly dissolved.
- Add the dry ingredients to the butter mixture in two additions, alternating with the milk-honey mixture, beginning and ending with the dry ingredients, and mix just until combined.
- Divide the batter evenly among the 12 liners, filling each about two-thirds full.
- Bake the cupcakes for 16 to 18 minutes or until a toothpick inserted in the center comes out clean.
- Remove the pan from the oven and let the cupcakes cool in the tin for 5 minutes, then transfer them to a wire rack to cool completely.
- While the cupcakes cool, beat the softened butter for the frosting until creamy and smooth.
- Gradually add the powdered sugar to the butter, mixing on low at first, then increasing to medium until fully combined.
- Add the milk and vanilla extract to the frosting and beat until light and fluffy, adjusting with a little more milk or sugar to reach a pipeable consistency.
- Tint the frosting with yellow gel food coloring, adding a drop at a time and mixing until you reach your desired shade.
- Transfer the yellow frosting to a piping bag fitted with a round tip and pipe swirls or domes onto each cooled cupcake.
- Melt the chocolate chips in a microwave-safe bowl in short bursts, stirring between each, until smooth, then let cool slightly.
- Use a small piping bag or a parchment cone filled with the melted chocolate to draw stripes and tiny eyes on each yellow candy-coated chocolate to create bee bodies.
- Gently press two sliced almonds into the frosting behind each candy bee as wings.
- Place one decorated bee on top of each cupcake, pressing lightly so it adheres to the frosting, then chill for 10 to 15 minutes to set the decorations before serving.
Notes

Cynthia Weatherford is a seasoned chef and culinary enthusiast who serves as the Recipe creator of Somonday. With decades of experience in the kitchen and a passion for exploring diverse cuisines, Cynthia brings a blend of creativity and technique to every dish. Known for transforming simple ingredients into show-stopping meals, Cynthia believes that cooking is an art form anyone can master. Dedicated to inspiring home cooks, Cynthia shares approachable recipes, pro tips, and culinary wisdom to make every meal memorable.


