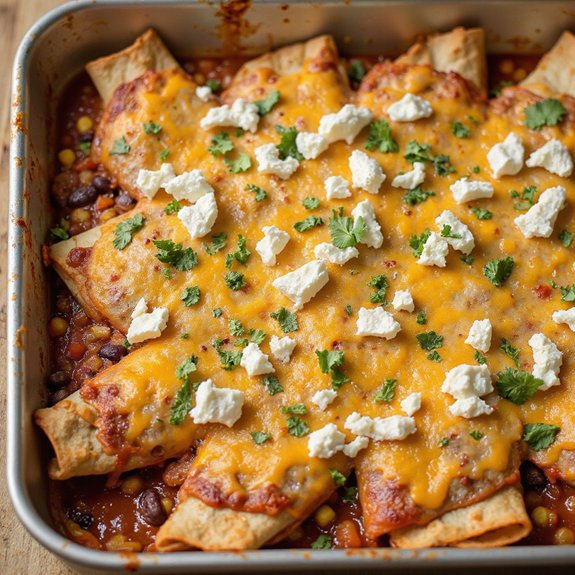
Imagine layers of sun-gold corn tortillas soaking up a ruby enchilada sauce, the kitchen filling with the smoky aroma of cumin and paprika as melted Monterey Jack turns lacy and bubbling at the edges.
Picture tender black beans and sweet pops of corn tucked into a cozy casserole that slices clean and serves like a hug—comfort you can see, smell, and taste.
This dish matters to me because it’s reliable warmth: a pan you can build in minutes, slide into the oven, and let the house do the rest.
On busy weeknights, it’s a hands-off hero; for Sunday suppers, it’s shareable and satisfying, especially with bright cilantro, creamy avocado, and a squeeze of lime.
Once, after a long school concert, this casserole rescued dinner—assembled ahead, baked while backpacks were dropped, and on the table before bedtime.
It’s pantry-friendly, vegetarian, and crowd-pleasing. Ready? Let’s cook!
Why You’ll Love It
- Delivers bold flavor with smoky spices and zesty enchilada sauce
- Packs plant-based protein from hearty black beans and corn
- Assembles quickly with simple pantry-friendly ingredients
- Freezes beautifully and reheats for easy weeknight meals
- Crowd-pleasing, cheesy comfort with satisfying layered texture
Ingredients
- 2 tablespoons olive oil — good extra-virgin for best flavor
- 1 medium yellow onion, diced — sweet and aromatic when sautéed
- 1 red bell pepper, diced — choose a firm, glossy pepper
- 3 cloves garlic, minced — fresh, not pre-minced, for brighter flavor
- 2 cans black beans (15 oz each), drained and rinsed — no-salt-added if possible
- 1 cup corn kernels, frozen or canned, drained if canned — sweet corn adds pop
- 1 can diced green chiles (4 oz), mild — adds gentle heat and tang
- 2 teaspoons ground cumin — freshly opened for robust aroma
- 1 teaspoon chili powder — use a balanced blend, not pure chile
- 1 teaspoon smoked paprika — adds subtle smokiness
- 1 teaspoon kosher salt — adjust to taste if sauce is salty
- 1/2 teaspoon black pepper — freshly ground for best bite
- 2 cups red enchilada sauce, divided — good-quality store-bought or homemade
- 8 corn tortillas (6-inch), halved — lightly toast to prevent sogginess
- 2 cups shredded Monterey Jack cheese — shred from a block for better melt
- 1/2 cup crumbled queso fresco (optional) — creamy, mildly salty finish
- 1/4 cup fresh cilantro, chopped — bright, fresh garnish
- 1 lime, cut into wedges, for serving — squeeze at the table
- 1 avocado, sliced (optional garnish) — ripe but still slightly firm
Step-by-Step Method
Preheat the Oven & Prep the Dish
Preheat the oven to 375°F (190°C). Lightly oil a 9×13-inch baking dish to prevent sticking. Gather all equipment and ingredients. Halve the corn tortillas. Drain and rinse the black beans and corn. Dice the onion and bell pepper, and mince the garlic. Shred the cheese and chop the cilantro for easy assembly later.
Sauté the Aromatics
Heat olive oil in a large skillet over medium heat. Add the diced onion and red bell pepper. Cook, stirring occasionally, until softened, about 5 minutes. Add the minced garlic and cook until fragrant, about 30 seconds. Keep heat moderate to avoid burning the garlic and maintain sweetness in the onions.
Build the Bean Filling
Stir in black beans, corn, and diced green chiles. Sprinkle in cumin, chili powder, smoked paprika, salt, and black pepper. Toss to coat evenly. Cook for about 2 minutes to warm through and meld flavors. Taste and adjust seasoning, especially salt and chili powder, to balance the richness of the enchilada sauce.
Sauce the Base
Spread 1/2 cup of red enchilada sauce evenly over the bottom of the prepared baking dish. Use the back of a spoon to reach corners. This prevents sticking and softens the first tortilla layer. If tortillas were lightly toasted, the sauced base still ensures proper hydration and cohesive layers.
Layer the First Tortillas
Arrange tortilla halves over the sauced base, slightly overlapping to cover the surface. Aim for full coverage without large gaps. Place cut sides along the edges for neatness. Press gently so the tortillas adhere to the sauce and create a sturdy foundation for the filling and cheese.
Add Filling & Cheese
Spoon half of the warm bean mixture evenly over the tortillas. Spread to the edges for consistent bites. Sprinkle about 2/3 cup shredded Monterey Jack cheese over the filling. Distribute evenly so the cheese melts into the beans and helps bind the layer without creating heavy pockets.
Sauce the Middle
Drizzle another 1/2 cup enchilada sauce over the cheese-topped filling. Spread lightly to cover. This middle sauce layer adds moisture and makes certain tender tortillas above. Avoid over-saucing, which can cause sogginess. Aim for a thin, even film that will meld flavors during baking.
Repeat Layers Neatly
Add another layer of tortilla halves, again overlapping slightly. Spoon on the remaining bean mixture and spread evenly. Sprinkle with another 2/3 cup Monterey Jack. Keep layers flat and level for even baking. Press gently to settle the filling and maintain tidy strata in the casserole.
Finish with Tortillas, Sauce & Cheeses
Top with a final layer of tortillas. Spread the remaining enchilada sauce evenly over the surface. Sprinkle the rest of the Monterey Jack and the crumbled queso fresco if using. Make certain cheese reaches the corners for full coverage. This promotes bubbly browning and appealing edges.
Bake Covered, Then Uncovered
Cover the dish loosely with aluminum foil, tenting to prevent cheese sticking. Bake for 20 minutes. Remove the foil and bake an additional 10 minutes until the cheese is bubbly and lightly browned. Check edges for gentle sizzling, indicating thorough heating and melded layers.
Rest, Garnish & Serve
Let the casserole rest for 10 minutes to set clean slices. Sprinkle with chopped fresh cilantro. Slice the avocado and arrange on top if desired. Cut into squares with a sharp knife and a spatula. Serve with lime wedges for brightness. Pair with a quick salad or rice to complete the meal.
Ingredient Swaps
- Dairy-free: use vegan shredded cheese and skip queso fresco (or use crumbled vegan feta).
- Gluten-free: the recipe already uses corn tortillas; just confirm enchilada sauce is certified GF.
- Spicier/milder: swap Monterey Jack with pepper jack for heat, or use mild cheese and mild sauce to tone it down.
- Beans: replace black beans with pinto or kidney beans; mix in 1 cup cooked lentils for extra protein.
- Veggies: sub corn with zucchini or bell peppers; add spinach, mushrooms, or sweet potato cubes (pre-roast).
- Sauce: use salsa verde or homemade red sauce; in a pinch, mix tomato sauce with taco seasoning and a splash of broth.
- Tortillas: flour tortillas work if not GF; cut into strips for easier layering, or use tortilla chips for a chilaquiles-style bake.
- Cheese budget swap: use part-skim mozzarella or cheddar instead of Monterey Jack; cotija for queso fresco.
You Must Know
Doneness • If the center looks wet after removing foil: return it covered for 5–8 minutes until edges are bubbling vigorously and the middle hits 165°F; this guarantees the cold layers heated through.
Troubleshoot • When tortillas seem soggy after cutting: let it stand an extra 5–10 minutes; starches re-set and slices hold, yielding clean squares with distinct layers.
Flavor Boost • To deepen sauce flavor with store-bought: simmer 1 cup sauce with 1 teaspoon cocoa or 1 tablespoon tomato paste and a pinch of sugar for 5 minutes; taste for balanced salt/heat before assembly.
Swap • For gluten-free certainty: verify enchilada sauce is GF and use certified GF corn tortillas; check labels—some sauces contain wheat flour.
Scale • For 8–10 servings: use a 11×15-inch pan or add 2 more tortillas, 1 additional cup beans, and 1/2 cup sauce; expect total time to extend by 5–10 minutes covered, watching for bubbling edges.
Serving Tips
- Plate squares with cilantro, avocado slices, and a squeeze of fresh lime.
- Serve alongside Mexican rice or cilantro-lime quinoa for a hearty meal.
- Add a quick cabbage slaw with lime crema for crunch and brightness.
- Offer toppings bar: sour cream, pickled jalapeños, hot sauce, and extra queso fresco.
- Pair with a simple tomato-cucumber salad or blackened corn salad.
Storage & Make-Ahead
Refrigerate leftovers in an airtight container for up to 4 days.
Reheat covered at 350°F until hot.
Assemble the casserole up to 24 hours ahead, cover, and bake from cold, adding about 10 minutes.
This freezes well for up to 2 months.
Thaw overnight and reheat covered until bubbly.
Reheating
Reheat gently: cover portions to retain moisture.
Microwave at 50–70% power, stirring midway.
Oven at 325°F, covered, until warmed through.
Stovetop in a lidded skillet on low, adding splash of sauce.
Las Posadas Potluck Tradition
Though winter nights settle early, Las Posadas glows with doorways, candles, and the rustle of neighbors carrying warm dishes to share. I tuck my Black Bean Enchilada Casserole under foil, still warm, and step into the procession.
You’ll hear carols, then a chorus of lids lifting—steam, spice, and citrus rising to meet the chill. I plan portions for twelve, cut clean squares after a brief rest, and set lime wedges nearby for brightness.
Corn tortillas hold firm, so the casserole travels well; I wrap the pan in a towel and bring a serving spoon. Someone brings posole, another, tamales; I trade slices for stories. When plates circle back empty, I scatter cilantro, replenish, and quietly savor the small miracle of shared warmth.
Final Thoughts
Ready to dig in? Give this Black Bean Enchilada Casserole a try as written, or make it your own with extra veggies, spicier cheese, or your favorite toppings.
Happy cooking!
Frequently Asked Questions
Can I Make This Gluten-Free and Dairy-Free Simultaneously?
Yes—you can. I’d choose certified gluten-free corn tortillas and sauce, swap dairy cheeses for melty vegan shreds, and use avocado or cashew crema. I’d bake until bubbling, then shower cilantro and lime—warm, cozy, and safe.
What Sides Pair Well for a High-Protein Meal?
For high-protein sides, I’d pair cilantro-lime quinoa, smoky chipotle pinto beans, and a zesty cabbage slaw with pumpkin seeds. I’d add grilled chicken or tofu strips—warm, savory ribbons—nestled alongside, turning your plate into a cozy, satisfying spread.
How Do I Prevent Tortillas From Cracking?
Warm them first. I wrap tortillas in a damp towel and microwave briefly, or kiss them on a hot skillet. I keep them covered, brush with sauce or oil, and stack gently—soft, pliant, no cracks.
Can I Cook It in a Slow Cooker?
Yes—you can. I’d layer sauce, tortillas, and filling in the slow cooker, then cook on low 3–4 hours. I’d finish uncovered 15 minutes, sprinkle cheese, let it melt, rest briefly, and serve steaming.
How Can I Reduce the Sodium Content?
Use no-salt beans, low-sodium sauce, and rinse everything well. I’ll salt last, tasting under warm lamplight. Swap queso fresco for a sprinkle of sharp cheddar, add lime, cumin, smoked paprika—flavor blooms while sodium tiptoes.

Black Bean Enchilada Casserole
Equipment
- 1 9×13 inch baking dish
- 1 large skillet
- 1 medium mixing bowl
- 1 Cutting board
- 1 Chef's knife
- 1 Wooden spoon
- 1 Measuring cups set
- 1 Measuring spoons set
- 1 aluminum foil sheet
Ingredients
- 2 tablespoon olive oil
- 1 medium yellow onion diced
- 1 red bell pepper diced
- 3 clove garlic minced
- 2 can black beans 15 ounces each, drained and rinsed
- 1 cup corn kernels frozen or canned, drained if canned
- 1 can diced green chiles 4 ounces, mild
- 2 teaspoon ground cumin
- 1 teaspoon chili powder
- 1 teaspoon smoked paprika
- 1 teaspoon kosher salt
- 1/2 teaspoon black pepper
- 2 cup red enchilada sauce divided
- 8 corn tortillas 6-inch, halved
- 2 cup shredded Monterey Jack cheese
- 1/2 cup crumbled queso fresco optional
- 1/4 cup fresh cilantro chopped
- 1 lime cut into wedges, for serving
- 1 avocado sliced, optional garnish
Instructions
- Preheat the oven to 375°F (190°C) and lightly oil the 9×13-inch baking dish.
- Heat olive oil in a large skillet over medium heat and sauté onion and bell pepper until softened, about 5 minutes.
- Add garlic and cook until fragrant, about 30 seconds.
- Stir in black beans, corn, green chiles, cumin, chili powder, smoked paprika, salt, and pepper, and cook for 2 minutes to warm through.
- Spread 1/2 cup enchilada sauce over the bottom of the baking dish.
- Arrange a layer of tortilla halves to cover the sauce, slightly overlapping.
- Spoon half of the bean mixture over the tortillas and sprinkle with 2/3 cup Monterey Jack cheese.
- Add another 1/2 cup enchilada sauce over the filling.
- Repeat with another layer of tortillas, the remaining bean mixture, and 2/3 cup Monterey Jack cheese.
- Top with a final layer of tortillas, spread the remaining enchilada sauce, and sprinkle the remaining Monterey Jack and queso fresco if using.
- Cover the baking dish loosely with foil and bake for 20 minutes.
- Remove the foil and bake for an additional 10 minutes until the cheese is bubbly and lightly browned.
- Let the casserole rest for 10 minutes, then garnish with cilantro and avocado slices.
- Cut into squares and serve with lime wedges.
Notes

Cynthia Weatherford is a seasoned chef and culinary enthusiast who serves as the Recipe creator of Somonday. With decades of experience in the kitchen and a passion for exploring diverse cuisines, Cynthia brings a blend of creativity and technique to every dish. Known for transforming simple ingredients into show-stopping meals, Cynthia believes that cooking is an art form anyone can master. Dedicated to inspiring home cooks, Cynthia shares approachable recipes, pro tips, and culinary wisdom to make every meal memorable.