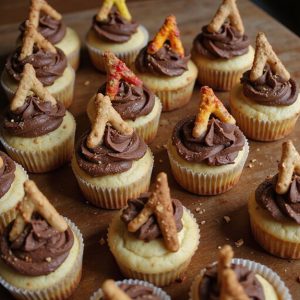
Picture a tray of cupcakes that look like tiny campfires, flickering with swirls of toasted “flames” and rich chocolate “logs.”
These bonfire cupcakes are a cozy dessert that tastes as magical as they look—soft, moist cake crowned with fluffy, marshmallowy frosting and a hint of smoky caramel.
They come together faster than a full-blown baking project, making them perfect for busy weeknights, last-minute cravings, or easy entertaining.
They’re ideal for families, sweet-tooth fans, and beginners who want a showstopping treat without complicated steps.
I first made them on a chilly Sunday when our outdoor firepit plans got rained out. Instead of cancelling, we gathered around the kitchen island, decorating cupcakes and telling stories as if we were around real flames. It turned disappointment into one of our coziest evenings.
They shine at fall gatherings, birthday parties, or any cold evening that needs warmth. Ready to bring this dish to life?
Why You’ll Love It
- Delivers playful, campfire-inspired cupcakes perfect for parties and celebrations
- Uses simple pantry staples and basic equipment most kitchens already have
- Offers fun, creative decorating that kids and adults enjoy doing together
- Adapts easily with different cookie “coals” or flavored buttercreams
- Looks impressively bakery-style without needing advanced cake-decorating skills
Ingredients
- 190 g all-purpose flour, sifted — measure after sifting for accuracy
- 150 g granulated sugar — standard white sugar works best
- 2 tsp baking powder — make sure it’s fresh for proper rise
- 0.25 tsp fine salt — balances sweetness and flavor
- 120 ml whole milk, room temperature — cold milk can toughen the crumb
- 80 ml vegetable oil — neutral oil like canola or sunflower
- 2 large eggs, room temperature — room temp helps batter emulsify
- 1.5 tsp vanilla extract — real vanilla gives better aroma
- 30 g unsalted butter, melted and cooled — don’t add while hot
- 200 g unsalted butter, softened — for buttercream, should be pliable
- 300 g powdered sugar, sifted — prevents lumpy frosting
- 2 tbsp heavy cream or milk — adjust for desired buttercream consistency
- 0.5 tsp vanilla extract — flavors the buttercream
- 1 pinch fine salt — sharpens the buttercream’s sweetness
- 2 tbsp unsweetened cocoa powder — creates “embers” chocolate frosting
- Red gel food coloring, as needed — gel keeps buttercream thick
- Orange gel food coloring, as needed — for mid-tone flames
- Yellow gel food coloring, as needed — base color of the flames
- 6 plain breadsticks or thin wafer sticks, halved — become “campfire logs”
- 4 plain digestive biscuits or graham crackers, crushed — for “ash and embers” crumbs
Step-by-Step Method
Preheat and Prepare Tin
Preheat the oven to 180°C. Line a standard 12-cup muffin tin with paper cupcake liners. Set the tin aside.
Make sure ingredients like milk, eggs, and butter are at room temperature. Sift the flour in advance so it’s ready. Clear your workspace and gather all bowls, whisk, and mixer before starting to streamline the process.
Combine Dry Ingredients
Whisk together the flour, baking powder, and salt in a medium bowl.
Make sure they’re evenly combined to avoid uneven rising. Break up any lumps with the whisk. Set this bowl aside. Keeping dry ingredients well mixed helps create a uniform batter and consistent texture in every cupcake after baking.
Mix Wet Base
In a large mixing bowl, whisk the sugar, milk, vegetable oil, eggs, vanilla extract, and melted, cooled butter until smooth.
Make sure the mixture is fully combined with no streaks of egg or oil. A smooth wet base helps the dry ingredients incorporate evenly, leading to tender cupcakes with a fine crumb structure.
Combine Batter Gently
Add the dry ingredients to the wet mixture.
Whisk gently just until the flour disappears and no dry streaks remain. Avoid overmixing to prevent tough cupcakes. Use a rubber spatula to scrape down the sides and bottom. Stop as soon as the batter looks uniform and smooth for the best, light texture.
Fill and Bake Cupcakes
Divide the batter evenly among the 12 lined cups, filling each about two-thirds full.
Place the tin in the preheated oven. Bake for 16–18 minutes. Check doneness by inserting a toothpick into the center; it should come out clean or with a few moist crumbs, but no wet batter.
Cool Completely
Transfer the muffin tin to a wire rack. Let the cupcakes cool in the pan for 5 minutes to set.
Remove each cupcake from the tin and place directly on the rack. Cool completely for about 25 minutes. Make sure they’re fully cool before frosting to prevent buttercream from melting or sliding.
Beat Butter for Frosting
Place softened butter in a large mixing bowl. Beat with an electric mixer on medium speed until pale and fluffy, about 3 minutes.
Scrape down the sides as needed. Properly aerating the butter creates a light, smooth base for the buttercream, making it easier to pipe realistic flames later.
Add Sugar and Cream
Gradually add the sifted powdered sugar on low speed to avoid a cloud of sugar.
Once incorporated, beat in the vanilla, pinch of salt, and cream or milk. Increase speed and whip until light and smooth. Adjust consistency with a tiny splash more cream if needed, keeping the frosting firm enough to hold shape.
Make Chocolate Embers Frosting
Transfer about one-third of the buttercream to a small bowl. Add the cocoa powder. Mix until fully combined and evenly colored.
Taste and adjust cocoa if desired for a deeper chocolate flavor. This darker buttercream forms the “embers” base, giving contrast under the flames and biscuit “ash” on each cupcake.
Color Flame Buttercreams
Divide the remaining plain buttercream into three small bowls. Tint each bowl with red, orange, or yellow gel food coloring.
Start with a little color and add more gradually. Mix well until no streaks remain. Aim for vibrant shades. These three colors will layer together to create realistic bonfire flames.
Pipe Embers Base
Spoon the chocolate buttercream into a piping bag fitted with a large round or star tip. Pipe a flat spiral or small mound onto each cooled cupcake top.
Cover most of the surface. This base represents glowing embers and gives structure for the “logs” and flames to sit on securely during decoration.
Add Ash and Logs
Sprinkle crushed biscuits over the chocolate frosting to resemble ash and coals. Press lightly so the crumbs adhere.
Break breadsticks or wafer sticks in half. Arrange 3–4 small pieces upright or leaning together in the center of each cupcake like a campfire teepee of logs for visual height.
Pipe Yellow Flame Layer
Fill one piping bag with yellow buttercream, using a small or large round or star tip.
Pipe short flicks and small peaks around and between the logs, focusing on the base area. Keep movements quick and upward. This yellow layer forms the inner, hottest part of the flames and sets the foundation.
Add Orange and Red Flames
Fill separate piping bags with orange and red buttercreams. Pipe orange flicks slightly above and between the yellow flames.
Finish with smaller red peaks near the tips for depth and realism. Layer colors without overcovering the logs. Adjust biscuit crumbs and logs as needed to balance each bonfire design.
Chill and Serve
Place the decorated cupcakes in the fridge for 10–15 minutes to slightly firm the buttercream.
This helps the flames hold their shape and makes transport easier. Store cupcakes in an airtight container. Serve at cool room temperature so the cake is soft and the buttercream creamy when eaten.
Ingredient Swaps
- Use cake flour for a softer crumb, or swap ⅓ of the flour for cocoa powder for chocolate cupcakes (reduce sugar slightly if desired).
- Dairy-free: replace milk and cream with oat/soy milk and butter with vegan block “butter”; guarantee biscuits and sticks are dairy‑free.
- Egg-free: use 2 flax eggs (2 tbsp ground flax + 6 tbsp water) or a commercial egg replacer.
- Budget/availability: any neutral oil (sunflower, canola) works; use regular liquid food coloring if needed but add gradually so the buttercream doesn’t loosen too much.
- For biscuits and “logs,” use any plain cookies/crackers and pretzel sticks or rolled wafers available locally.
You Must Know
– Doneness • If the cupcakes dome or sink a lot: Lightly tap the top at 15 minutes; they’re ready when the centers spring back and a tester has only a few moist crumbs, not wet batter.
Pulling them once they pass this “spring test” (usually 16–18 minutes at 180°C) helps prevent collapse or dry crumb.
– Troubleshoot • When your buttercream looks split or grainy****: Warm the bowl bottom with your hands or a warm towel for 10–20 seconds, then beat on medium until it comes together.
Slightly warming helps the fat and sugar re-emulsify so it turns smooth and fluffy again.
– Avoid • For buttercream that holds flame shapes: Work with it cool but pliable—about 18–21°C; if it feels loose or glossy, chill 5–10 minutes, then beat briefly.
Firmer buttercream keeps the flame “flicks” sharp instead of slumping after a few minutes.
– Scale • To make 24 cupcakes: Use 2× all ingredients (e.g., 380 g flour, 300 g sugar, 400 g butter total) but keep the oven temperature at 180°C and check doneness starting at 15 minutes.
Doubling ingredients, not time or temp, preserves texture and rise.
– Flavor Boost • For deeper “campfire” vibes: Add 1–2 tsp instant espresso or 10 g extra cocoa to the chocolate portion, and a tiny pinch (1–2 grains) of flaky salt over the “embers.”
The bitterness and salt sharpen the chocolate and make the sweetness taste more complex.
Serving Tips
- Serve on a wooden board sprinkled with extra “ash” crumbs for campfire vibes.
- Pair with hot chocolate or spiced apple cider for a cozy autumn treat.
- Add toasted marshmallows or mini marshmallows on the side for s’mores-inspired fun.
- Arrange cupcakes in a circle with a candle-lit lantern centerpiece for parties.
- Label each flavor accent (espresso, extra cocoa, etc.) on small handwritten tags.
Storage & Make-Ahead
Bonfire cupcakes keep 2–3 days in an airtight container in the fridge.
Bring to room temperature before serving for the best texture.
You can bake the cupcakes a day ahead and frost later.
They freeze well (undecorated or fully decorated) for up to 2 months.
Thaw overnight in the fridge.
Reheating
Reheat cupcakes gently: microwave 5–10 seconds (unwrapped) until just soft, not hot.
Or warm in a 150°C oven for 5–8 minutes, loosely tented with foil.
Avoid stovetop reheating.
Bonfire Cupcakes at Parties
Whenever I’m planning a cozy gathering, I treat bonfire cupcakes as both dessert and centerpiece. I cluster them on a wooden board, tuck in a few sprigs of rosemary “pine,” and scatter extra biscuit “ashes” so the whole spread looks like a miniature campsite. Guests always drift toward them, curious before they even take a bite.
For kids’ parties, I set out plain cupcakes, bowls of crumbs, “logs,” and colored buttercreams, then guide everyone as they build their own flames. For adults, I prep them ahead and focus on presentation—dim lights, twinkle strands, maybe a plaid table runner. I keep a few undecorated cupcakes nearby for anyone who prefers less frosting but still wants in on the bonfire theme.
Final Thoughts
Give these bonfire cupcakes a try for your next cozy gathering or celebration—they’re simpler to decorate than they look and always impress.
Feel free to play with flavors, colors, and toppings to make your own unique “campfire” creation.
Frequently Asked Questions
Can I Turn These Bonfire Cupcakes Into a Full-Size Campfire Cake?
You absolutely can. I’d bake this batter as an 8‑inch layer cake, frost the top with “ember” buttercream and crumbs, then stack breadstick logs and swirl fiery red‑orange‑yellow flames high for a dramatic campfire centerpiece.
Are There Gluten-Free Adaptations Specifically Tested for This Bonfire Cupcake Design?
No, I haven’t personally tested a gluten‑free version yet. I’d swap in a 1:1 gluten‑free baking flour, use certified GF biscuits and sticks, then test one cupcake first to confirm structure and crumble.
How Can Kids Safely Help Decorate the Bonfire Flames and “Logs”?
Kids can safely help by piping soft flames with wide tips, while you steady their hands. I’d let them press in pre-snapped wafer “logs,” sprinkle crumbs, and keep sharp tools, hot trays, and food-coloring bottles under your control.
What Drinks Pair Best With Bonfire Cupcakes for Autumn Gatherings?
I’d pour spiced apple cider, smoky black tea, or creamy hot chocolate for you. They echo autumn’s warmth, balance the sweetness, and invite lingering conversation by the fire’s glow, especially with a splash of bourbon or cinnamon.
Can I Ship Bonfire Cupcakes Without Ruining the Flame Decorations?
You can, but only with care. I’d chill them firm, pipe slightly shorter flames, nestle each cupcake in a snug insert, add cold packs, ship overnight, and warn the recipient to unpack upright immediately.
Bonfire Cupcakes
Equipment
- 1 standard 12-cup muffin tin
- 12 paper cupcake liners
- 2 medium mixing bowls
- 1 large mixing bowl
- 1 Whisk
- 1 electric mixer or stand mixer
- 1 Rubber spatula
- 1 wire cooling rack
- 3 piping bags
- 3 piping tips (1 large round, 1 large star, 1 small round)
- 1 toothpick or cake tester
- 1 Oven
Ingredients
- 190 gram all-purpose flour sifted
- 150 gram granulated sugar
- 2 teaspoon baking powder
- 1/4 teaspoon fine salt
- 120 milliliter whole milk room temperature
- 80 milliliter vegetable oil
- 2 large eggs room temperature
- 3/2 teaspoon vanilla extract
- 30 gram unsalted butter melted and cooled
- 200 gram unsalted butter for buttercream; softened
- 300 gram powdered sugar for buttercream; sifted
- 2 tablespoon heavy cream or milk for buttercream
- 1/2 teaspoon vanilla extract for buttercream
- 1 pinch fine salt for buttercream
- 2 tablespoon unsweetened cocoa powder
- 1 Red gel food coloring as needed
- 1 Orange gel food coloring as needed
- 1 Yellow gel food coloring as needed
- 6 plain breadsticks or thin wafer sticks halved
- 4 plain digestive biscuits or graham crackers crushed
Instructions
- Preheat the oven to 180°C and line the muffin tin with paper cupcake liners.
- In a medium bowl whisk together flour, baking powder, and salt until well combined.
- In a large mixing bowl whisk sugar, milk, vegetable oil, eggs, vanilla extract, and melted butter until smooth.
- Add the dry ingredients to the wet ingredients and whisk gently until just combined and no dry streaks remain.
- Divide the batter evenly among the 12 cupcake liners, filling each about two-thirds full.
- Bake the cupcakes for 16–18 minutes or until a toothpick inserted in the center comes out clean.
- Transfer the tin to a wire rack and let the cupcakes cool in the pan for 5 minutes.
- Remove the cupcakes from the tin and cool completely on the wire rack for about 25 minutes.
- To make the buttercream, beat the softened butter with an electric mixer on medium speed until pale and fluffy, about 3 minutes.
- Gradually add the powdered sugar, mixing on low speed until incorporated, then beat in the vanilla, salt, and cream until light and smooth.
- Transfer about one-third of the buttercream to a small bowl and mix in the cocoa powder until evenly combined to make chocolate “embers” frosting.
- Divide the remaining plain buttercream into three small bowls and color each one with red, orange, or yellow gel coloring to create flame colors.
- Spoon the chocolate buttercream into a piping bag fitted with a large round or star tip.
- Pipe a flat spiral or small mound of chocolate buttercream onto the top of each cooled cupcake.
- Sprinkle crushed biscuits over the chocolate buttercream to resemble ash and embers.
- Arrange 3–4 small pieces of breadsticks or wafer sticks in the center of each cupcake like a teepee or campfire logs.
- Fill separate piping bags fitted with small or large round or star tips with the red, orange, and yellow buttercreams.
- Pipe short flicks and small peaks of colored buttercream between and around the “logs,” layering the colors to resemble flames.
- Adjust or add more biscuit crumbs and logs if needed to balance the look of each bonfire cupcake.
- Chill the decorated cupcakes for 10–15 minutes to slightly firm the buttercream before serving, if desired.
Notes

Cynthia Weatherford is a seasoned chef and culinary enthusiast who serves as the Recipe creator of Somonday. With decades of experience in the kitchen and a passion for exploring diverse cuisines, Cynthia brings a blend of creativity and technique to every dish. Known for transforming simple ingredients into show-stopping meals, Cynthia believes that cooking is an art form anyone can master. Dedicated to inspiring home cooks, Cynthia shares approachable recipes, pro tips, and culinary wisdom to make every meal memorable.