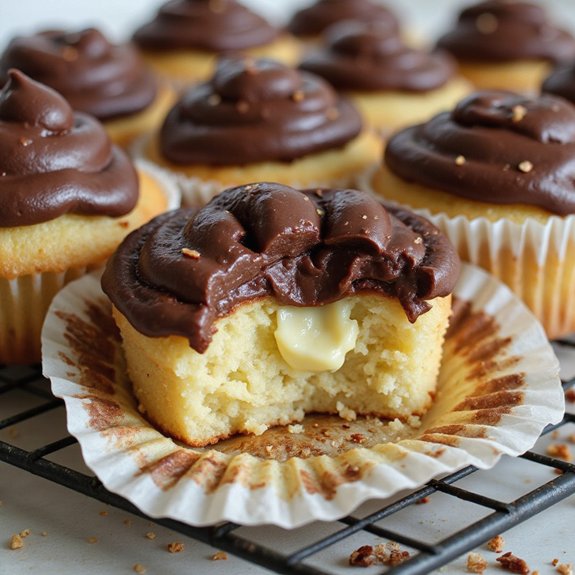
There’s something about cracking into a glossy chocolate shell and finding cool, silky custard tucked inside a tender vanilla cupcake that feels like instant celebration.
These Boston Cream Pie Cupcakes are a cozy, nostalgic dessert in handheld form—soft golden crumbs, creamy centers, and a rich, shiny ganache on top.
They’re surprisingly quick to pull together, making them perfect for busy weeknights, last-minute cravings, or easy entertaining.
They’ve saved me more than once—like the rainy Sunday my friends dropped by unannounced.
I whipped up a batch, filled them while we chatted at the table, and by the time the coffee finished brewing, we’d warm, bakery-worthy treats that made the gray day feel special.
Ideal for sweet-tooth fans, families, and even beginner bakers, these cupcakes shine at birthday gatherings, potlucks, or simple Sunday suppers. Ready to bring this dish to life?
Why You’ll Love It
- Delivers classic Boston cream pie flavor in perfectly portioned cupcakes
- Combines tender vanilla cake, silky pastry cream, and rich ganache
- Impresses guests without requiring advanced baking skills or equipment
- Makes ahead easily for parties, potlucks, and holiday dessert tables
- Adapts well to decorations for birthdays, showers, or special occasions
Ingredients
- 1 1/2 cups all-purpose flour — measure with spoon-and-level for accuracy
- 1 1/2 teaspoons baking powder — make sure it’s fresh for proper rise
- 1/4 teaspoon fine sea salt — balances sweetness and flavor
- 1/2 cup unsalted butter, softened — leave at room temp until easily indented
- 3/4 cup granulated sugar — standard white sugar works best here
- 2 large eggs, room temperature — helps batter emulsify smoothly
- 2 teaspoons vanilla extract — use pure vanilla for best flavor
- 1/2 cup whole milk, room temperature — fat content keeps cupcakes tender
- 1 1/4 cups whole milk — forms the creamy base for the custard
- 3 large egg yolks — enrich and thicken the pastry cream
- 1/3 cup granulated sugar — sweetens without overpowering vanilla
- 2 tablespoons cornstarch — key thickener for stable pastry cream
- 1 tablespoon unsalted butter — adds silkiness and richness
- 1 teaspoon vanilla extract — classic Boston cream flavor note
- 1/8 teaspoon fine sea salt — sharpens the custard’s sweetness
- 1/2 cup semi-sweet chocolate chips — choose a good-quality brand for smooth melt
- 1/2 cup heavy cream — at least 36% fat for glossy ganache
- 1 teaspoon corn syrup (optional) — adds shine and slightly softer set
Step-by-Step Method
Preheat and Prepare the Pan
Preheat the oven to 350°F (175°C). Line a standard 12-cup muffin tin with paper cupcake liners to prevent sticking and guarantee easy removal. Set the pan aside.
This step lets the oven reach the correct temperature while you mix the batter, helping the cupcakes rise evenly and bake consistently.
Mix Dry Ingredients
Whisk together the all-purpose flour, baking powder, and fine sea salt in a medium bowl. Break up any lumps and fully combine the leavening and salt with the flour. Set this bowl aside.
Keeping dry ingredients separate first guarantees even distribution, which helps the cupcakes rise uniformly and maintain a tender crumb.
Cream Butter and Sugar
Beat the softened unsalted butter and granulated sugar in a large bowl using a hand mixer or stand mixer. Mix for 2 to 3 minutes until the mixture looks light, pale, and fluffy.
Incorporate air as you beat. This creaming step helps create a soft, tender cupcake texture once baked.
Add Eggs and Vanilla
Add the eggs one at a time to the butter mixture, beating well after each addition. Guarantee each egg is fully incorporated before adding the next. Mix in the vanilla extract until smooth.
Scrape down the sides of the bowl as needed. This helps create a smooth, cohesive batter without lumps.
Combine Wet and Dry Mixtures
Add the dry ingredients to the butter mixture in two additions, alternating with the milk. Begin and end with the dry ingredients. Mix on low speed just until combined after each addition.
Avoid overmixing to prevent tough cupcakes. Stop when you no longer see streaks of flour in the batter.
Fill and Bake the Cupcakes
Divide the batter evenly among the 12 liners, filling each about two-thirds full. Tap the pan gently to remove air bubbles.
Bake for 18 to 20 minutes, until a toothpick inserted in the center comes out clean. Don’t overbake. Golden tops and springy centers indicate the cupcakes are done.
Cool the Cupcakes Completely
Transfer the muffin tin to a wire rack and let the cupcakes cool in the pan for 5 minutes. Carefully remove each cupcake from the tin and place directly on the rack.
Allow them to cool completely before filling. Warm cupcakes can melt the pastry cream and cause the ganache to slide off.
Heat Milk for Pastry Cream
Start the pastry cream while the cupcakes bake. Pour whole milk into a medium saucepan and heat over medium heat until steaming but not boiling. Watch closely and stir occasionally to prevent scorching.
Remove from heat once small bubbles appear around the edges. Properly warmed milk helps temper the eggs smoothly.
Whisk Yolks, Sugar, and Cornstarch
In a medium bowl, whisk together the egg yolks, granulated sugar, and cornstarch until the mixture is smooth and slightly pale. Ensure there are no lumps of cornstarch.
This forms the base of the pastry cream and thickens it as it cooks. Whisk vigorously to fully blend the ingredients.
Temper the Egg Mixture
Slowly pour about half of the hot milk into the yolk mixture while whisking constantly.
Add the milk in a thin stream to avoid scrambling the eggs. Continue whisking until the mixture is smooth and slightly warmed.
Tempering gradually raises the egg temperature, preventing curdling when returned to the saucepan.
Cook Until Thickened
Pour the tempered yolk mixture back into the saucepan with the remaining hot milk while whisking.
Cook over medium heat, whisking continuously, until the mixture thickens and just begins to bubble, 1 to 3 minutes.
Remove from heat immediately. The pastry cream should be thick, smooth, and able to coat the back of a spoon.
Finish and Chill the Pastry Cream
Whisk in the butter, vanilla extract, and salt until completely smooth. Transfer the hot pastry cream to a small bowl.
Press plastic wrap directly onto the surface to prevent a skin from forming. Chill in the refrigerator for at least 1 hour. Proper chilling allows the cream to firm up for clean piping.
Prepare the Ganache Base
Place the semi-sweet chocolate chips in a small heatproof bowl. Use good-quality chocolate for the best flavor and texture. Set the bowl aside.
Measure the heavy cream and optional corn syrup separately. Having everything ready makes the ganache process smooth and prevents the chocolate from cooling too quickly.
Heat Cream and Combine
Heat the heavy cream in a small saucepan over medium heat until just simmering, with small bubbles forming around the edges. Don’t let it boil. Immediately pour the hot cream over the chocolate chips.
Let the mixture sit undisturbed for 2 minutes to soften the chocolate before whisking.
Whisk Ganache and Cool
Add corn syrup, if using, then whisk the cream and chocolate together until smooth and glossy. Ensure there are no unmelted bits.
Let the ganache cool at room temperature for 15 to 20 minutes, until slightly thickened but still pourable. If too thin, let it sit longer; if too thick, gently rewarm.
Core the Cooled Cupcakes
Guarantee the cupcakes are completely cool. Use a small knife or the wide end of a piping tip to cut a small cone-shaped piece from the center of each cupcake.
Don’t cut all the way through to the bottom. Reserve the removed cake plugs. These will be trimmed and used to cover the filling later.
Fill with Pastry Cream
Transfer the chilled pastry cream to a piping bag or a zip-top bag with a corner snipped off. Pipe the cream into each cupcake cavity until nearly full.
Avoid overfilling so the tops can sit flat. The pastry cream should be thick, smooth, and hold its shape inside the cupcakes.
Replace the Cake Tops
Trim the reserved cake cones so they’re thin enough to sit flush on the cupcake surface. Gently press a piece back over each filled center to seal the pastry cream inside.
This creates a smooth base for the ganache and keeps the filling from oozing out when you bite into the cupcake.
Dip in Ganache and Set
Spoon or gently dip the top of each cupcake into the cooled ganache, allowing excess to drip off. Place the glazed cupcakes back on the wire rack.
Let the ganache set at room temperature for 20 to 30 minutes before serving. The topping should firm up slightly yet remain soft and silky.
Ingredient Swaps
- Use plant-based butter, dairy-free milk, and coconut cream in the ganache for a fully dairy-free version; swap pastry cream milk with a rich non-dairy milk plus a bit of extra cornstarch to thicken.
- For gluten-free, replace all-purpose flour with a 1:1 gluten-free baking blend that contains xanthan gum.
- If you don’t have heavy cream, use evaporated milk or half-and-half for ganache (reduce slightly or add a few extra chocolate chips).
- In place of semi-sweet chocolate chips, use chopped chocolate bars (50–60% cacao), and if corn syrup isn’t available, substitute honey or leave it out entirely.
You Must Know
– Scale – To double the batch (24 cupcakes), multiply every ingredient by 2 but keep the oven temperature the same and extend the total cupcake time only slightly, checking for doneness at 17 minutes and then every 2 minutes so they don’t dry out.
Serving Tips
- Serve on a white platter, garnished with fresh berries for color contrast.
- Add a dollop of lightly sweetened whipped cream beside each cupcake.
- Drizzle extra warm ganache on the plate before setting the cupcake down.
- Pair with hot coffee or espresso to balance the rich pastry cream and chocolate.
- For parties, display on a tiered stand with small “Boston Cream” label tags.
Storage & Make-Ahead
Boston cream pie cupcakes keep in the fridge, covered, for up to 2 days.
Let sit 15–20 minutes at room temperature before serving for best texture.
You can make pastry cream and ganache a day ahead.
Cupcakes freeze (unfilled, unfrosted) up to 2 months.
Thaw, then fill and top.
Reheating
Reheat gently to preserve texture.
Microwave 10–15 seconds, or warm in a 300°F (150°C) oven for 5–8 minutes.
Avoid stovetop direct heat.
Keep ganache from overheating or melting.
Boston Dessert Shop Traditions
Most afternoons, I can still picture myself ducking into a tiny Back Bay bakery, escaping the wind and following the smell of warm vanilla and chocolate.
The glass case always held a proud row of Boston cream pies, their glossy ganache reflecting the soft overhead lights like a city skyline after rain.
I’d watch the baker split sponge cakes in one swift motion, spoon in cool pastry cream, then finish with a slow pour of warm chocolate. No rush, just ritual.
Around me, people lingered with coffee, tapping crumbs from paper napkins, trading stories between bites.
Those shops taught me that Boston desserts aren’t flashy—they’re comforting, a little old‑fashioned, and always layered with memory, like our cupcakes.
Final Thoughts
Give these Boston Cream Pie Cupcakes a try and enjoy all the classic flavors in a fun, handheld treat.
Feel free to tweak the filling, chocolate, or even the cake flavor to make them your own!
Frequently Asked Questions
Can I Make These Cupcakes Gluten-Free Without Compromising Texture?
You can, and I’d use a good 1:1 gluten-free blend with xanthan gum. I picture you whisking in a warm kitchen, batter silky, cupcakes rising gently—just like when I first baked gluten-free for my sister.
How Can I Adapt This Recipe for a Dairy-Free Diet?
You can swap butter and milk with rich oat milk and vegan butter, use coconut milk for ganache and pastry cream. I’ve served this version at winter gatherings; nobody noticed, they just asked for seconds.
Are There Kid-Friendly Variations or Decorations for Parties?
You can absolutely make kid-friendly variations—I’d swirl rainbow sprinkles into the ganache, top each with gummy bears or mini cookies, and once added tiny flags with kids’ names; my nieces squealed seeing “their” cupcakes lined up.
What’s the Best Way to Transport These Filled Cupcakes Safely?
I tuck them in a snug cupcake carrier, chill them first, and avoid stacking. I’ve even wedged parchment around each one—like little seatbelts—so they arrive looking party‑ready, not like they hit a sugar storm.
Can I Scale This Recipe for a Large Crowd or Bake Sale?
You can absolutely scale this; I’ve doubled and tripled it for bake sales. I batch the cupcakes, then make pastry cream and ganache in separate big pots, cooling pans on every surface like a tiny bakery.

Boston Cream Pie Cupcakes
Equipment
- 1 standard 12-cup muffin tin
- 12 paper cupcake liners
- 2 medium mixing bowls
- 2 small mixing bowls
- 1 large mixing bowl
- 1 Medium saucepan
- 1 Small saucepan
- 1 Whisk
- 1 hand mixer or stand mixer
- 1 Rubber spatula
- 1 Wooden spoon
- 1 piping bag or zip-top bag
- 1 small round piping tip optional
- 1 wire cooling rack
- 1 Oven
Ingredients
- 1 1/2 cup all-purpose flour
- 1 1/2 teaspoon baking powder
- 1/4 teaspoon fine sea salt
- 1/2 cup unsalted butter softened
- 3/4 cup granulated sugar
- 2 large eggs room temperature
- 2 teaspoon vanilla extract
- 1/2 cup whole milk room temperature
- 1 1/4 cup whole milk
- 3 large egg yolks
- 1/3 cup granulated sugar
- 2 tablespoon cornstarch
- 1 tablespoon unsalted butter
- 1 teaspoon vanilla extract
- 1/8 teaspoon fine sea salt
- 1/2 cup semi-sweet chocolate chips
- 1/2 cup heavy cream
- 1 teaspoon corn syrup for shine; optional
Instructions
- Preheat the oven to 350°F (175°C) and line a 12-cup muffin tin with paper liners.
- In a medium bowl whisk together the flour, baking powder, and salt, then set aside.
- In a large bowl beat the softened butter and sugar with a mixer until light and fluffy, about 2 to 3 minutes.
- Add the eggs one at a time, beating well after each addition, then mix in the vanilla extract.
- Add the dry ingredients to the butter mixture in two additions, alternating with the milk, beginning and ending with dry ingredients, mixing just until combined.
- Divide the batter evenly among the 12 liners, filling each about two-thirds full.
- Bake the cupcakes for 18 to 20 minutes, or until a toothpick inserted in the center comes out clean.
- Transfer the pan to a wire rack and let the cupcakes cool in the pan for 5 minutes, then remove them to the rack to cool completely.
- While the cupcakes bake, start the pastry cream by heating the milk in a medium saucepan over medium heat until steaming but not boiling.
- In a medium bowl whisk together the egg yolks, sugar, and cornstarch until smooth and pale.
- Slowly whisk about half of the hot milk into the yolk mixture to temper it, whisking constantly.
- Pour the tempered yolk mixture back into the saucepan with the remaining milk while whisking.
- Cook over medium heat, whisking constantly, until the mixture thickens and just starts to bubble, 1 to 3 minutes.
- Remove from heat and whisk in the butter, vanilla extract, and salt until smooth.
- Transfer the pastry cream to a small bowl, press plastic wrap directly onto the surface, and chill in the refrigerator for at least 1 hour.
- For the ganache, place the chocolate chips in a small heatproof bowl.
- Heat the heavy cream in a small saucepan over medium heat until just simmering, then remove from heat.
- Pour the hot cream over the chocolate chips, let sit for 2 minutes, then add corn syrup if using and whisk until smooth and glossy.
- Let the ganache cool to room temperature until it thickens slightly but is still pourable, about 15 to 20 minutes.
- Once the cupcakes are completely cool, use a small knife or the end of a piping tip to cut a small cone-shaped hole in the center of each cupcake, reserving the tops.
- Fill a piping bag or zip-top bag with the chilled pastry cream and pipe it into each cavity, filling nearly to the top.
- Trim the reserved cake plugs and gently place a thin piece back over each filled center to seal.
- Spoon or dip the top of each cupcake into the cooled ganache, allowing excess to drip off, then place back on the rack.
- Let the ganache set at room temperature for at least 20 to 30 minutes before serving.
Notes

Cynthia Weatherford is a seasoned chef and culinary enthusiast who serves as the Recipe creator of Somonday. With decades of experience in the kitchen and a passion for exploring diverse cuisines, Cynthia brings a blend of creativity and technique to every dish. Known for transforming simple ingredients into show-stopping meals, Cynthia believes that cooking is an art form anyone can master. Dedicated to inspiring home cooks, Cynthia shares approachable recipes, pro tips, and culinary wisdom to make every meal memorable.