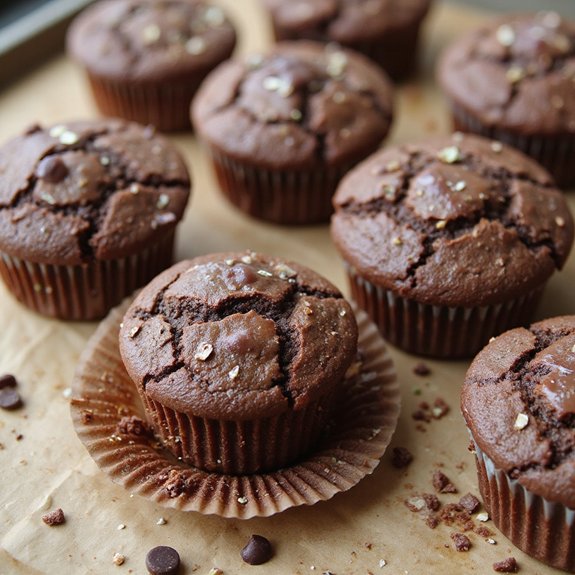
There’s something about peeling back a cupcake wrapper and seeing that deep, glossy chocolate crumb waiting beneath.
These brownie cupcakes are the best of both worlds: the crackly top of a classic brownie with the soft, fudgy center of a cozy dessert, all in neat little hand-held portions.
They’re quick enough for last-minute cravings—mixed, baked, and cooled in under an hour—yet special enough to feel like a treat.
They’re perfect for sweet-tooth fans, busy families, and baking beginners who want guaranteed success without fuss.
I still remember a rainy Tuesday when a long day left everyone drained; a single batch of these warm, chocolatey cupcakes turned our quiet evening into an impromptu “mini party” at the kitchen table.
They shine at birthday gatherings, casual potlucks, or Sunday suppers when you need a simple crowd-pleaser. Ready to bring this dish to life?
Why You’ll Love It
- Delivers bold chocolate flavor with a rich, brownie-like center
- Combines cupcake convenience with classic, fudgy brownie goodness
- Uses simple pantry staples and straightforward, beginner-friendly steps
- Bakes in under 20 minutes for fast, crowd-pleasing desserts
- Stays moist and soft, perfect for make-ahead treats and lunchboxes
Ingredients
- 115 g unsalted butter, melted — use good-quality butter for richer flavor
- 150 g semisweet chocolate chips, divided — choose chips that melt smoothly
- 150 g granulated sugar — standard white sugar works best here
- 50 g light brown sugar, packed — adds moisture and a hint of caramel
- 2 large eggs, room temperature — room temp helps them whisk up thicker
- 1 tsp vanilla extract — pure vanilla gives better aroma
- 95 g all-purpose flour — measure accurately to keep texture fudgy
- 25 g unsweetened cocoa powder — use natural cocoa for classic brownie taste
- 0.5 tsp fine salt — fine grain disperses evenly in the batter
- 0.25 tsp baking powder — just enough lift without losing fudginess
- 60 ml whole milk, room temperature — whole milk keeps the crumb tender
Step-by-Step Method
Preheat and Prepare Pan
Preheat the oven to 350°F (175°C). Line a 12-cup muffin tin with paper cupcake liners. Make certain the rack is in the center of the oven for even baking.
Lightly mist liners with nonstick spray if you prefer softer sides. Set the pan aside while you prepare the brownie batter.
Melt Butter and Chocolate
Place the butter and 100 g of the chocolate chips in a small microwave-safe bowl.
Heat in 20–30 second bursts, stirring thoroughly between each interval until completely smooth and glossy. Don’t overheat.
Let the mixture cool slightly so it doesn’t scramble the eggs later when combined.
Whisk Sugars and Eggs
In a medium mixing bowl, add the granulated sugar, brown sugar, eggs, and vanilla extract. Whisk vigorously until the mixture looks glossy, slightly thickened, and lighter in color.
Incorporate a bit of air, but don’t overbeat. This creates a rich, fudgy base and balances sweetness with the chocolate.
Combine Chocolate with Egg Mixture
Slowly pour the lukewarm melted chocolate-butter mixture into the sugar-egg mixture while whisking gently. Mix until fully combined and uniform in color.
Scrape down the sides of the bowl with a spatula to ensure no streaks remain. Avoid adding the chocolate while very hot to prevent cooking the eggs.
Mix Dry Ingredients
In a separate medium bowl, whisk together the flour, cocoa powder, salt, and baking powder. Break up any cocoa lumps and blend thoroughly so leavening is evenly distributed.
This prevents pockets of dry ingredients and ensures a consistent crumb in every cupcake. Set this dry mixture aside near your wet ingredients.
Fold Dry Into Wet
Add the dry ingredient mixture to the chocolate-egg mixture. Using a rubber spatula, fold gently just until a few streaks of flour remain.
Work from the bottom of the bowl upwards. Avoid vigorous stirring, which can develop gluten and make the cupcakes tough instead of soft and fudgy.
Add Milk and Smooth Batter
Pour in the room-temperature milk. Fold the batter again with the spatula until it’s smooth and no dry spots remain.
Scrape the bottom and sides of the bowl to incorporate everything evenly. Stop mixing as soon as the batter is uniform to maintain a tender texture in the finished cupcakes.
Stir in Remaining Chocolate Chips
Add the remaining 50 g of chocolate chips to the batter. Fold them in gently until they’re evenly distributed throughout.
Make sure not to overmix at this stage. The extra chips give melty chocolate pockets in each cupcake, enhancing both flavor and texture for a more indulgent bite.
Portion Batter into Liners
Using a spoon or measuring scoop, divide the batter evenly among the 12 prepared muffin cups. Fill each liner about two-thirds to three-quarters full to allow room for rising.
Level the tops slightly if needed. Tap the pan lightly on the counter to release any large air bubbles before baking.
Bake Until Just Set
Place the muffin tin on the center rack and bake for 16–18 minutes. Begin checking at 16 minutes.
Insert a toothpick into the center of a cupcake; it should come out with moist crumbs but no wet batter. Slight underbaking yields fudgier centers, while an extra minute or two gives a cakier texture.
Cool Briefly in Pan
Remove the pan from the oven and set it on a heatproof surface. Let the brownie cupcakes cool in the muffin tin for about 10 minutes.
This resting time helps them firm slightly and release more easily from the liners. Avoid removing them too early, as they’re delicate when very hot.
Transfer and Cool Completely
Carefully lift each cupcake from the pan and place on a wire cooling rack. Allow them to cool for another 10 minutes, or until just warm or room temperature.
Cool completely if you plan to frost them. Once cooled, enjoy immediately or store in an airtight container to keep them soft.
Ingredient Swaps
- Butter: Swap with equal amount of neutral oil for extra-moist cupcakes, or use vegan butter for dairy-free.
- Chocolate chips: Use chopped chocolate bars, milk chocolate, or dark chocolate; for dairy-free, choose vegan chocolate.
- Flour: Substitute with a 1:1 gluten‑free baking blend; avoid single flours like almond/coconut unless using a tested recipe.
- Milk: Use any unsweetened plant milk (soy, oat, almond) or 2% dairy milk with minimal texture change.
- Sugars: Brown sugar can be replaced with more granulated sugar; flavor will be slightly less caramelly.
You Must Know
– Flavor Boost – For deeper chocolate flavor, swap 15 g of the sugar for 15 g extra cocoa (total 40 g cocoa) and add 0.25 tsp instant espresso powder; they’ll look slightly darker when done and taste more intensely chocolaty without being coffee-flavored.
Serving Tips
- Top with vanilla ice cream and warm fudge sauce for a sundae-style dessert.
- Dust with powdered sugar and add fresh berries for a simple, elegant finish.
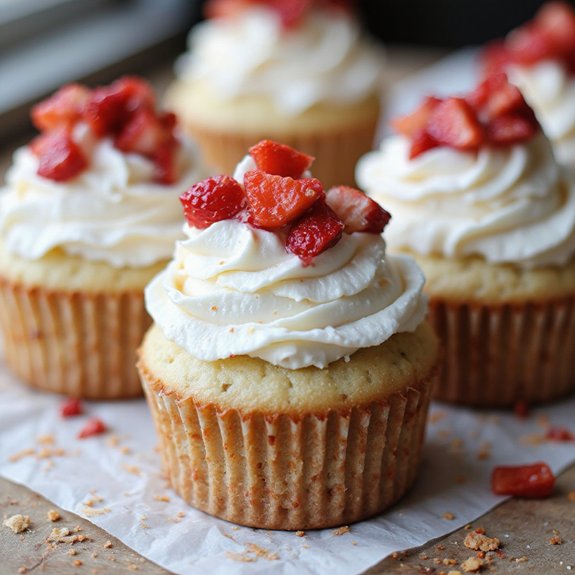
- Pipe on chocolate or cream cheese frosting, then sprinkle with mini chips or sprinkles.
- Serve slightly warm with a dollop of whipped cream and shaved chocolate.
- Plate trio-style: plain, frosted, and topped with fruit for a tasting flight.
Storage & Make-Ahead
Brownie cupcakes keep in the fridge for up to 5 days in an airtight container.
Bring to room temperature or warm briefly before serving.
Great for make-ahead: bake, cool completely, then freeze (well-wrapped) up to 2 months.
Thaw overnight in the fridge or at room temperature for a few hours.
Reheating
Reheat brownie cupcakes gently.
Microwave 5–10 seconds (single cupcake).
Oven at 300°F (150°C) for 5–8 minutes.
Or use a covered skillet on low heat briefly to warm through.
Brownie Cupcakes at Bake Sales
Whenever I’m setting up a bake sale table, I reach for brownie cupcakes because they look like classic cupcakes but promise that rich, fudgy bite everyone hopes for.
I line them up in neat rows, their crackly tops catching the light, and the air fills with the warm scent of cocoa and butter.
I’ve learned that clear labeling helps them disappear fast—“Extra Fudgy Brownie Cupcakes” with a quick note like “chewy edges, soft centers.”
I’ll stack them on tiered stands, so those glossy domes sit right at eye level.
If I’m selling different flavors, I keep these front and center. Kids point first, adults pretend to hesitate, but once they see those melty chocolate pockets, they’re sold.
Final Thoughts
Give these brownie cupcakes a try and enjoy them warm, fudgy, and straight from your own oven.
Feel free to tweak the mix-ins or add your favorite frosting to make them your perfect chocolate treat.
Frequently Asked Questions
Can I Make These Brownie Cupcakes Gluten-Free Without Compromising Texture?
Yes, you can. I’d swap the flour for a good 1:1 gluten‑free blend, sift it, and keep the batter slightly undermixed; you’ll still bite into a glossy, crackly top and dense, fudgy middle.
How Do High-Altitude Baking Adjustments Affect These Brownie Cupcakes?
You’ll tweak leavening, liquid, and bake time: I’d reduce baking powder slightly, add a tablespoon or two of milk, and bake hotter, shorter. You’ll get glossy tops, fragrant centers, and fudgy crumbs that don’t dry out.
Can I Turn This Recipe Into a Layered Brownie Cupcake Cake?
Yes, you can. I’d double the batter, bake it in two parchment-lined 8-inch pans, then stack with silky ganache or whipped cream, letting fudgy crumbs and glossy chocolate drip dramatically down the sides.
What Are Kid-Friendly Decorating Ideas for Brownie Cupcake Parties?
You can set up a DIY topping bar: I’d offer swirlable frosting, candy “confetti,” mini marshmallows, crushed cookies, and colorful sprinkles, then let kids pipe, dunk, and drizzle until their brownie towers look delightfully over-the-top.
How Can I Package Brownie Cupcakes Attractively for Gifting?
I’d tuck each one into a crinkly liner, nestle them in a kraft bakery box, add parchment ruffles, then tie it with twine and a handwritten tag—the chocolate aroma becomes part of the wrapping.

Brownie Cupcakes
Equipment
- 1 12-cup muffin tin
- 12 paper cupcake liners
- 2 medium mixing bowls
- 1 small microwave-safe bowl or saucepan
- 1 Whisk
- 1 Rubber spatula
- 1 Measuring cups set
- 1 Measuring spoons set
- 1 wire cooling rack
- 1 toothpick for doneness test
Ingredients
- 115 gram unsalted butter melted
- 150 gram semisweet chocolate chips divided
- 150 gram granulated sugar
- 50 gram light brown sugar packed
- 2 large eggs room temperature
- 1 teaspoon vanilla extract
- 95 gram all-purpose flour
- 25 gram unsweetened cocoa powder
- 0.5 teaspoon fine salt
- 0.25 teaspoon baking powder
- 60 milliliter whole milk room temperature
Instructions
- Preheat the oven to 350°F (175°C) and line a 12-cup muffin tin with paper liners.
- In a small microwave-safe bowl, melt the butter with 100 g of the chocolate chips in 20–30 second bursts, stirring between each until smooth, then let cool slightly.
- In a medium bowl, whisk together the granulated sugar, brown sugar, eggs, and vanilla extract until glossy and slightly thickened.
- Slowly whisk the melted chocolate mixture into the sugar-egg mixture until fully combined.
- In another bowl, whisk together the flour, cocoa powder, salt, and baking powder.
- Add the dry ingredients to the wet ingredients and fold gently with a spatula until just a few streaks of flour remain.
- Add the milk and fold again until the batter is smooth and no dry spots remain.
- Fold in the remaining 50 g chocolate chips until evenly distributed.
- Divide the batter evenly among the 12 lined muffin cups, filling each about two-thirds to three-quarters full.
- Bake for 16–18 minutes, or until the tops are set and a toothpick inserted in the center comes out with moist crumbs but no wet batter.
- Remove the muffin tin from the oven and let the brownie cupcakes cool in the pan for 10 minutes.
- Transfer the cupcakes to a wire rack and let them cool for an additional 10 minutes before serving or frosting, if desired.
Notes

Cynthia Weatherford is a seasoned chef and culinary enthusiast who serves as the Recipe creator of Somonday. With decades of experience in the kitchen and a passion for exploring diverse cuisines, Cynthia brings a blend of creativity and technique to every dish. Known for transforming simple ingredients into show-stopping meals, Cynthia believes that cooking is an art form anyone can master. Dedicated to inspiring home cooks, Cynthia shares approachable recipes, pro tips, and culinary wisdom to make every meal memorable.