
There’s something about unwrapping a Butterfinger candy bar—the golden crunch, the rich chocolate, that caramelized peanut aroma—that feels like pure nostalgia.
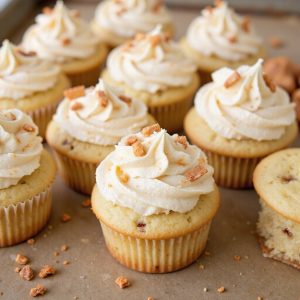
Now picture all of that baked into a cozy dessert: soft, tender cupcakes crowned with silky peanut butter frosting and a shower of crisp Butterfinger bits.
These Butterfinger Cupcakes come together quickly enough for a weeknight treat, but feel special enough for birthdays, potlucks, or easy entertaining.
They’re perfect for sweet-tooth fans, busy families, and beginner bakers who still want that “wow” factor.
I once pulled these together on a hectic Friday when my kids’ school announced a last-minute bake sale. No time for fussy decorations—just a simple swirl of frosting and crushed candy on top.
They vanished from the table in minutes, and I came home with an empty tray and lots of recipe requests.
Ready to bring this dessert to life?
Why You’ll Love It
- Delivers bold flavor from crushed Butterfinger pieces in every single bite
- Balances moist vanilla cupcake with rich, fluffy Butterfinger-studded frosting
- Comes together with simple, familiar baking tools and basic pantry ingredients
- Feels special enough for parties yet easy for casual weeknight baking
- Offers fun garnish options for customizable, candy-bar-inspired presentation
Ingredients
- 1 1/2 cups all-purpose flour — measure with spoon-and-level for accuracy
- 1 cup granulated sugar — standard white sugar for best texture
- 1 1/2 teaspoons baking powder — guarantees cupcakes rise nicely
- 1/2 teaspoon baking soda — helps browning and lift with buttermilk
- 1/2 teaspoon fine salt — balances sweetness and flavor
- 1/2 cup unsalted butter, melted and cooled — cooling prevents scrambling eggs
- 2 large eggs, room temperature — room temp blends more evenly
- 3/4 cup buttermilk, room temperature — adds tang and tenderness
- 2 teaspoons vanilla extract — use pure vanilla for best flavor
- 1 cup Butterfinger candy bars, finely chopped — small bits distribute evenly
- 1 cup unsalted butter, room temperature — soft but not greasy to the touch
- 3 cups powdered sugar, sifted — sifting prevents lumpy frosting
- 2 tablespoons heavy cream — adjust for desired frosting consistency
- 1 teaspoon vanilla extract — adds warmth and depth to frosting
- 1/8 teaspoon fine salt — cuts sweetness slightly
- 1/2 cup Butterfinger candy bars, finely crushed — finer crumbs mix smoothly
- 3 Butterfinger candy bars, cut into 12 small pieces — optional garnish on top
Step-by-Step Method
Preheat the oven to 350°F (175°C). Line a standard 12-cup muffin tin with paper cupcake liners and set aside. Assure your oven rack is in the center position for even baking.
Gather all ingredients and equipment so everything is within reach before you begin mixing the cupcake batter.
Mix Dry Ingredients
Whisk flour, granulated sugar, baking powder, baking soda, and salt in a medium bowl. Break up any lumps so the mixture is smooth and uniform.
This step assures the leavening agents are evenly dispersed, helping the cupcakes rise properly and bake with a tender, even crumb.
Combine Wet Ingredients
Whisk melted, cooled butter, eggs, buttermilk, and vanilla in a large bowl until smooth. Make sure the eggs and buttermilk are at room temperature so the butter doesn’t solidify.
Mix until the liquid looks cohesive and slightly thickened, with no visible streaks of egg or fat remaining.
Bring Batter Together
Add the dry ingredients to the wet ingredients. Gently fold with a rubber spatula until just combined. Stop mixing as soon as no dry flour streaks remain.
Avoid overmixing, which can develop gluten and make the cupcakes dense or tough instead of light and tender.
Fold in Candy
Fold in the finely chopped Butterfinger candy bars. Distribute the pieces evenly throughout the batter with a few gentle strokes of the spatula.
Confirm there are bits of candy in every scoop without overworking the batter. Scrape the sides and bottom of the bowl to incorporate everything.
Fill the Liners
Divide the batter evenly among the 12 liners, filling each about two-thirds full. Use a spoon or measuring scoop for consistency.
Level the tops slightly if needed. Even filling helps the cupcakes bake at the same rate and rise to a similar height, giving a uniform appearance.
Bake & Test
Bake the cupcakes for 18–20 minutes. Check for doneness by inserting a toothpick in the center; it should come out clean or with a few moist crumbs.
Avoid opening the oven too early. Once done, remove the tin from the oven and place it on a wire cooling rack.
Cool Completely
Cool the cupcakes in the tin for 5 minutes to set their structure. Gently remove them from the pan and transfer to the wire rack.
Let them cool completely for about 25 minutes. Make certain there’s no residual warmth before frosting, or the buttercream may melt and slide off.
Cream the Butter
Beat room-temperature butter in a large bowl with a hand or stand mixer on medium speed. Continue for about 2 minutes until the butter looks pale, smooth, and fluffy.
Scrape down the bowl as needed. Properly creamed butter forms the base for a light, airy frosting texture.
Add Sugar Gradually
Reduce the mixer speed to low. Add sifted powdered sugar about 1/2 cup at a time. Mix until each addition is incorporated, then increase speed to medium briefly.
Continue until all sugar is blended. This gradual method prevents a sugar cloud and helps create a smooth, lump-free frosting.
Adjust Texture & Flavor
Add heavy cream, vanilla, and salt to the butter-sugar mixture. Beat on medium-high for 1–2 minutes until light, creamy, and spreadable.
Adjust consistency as needed: add a teaspoon of cream at a time if too thick, or a tablespoon of powdered sugar if too thin, beating briefly after each adjustment.
Fold in Candy Crumbs
Gently fold in the crushed Butterfinger candy bars using a spatula. Aim for finer crumbs so they blend smoothly through the frosting.
Mix just until evenly distributed. Avoid overmixing, which can break down the candy too much and make the frosting overly soft or grainy.
Prepare to Frost
Transfer the Butterfinger frosting to a piping bag fitted with your preferred tip, or ready an offset spatula for spreading. Press the frosting down into the bag to remove air pockets.
If the frosting seems soft, chill it briefly to firm up before piping decorative swirls on the cooled cupcakes.
Frost & Garnish
Pipe or spread a generous swirl of frosting onto each cupcake. Aim for even coverage and attractive peaks or swirls.
Top each cupcake with a small piece of Butterfinger candy bar for garnish, if desired. Serve immediately or store in an airtight container until ready to enjoy.
Ingredient Swaps
- Buttermilk: Substitute with ¾ cup milk mixed with 2 teaspoons white vinegar or lemon juice; let stand 5 minutes to thicken.
- Butter: Use equal amounts of vegetable oil in the batter for a slightly denser, very moist cupcake; for the frosting, stick with butter or a high‑quality vegan butter for similar texture.
- Eggs: Replace each egg with ¼ cup unsweetened applesauce or 3 tablespoons aquafaba (chickpea liquid) for an egg-free version, noting cupcakes will be a bit denser.
- Butterfinger bars: Any crisp peanut butter candy bar, peanut butter chips plus toffee bits, or even chopped chocolate-covered toffee can stand in if Butterfingers aren’t available.
- Dairy-free: Use plant-based milk plus 2 teaspoons vinegar in place of buttermilk and vegan butter in both batter and frosting.
You Must Know
– Scale – To make mini cupcakes, portion about 1 tablespoon batter per mini liner and start checking at 10–12 minutes for doneness.
For a 9×9-inch cake, bake at the same temperature and start checking around 22–25 minutes; use the same toothpick-and-spring-back cues to avoid overbaking.
Serving Tips
- Serve on a platter drizzled with warm caramel or chocolate sauce.
- Pair with cold milk, vanilla ice cream, or a simple latte.
- Plate each cupcake with extra crushed Butterfinger sprinkled around the rim.
- Add a small dollop of whipped cream beside the cupcake for extra indulgence.
- Present on tiered stands lined with bright wrappers for parties or bake sales.
Storage & Make-Ahead
Butterfinger cupcakes keep in the fridge, tightly covered, for up to 5 days.
For make-ahead, bake and cool cupcakes, then refrigerate or freeze unfrosted.
They freeze well (wrapped airtight) for up to 2 months.
Thaw at room temperature, then frost and garnish just before serving for best texture and flavor.
Reheating
Reheat unfrosted cupcakes briefly: in the microwave at 50% power 8–10 seconds.
Or in a 300°F (150°C) oven for 5–8 minutes.
Avoid stovetop methods to prevent drying.
Butterfinger Bake-Sale Traditions
Every time I bring a tray of Butterfinger cupcakes to a bake sale, I watch the same little ritual unfold: kids’ eyes lock onto the golden, candy-studded tops, parents lean in to ask what smells like toasted peanuts and caramel, and someone always snaps a photo before the first wrapper is peeled back.
Over time, these cupcakes have become “my thing” at school fundraisers and church socials.
I love how the crinkling paper liners and sharp snap of the garnish pieces cutting under a knife turn into a kind of soundtrack at the table.
I’ll tuck a handwritten sign beside them, listing “Butterfinger bits inside and on top,” and by noon, there’s usually nothing left but crumbs and smudged frosting.
Final Thoughts
Give these Butterfinger Cupcakes a try and enjoy all that crunchy, peanut-buttery goodness in every bite.
Feel free to tweak the recipe with extra candy pieces, a drizzle of chocolate, or your favorite frosting style to make them your own.
Frequently Asked Questions
Can I Make These Butterfinger Cupcakes Gluten-Free Without Affecting Texture Too Much?
Yes, you can. I’d swap in a good 1:1 gluten‑free baking flour with xanthan gum, sift it well, and mix gently. You’ll still get tender, golden crumbs, crackly candy pockets, and lush, buttery frosting.
How Can I Convert This Cupcake Recipe Into a Layered Butterfinger Cake?
You can, and I’d scale the batter for two 8-inch rounds, bake slightly longer, then layer with extra Butterfinger-studded frosting between. I’d sprinkle crushed bars between layers so each slice shatters with caramel-peanut crunch.
Are There Kid-Friendly Ways to Decorate Butterfinger Cupcakes for Parties?
Yes—I’d keep decorations playful and colorful: I’d swirl tall frosting, shower on rainbow sprinkles, perch mini Butterfinger bits, add bright liners, and maybe tiny flags or candy eyes so each cupcake feels like its own character.
What Drink Pairings Work Best With Rich Butterfinger Cupcakes?
I’d pour cold milk first; it softens the sweetness and crunch. For you adults, I’d brew dark coffee or rich espresso, or even serve a nutty porter—each sip cuts through caramel, peanut, and chocolate decadence.
Can I Ship Butterfinger Cupcakes Without the Frosting Melting or Spoiling?
You can, but you’ll need insulation and speed. I’d chill the cupcakes hard, frost with a slightly stiffer buttercream, pack with frozen gel packs, use an insulated box, and ship overnight to keep everything safe.
Butterfinger Cupcakes
Equipment
- 1 standard 12-cup muffin tin
- 12 paper cupcake liners
- 2 medium mixing bowls
- 1 large mixing bowl
- 1 hand mixer or stand mixer
- 1 Rubber spatula
- 1 Whisk
- 1 Wooden spoon
- 1 Measuring cups set
- 1 Measuring spoons set
- 1 wire cooling rack
- 1 piping bag or 1 offset spatula
- 1 small zip-top bag (for crushing candy bars)
Ingredients
- 1 1/2 cup all-purpose flour
- 1 cup granulated sugar
- 1 1/2 teaspoon baking powder
- 1/2 teaspoon baking soda
- 1/2 teaspoon fine salt
- 1/2 cup unsalted butter melted and cooled
- 2 large eggs room temperature
- 3/4 cup buttermilk room temperature
- 2 teaspoon vanilla extract
- 1 cup Butterfinger candy bars finely chopped
- 1 cup unsalted butter room temperature
- 3 cup powdered sugar sifted
- 2 tablespoon heavy cream
- 1 teaspoon vanilla extract
- 1/8 teaspoon fine salt
- 1/2 cup Butterfinger candy bars finely crushed
- 3 Butterfinger candy bars cut into 12 small pieces
Instructions
- Preheat the oven to 350°F (175°C) and line the muffin tin with 12 cupcake liners.
- In a medium bowl whisk together flour, granulated sugar, baking powder, baking soda, and salt.
- In a large bowl whisk together melted butter, eggs, buttermilk, and vanilla until smooth.
- Add the dry ingredients to the wet ingredients and mix gently with a spatula until just combined and no dry streaks remain.
- Fold in the 1 cup of finely chopped Butterfinger candy bars until evenly distributed.
- Divide the batter evenly among the 12 liners, filling each about two-thirds full.
- Bake for 18–20 minutes or until a toothpick inserted in the center comes out clean or with a few moist crumbs.
- Transfer the muffin tin to a wire rack and cool in the pan for 5 minutes.
- Remove cupcakes from the tin and let them cool completely on the wire rack, about 25 minutes.
- While cupcakes cool, beat the room-temperature butter in a large bowl with a mixer on medium speed until light and creamy, about 2 minutes.
- Gradually add the powdered sugar, 1/2 cup at a time, mixing on low until incorporated, then increasing to medium until fluffy.
- Add heavy cream, vanilla, and salt, then beat on medium-high for 1–2 minutes until light and spreadable.
- Fold in the 1/2 cup crushed Butterfinger candy bars with a spatula until evenly mixed into the frosting.
- Transfer the frosting to a piping bag fitted with your preferred tip or prepare an offset spatula for spreading.
- Once cupcakes are completely cool, pipe or spread a generous swirl of frosting on each cupcake.
- Top each cupcake with an optional piece of Butterfinger candy bar for garnish.
Notes

Cynthia Weatherford is a seasoned chef and culinary enthusiast who serves as the Recipe creator of Somonday. With decades of experience in the kitchen and a passion for exploring diverse cuisines, Cynthia brings a blend of creativity and technique to every dish. Known for transforming simple ingredients into show-stopping meals, Cynthia believes that cooking is an art form anyone can master. Dedicated to inspiring home cooks, Cynthia shares approachable recipes, pro tips, and culinary wisdom to make every meal memorable.


