There’s something about the glow of a campfire—flickering amber light, the smell of toasted marshmallows, chocolate just starting to melt—that makes everything feel a little more magical.
These Campfire Cupcakes capture that feeling in a cozy, handheld dessert that’s ready faster than building an actual fire.
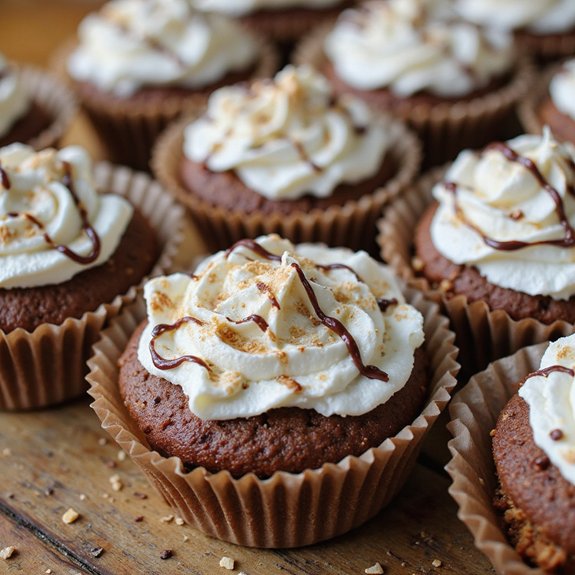
Think tender chocolate cupcakes, swirls of marshmallow frosting, and crunchy graham cracker crumbs, all done in under an hour.
They’re perfect for sweet-tooth fans, families, and beginners who want impressive results without fussy techniques.
I first leaned on these cupcakes during a rainy camping trip that got moved indoors. The kids were disappointed, the firewood was soaked, and everyone was restless—until a tray of “campfire” cupcakes came out of the oven.
Suddenly, the living room felt like a cabin retreat. These shine at birthday parties, casual gatherings, Sunday suppers, or last-minute cravings. Ready to bring this dessert to life?
Why You’ll Love It
- Captures classic s’mores flavor in a fun, portable cupcake form
- Delivers rich, moist chocolate cake with buttery graham cracker crust
- Tops with fluffy whipped cream instead of heavy, sugary buttercream
- Finishes with melty chocolate drizzle and gooey, toasted mini marshmallows
- Simple equipment and everyday ingredients make it weeknight- or party-friendly
Ingredients
- 1 1/4 cups all-purpose flour — spoon and level for accurate measuring
- 1/2 cup unsweetened cocoa powder — use a good-quality Dutch or natural cocoa
- 1 teaspoon baking powder — check it’s fresh for proper rise
- 1/2 teaspoon baking soda — helps tenderize the crumb
- 1/4 teaspoon fine salt — balances the sweetness
- 1 cup granulated sugar — white sugar gives structure and sweetness
- 2 large eggs, room temperature — room temp blends more easily
- 1/2 cup whole milk, room temperature — adds moisture and richness
- 1/2 cup vegetable oil — neutral oil keeps cupcakes soft
- 1 teaspoon vanilla extract — pure vanilla adds best flavor
- 1/2 cup hot water — hot water blooms the cocoa
- 3/4 cup graham cracker crumbs — crush finely for an even crust
- 3 tablespoons unsalted butter, melted — binds the graham crust
- 2 cups mini marshmallows — melt and toast easily on top
- 1 1/4 cups heavy whipping cream, chilled — cold cream whips faster
- 1/3 cup powdered sugar — sweetens and stabilizes whipped cream
- 1 teaspoon vanilla extract — flavors the whipped cream
- 1/2 cup milk chocolate chips — melt smoothly for drizzling
- 1 teaspoon vegetable oil — thins melted chocolate for an easy drizzle
Step-by-Step Method
Preheat & Prepare Pan
Preheat your oven to 350°F (175°C). Line a 12-cup muffin tin with paper cupcake liners so the cupcakes release easily. Set the pan aside. Gather all equipment and ingredients before you start. This makes the process smoother and prevents overmixing later when combining wet and dry ingredients.
Combine Dry Ingredients
Whisk together the flour, cocoa powder, baking powder, baking soda, and salt in a medium bowl. Break up any cocoa lumps and guarantee everything is evenly blended. Set this bowl aside.
Keeping dry ingredients well mixed helps the cupcakes rise evenly and develop a uniform, tender crumb.
Beat Eggs & Sugar
Beat the granulated sugar and eggs in a large mixing bowl using an electric mixer. Mix on medium speed until the mixture looks pale, thickened, and slightly frothy, about two minutes.
This step incorporates air, which helps the cupcakes bake up light while giving structure to the batter.
Add Milk, Oil & Vanilla
Pour in the milk, vegetable oil, and vanilla extract to the egg-sugar mixture. Mix on low to medium speed until the batter is smooth and fully combined. Scrape down the sides of the bowl with a rubber spatula.
Make sure there are no streaks of unmixed liquid before adding the dry ingredients.
Incorporate Dry Ingredients
Add the dry ingredient mixture to the wet ingredients. Mix on low speed just until the flour is incorporated. Stop as soon as you no longer see dry pockets.
Avoid overmixing at this stage. Overworking the batter can develop gluten and make the cupcakes dense instead of tender.
Thin Batter with Hot Water
Pour in the hot water slowly while mixing on low speed. Continue mixing until the batter is smooth and thin. The hot water helps bloom the cocoa, deepening the chocolate flavor.
Scrape the bowl once more to ensure the texture is even. Set the finished batter aside briefly.
Make Graham Cracker Crust
Stir together graham cracker crumbs and melted butter in a separate medium bowl. Mix until all crumbs are evenly moistened and resemble wet sand. This forms the base crust.
Guarantee no dry crumbs remain. A well-mixed crust will hold together nicely under the chocolate cupcake layer.
Press Crust into Liners
Spoon about one tablespoon of the graham mixture into each cupcake liner. Gently press it down with the back of the spoon or your fingers to form a firm, even crust. Don’t pack it too hard.
Aim for a flat layer so the batter sits evenly on top and bakes uniformly.
Fill Liners with Batter
Divide the chocolate cupcake batter evenly over the graham crusts. Fill each liner about two-thirds full. Use a measuring cup or scoop for consistent sizes.
Avoid overfilling to prevent overflow while baking. Tap the pan lightly on the counter to release any large air bubbles.
Bake Until Just Set
Place the muffin tin in the preheated oven. Bake for 16–18 minutes, or until a toothpick inserted in the center of a cupcake comes out with a few moist crumbs. Rotate the pan once if your oven has hot spots.
Don’t overbake, or the cupcakes may become dry.
Soften Marshmallows on Top
Remove the pan from the oven and immediately sprinkle each cupcake with a few mini marshmallows. Return the pan to the oven for 1–2 minutes. Watch closely and bake only until the marshmallows are just softened and slightly puffed.
Take care not to let them brown too much.
Cool Completely on Rack
Transfer the cupcakes from the muffin tin to a wire cooling rack. Let them cool completely, about 30 minutes.
The cupcakes must be fully cool before adding whipped cream. If they’re warm, the cream will melt and slide off, ruining both the texture and the presentation.
Whip the Cream Topping
Whip the chilled heavy cream, powdered sugar, and vanilla extract in a cold bowl. Use an electric mixer on medium-high speed until stiff peaks form. The cream should hold its shape when the beaters are lifted.
Don’t overbeat, or it can turn grainy and start to separate.
Pipe Whipped Cream Swirls
Spoon the whipped cream into a piping bag or zip-top bag fitted with a large round or star tip. Gently squeeze to remove air pockets. Pipe a generous swirl of whipped cream on each cooled cupcake.
Start at the outer edge and spiral inward and upward for a neat, campfire-like mound.
Melt Chocolate for Drizzling
Combine the milk chocolate chips and one teaspoon vegetable oil in a microwave-safe bowl. Heat in 20-second bursts, stirring thoroughly between each. Continue until the mixture is smooth and pourable.
Don’t overheat, as chocolate can scorch. Let it cool slightly so it thickens a bit.
Drizzle Chocolate Over Topping
Drizzle the melted chocolate over the whipped cream swirls on each cupcake. Use a spoon or pour into a small bag and snip the corner. Make thin lines back and forth for a decorative effect.
Work steadily so the chocolate sets nicely without melting the whipped cream.
Torch & Garnish Marshmallows
If desired, torch a few extra mini marshmallows with a kitchen torch until lightly toasted. Let them cool briefly, then place them on top of each cupcake for a campfire look.
If you don’t have a torch, briefly broil marshmallows on a parchment-lined sheet and transfer carefully.
Ingredient Swaps
- Use canola or other neutral oil instead of vegetable oil; 2% milk can replace whole milk in a pinch.
- For gluten-free, swap in a 1:1 gluten-free baking flour and gluten-free graham crackers.
- For dairy-free, use plant milk, dairy-free butter, coconut cream (whipped) instead of heavy cream, and dairy-free chocolate chips.
- If graham crackers are hard to find, use crushed digestive biscuits or vanilla wafers.
You Must Know
– Make-Ahead – For best texture, store the unfrosted cupcakes (with marshmallows) at room temperature up to 1 day, tightly covered, and whip/pipe the cream within 2 hours of serving.
Once topped, refrigerate and enjoy within 24 hours so the graham crust doesn’t absorb too much moisture and turn soggy.
Serving Tips
- Serve on a wooden board scattered with extra graham crumbs for a “campfire” feel.
- Pair with hot cocoa, coffee, or cold milk to balance the rich chocolate.
- Garnish plates with chocolate drizzle and a few toasted mini marshmallows.
- Add small chocolate bar pieces or graham squares upright in the whipped cream.
- Present in parchment cupcake wrappers inside a cast-iron skillet for rustic styling.
Storage & Make-Ahead
Store Campfire Cupcakes in an airtight container in the fridge for up to 3 days because of the whipped cream.
For easy prep, bake cupcakes and crust a day ahead, then top with whipped cream and chocolate just before serving.
These cupcakes don’t freeze well due to the whipped cream.
Reheating
Reheat cupcakes gently: microwave 5–10 seconds (just to take the chill off).
Or warm in a 300°F (150°C) oven for 5 minutes.
Avoid stovetop to prevent drying or melting.
Campfire Cupcakes in Culture
Often, when people talk about “campfire cupcakes,” they’re really talking about a feeling as much as a dessert: the glow of embers, smoky-sweet air, and the shared ritual of roasting marshmallows together.
When I bake these, I’m inviting that mood indoors, no tent or fire ring required.
You’ve probably seen similar treats at summer birthday parties, Scout banquets, or school bake sales. They show up wherever people want nostalgia without the logistics of a real fire.
I think of them as edible stories: layers of graham, chocolate, and marshmallow that echo the layered memories of camping trips, cabins, and late-night singsongs.
When you share campfire cupcakes, you’re not just serving dessert—you’re quietly saying, “Let’s linger a little longer together.”
Final Thoughts
Give these Campfire Cupcakes a try the next time you’re craving a cozy, s’mores-inspired treat at home.
Feel free to tweak the toppings, play with different chocolates, or add your own fun twists to make them uniquely yours.
Frequently Asked Questions
Can I Make These Cupcakes Without Eggs or Dairy for Allergies or Vegan Diets?
You can absolutely make them vegan: I’d swap eggs for unsweetened applesauce, milk and cream for oat or soy versions, butter for vegan butter, and use dairy‑free chocolate chips so every bite stays safe, lush, and indulgent.
How Can Kids Safely Help Decorate Campfire Cupcakes Without Using a Kitchen Torch?
Kids can safely help by pressing extra mini marshmallows on top, then I’d briefly broil them myself. They can also drizzle cooled melted chocolate and scatter graham crumbs, creating a cozy “campfire” look together.
What’s the Best Way to Transport These Cupcakes to Outdoor Events or Picnics?
I’d nest each cupcake in a snug carrier, chill them first, then drive them level and shaded. At your picnic spot, I’d add final chocolate drizzle and marshmallow garnish so everything arrives picture-perfect.
Can I Convert This Cupcake Recipe Into a Full Campfire-Themed Layer Cake?
Yes, you can. I’d bake the batter in two or three round pans, press graham crust into each, fill and frost with marshmallowy whipped cream, then drizzle chocolate and crown everything with toasted mini marshmallows.
How Do I Scale This Recipe for a Large Party or Bake Sale?
I’d simply double or triple the quantities, then bake in batches so each dozen bakes evenly. I’d label flavors, price clearly, and display them at different heights so your table feels abundant and irresistible.

Campfire Cupcakes
Equipment
- 1 12-cup muffin tin
- 12 paper cupcake liners
- 2 medium mixing bowls
- 1 large mixing bowl
- 1 Whisk
- 1 electric hand mixer or stand mixer
- 1 Rubber spatula
- 1 wire cooling rack
- 1 piping bag or 1 zip-top bag
- 1 kitchen torch (optional)
Ingredients
- 1 1/4 cup all-purpose flour
- 1/2 cup unsweetened cocoa powder
- 1 teaspoon baking powder
- 1/2 teaspoon baking soda
- 1/4 teaspoon fine salt
- 1 cup granulated sugar
- 2 large eggs room temperature
- 1/2 cup whole milk room temperature
- 1/2 cup vegetable oil
- 1 teaspoon vanilla extract
- 1/2 cup hot water
- 3/4 cup graham cracker crumbs
- 3 tablespoon unsalted butter melted
- 2 cup mini marshmallows
- 1 1/4 cup heavy whipping cream chilled
- 1/3 cup powdered sugar
- 1 teaspoon vanilla extract
- 1/2 cup milk chocolate chips
- 1 teaspoon vegetable oil
Instructions
- Preheat the oven to 350°F (175°C) and line the muffin tin with paper cupcake liners.
- In a medium bowl whisk together flour, cocoa powder, baking powder, baking soda, and salt.
- In a large bowl beat sugar and eggs with the electric mixer until pale and slightly thickened, about 2 minutes.
- Add milk, vegetable oil, and vanilla extract to the egg mixture and mix until smooth.
- Add the dry ingredients to the wet ingredients and mix on low speed until just combined.
- Pour in the hot water and mix slowly until the batter is smooth and thin.
- In a separate bowl stir together graham cracker crumbs and melted butter until evenly moistened.
- Spoon about 1 tablespoon of graham mixture into the bottom of each cupcake liner and gently press to form a crust.
- Divide the chocolate cupcake batter evenly over the graham crusts, filling liners about two-thirds full.
- Bake for 16–18 minutes or until a toothpick inserted in the center comes out with a few moist crumbs.
- Remove the pan from the oven, immediately sprinkle each cupcake with a few mini marshmallows, and return to the oven for 1–2 minutes until just softened.
- Transfer cupcakes to a wire rack and let cool completely, about 30 minutes.
- While cupcakes cool, whip the heavy cream, powdered sugar, and vanilla extract in a chilled bowl to stiff peaks.
- Spoon the whipped cream into a piping bag or zip-top bag fitted with a large round or star tip.
- Pipe a swirl of whipped cream on top of each cooled cupcake.
- Place chocolate chips and 1 teaspoon vegetable oil in a microwave-safe bowl and heat in 20-second bursts, stirring between each, until smooth.
- Drizzle the melted chocolate over the whipped cream topping on each cupcake.
- If desired, torch a few extra mini marshmallows with a kitchen torch and place them on top for a toasted campfire look.
Notes

Cynthia Weatherford is a seasoned chef and culinary enthusiast who serves as the Recipe creator of Somonday. With decades of experience in the kitchen and a passion for exploring diverse cuisines, Cynthia brings a blend of creativity and technique to every dish. Known for transforming simple ingredients into show-stopping meals, Cynthia believes that cooking is an art form anyone can master. Dedicated to inspiring home cooks, Cynthia shares approachable recipes, pro tips, and culinary wisdom to make every meal memorable.


