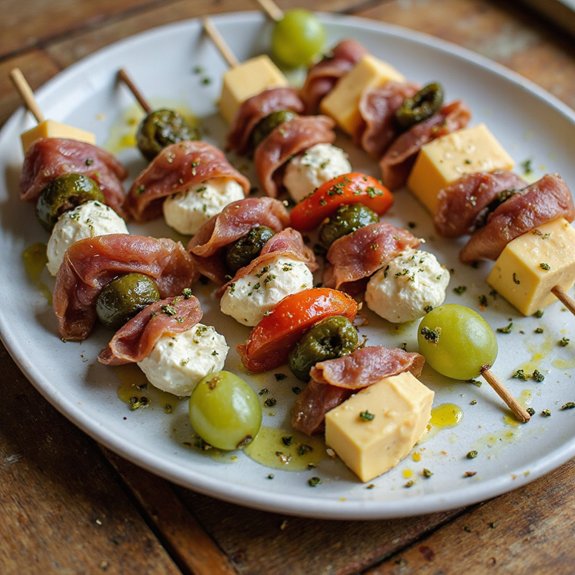
There’s something about a tray of charcuterie sticks that instantly turns “What on earth do I serve?” into “Oh, this is perfect.”
Picture neat rows of crisp breadsticks, glossy ribbons of prosciutto, nuggets of sharp cheddar, and bright pops of grape tomatoes and olives, all ready to grab and go.
It’s a grazing-style snack-meal—part appetizer, part light dinner—that comes together in about 15–20 minutes, no cooking required.
These are ideal for busy weeknights, casual hosts, beginner cooks, and anyone who loves to entertain without stress.
Once, when unexpected guests dropped by right before dinner, I raided the fridge, threaded what I’d onto skewers, and watched the room relax as everyone started nibbling and chatting.
Since then, charcuterie sticks have become my go-to for game nights, last-minute gatherings, and easy lunches.
Ready to bring this effortless little crowd-pleaser to life?
Why You’ll Love It
- Delivers bold flavor in every bite-sized, perfectly balanced skewer
- Elevates any gathering with a fun, modern twist on charcuterie boards
- Saves time with easy, no-cook assembly using simple, fresh ingredients
- Adapts effortlessly to different tastes, diets, and seasonal ingredients
- Travels well for picnics, potlucks, game days, and holiday parties
Ingredients
- 16 wooden skewers (8–10 inch) — sturdy, splinter-free skewers make assembly easier
- 16 slices cured salami, thin — choose a flavorful, good-quality salami
- 16 cubes cheddar cheese, 2.5 cm — sharp or medium cheddar holds shape well
- 16 cubes gouda cheese, 2.5 cm — young gouda is milder and slices cleanly
- 16 pitted green olives, whole — briny, firm olives work best for skewering
- 16 pitted black olives, whole — choose meaty, not mushy, black olives
- 16 cherry tomatoes, whole — pick firm, brightly colored tomatoes
- 16 mini mozzarella balls, drained — pat very dry so sticks don’t get soggy
- 16 slices prosciutto, halved lengthwise — look for thin, flexible slices
- 16 small cornichons, whole — tangy crunch balances the rich meats and cheeses
- 16 seedless red grapes, whole — sweet grapes add freshness to each bite
- 16 seedless green grapes, whole — use crisp, not overly soft, grapes
- 4 tablespoons olive oil, extra virgin — a fruity, good-quality oil adds flavor
- 1 teaspoon dried Italian herbs, mixed — a balanced blend of oregano, basil, and thyme
- 0.5 teaspoon black pepper, freshly ground — grind just before mixing for best aroma
- 0.25 teaspoon sea salt, fine — season lightly so meats and olives don’t taste too salty
- 2 tablespoons balsamic glaze — drizzle sparingly for sweetness and acidity
Step-by-Step Method
Soak the Skewers
Soak wooden skewers in a bowl of water for about 10 minutes if assembling ahead. This helps prevent splintering and keeps the wood from drying out.
Drain them well and pat dry before threading ingredients. Set the skewers aside on a clean tray or plate so they’re ready when you begin assembling.
Prep the Meats and Cheese
Place salami, prosciutto, cheddar, and gouda on a cutting board. Slice prosciutto lengthwise into long, narrow strips.
Make sure cheese cubes are roughly 2.5 cm for even cooking and appearance. Separate meat slices so they don’t stick together.
Keep everything in neat piles for quick, efficient assembly later.
Season the Mozzarella and Tomatoes
Pat mozzarella balls dry with paper towels to remove excess moisture. In a small bowl, whisk olive oil, dried Italian herbs, black pepper, and sea salt.
Toss mozzarella balls and cherry tomatoes in half the herb oil mixture. Coat evenly but lightly.
Set the seasoned mixture aside to allow flavors to absorb while you work.
Start the Skewer Base
Begin each skewer with a green grape to create a sturdy base. Slide it down gently, then add a cube of cheddar cheese.
Position both firmly at the bottom without cracking the grape. This combination starts the balance of sweet and savory flavors.
Repeat for each skewer to maintain a consistent pattern.
Layer Salami and Olives
Fold a slice of salami into quarters or a loose fan shape. Thread it onto the skewer above the cheddar.
Add a black olive next, pushing it down to snugly meet the salami. Avoid packing ingredients too tightly.
Aim for a secure yet flexible arrangement that holds its shape without crushing the components.
Add Tomatoes and Gouda
Thread a seasoned cherry tomato above the black olive. Slide gently to keep the skin intact.
Follow with a cube of gouda cheese. Press the pieces together lightly so they touch but don’t squeeze.
This middle section adds color and texture contrast. Continue building each skewer the same way for uniform presentation.
Fold and Thread Prosciutto
Take a halved slice of prosciutto and fold it into a loose ribbon or accordion shape. Thread it onto the skewer above the gouda.
Let the edges ruffle slightly for an attractive look. Avoid compressing it too much, which can make it chewy.
This step adds rich, salty flavor and a delicate, elegant texture.
Finish with Cornichon and Mozzarella
Top each skewer with a cornichon, then a seasoned mozzarella ball. Place the mozzarella last so it stays visible and doesn’t get squashed.
Make certain the tip of the skewer is fully covered by the mozzarella for safety. Adjust spacing if needed so all components feel secure and well-balanced along the stick.
Arrange and Drizzle
Lay completed charcuterie sticks on a platter in a single layer. Alternate the direction of the skewers to create visual interest.
Drizzle remaining herb oil lightly over the top, avoiding heavy pooling. If desired, add a thin zigzag of balsamic glaze across the platter.
Keep the drizzle delicate so it enhances rather than overwhelms flavors.
Chill Briefly and Serve
Cover the platter loosely and refrigerate for about 10 minutes. Let the flavors meld and the cheeses firm slightly.
Serve sticks slightly chilled or at cool room temperature for best texture. If preparing in advance, chill up to four hours.
Add any final drizzles or garnishes just before presenting to guests.
Ingredient Swaps
- Use any firm cheeses you like (Colby Jack, pepper jack, Manchego, or feta cubes) in place of cheddar and gouda; swap mozzarella balls for marinated bocconcini or small cubes of provolone.
- Replace salami/prosciutto with turkey pepperoni, smoked ham, or omit entirely and add extra cheese, nuts (almonds, walnuts), or roasted veggies for a vegetarian version.
- If cornichons or balsamic glaze are hard to find, use sliced dill pickles or pickled onions, and a light drizzle of honey, pomegranate molasses, or reduced regular balsamic instead.
You Must Know
- Flavor Boost • If you want more punch from the herbs, coat the cheese more heavily in the oil mixture and use a light hand on the grapes and tomatoes, so the salty, herby flavor stands out instead of the sweetness; you’ll notice it most after chilling for at least 10–15 minutes.
- Avoid • To prevent soggy or greasy sticks, keep very wet items (mozzarella, tomatoes) to just a thin sheen of oil—if you see oil pooling in the bowl or dripping when lifted, pat lightly with a paper towel before skewering.
- Troubleshoot • If ingredients crack or split as you slide them on, rotate the skewer and pierce through a “meatier” side (avoid the tomato stem scar or the olive pit hole); it should pass through with gentle pressure in under 1–2 seconds, not require force.
- Scale • For a larger crowd, count 2–3 sticks per person as a light appetizer (so 24 sticks for 8–10 people, 48 sticks for ~16–20), and keep the ingredient ratio 1:1 per stick (1 of each meat, cheese, olive, tomato, grape, cornichon, mozzarella) to avoid running out of any single item.
- Make-Ahead • For holding longer than 4 hours (up to ~24 hours), leave the tomatoes and mozzarella in a covered container and assemble those to the top of the sticks within 1 hour of serving; this keeps the top pieces glossy and prevents the cheese from drying or weeping liquid on the platter.
Serving Tips
- Serve upright in a low jar or glass, like edible flower arrangements.
- Pair with a crisp white wine, light rosé, or Prosecco for balanced flavors.
- Add a small bowl of mixed nuts or crackers alongside for extra crunch.
- Arrange in concentric circles on a platter, alternating stick direction for visual interest.
- Offer a honey or fig jam dip nearby for sweet contrast to the salty meats and cheeses.
Storage & Make-Ahead
Charcuterie sticks keep in the fridge for up to 2 days, tightly covered.
For best texture, assemble no more than 4 hours ahead and add oil or balsamic drizzle just before serving.
They don’t freeze well—freezing alters cheese, tomatoes, and grapes—so always store and serve them fresh from the refrigerator.
Reheating
Reheat charcuterie sticks gently: briefly microwave at 50% power, or warm in a 300°F (150°C) oven until just slightly warmed.
Avoid stovetop to prevent uneven heating and melted cheese.
Charcuterie Sticks at Parties
At almost any gathering, I love setting out a platter of charcuterie sticks because they turn nibbling into something playful and effortless.
Guests hover, eyeing the glossy grapes, curls of prosciutto, and jewel-bright tomatoes, then reach for a skewer without needing plates or decisions—everything’s already curated for them.
When I’m planning a party, I think about how these sticks quietly solve so many hosting headaches:
- They cut down on traffic jams at the grazing table—people grab and move.
- They keep fingers cleaner, with less crumb chaos on your floor.
- They invite mingling; guests roam with one hand free for drinks.
- They photograph beautifully, instantly dressing up even the simplest get-together.
Final Thoughts
Give these charcuterie sticks a try for your next gathering—they’re fun to assemble, easy to serve, and always a crowd-pleaser.
Feel free to swap in your favorite meats, cheeses, or veggies to make them perfectly your own.
Frequently Asked Questions
Can I Make Charcuterie Sticks Kid-Friendly or School-Lunch Safe?
You can, and I do it often—swap cured meats for turkey, skip nuts, use mild cheddar, juicy grapes, cucumber coins, and cherry tomatoes; I thread them snugly so they travel well in small, colorful lunch containers.
How Do I Price Charcuterie Sticks if I’M Selling Them?
I’d price them by tripling ingredient cost per stick, then adjusting for time and packaging. I’d check local competitors, aim higher for premium ingredients, and offer tiered boxes so you and your customers both feel spoiled.
What Wine or Cocktails Pair Best With These Charcuterie Sticks?
I’d pour you a light Pinot Noir or dry Prosecco—both hug the salty meats and creamy cheeses. For cocktails, I’d mix a Negroni or French 75; their bright bitterness slices through the richness beautifully.
How Can I Make These Sticks Look Extra Impressive for Photos or Social Media?
I layer colors like a rainbow, vary heights, and fan the sticks on a dark board. I drizzle glossily, scatter herbs, and shoot near a window so you almost taste the shine.
Are There Food Safety Concerns When Serving Charcuterie Sticks Outdoors or at Picnics?
Yes—heat and time really matter here. I’d keep everything chilled until serving, limit outdoor time to about two hours (one if it’s hot), shade the platter, and refresh it from a cooler with ice.

Charcuterie Sticks
Equipment
- 16 wooden skewers (8–10 inch)
- 1 small cutting board
- 1 Chef's knife
- 2 Small bowls
Ingredients
- 16 slices cured salami thin
- 16 cubes cheddar cheese 2.5 cm
- 16 cubes gouda cheese 2.5 cm
- 16 pitted green olives whole
- 16 pitted black olives whole
- 16 cherry tomatoes whole
- 16 mini mozzarella balls drained
- 16 slices prosciutto halved lengthwise
- 16 small cornichons whole
- 16 seedless red grapes whole
- 16 seedless green grapes whole
- 4 tablespoon olive oil extra virgin
- 1 teaspoon dried Italian herbs mixed
- 1/2 teaspoon black pepper freshly ground
- 1/4 teaspoon sea salt fine
- 2 tablespoon balsamic glaze optional; for drizzling
Instructions
- Place the skewers in a bowl of water for 10 minutes if serving later to prevent them from drying or splintering.
- On a cutting board, slice the prosciutto in half lengthwise and pat the mozzarella balls dry with a paper towel.
- In a small bowl, whisk together the olive oil, dried Italian herbs, black pepper, and sea salt.
- Toss the mozzarella balls and cherry tomatoes in half of the herb oil mixture and set aside.
- To assemble each skewer, start with a green grape, followed by a cube of cheddar cheese.
- Add a folded slice of salami, then a black olive, and slide them gently down the skewer.
- Add a cherry tomato, then a cube of gouda cheese, ensuring everything is packed snugly but not crushed.
- Fold a half-slice of prosciutto into a loose ribbon and thread it onto the skewer.
- Finish each skewer with a cornichon and a mini mozzarella ball on top.
- Repeat the assembling process until all skewers are filled and ingredients are used up.
- Arrange the charcuterie sticks on a platter in a single layer, alternating the direction of the sticks for visual appeal.
- Drizzle the remaining herb oil mixture lightly over the skewers.
- If using, drizzle a thin line of balsamic glaze over the platter, avoiding heavy pooling on any single skewer.
- Let the charcuterie sticks rest, covered loosely, in the refrigerator for 10 minutes to chill and allow flavors to meld.
- Serve the charcuterie sticks slightly chilled or at cool room temperature.
Notes

Cynthia Weatherford is a seasoned chef and culinary enthusiast who serves as the Recipe creator of Somonday. With decades of experience in the kitchen and a passion for exploring diverse cuisines, Cynthia brings a blend of creativity and technique to every dish. Known for transforming simple ingredients into show-stopping meals, Cynthia believes that cooking is an art form anyone can master. Dedicated to inspiring home cooks, Cynthia shares approachable recipes, pro tips, and culinary wisdom to make every meal memorable.