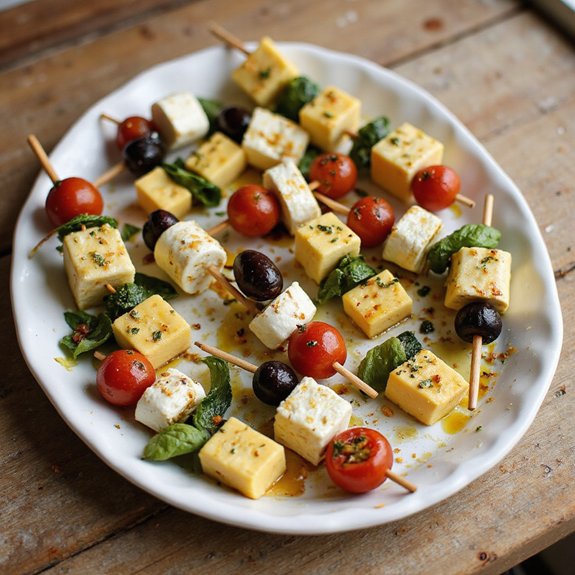
There’s something about a platter of cheese skewers that instantly says, “You’re welcome, everyone’s taken care of.”
Picture glossy cubes of cheddar and mozzarella, marbled Colby Jack, and creamy feta threaded with bursts of color—ruby cherry tomatoes, crisp cucumber, glossy olives, maybe a fold of salty salami.
The air carries that irresistible mix of sharp, nutty cheese and fresh herbs, and there’s no stove, no oven, just quick, easy assembly in minutes.
This is a light, crowd-pleasing appetizer, perfect for busy hosts, beginners, and anyone who wants impressive snacks without a lot of fuss.
I still remember a hectic weekday when friends dropped by unannounced; a few cheeses, some leftover vegetables, and toothpicks turned into a beautiful tray that made the evening feel intentional instead of rushed.
These skewers shine at game nights, holiday parties, potlucks, or any last-minute gathering.
Ready to bring this dish to life?
Why You’ll Love It
- Delivers a colorful, crowd-pleasing appetizer in just 15 minutes.
- Balances creamy cheeses with fresh veggies and fruit for perfect bites.
- Requires no cooking, only simple chopping and quick assembly.
- Customizes easily with your favorite cheeses, fruits, or marinated veggies.
- Makes entertaining stress-free with easy make-ahead, chill, and serve prep.
Ingredients
- 8 oz cheddar cheese, cubed — use a sharp block cheddar for best flavor
- 8 oz mozzarella cheese, cubed — low‑moisture mozzarella holds shape well
- 8 oz gouda cheese, cubed — young gouda is easier to skewer than aged
- 1 cup cherry tomatoes, whole — choose firm, brightly colored tomatoes
- 1 cup cucumber, sliced into half-moons — pat slices dry to avoid sogginess
- 1 cup seedless grapes, whole — red or black grapes add nice sweetness
- 0.25 cup black olives, pitted — use good-quality brined olives for depth
- 2 tbsp extra-virgin olive oil — a fruity olive oil boosts overall flavor
- 1 tbsp balsamic vinegar — a thicker, aged style clings better to skewers
- 0.5 tsp dried oregano — crush lightly in your fingers to release aroma
- 0.25 tsp black pepper, freshly ground — grind just before mixing dressing
- 0.25 tsp salt, fine — season lightly so cheese doesn’t taste oversalted
- 2 tbsp fresh basil, finely chopped — add just before serving for freshness
Step-by-Step Method
Cut the Cheese Neatly
Cut the cheddar, mozzarella, and gouda into even, bite-size cubes. Aim for similar dimensions so they stack well on the skewers and look uniform.
Use a sharp chef’s knife for clean cuts that won’t crumble the cheese. Keep the cubes chilled while you prepare the vegetables so they stay firm and easy to handle.
Prep the Vegetables Cleanly
Slice the cucumber into thin half-moons and pat them dry with a paper towel to remove excess moisture.
Leave cherry tomatoes and seedless grapes whole for easy skewering. Drain and pat the black olives dry as well. Keep all pieces relatively similar in size to the cheese cubes so the skewers are balanced.
Mix the Simple Dressing
Whisk together extra-virgin olive oil, balsamic vinegar, dried oregano, black pepper, and salt in a small bowl.
Combine until the mixture looks smooth and slightly thickened. Taste and adjust seasoning if needed. Set the dressing aside while you assemble the skewers so it’s ready to drizzle just before chilling and serving.
Thread the Colorful Skewers
Thread the wooden skewers with alternating pieces of cheese, cherry tomatoes, cucumber slices, grapes, and olives.
Vary the order to create a colorful pattern on each skewer. Leave a small space at each end of the skewer for easy handling. Pack ingredients snugly but avoid pressing so hard that cheese breaks.
Arrange on the Serving Platter
Lay the filled skewers neatly in a single layer on a large serving platter.
Avoid piling them too high, which can crush the ingredients or cause them to slide off. Angle the skewers slightly or fan them out in a circular pattern for a more attractive presentation that makes it easy for guests to grab one.
Drizzle and Garnish Generously
Drizzle the prepared dressing evenly over the skewers, moving in a thin stream back and forth across the platter.
Sprinkle the finely chopped fresh basil over the top so it adheres to the lightly oiled ingredients. Make sure every skewer gets some herbs and dressing for balanced flavor in each bite.
Chill Briefly to Meld Flavors
Place the platter of dressed skewers in the refrigerator for about 10 minutes.
Letting them rest allows the flavors of the dressing and basil to infuse lightly into the cheese and vegetables. Avoid chilling for too long to keep the textures fresh and prevent the cheeses from becoming too firm or dry.
Ingredient Swaps
- Swap cheeses based on preference or budget: use Colby, Monterey Jack, or Edam in place of cheddar or gouda, or all mozzarella for a milder flavor.
- For vegetarian (no animal rennet), choose cheeses labeled “vegetarian” and replace gelatin‑set cheeses. For a lighter option, increase vegetables and grapes and use half the cheese.
- Make it Mediterranean with feta cubes, Kalamata olives, and bell pepper; or go more Italian with provolone, marinated artichokes, and sun-dried tomatoes (pat very oily items dry before skewering).
You Must Know
– Scale – For a crowd, multiply all ingredients by 2 for 16 servings (32 skewers); check platter capacity by dry‑laying a single layer first—each skewer should have at least ½ inch space so the dressing can reach all sides instead of pooling underneath.
Serving Tips
- Arrange skewers in a fan shape on a white platter for colorful contrast.
- Serve with a small bowl of extra balsamic glaze for optional dipping.
- Pair with crisp white wine or sparkling water infused with lemon and mint.
- Add scattered arugula or lettuce leaves under skewers for a fresh, decorative base.
- Mix skewers on a tall stand or tiered tray to add height to the table.
Storage & Make-Ahead
Cheese skewers can be made up to 24 hours ahead.
Store them covered in the refrigerator without dressing or basil to prevent sogginess.
Add dressing and herbs just before serving.
These skewers don’t freeze well; freezing affects cheese texture and vegetable freshness, so refrigeration only is recommended.
Reheating
Reheat cheese skewers gently to avoid melting.
Use a low-power microwave in short bursts.
Use a 300°F (150°C) oven for a few minutes.
Alternatively, briefly warm components in a covered skillet on the stovetop.
Skewers at Global Potlucks
At a bustling global potluck, I love how these cheese skewers slip effortlessly onto the table between fragrant curries, smoky grilled meats, and crisp salads, bridging flavors from everywhere.
They’re neutral yet vivid: salty cheddar, buttery gouda, and milky mozzarella mingling with sweet grapes, cool cucumber, and juicy tomatoes.
I watch guests circle back to them between bold dishes. They’re a little flavor reset—something familiar to hold while you decide between samosas or enchiladas.
The balsamic drizzle whispers of Italy, the oregano nods toward Greece, while the skewer format feels backyard‑casual and universal.
When I bring these, I’m not competing with anyone’s treasured family recipe. I’m offering a colorful, shareable “common language” that lets every other dish shine.
Final Thoughts
Give these cheese skewers a try for your next gathering—they’re colorful, easy to make, and always a hit.
Feel free to mix in your favorite cheeses, fruits, or veggies to make the recipe your own.
Frequently Asked Questions
How Can I Adapt These Skewers for Guests With Dairy Allergies?
Swap cheeses for marinated tofu or firm avocado, and keep the tomatoes, cucumbers, grapes, and olives. I’d drizzle lemony olive oil, scatter herbs, and serve yours on separate skewers so flavors shine and guests feel cared for.
What Wine or Drinks Pair Best With Cheese Skewer Appetizers?
I’d pour a crisp Sauvignon Blanc or dry rosé; they cut through rich cheese and brighten fruit. For non-alcoholic sparkle, try chilled sparkling water with lemon or a tart apple cider over ice.
How Do I Prevent Wooden Skewers From Splintering or Breaking?
I prevent splintering by buying sturdy, smooth skewers, then soaking them 20–30 minutes. I run fingers along the grain, trim rough tips, and twist ingredients on gently so you feel clean wood, not sharp snags.
Are There Kid-Friendly Versions With Milder Flavors and Fun Shapes?
Yes—go for mild mozzarella cubes, heart‑ or star‑shaped cheddar, and sweet grapes. I’d add cherry tomatoes, tiny cucumber moons, maybe butterfly‑shaped slices, then let kids “paint” with a light honey‑yogurt or ranch dip.
How Many Skewers Should I Plan per Person for a Party?
I’d plan two skewers per person for a light nibble, three to four if they’re hungry. Picture guests chatting, hands full of jewel-bright bites—cheese, tomatoes, grapes—so plan generously and let the platter look abundantly inviting.

Cheese Skewers Appetizers
Equipment
- 16 wooden skewers (6-inch)
- 1 large cutting board
- 1 Chef's knife
- 1 Small mixing bowl
- 1 serving platter
Ingredients
- 8 ounce cheddar cheese cubed
- 8 ounce mozzarella cheese cubed
- 8 ounce gouda cheese cubed
- 1 cup cherry tomatoes whole
- 1 cup cucumber sliced into half-moons
- 1 cup seedless grapes whole
- 1/4 cup black olives pitted
- 2 tablespoon extra-virgin olive oil
- 1 tablespoon balsamic vinegar
- 1/2 teaspoon dried oregano
- 1/4 teaspoon black pepper freshly ground
- 1/4 teaspoon salt fine
- 2 tablespoon fresh basil finely chopped
Instructions
- Cut the cheddar, mozzarella, and gouda cheeses into even bite-size cubes.
- Slice the cucumber into thin half-moons and pat dry with a paper towel.
- In a small bowl, whisk together the olive oil, balsamic vinegar, dried oregano, black pepper, and salt.
- Thread cubes of mixed cheese, cherry tomatoes, cucumber slices, grapes, and olives alternately onto each wooden skewer.
- Arrange the filled skewers neatly on a serving platter in a single layer.
- Drizzle the dressing evenly over the skewers.
- Sprinkle the chopped fresh basil over the top of the skewers.
- Let the skewers rest in the refrigerator for 10 minutes to allow flavors to meld before serving.
Notes

Cynthia Weatherford is a seasoned chef and culinary enthusiast who serves as the Recipe creator of Somonday. With decades of experience in the kitchen and a passion for exploring diverse cuisines, Cynthia brings a blend of creativity and technique to every dish. Known for transforming simple ingredients into show-stopping meals, Cynthia believes that cooking is an art form anyone can master. Dedicated to inspiring home cooks, Cynthia shares approachable recipes, pro tips, and culinary wisdom to make every meal memorable.