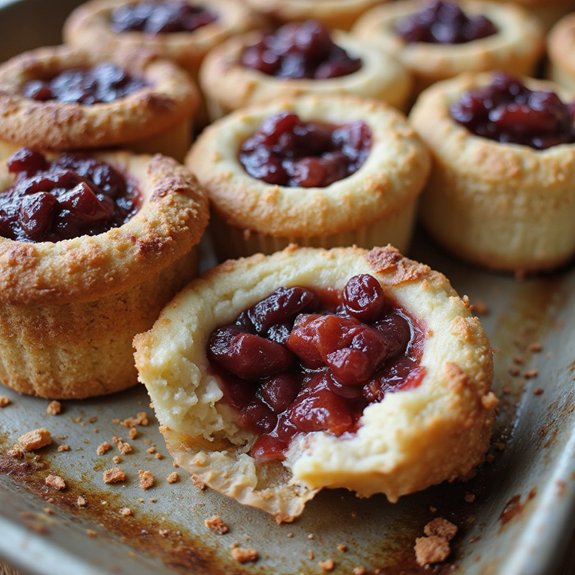
There’s something about peeling back a cupcake liner and finding creamy, velvety cheesecake underneath that makes everything feel a little brighter.
These cheesecake cupcakes are a cozy, handheld dessert with a buttery crumb crust and a silky, tangy-sweet filling.
They bake up far faster than a full-size cheesecake, so you can have an impressive treat ready in under an hour. They’re perfect for sweet-tooth fans, beginner bakers, and anyone who needs a make-ahead dessert for busy days.
I still remember a hectic week when a last-minute invite turned into an impromptu game night. I didn’t have time for a fancy dessert, but a batch of these chilled in the fridge while we cleared the table.
When friends arrived, everyone grabbed their own little cheesecake, and it felt effortless but special.
They shine for gatherings, potlucks, and sudden dessert cravings. Ready to bring this dish to life?
Why You’ll Love It
- Delivers rich, creamy cheesecake flavor in perfectly portioned cupcakes
- Bakes faster than a full cheesecake, ideal for weeknight desserts
- Uses simple, everyday ingredients you likely already have on hand
- Chills and sets beautifully for make-ahead entertaining ease
- Pairs effortlessly with any topping, from cherry pie filling to ganache
Ingredients
- 1 cup graham cracker crumbs — crush finely so the crust holds together well
- 3 tablespoons granulated sugar — mix thoroughly into crust for even sweetness
- 4 tablespoons unsalted butter, melted — cool slightly so crumbs don’t get greasy
- 16 ounces cream cheese, softened — bring fully to room temp for a smooth batter
- 1/2 cup granulated sugar — beat well with cream cheese until light and fluffy
- 2 large eggs, room temperature — add one at a time and don’t overbeat
- 1/3 cup sour cream, room temperature — adds tang and keeps the texture creamy
- 1 teaspoon vanilla extract — use pure vanilla for best flavor
- 1 tablespoon all-purpose flour — helps the cheesecakes set without cracking
- 1 pinch salt — balances sweetness and boosts flavor
- 1/2 cup cherry pie filling, for topping (optional) — add just before serving for freshness
Step-by-Step Method
Prep the Pan & Preheat
Line a 12-cup muffin pan with paper liners. Ensure each liner sits flat so the batter distributes evenly.
Preheat your oven to 325°F (165°C) so it reaches temperature as you prepare the crust and filling. Set out cream cheese, eggs, and sour cream to come to room temperature for a smoother, lump-free batter.
Mix the Crust
Combine graham cracker crumbs, 3 tablespoons granulated sugar, and melted butter in a small bowl.
Stir until every crumb is evenly moistened and the mixture resembles wet sand. Check that there are no dry patches. This even coating of butter helps the crust hold together and bake into a firm, flavorful base.
Press & Prebake the Crust
Divide the crumb mixture evenly between the liners.
Press firmly into the bottoms using your fingers or the flat bottom of a small glass. Create a compact, level crust in each cup. Bake for about 5 minutes, then remove. Let the crusts cool slightly while you prepare the cheesecake filling.
Beat the Cream Cheese
Place softened cream cheese in a mixing bowl.
Beat with an electric mixer until completely smooth and creamy, scraping down the bowl as needed. Eliminate all lumps at this stage. Properly softened cream cheese ensures a silky texture later. Avoid adding sugar before it’s perfectly smooth to prevent remaining bits from staying grainy.
Add Sugar & Eggs Gently
Add 1/2 cup granulated sugar to the cream cheese and beat until light and well combined.
Crack in the eggs one at a time. Beat on low speed just until each egg is incorporated. Don’t overmix after adding eggs. Gentle mixing helps prevent too much air in the batter, which can cause cracking.
Blend in Sour Cream & Flavor
Add sour cream, vanilla extract, flour, and a pinch of salt.
Mix on low speed until the batter is smooth and uniform. Scrape down the sides and bottom of the bowl to catch any unmixed streaks. Stop as soon as everything is blended. Overmixing can toughen the texture and create excess air bubbles.
Fill the Liners & Release Air
Spoon or scoop the cheesecake batter evenly over the cooled crusts.
Fill each liner almost to the top, leaving a slight space to avoid overflow. Tap the muffin pan firmly on the counter a few times. Release any trapped air bubbles in the batter so the cheesecakes bake with smooth tops and even interiors.
Bake Until Just Set
Place the pan on the center rack of the preheated oven.
Bake for 15 to 18 minutes. Check that the edges are set while the centers remain slightly jiggly but not wet or shiny. Avoid opening the oven door repeatedly. Once done, remove the pan and place it on a cooling rack to start cooling.
Cool Gradually on the Rack
Let the cheesecake cupcakes cool in the pan on the rack for about 30 minutes.
Keep them away from drafts and don’t move them too much. This gradual cooling helps them set evenly and reduces the risk of sinking or cracking. The centers will continue firming as they lose heat.
Chill to Fully Set
Transfer the cooled cupcakes, still in their liners, to the refrigerator.
Chill for at least 1 1/2 hours, or until fully cold and firm. Longer chilling improves flavor and texture. Keep them covered if storing longer. Proper chilling ensures clean slices, a creamy consistency, and stable shape when unwrapped.
Top & Serve Chilled
Remove the chilled cheesecake cupcakes from the liners carefully.
Spoon a little cherry pie filling on top of each, if desired. Serve them cold for the best texture and flavor. Add any other toppings just before serving. Store leftovers covered in the refrigerator for up to four days, enjoying as a convenient make-ahead dessert.
Ingredient Swaps
- Use crushed digestive biscuits, vanilla wafers, or shortbread in place of graham crackers; swap in browned butter for a richer crust.
- For lighter or lower-lactose filling, use Neufchâtel or lactose-free cream cheese and full-fat Greek yogurt instead of sour cream.
- Gluten-free: use GF cookies or oats for the crust and a 1:1 gluten-free flour blend instead of all-purpose flour.
- Egg-free: replace each egg with 3 tablespoons of plain yogurt or a commercial egg replacer (texture will be slightly denser).
You Must Know
– Doneness · If the tops start to crack early
Lightly tent the pan with foil for the last 5–7 minutes and pull them when the centers still have a quarter-sized wobble.
This protects the delicate custard from overcooking, which causes cracks and dryness, and the residual heat finishes setting them as they cool.
– Troubleshoot · When the crust crumbles and won’t hold together
Add 1–2 teaspoons extra melted butter and firmly compress with the back of a spoon until the surface looks smooth and slightly glossy.
The extra fat and tighter packing help the crumbs fuse into a solid base that slices cleanly once chilled for at least 90 minutes.
– Scale · For double or half batches
Keep the same 325°F (165°C) and aim for a similar fill level (about ¼ inch below the liner’s top), but start checking doneness at 12 minutes for half batches and up to 22 minutes for double batches or larger pans.
Oven load and pan size change how fast the centers lose their wet shine, the key visual cue for pulling them.
– Flavor Boost · To intensify the cheesecake taste
Swap 2 tablespoons of the sour cream for freshly squeezed lemon juice and add the finely grated zest of ½ lemon.
The acidity sharpens the tang of the 16 ounces of cream cheese and balances sweetness, especially if you’re using a very sweet fruit topping.
– Make-Ahead · For serving the next day or later
Chill uncovered until completely cold (about 2 hours total), then cover tightly and keep refrigerated up to 4 days or frozen up to 2 months without toppings.
Cooling before covering prevents condensation that can drip on the surface; adding cherry pie filling right before serving keeps the tops from getting soggy.
Serving Tips
- Top with cherry pie filling and a mint leaf for a simple, classic look.
- Serve on small dessert plates with a drizzle of chocolate or caramel sauce.
- Add fresh berries and a dusting of powdered sugar for a colorful finish.
- Plate alongside a scoop of vanilla ice cream for an indulgent dessert.
- Arrange on a tiered stand for parties, mixing different fruit toppings for variety.
Storage & Make-Ahead
Cheesecake cupcakes keep well covered in the refrigerator for up to 4 days, making them perfect for preparing a day or two ahead.
They also freeze nicely (without toppings) for up to 2 months; thaw overnight in the fridge, then add cherry pie filling or other toppings just before serving.
Reheating
Reheat cheesecake cupcakes gently to preserve texture.
Use a microwave at 50% power in 10-second bursts.
Use a low oven (275°F) for brief warming.
Use a stovetop steamer for subtle warmth.
Cheesecake Cupcakes in Pop Culture
When I think about cheesecake cupcakes in pop culture, my mind jumps straight to those TV scenes where a character opens the fridge late at night and finds a perfectly swirled, bite-size cheesecake waiting like a tiny, glittering secret.
I always lean closer to the screen, trying to see if it’s cherry on top—because that glossy red has become the unofficial signal for comfort.
I notice them in baking shows too, lined up like little jewelry: caramel-drizzled, Oreo-crusted, birthday-sprinkled. They’re the “glow‑up” version of regular cupcakes, so they show up at fictional office parties, bridal showers, even break‑up nights in.
Whenever I spot one on screen, I don’t just see dessert; I see a tiny, edible plot twist promising everything’s about to feel softer.
Final Thoughts
Now that you know how simple these cheesecake cupcakes are to make, it’s the perfect time to give them a try.
Feel free to tweak the toppings, swap in your favorite crust, or add your own creative twist to make them truly yours.
Frequently Asked Questions
Can I Make These Cheesecake Cupcakes Gluten-Free Without Affecting Texture?
Yes, you can. I’d swap in finely ground gluten-free graham crackers and a spoonful of cornstarch instead of flour. I’ve done it for friends, and the cheesecakes still baked up silky, rich, and beautifully intact.
How Do Altitude Changes Affect Cheesecake Cupcake Baking Time?
Altitude makes them bake faster and set slower, so I tell you to lower oven temperature slightly, extend time a few minutes, then watch for a soft wobble—like a calm pond—rather than trusting the clock.
What Are Kid-Friendly Topping Ideas Beyond Fruit or Chocolate?
I love using crushed rainbow cereal, mini marshmallows, gummy bears, or sprinkles. Sometimes I swirl peanut butter or caramel on top—kids’ eyes light up like birthday candles when they see their own wild creations.
Can I Convert This Recipe for Mini or Jumbo Muffin Tins?
You can, but you’ll need to adjust. For minis, bake crust 3 minutes, filling 8–12. For jumbo, crust 7 minutes, filling 22–28. I always test with the “slight wobble” center.
How Can I Adapt This Recipe for Keto or Low-Carb Diets?
You can absolutely adapt this: I’d swap graham crumbs for almond flour and butter, use powdered erythritol or allulose instead of sugar, and choose a no-sugar fruit topping—still rich, creamy, and midnight-fridge-raid worthy.
Cheesecake Cupcakes
Equipment
- 1 12-cup muffin pan
- 12 paper cupcake liners
- 2 Mixing bowls
- 1 Electric mixer or whisk
- 1 Rubber spatula
- 1 Measuring cups set
- 1 Measuring spoons set
- 1 spoon or small scoop
- 1 Cooling rack
Ingredients
- 1 cup graham cracker crumbs
- 3 tablespoon granulated sugar
- 4 tablespoon unsalted butter melted
- 16 ounce cream cheese softened
- 1/2 cup granulated sugar
- 2 large eggs room temperature
- 1/3 cup sour cream room temperature
- 1 teaspoon vanilla extract
- 1 tablespoon all-purpose flour
- 1 pinch salt
- 1/2 cup cherry pie filling for topping optional
Instructions
- Line the muffin pan with paper cupcake liners and preheat the oven to 325°F (165°C).
- In a small bowl, mix together the graham cracker crumbs, 3 tablespoons sugar, and melted butter until evenly moistened.
- Divide the crumb mixture evenly among the cupcake liners and press firmly into the bottoms to form crusts.
- Bake the crusts for 5 minutes, then remove from the oven and set aside to cool slightly.
- In a mixing bowl, beat the softened cream cheese with an electric mixer until smooth and creamy.
- Add 1/2 cup sugar and beat until well combined and fluffy.
- Beat in the eggs one at a time, mixing on low speed just until incorporated after each addition.
- Add sour cream, vanilla extract, flour, and salt, then mix on low speed until the batter is smooth without overbeating.
- Spoon or scoop the cheesecake batter evenly over the prepared crusts, filling each liner almost to the top.
- Tap the pan gently on the counter to release any air bubbles from the batter.
- Bake for 15 to 18 minutes, or until the centers are mostly set and only slightly jiggly in the middle.
- Remove the pan from the oven and cool the cupcakes in the pan on a cooling rack for 30 minutes.
- Transfer the cooled cheesecake cupcakes (still in liners) to the refrigerator and chill for at least 1 1/2 hours or until fully set.
- Before serving, remove the liners, top each cupcake with a spoonful of cherry pie filling if desired, and serve chilled.
Notes

Cynthia Weatherford is a seasoned chef and culinary enthusiast who serves as the Recipe creator of Somonday. With decades of experience in the kitchen and a passion for exploring diverse cuisines, Cynthia brings a blend of creativity and technique to every dish. Known for transforming simple ingredients into show-stopping meals, Cynthia believes that cooking is an art form anyone can master. Dedicated to inspiring home cooks, Cynthia shares approachable recipes, pro tips, and culinary wisdom to make every meal memorable.


