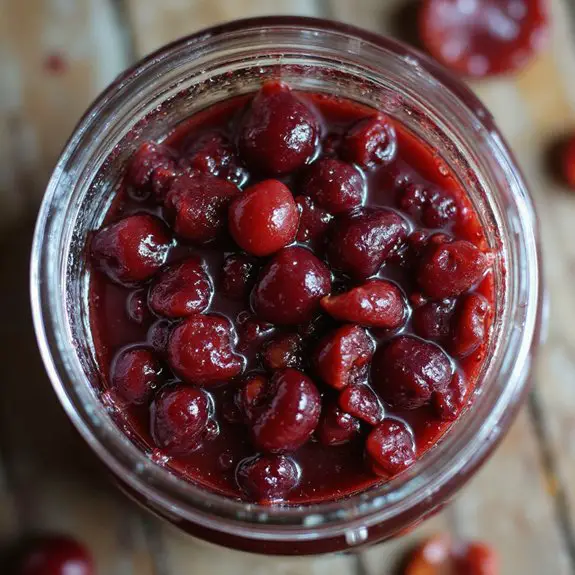
Imagine the sweet aroma of ripe cherries filling your kitchen as you prepare a delightful batch of cherry jam.
There’s something about the deep red hue and rich fragrance that instantly evokes a sense of comfort and indulgence.
This recipe is incredibly simple yet transforms basic ingredients into a luscious spread that captures summer in a jar.
With just a few steps, you can create your very own homemade cherry jam. Let’s bring this dish to life!
Kitchen Tools Required
- 1 large pot
- 1 wooden spoon
- 1 potato masher
- 1 ladle
- 4 sterilized jars with lids
Ingredients
- 4 cups fresh cherries, pitted
- 2 cups granulated sugar
- 1 tablespoon lemon juice
- 1 teaspoon vanilla extract (optional)
Cook & Prep Time
To efficiently manage your time while preparing and cooking cherry jam, follow this timeline:
- Reading & Preparation:
- 5 minutes: Quickly read through the entire recipe to familiarize yourself with the steps and equipment needed. Gather all ingredients and equipment.
- Prep Work:
- 15 minutes:
- Pit the cherries (4 cups).
- Set up your cooking station with the pot, potato masher, wooden spoon, ladle, and sterilized jars.
- Cooking:
- 45 minutes:
- Add the pitted cherries to the pot and slightly crush them with the potato masher.
- Stir in the sugar (2 cups) and lemon juice (1 tablespoon).
- Cook over medium heat, stirring occasionally.
- Bring to a boil, then reduce to a simmer and continue to simmer for 45 minutes until thickened.
- Optionally, stir in 1 teaspoon of vanilla extract.
- Cooling & Jarring:
- 10 minutes:
- Remove the pot from heat and let it cool slightly.
- Use the ladle to transfer the jam into sterilized jars.
- Seal the jars with lids.
- Resting:
- 12 hours: Allow the jars to rest and set.
Feel free to adjust the timeline as needed to suit your pace and kitchen setup.
Recipe Instructions
Add pitted cherries to a large pot.
Use a potato masher to slightly crush the cherries.
Stir in granulated sugar and lemon juice.
Cook the mixture over medium heat, stirring occasionally.
Bring the mixture to a boil and reduce the heat to a simmer.
Continue to simmer for 45 minutes or until the mixture thickens.
Stir in vanilla extract if desired.
Remove the pot from heat and let it cool slightly.
Use a ladle to transfer the jam into sterilized jars.
Seal the jars with lids and let them rest for 12 hours to set.
Serving Tips
- Toast: Spread the cherry jam on a slice of warm toast for a simple yet delightful breakfast or snack.
- Yogurt: Swirl a spoonful of cherry jam into plain or vanilla yogurt for a fruity twist.
- Pancakes: Use cherry jam as a topping on pancakes or waffles to add a burst of flavor and color.
- Cheese Plate: Pair cherry jam with a selection of cheeses, such as brie or goat cheese, for a sweet and savory appetizer.
- Ice Cream: Drizzle cherry jam over vanilla ice cream for a delicious and fruity dessert topping.
Storage
Store cherry jam in sterilized jars with tightly sealed lids.
Keep in a cool, dark place for up to one year.
Refrigerate opened jars and consume within a month for ideal freshness.
Freezing
To freeze cherry jam, transfer it to freezer-safe containers.
Leave some space for expansion. Seal tightly, label with the date, and store for up to six months for ideal freshness.
Reheating
To reheat cherry jam, use a microwave or stovetop on low heat.
Stir frequently to avoid burning. Confirm the jam reaches desired warmth without boiling.
This helps preserve its texture and flavor.
Final Thoughts
Making cherry jam at home is a rewarding experience that allows you to enjoy the sweet, tangy taste of cherries year-round.
Once you’ve mastered the basic recipe, don’t hesitate to experiment with flavors and textures.
Consider adding a pinch of cinnamon or a splash of almond extract for a unique twist.
Remember, the quality of your ingredients will greatly influence the final product, so choose ripe, flavorful cherries for the best results.
With patience and practice, you’ll be able to create a delicious homemade cherry jam that will be a hit at any table.
Frequently Asked Questions
How Can I Tell if Cherries Are Ripe?
You can tell cherries are ripe by their deep, rich color and firm texture. Gently squeeze them; they should yield slightly but not mush. Their sweet aroma will entice your senses, signaling they’re ready for culinary magic.
Can I Use Frozen Cherries Instead of Fresh?
Yes, you can use frozen cherries. Thaw them first, capturing their juice. Their flavors meld beautifully, though slightly softer than fresh. Adjust cooking time as needed, ensuring your jam thickens to a luscious, aromatic consistency.
How Do I Pit Cherries Without a Pitter?
You can easily pit cherries without a pitter. Just use a sturdy straw or chopstick. Push through the cherry’s stem end, feeling the gentle pop as the pit releases, leaving juicy, sweet flesh behind.
What Is the Shelf Life of Homemade Cherry Jam?
Your homemade jam, bursting with luscious cherry flavor and a perfect balance of sweetness, can last up to a year when sealed in sterilized jars. Store in a cool, dark place to preserve its delightful taste.
Are There Any Substitutes for Lemon Juice in This Recipe?
You could swap lemon juice with lime juice for a zesty twist, or use apple cider vinegar for a tangy depth. Each substitute maintains that essential acidity, ensuring your mixture sets perfectly and bursts with vibrant flavor.
Cherry Jam
Equipment
- 1 Large pot
- 1 Wooden spoon
- 1 potato masher
- 1 Ladle
- 4 sterilized jars with lids
Ingredients
- 4 cups fresh cherries pitted
- 2 cups granulated sugar
- 1 tablespoon lemon juice
- 1 teaspoon vanilla extract optional
Instructions
- Add pitted cherries to a large pot.
- Use a potato masher to slightly crush the cherries.
- Stir in granulated sugar and lemon juice.
- Cook the mixture over medium heat, stirring occasionally.
- Bring the mixture to a boil and reduce the heat to a simmer.
- Continue to simmer for 45 minutes or until the mixture thickens.
- Stir in vanilla extract if desired.
- Remove the pot from heat and let it cool slightly.
- Use a ladle to transfer the jam into sterilized jars.
- Seal the jars with lids and let them rest for 12 hours to set.
Notes

Cynthia Weatherford is a seasoned chef and culinary enthusiast who serves as the Recipe creator of Somonday. With decades of experience in the kitchen and a passion for exploring diverse cuisines, Cynthia brings a blend of creativity and technique to every dish. Known for transforming simple ingredients into show-stopping meals, Cynthia believes that cooking is an art form anyone can master. Dedicated to inspiring home cooks, Cynthia shares approachable recipes, pro tips, and culinary wisdom to make every meal memorable.