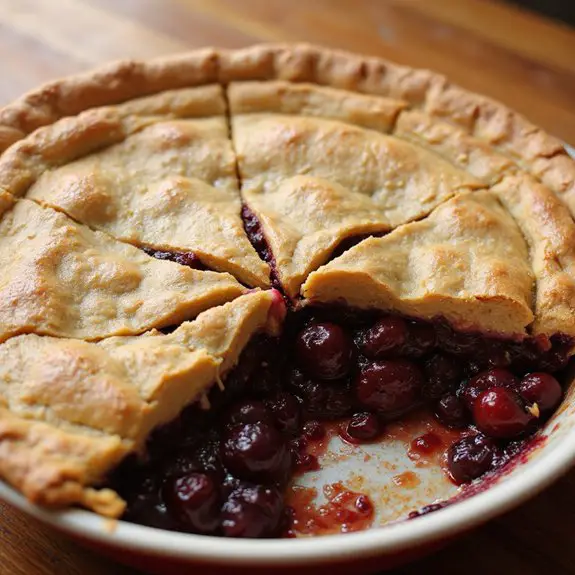
Imagine biting into a warm slice of chocolate cherry pie, the flaky crust giving way to a luscious filling of sweet cherries and rich chocolate, all topped with a silky pumpkin spice glaze.
The aroma of this delightful dessert fills your kitchen, enveloping you in a comforting embrace of sweet and spicy notes.
This pie brings back memories of a chilly winter evening when I needed a quick dessert to impress unexpected guests.
The combination of chocolate and cherries was a hit, and the pumpkin spice glaze added just the right touch of warmth.
It’s perfect for busy weeknights when you crave a homemade treat or as a centerpiece for a cozy Sunday supper with family.
This pie isn’t just delicious—it’s a celebration of the joy of sharing good food with those you love.
Ready? Let’s cook!
Why You’ll Love It
- Delivers bold flavor with rich chocolate and sweet cherry blend.
- Uses pantry staples like sugar, cornstarch, and vanilla extract.
- Offers easy preparation with pre-made pie crusts.
- Impresses with a unique pumpkin spice glaze topping.
- Satisfies dessert cravings with a delightful, homemade taste.
Ingredients
- 1 package of pie crust (2 crusts) — ready-made for convenience
- 2 cups sweet cherries, pitted and halved — fresh for best flavor
- 1 cup semi-sweet chocolate chips — opt for high-quality brand
- 3/4 cup granulated sugar — adjust based on cherry sweetness
- 1/4 cup cornstarch — acts as a thickening agent
- 1 tablespoon lemon juice — freshly squeezed for brightness
- 1 teaspoon vanilla extract — use pure for rich flavor
- 1 teaspoon pumpkin spice — homemade blend if preferred
- 1/2 cup powdered sugar — sifted for smooth glaze
- 1 tablespoon milk — whole milk for creamy texture
- 1 egg, beaten — for shiny crust finish
Step-by-Step Method
Preheat the oven to 375°F (190°C). Roll out one pie crust and carefully fit it into the pie dish. Confirm the crust is evenly spread and pressed into the corners. This will form the base of your pie, creating a foundation for the filling to rest upon.
Mix the Filling
Combine the cherries, chocolate chips, granulated sugar, cornstarch, lemon juice, and vanilla extract in a large mixing bowl.
Mix until all ingredients are evenly distributed. This mixture will provide a delightful blend of tart and sweet flavors that will fill your pie.
Assemble the Pie
Pour the cherry mixture into the prepared pie crust.
Roll out the second pie crust and lay it over the filling. Seal the edges by pressing them together firmly to prevent any leakage during baking.
Cut slits in the top crust to allow steam to escape, confirming a perfectly baked pie.
Apply the Egg Wash
Brush the top crust with beaten egg using a pastry brush.
This will give the pie a lovely golden color when baked. Be gentle to avoid tearing the crust and confirm even coverage for a beautiful finish.
Bake the Pie
Place the pie in the preheated oven.
Bake for 45 minutes or until the crust is golden brown and the filling is bubbling.
The baked pie should emit a delicious aroma, indicating that it’s ready to be removed from the oven.
Prepare the Glaze
Whisk together pumpkin spice, powdered sugar, and milk in a medium saucepan over low heat.
Stir until smooth and well-combined. The glaze should be slightly thick but pourable, adding a festive touch to the pie.
Cool & Serve
Once the pie is baked, remove it from the oven and let it rest for 30 minutes to allow the filling to set.
Drizzle the pumpkin spice glaze over the pie before serving, enhancing its flavors and making it irresistibly appetizing.
Serve and enjoy this delightful dessert with family and friends.
Ingredient Swaps
- For a gluten-free option, use a gluten-free pie crust instead of the regular pie crust.
- Substitute dark chocolate chips for semi-sweet chocolate chips if you prefer a richer flavor.
- Use a sugar substitute, like stevia or erythritol, in place of granulated sugar for a lower-calorie version.
- If fresh cherries are unavailable, canned or frozen cherries can be used, ensuring they’re well-drained.
- Almond milk or a similar non-dairy milk can replace regular milk in the glaze for a dairy-free alternative.
You Must Know
- Preheat the Oven: Confirm your oven is preheated to 375°F (190°C) before starting to bake the pie. This guarantees even cooking and the perfect golden crust.
- Use Fresh Cherries: For the best flavor, use fresh, sweet cherries. If using frozen cherries, make certain to thaw and drain them thoroughly to avoid excess moisture in your pie.
- Seal the Pie Edges: Make certain the edges of the pie crust are well-sealed to prevent any filling from leaking out during baking, which can cause a mess and affect the pie’s texture.
- Cut Slits in the Top Crust: Remember to cut slits in the top pie crust to allow steam to escape. This helps prevent the pie from becoming soggy and guarantees a crisp crust.
- Cool Before Glazing: Allow the pie to rest and cool for at least 30 minutes after baking before drizzling the pumpkin spice glaze. This prevents the glaze from melting and guarantees it sets nicely on top.
Serving Tips
- Serve slices of pie with a scoop of vanilla ice cream.
- Pair with a dollop of whipped cream and a sprinkle of chocolate shavings.
- Garnish with fresh cherries and a mint leaf for an elegant touch.
- Accompany with a hot cup of coffee or spiced tea.
- Use a decorative plate to enhance presentation and appeal.
Storage & Make-Ahead
Chocolate Cherry Pie can be stored in the refrigerator for up to 4 days.
To make ahead, prepare the pie and freeze it unbaked for up to 3 months.
When ready to enjoy, bake directly from frozen. Add an extra 10-15 minutes to the baking time.
Reheating
To gently reheat Chocolate Cherry Pie, use a microwave at low power.
An oven at 300°F for 10-15 minutes.
Or a stovetop covered on low heat until warmed through.
Culinary Traditions and Celebrations
When we think about the sweet indulgence of pie, it’s easy to recall cherished family gatherings and festive celebrations.
I remember standing in my grandmother’s cozy kitchen, surrounded by laughter and the aroma of baking, as she shared her pie-making secrets. Those moments were more than just about dessert; they were about connection and tradition.
Baking a pie like Chocolate Cherry with Pumpkin Spice Glaze transforms an ordinary day into a celebration. The rich chocolate mingling with sweet cherries, all under a warm, spiced glaze, evokes warmth and joy.
It’s the kind of dessert that invites everyone around the table, inspires stories, and creates new memories. Sharing this pie with loved ones feels like honoring those traditions and creating new ones together.
Final Thoughts
Give this Chocolate Cherry Pie with Pumpkin Spice Glaze a try for a delightful twist on a classic dessert, and feel free to adjust the sugar based on your taste preferences or the sweetness of your cherries. Enjoy creating your own delicious version of this treat!
Frequently Asked Questions
Can I Use a Gluten-Free Pie Crust?
I’ve swapped regular crust for gluten-free in pies before, and it’s been delicious! Just guarantee the crust is sturdy enough to hold the filling. A friend once tried it, and the pie turned out wonderfully.
How Do I Prevent a Soggy Bottom Crust?
I always blind bake my crust first to prevent sogginess. Just line it with parchment, fill with weights, and bake until golden. It works wonders! You’ll love the crisp texture it brings to your pie.
What Can I Substitute for Pumpkin Spice?
Whenever I run out of pumpkin spice, I mix cinnamon, nutmeg, and clove. It’s like creating my own little fall magic. The aroma transports me back to cozy afternoons baking with my grandmother. Try it!
Is There a Vegan Alternative for the Egg Wash?
I’ve found that a mix of almond milk and maple syrup works wonders as a vegan egg wash alternative. It gives the crust a lovely golden finish. I remember the first time I tried it, perfection!
How Can I Make This Pie Nut-Free?
I’d swap chocolate chips for a nut-free brand. Once, my friend had a similar dilemma, and I suggested Enjoy Life chocolate. It turned out deliciously! Always double-check labels, and you’ll savor every bite worry-free.
Chocolate Cherry Pie with Pumpkin Spice Glaze
Equipment
- 1 Pie dish
- 1 Rolling Pin
- 1 Medium saucepan
- 1 Whisk
- 1 large mixing bowl
- 1 pastry brush
- 1 Measuring cups and spoons
- 1 Oven
Ingredients
- 1 package pie crust (2 crusts)
- 2 cup sweet cherries pitted and halved
- 1 cup semi-sweet chocolate chips
- 3/4 cup granulated sugar
- 1/4 cup cornstarch
- 1 tablespoon lemon juice
- 1 teaspoon vanilla extract
- 1 teaspoon pumpkin spice
- 1/2 cup powdered sugar
- 1 tablespoon milk
- 1 egg beaten (for egg wash)
Instructions
- Preheat the oven to 375°F (190°C).
- Roll out one pie crust and fit it into the pie dish.
- In a large mixing bowl, combine cherries, chocolate chips, granulated sugar, cornstarch, lemon juice, and vanilla extract.
- Pour the cherry mixture into the prepared pie crust.
- Roll out the second pie crust and place it over the filling, sealing the edges.
- Cut slits in the top crust to allow steam to escape.
- Brush the top crust with beaten egg.
- Place the pie in the oven and bake for 45 minutes or until golden brown.
- While the pie bakes, whisk together pumpkin spice, powdered sugar, and milk in a saucepan over low heat until smooth for the glaze.
- Once the pie is done, remove it from the oven and let it rest for 30 minutes.
- Drizzle the pumpkin spice glaze over the pie before serving.
Notes

Cynthia Weatherford is a seasoned chef and culinary enthusiast who serves as the Recipe creator of Somonday. With decades of experience in the kitchen and a passion for exploring diverse cuisines, Cynthia brings a blend of creativity and technique to every dish. Known for transforming simple ingredients into show-stopping meals, Cynthia believes that cooking is an art form anyone can master. Dedicated to inspiring home cooks, Cynthia shares approachable recipes, pro tips, and culinary wisdom to make every meal memorable.


