There’s something about biting into a chocolate-covered strawberry that feels instantly celebratory—juicy red berries, glossy dark chocolate, and that first fragrant burst of sweetness.
Now imagine all of that captured in a cozy dessert you can hold in one hand: chocolate covered strawberry cupcakes.
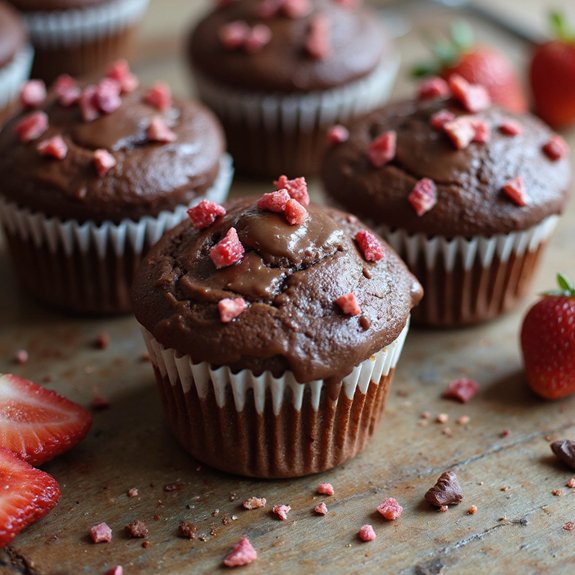
These tender chocolate cupcakes, crowned with fluffy strawberry buttercream and a chocolate-drizzled berry on top, look bakery-fancy but are surprisingly quick to pull together, perfect for busy hosts or confident beginners.
They’re ideal for sweet-tooth fans, date nights at home, birthdays, and anyone who loves a little romance in dessert form.
When a friend texted that she’d had a rough week, a batch of these cupcakes—still slightly warm, with the frosting swirling high—turned an ordinary Tuesday into a small celebration on her porch.
They shine at last-minute gatherings, Valentine’s Day, or when you just need something pretty and comforting.
Ready to bring this dish to life?
Why You’ll Love It
- Delivers rich chocolate flavor with fresh, juicy strawberry in every bite
- Feels special-occasion fancy while using simple, everyday baking ingredients
- Offers a stunning presentation with glossy ganache and whole strawberry topper
- Balances tender, moist cupcake crumb with silky, melt-in-your-mouth chocolate
- Impresses guests yet stays approachable for beginner and experienced bakers alike
Ingredients
- 1 1/4 cups all-purpose flour, sifted — fluff and level for accurate measure
- 1/2 cup unsweetened cocoa powder, sifted — use natural cocoa, not hot cocoa mix
- 1 teaspoon baking powder — check it’s fresh for proper rise
- 1/2 teaspoon baking soda — balances acidity from strawberries
- 1/4 teaspoon fine salt — enhances chocolate and berry flavor
- 3/4 cup granulated sugar — gives structure and sweetness
- 1/4 cup light brown sugar, packed — adds moisture and caramel notes
- 1/2 cup unsalted butter, softened — room temp for easy creaming
- 2 large eggs, room temperature — incorporate more evenly into batter
- 1 teaspoon pure vanilla extract — rounds out chocolate and fruit flavors
- 3/4 cup whole milk, room temperature — keeps cupcakes tender and moist
- 1 cup fresh strawberries, finely chopped — ripe berries give best flavor
- 1 teaspoon fresh lemon juice — brightens and helps macerate strawberries
- 1 tablespoon granulated sugar (for strawberries) — draws out strawberry juices
- 1/2 cup heavy whipping cream (for ganache) — higher fat makes silkier ganache
- 1 cup semi-sweet chocolate chips (for ganache) — choose good-quality melting chips
- 1 tablespoon unsalted butter, room temperature (for ganache) — adds shine and softness
- 12 whole fresh strawberries, dried and hulled (for topping) — pat very dry so ganache adheres
Step-by-Step Method
Prep the Pan & Heat the Oven
Preheat the oven to 350°F (175°C). Line a standard 12-cup muffin pan with paper cupcake liners so the cakes release easily.
Clear your workspace and gather all ingredients and tools. This prep step keeps the process smooth and prevents overmixing later while you hunt for missing equipment or ingredients.
Combine the Dry Ingredients
Whisk together the sifted flour, sifted cocoa powder, baking powder, baking soda, and salt in a medium bowl.
Break up any lumps as you whisk. Properly combining these dry ingredients guarantees even leavening and consistent texture throughout the cupcakes.
Set this bowl aside for later mixing with the wet ingredients.
Macerate the Strawberries
Stir the finely chopped fresh strawberries with lemon juice and 1 tablespoon granulated sugar in a small bowl.
Let them sit while you prepare the batter. The sugar and acid draw out juices, softening the berries and intensifying flavor.
These juices will blend into the batter, adding moisture and subtle strawberry sweetness.
Cream the Butter and Sugars
Beat the softened butter, granulated sugar, and light brown sugar in a large mixing bowl on medium speed.
Mix for 2–3 minutes until the mixture looks light, creamy, and slightly fluffy. Proper creaming incorporates air, helping the cupcakes rise evenly and bake with a tender, soft crumb.
Add the Eggs and Vanilla
Add the eggs one at a time to the creamed butter mixture, beating well after each addition. Guarantee each egg is fully incorporated before adding the next.
Mix in the vanilla extract to flavor the batter. Scrape down the sides of the bowl as needed to avoid any unmixed streaks of egg or sugar.
Alternate Dry Ingredients and Milk
Add half of the dry ingredient mixture to the wet ingredients and mix on low speed just until combined.
Pour in the milk and mix again on low until mostly incorporated. Add the remaining dry ingredients and mix only until no dry streaks remain.
Avoid overmixing to keep the cupcakes tender and soft.
Fold in the Macerated Strawberries
Gently fold the macerated strawberries and all their juices into the batter using a rubber spatula.
Lift and turn the batter rather than stirring vigorously. Distribute the fruit evenly without deflating the mixture.
This gentle folding prevents toughness and keeps pockets of fresh strawberry flavor throughout each cupcake.
Fill the Liners and Bake
Divide the batter evenly among the 12 cupcake liners, filling each about two-thirds full. Use a scoop or spoon for even portions.
Place the pan in the preheated oven and bake for 18–20 minutes. Check doneness by inserting a toothpick in the center; it should come out with a few moist crumbs, not wet batter.
Cool the Cupcakes Completely
Remove the pan from the oven and let the cupcakes cool in the pan for 5 minutes.
Transfer them to a wire cooling rack to cool completely, about 30–40 minutes. Make certain they’re fully cool before adding ganache.
Warm cupcakes will melt the topping and cause it to slide off instead of setting neatly.
Heat the Cream for Ganache
Warm the heavy whipping cream in a small saucepan over medium-low heat.
Watch carefully and heat until steaming and just starting to bubble around the edges, but not boiling. Removing it before boiling prevents scorching and keeps the cream smooth.
Properly heated cream will melt the chocolate evenly for a silky ganache.
Melt the Chocolate and Whisk Smooth
Place the semi-sweet chocolate chips in a heatproof bowl. Pour the hot cream over the chocolate and let it sit undisturbed for 2–3 minutes.
Add the tablespoon of butter, then whisk gently from the center outward until the mixture becomes smooth, glossy, and fully combined with no visible chocolate pieces.
Thicken the Ganache Slightly
Let the ganache sit at room temperature for 10–15 minutes so it thickens slightly while remaining pourable.
Stir occasionally to monitor consistency. You’re aiming for a texture that coats a spoon without running off too quickly.
If it becomes too thick, briefly warm it and stir again until smooth and fluid.
Dip or Spoon the Ganache
Make certain the cupcakes are completely cool. Dip the top of each cupcake directly into the ganache, twisting slightly for an even coating, or spoon ganache over the tops and let the excess drip off.
If desired, transfer some ganache to a piping bag and pipe a small swirl in the center for extra height and drama.
Top with Whole Strawberries and Set
Press one whole, dry, hulled strawberry gently into the center of each cupcake while the ganache is still soft so it adheres.
Let the ganache set at room temperature for about 10 minutes before serving or refrigerating. Serve the cupcakes the same day for best texture, bringing chilled cupcakes back to room temperature before enjoying.
Ingredient Swaps
- Flour: Use a 1:1 gluten-free all-purpose blend for gluten-free cupcakes; add an extra tablespoon of milk if the batter seems thick.
- Dairy: Swap butter for vegan butter and whole milk for oat or soy milk; for ganache, use coconut cream plus dairy-free chocolate chips.
- Sugar: Light brown sugar can be replaced with all granulated sugar; use coconut sugar for a less refined option (cupcakes will be slightly denser).
- Chocolate: Any baking chocolate (chopped bar) works in place of chips; use dark chocolate for a less sweet ganache.
- Strawberries: Frozen strawberries (thawed and well-drained) can sub for fresh in the batter, but keep fresh berries for the topping if possible.
You Must Know
– Scale – *For a larger batch,* multiply all ingredients by 1.5 to yield about 18 cupcakes; for a smaller batch, halve everything for 6 cupcakes but keep the oven temperature the same and start checking doneness 2–3 minutes earlier, since smaller batches sometimes finish a bit quicker.
Serving Tips
- Serve on a white platter to highlight the dark chocolate and red strawberries.
- Pair with chilled strawberry milk, rosé, or a light sparkling wine.
- Add a dollop of whipped cream and a drizzle of leftover ganache on plates.
- Garnish the platter with fresh strawberry slices and a dusting of powdered sugar.
- For parties, display on a tiered stand lined with pink or red cupcake wrappers.
Storage & Make-Ahead
Store cupcakes in an airtight container in the fridge for up to 2 days.
Bring to room temperature before serving for best texture.
You can bake cupcakes a day ahead, then ganache and top with berries the day of serving.
Unfilled, ungarnished cupcakes freeze well for up to 2 months.
Reheating
Reheat cupcakes gently: in the microwave at 50% power for 10–15 seconds, or in a 300°F oven, loosely covered, for 5–8 minutes.
Avoid stovetop, which heats unevenly.
Valentine’s Dessert Traditions
When February light softens and everything seems dipped in pink and red, I always think of how desserts quietly anchor Valentine’s traditions.
Long before I plan flowers or music, I’m already picturing something chocolatey on the table, catching the glow of a candle flame.
For me, Valentine’s desserts feel a bit like love letters you can taste. There’s the hush of melting chocolate on the stove, the sweet-tart scent of strawberries, the soft thud of a whisk against a bowl.
I love how we slow down around a shared plate, trading forkfuls and stories. Even a simple cupcake on a weekday night can feel like a tiny celebration of “us”—a ritual that says, “You matter; I chose to make this for you.”
Final Thoughts
Give these Chocolate Covered Strawberry Cupcakes a try and enjoy all the flavors of a classic chocolate-dipped strawberry in cupcake form.
Feel free to tweak the toppings, add sprinkles, or experiment with different chocolates to make them your own.
Frequently Asked Questions
Can I Make These Cupcakes Gluten-Free Without Affecting Texture Too Much?
Yes, you can. I’d reach for a good 1:1 gluten‑free baking blend, sift it well, add an extra tablespoon of milk, and let the batter rest so the starches relax and stay tender.
How Can Kids Safely Help With This Cupcake Recipe?
Kids can safely wash berries, stir dry ingredients, line tins, and spoon batter while you handle knives, oven, and hot ganache. I’d walk them through each step, stressing slow movements, cool surfaces, and handwashing.
What Drink Pairings Work Best With Chocolate Covered Strawberry Cupcakes?
I’d pour chilled strawberry milk, fizzy raspberry soda, or a small glass of cold whole milk. For adults, I love a not‑too‑sweet rosé or rich coffee—each sip deepens the chocolate and brightens the berries.
How Do Altitude Adjustments Change Baking Time or Temperature for These Cupcakes?
I’d raise your oven to 365°F, check doneness a few minutes earlier, and maybe bake slightly longer; at altitude, batters set slower, so I watch centers carefully, listening for that soft, springy crumb.
Can I Turn This Cupcake Recipe Into a Layer Cake?
Yes, you can. I’d spread this batter into two greased 8‑inch pans, bake a bit longer, then flood each tender layer with silky ganache and juicy strawberries, stacking them into one lush, glistening tower.

Chocolate Covered Strawberry Cupcakes
Equipment
- 1 Standard 12-cup muffin pan
- 12 paper cupcake liners
- 2 medium mixing bowls
- 1 large mixing bowl
- 1 hand mixer or stand mixer
- 1 Rubber spatula
- 1 Whisk
- 1 fine-mesh sieve (for sifting)
- 1 Small saucepan
- 1 microwave-safe bowl (for melting chocolate, optional)
- 1 wire cooling rack
- 1 piping bag with round or star tip (optional)
- 1 small paring knife
- 1 Measuring cups set
- 1 Measuring spoons set
Ingredients
- 1 1/4 cup all-purpose flour sifted
- 1/2 cup unsweetened cocoa powder sifted
- 1 teaspoon baking powder
- 1/2 teaspoon baking soda
- 1/4 teaspoon fine salt
- 3/4 cup granulated sugar
- 1/4 cup light brown sugar packed
- 1/2 cup unsalted butter softened
- 2 large eggs room temperature
- 1 teaspoon pure vanilla extract
- 3/4 cup whole milk room temperature
- 1 cup fresh strawberries finely chopped
- 1 teaspoon lemon juice fresh
- 1 tablespoon granulated sugar for strawberries
- 1/2 cup heavy whipping cream for ganache
- 1 cup semi-sweet chocolate chips for ganache
- 1 tablespoon unsalted butter for ganache shine; room temperature
- 12 whole fresh strawberries for topping; dried and hulled
Instructions
- Preheat the oven to 350°F (175°C) and line the muffin pan with 12 paper cupcake liners.
- In a medium bowl whisk together the flour, cocoa powder, baking powder, baking soda, and salt, then set aside.
- In another small bowl combine the finely chopped strawberries, lemon juice, and 1 tablespoon granulated sugar, stirring and letting them macerate while you prepare the batter.
- In a large mixing bowl beat the softened butter, granulated sugar, and brown sugar with a mixer on medium speed until light and fluffy, about 2–3 minutes.
- Add the eggs one at a time to the butter mixture, beating well after each addition, then mix in the vanilla extract.
- Add half of the dry ingredients to the wet mixture and mix on low just until combined.
- Pour in the milk and mix on low until mostly incorporated.
- Add the remaining dry ingredients and mix just until no dry streaks remain, scraping down the bowl with a spatula as needed.
- Gently fold the macerated chopped strawberries and their juices into the batter with a spatula until evenly distributed.
- Divide the batter evenly among the 12 cupcake liners, filling each about two-thirds full.
- Bake the cupcakes for 18–20 minutes, or until a toothpick inserted in the center comes out with a few moist crumbs.
- Remove the pan from the oven and let the cupcakes cool in the pan for 5 minutes.
- Transfer the cupcakes to a wire cooling rack and let them cool completely, about 30–40 minutes.
- While the cupcakes cool, heat the heavy cream in a small saucepan over medium-low heat until steaming but not boiling.
- Place the chocolate chips in a heatproof bowl and pour the hot cream over them, letting it sit for 2–3 minutes.
- Add 1 tablespoon butter to the chocolate and cream, then whisk gently until smooth and glossy.
- Let the ganache sit at room temperature for 10–15 minutes until it thickens slightly but is still pourable.
- Once the cupcakes are completely cool, dip the top of each cupcake into the ganache or spoon the ganache over the tops, letting excess drip off.
- If desired, transfer some ganache to a piping bag and pipe a small swirl in the center of each cupcake for extra height.
- Press one whole dry strawberry gently onto the center of each cupcake while the ganache is still soft so it adheres.
- Let the ganache set at room temperature for about 10 minutes before serving or refrigerating.
Notes

Cynthia Weatherford is a seasoned chef and culinary enthusiast who serves as the Recipe creator of Somonday. With decades of experience in the kitchen and a passion for exploring diverse cuisines, Cynthia brings a blend of creativity and technique to every dish. Known for transforming simple ingredients into show-stopping meals, Cynthia believes that cooking is an art form anyone can master. Dedicated to inspiring home cooks, Cynthia shares approachable recipes, pro tips, and culinary wisdom to make every meal memorable.


