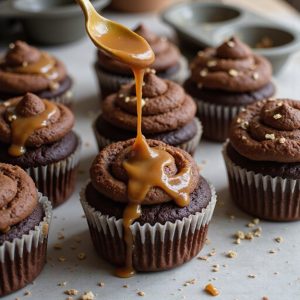
There’s something about peeling back a cupcake wrapper and seeing glossy caramel slowly drip down over rich, dark chocolate.
The first whiff hits you—warm cocoa, buttery caramel, and a hint of vanilla—promising pure comfort.
This is a cozy dessert through and through: tender chocolate cupcakes crowned with a silky caramel topping, ready in under an hour from mixing bowl to first bite.
These cupcakes are perfect for sweet-tooth fans, beginners, and anyone needing a reliable treat for busy weeknights or last‑minute cravings.
I still remember a rainy Tuesday when a tough day left everyone quiet at the dinner table.
I pulled a tray of these cupcakes from the oven, and the room changed—kids leaning in, my partner smiling, conversation suddenly easy again.
They shine at Sunday suppers, casual gatherings, or as a surprise dessert “just because.”
Ready to bring this dish to life?
Why You’ll Love It
- Delivers bold flavor with rich chocolate and buttery, silky caramel topping
- Feels bakery-quality yet uses simple, everyday pantry ingredients and tools
- Stays incredibly moist thanks to oil, milk, and added boiling water
- Impresses guests with elegant caramel drizzle and optional salted finish
- Adapts easily for occasions with toppings like nuts, sea salt, or cream
Ingredients
- 1 cup all-purpose flour — scoop and level for accuracy
- 1 cup granulated sugar — regular white baking sugar works best
- 1⁄2 cup unsweetened cocoa powder — use natural cocoa, not hot cocoa mix
- 1 teaspoon baking powder — check it’s fresh for proper rise
- 1⁄2 teaspoon baking soda — helps cupcakes rise and stay tender
- 1⁄2 teaspoon fine salt — balances sweetness and cocoa flavor
- 2 large eggs — use at room temperature for smoother batter
- 1⁄2 cup whole milk — adds richness and moisture
- 1⁄4 cup vegetable oil — neutral oil like canola works well
- 1 teaspoon vanilla extract — pure vanilla gives best flavor
- 1⁄2 cup boiling water — thins batter and deepens chocolate flavor
- 1 cup granulated sugar — for caramel base, don’t substitute
- 4 tablespoons unsalted butter, cut into pieces — soften slightly for easier melting
- 1⁄2 cup heavy cream, at room temperature — prevents caramel from seizing
- 1⁄4 teaspoon fine salt (optional) — use for a salted caramel finish
Step-by-Step Method
Preheat & Prepare Pan
Preheat the oven to 350°F. Line a standard 12-cup muffin tin with paper liners and set aside.
Clear your workspace and gather all ingredients and equipment. This prep step guarantees a smooth process.
Having the pan ready lets you transfer the batter quickly once it’s mixed, helping the cupcakes bake evenly.
Combine Dry Ingredients
Measure the flour, sugar, cocoa powder, baking powder, baking soda, and salt into a medium mixing bowl.
Whisk thoroughly until everything is evenly blended and there are no visible lumps.
This step distributes the leaveners and cocoa evenly, which helps the cupcakes rise properly and guarantees uniform chocolate flavor throughout.
Mix Wet Ingredients
In a separate medium bowl, add the eggs, whole milk, vegetable oil, and vanilla extract.
Beat with an electric mixer or whisk until the mixture looks smooth and slightly frothy.
This incorporates air and fully blends the liquids. A well-mixed wet base combines more easily with the dry ingredients, preventing overmixing later.
Combine Wet & Dry Mixtures
Pour the wet mixture into the bowl of dry ingredients. Mix on low speed just until the batter comes together and no dry streaks of flour remain.
Scrape the bowl’s sides and bottom if needed.
Stop mixing as soon as it looks uniform to avoid developing excess gluten, which can make cupcakes dense.
Add Boiling Water Carefully
Slowly pour the boiling water into the batter while mixing on low speed. Continue mixing until the batter becomes thin, smooth, and glossy.
The hot water blooms the cocoa, deepening the chocolate flavor and creating a tender crumb. Take care when adding the water to avoid splashes and burns.
Fill Liners & Bake
Divide the thin batter evenly among the 12 cupcake liners, filling each about two-thirds full. Place the muffin tin in the preheated oven.
Bake for 16 to 18 minutes, or until a toothpick inserted in the center comes out clean or with a few moist crumbs. Avoid overbaking to keep cupcakes soft.
Cool Cupcakes Completely
Remove the muffin tin from the oven and place it on a heat-safe surface.
Let the cupcakes cool in the pan for 5 minutes to set their structure.
Then transfer them to a wire cooling rack. Allow them to cool completely, about 25 minutes, so the caramel topping will adhere without sliding off.
Melt Sugar for Caramel
Place the granulated sugar for the caramel in a small, heavy-bottomed saucepan over medium heat. Let the sugar melt undisturbed at first, watching the edges liquefy.
Once melting starts, gently stir occasionally until all the sugar is dissolved and turns a deep amber color. Avoid burning by monitoring the color closely.
Incorporate Butter Smoothly
Add the butter pieces carefully to the melted sugar. Stir constantly as the mixture bubbles vigorously, ensuring the butter fully melts and emulsifies into the caramel.
Keep the pan on medium heat and continue stirring until the mixture looks smooth and glossy. This step creates a rich, buttery base for the caramel sauce.
Add Cream & Thicken Caramel
Slowly pour in the room-temperature heavy cream while stirring continuously. Expect bubbling and steam as the cream hits the hot caramel.
Stir until the mixture becomes smooth. Continue cooking for 1 to 2 minutes, stirring, until the caramel slightly thickens.
Remove from heat and stir in salt if making salted caramel.
Cool Caramel to Pourable Stage
Let the caramel rest off the heat until it cools to a warm, thick, but still pourable consistency. Stir occasionally to keep it smooth.
If it thickens too much before using, gently rewarm it over low heat or briefly in the microwave, stirring frequently.
The ideal texture should drizzle slowly without running off completely.
Drizzle & Set Topping
Guarantee the cupcakes are fully cool. Spoon or drizzle the warm caramel over each cupcake, letting a little drip over the sides for a decorative look.
Work steadily so the caramel doesn’t firm up in the pot.
Allow the caramel-topped cupcakes to rest a few minutes, letting the topping set slightly before serving or storing.
Ingredient Swaps
- Use gluten-free all-purpose flour (1:1 blend) in place of regular flour for a gluten-free version; check that cocoa and baking powder are GF, too.
- Swap whole milk with any unsweetened non-dairy milk (oat, almond, soy) and use vegan butter and coconut cream for a dairy-free cupcake and caramel.
- Replace vegetable oil with melted coconut oil or neutral-tasting olive oil; granulated sugar can be swapped with light brown sugar for a deeper, molasses-like flavor.
- For egg-free cupcakes, use 2 flax “eggs” (2 tbsp ground flax + 6 tbsp water, rested 5–10 minutes) instead of the 2 large eggs.
You Must Know
– Scale – To make 24 cupcakes, double every ingredient exactly and use two pans; rotate the pans halfway through the 16–18 minute bake window.
Rotating keeps heat even so both trays rise to the same height and bake at the same rate.
Serving Tips
- Serve with a scoop of vanilla ice cream and an extra caramel drizzle.
- Garnish cupcakes with a pinch of flaky sea salt just before serving.
- Plate with fresh berries for color contrast and brightness.
- Add a dollop of whipped cream and chocolate shavings on top.
- Arrange on a tiered stand, alternating with plain chocolate cupcakes for variety.
Storage & Make-Ahead
Store cupcakes in an airtight container in the fridge for up to 4–5 days.
Bring to room temperature before serving for best texture.
You can bake cupcakes (without caramel) up to 2 days ahead.
They also freeze well, unfrosted, for up to 2 months; thaw, then add caramel.
Reheating
Reheat cupcakes gently: in microwave at 50% power in short bursts.
In a 300°F oven, loosely covered, until just warm.
Or warm caramel separately on the stovetop over low heat.
Cupcakes in American Celebrations
Once you’ve mastered warming these chocolate cupcakes so the crumb feels soft and the caramel turns glossy again, it’s easy to see why they’ve become such a fixture at American celebrations.
When I bring a tray to a party, people hover, drawn by the shine of the caramel and that deep cocoa aroma cutting through the chatter.
I’ve noticed these cupcakes slip easily into almost any festivity:
- Birthdays: A forest of little candles, each cupcake its own wish, caramel dripping like molten gold.
- Holidays: On crowded dessert tables, their dark crumb and tawny tops contrast against pastel pies and cookies.
- Casual gatherings: Movie nights, game days, office celebrations—wherever hands reach for something sweet, they disappear first.
Final Thoughts
Give these chocolate cupcakes with caramel topping a try and see just how impressive (and simple) homemade treats can be.
Feel free to tweak the recipe—add a pinch of espresso, a sprinkle of sea salt, or your favorite garnish to make them your own.
Frequently Asked Questions
Can I Make These Cupcakes Gluten-Free Without Sacrificing Texture?
Yes, you can. I’d swap the flour for a 1:1 gluten‑free blend, sift it well, and add an extra egg yolk; you’ll still bite into a tender, moist crumb that feels decadently “normal.”
How Do I Adjust Baking Time for Mini or Jumbo Cupcakes?
For minis, I’d bake 10–12 minutes; for jumbo, 22–26, checking early. I watch for domed tops, fragrant chocolatey scent, and a toothpick with moist crumbs—like catching that perfect, tender moment before they dry out.
What’s the Best Way to Transport Caramel-Topped Cupcakes Without Mess?
I chill the caramel until softly set, then nestle each cupcake in a deep carrier so they can’t slide. I leave a whisper of space above, imagining golden tops arriving intact, glossy and irresistible.
Can I Freeze the Caramel Separately and Use It Later for Cupcakes?
Yes, you can freeze the caramel. I pour it into a small jar, cool it, freeze, then thaw in the fridge. You’ll rewarm it gently, stirring until it turns glossy, silky, and beautifully pourable again.
How Can Kids Safely Help With the Caramel-Making Process?
Kids can safely help by measuring sugar, butter, and cream, stirring off the heat, and watching the color change from a distance. I handle the bubbling pot, you narrate the “golden lava” magic.
Chocolate Cupcakes With Caramel Topping
Equipment
- 1 standard 12-cup muffin tin
- 12 paper cupcake liners
- 2 medium mixing bowls
- 1 Small saucepan
- 1 Whisk
- 1 wooden spoon or heatproof spatula
- 1 electric hand mixer or stand mixer
- 1 wire cooling rack
- 1 Measuring cups set
- 1 Measuring spoons set
Ingredients
- 1 cup all-purpose flour
- 1 cup granulated sugar
- 1/2 cup unsweetened cocoa powder
- 1 teaspoon baking powder
- 1/2 teaspoon baking soda
- 1/2 teaspoon fine salt
- 2 large eggs
- 1/2 cup whole milk
- 1/4 cup vegetable oil
- 1 teaspoon vanilla extract
- 1/2 cup boiling water
- 1 cup granulated sugar for caramel
- 4 tablespoons unsalted butter for caramel; cut into pieces
- 1/2 cup heavy cream for caramel; at room temperature
- 1/4 teaspoon fine salt for salted caramel, optional
Instructions
- Preheat the oven to 350°F and line the muffin tin with the paper cupcake liners.
- In a medium mixing bowl, whisk together the flour, sugar, cocoa powder, baking powder, baking soda, and salt until well combined.
- In a separate bowl, beat the eggs, milk, vegetable oil, and vanilla extract until smooth and slightly frothy.
- Add the wet mixture to the dry ingredients and mix with an electric mixer on low speed just until combined and no dry streaks remain.
- Carefully pour in the boiling water and mix on low speed until the batter is thin and smooth.
- Divide the batter evenly among the 12 liners, filling each about two thirds full.
- Bake the cupcakes for 16 to 18 minutes, or until a toothpick inserted in the center comes out clean or with a few moist crumbs.
- Remove the muffin tin from the oven and let the cupcakes cool in the pan for 5 minutes.
- Transfer the cupcakes to a wire cooling rack and let them cool completely for about 25 minutes before topping.
- While the cupcakes cool, place the granulated sugar for the caramel in a small saucepan over medium heat.
- Allow the sugar to melt undisturbed around the edges, then gently stir with a wooden spoon or heatproof spatula until fully melted and amber in color.
- Add the butter pieces carefully to the melted sugar and stir constantly until the butter is completely melted and incorporated.
- Slowly pour in the heavy cream while stirring, allowing the mixture to bubble up and then smooth out.
- Continue cooking the caramel for 1 to 2 minutes, stirring, until slightly thickened, then remove from the heat.
- Stir in the salt if making salted caramel and let the caramel cool until it is warm but pourable.
- Once the cupcakes are completely cool, spoon or drizzle the warm caramel over the tops of each cupcake, letting it drip slightly down the sides.
- Allow the caramel-topped cupcakes to rest a few more minutes so the topping sets slightly before serving.
Notes

Cynthia Weatherford is a seasoned chef and culinary enthusiast who serves as the Recipe creator of Somonday. With decades of experience in the kitchen and a passion for exploring diverse cuisines, Cynthia brings a blend of creativity and technique to every dish. Known for transforming simple ingredients into show-stopping meals, Cynthia believes that cooking is an art form anyone can master. Dedicated to inspiring home cooks, Cynthia shares approachable recipes, pro tips, and culinary wisdom to make every meal memorable.