There’s something about a tray of chocolate cupcakes coming out of the oven—the rich cocoa aroma, the glossy tops, the promise of a sweet bite—that instantly softens the day.
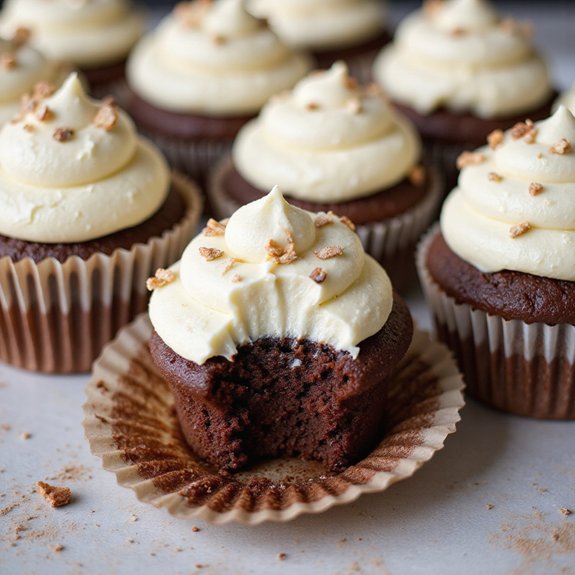
These cupcakes are a cozy, classic dessert: tender, dark chocolate crumb crowned with a cloud of creamy vanilla frosting.
They’re quick enough for last-minute cravings or weeknight baking sessions, but special enough for birthdays, potlucks, and easy entertaining.
They’re perfect for beginners and busy home bakers alike—simple steps, familiar ingredients, and reliable results.
I still remember pulling together a batch on a hectic Tuesday when a friend dropped by unexpectedly; by the time we’d finished catching up, the cupcakes were cooled, swirled with frosting, and suddenly it felt like a celebration instead of an interruption.
Whether you’re soothing a long day, planning a family treat, or sweetening a gathering, these cupcakes fit right in. Ready to bring this dish to life?
Why You’ll Love It
- Delivers bold chocolate flavor with a light, tender cupcake crumb
- Balances rich chocolate cupcakes with creamy, classic vanilla buttercream frosting
- Uses simple pantry staples and everyday kitchen tools—no special equipment needed
- Mixes up quickly, perfect for weeknights, parties, or last-minute celebrations
- Stays soft and moist, even when made a day ahead of serving
Ingredients
- 160 g all-purpose flour — spoon and level for accuracy
- 40 g unsweetened cocoa powder — natural cocoa works best here
- 200 g granulated sugar — standard white sugar is perfect
- 1 tsp baking powder — check it’s fresh for good rise
- 1/2 tsp baking soda — helps create a tender crumb
- 1/2 tsp fine salt — balances sweetness and chocolate flavor
- 120 ml whole milk, room temperature — take out of fridge 30 minutes early
- 60 ml vegetable oil — use a neutral-flavored oil
- 2 large eggs, room temperature — guarantees smoother batter
- 2 tsp vanilla extract, divided — real vanilla gives best flavor
- 120 ml hot water or hot coffee — coffee deepens chocolate taste
- 115 g unsalted butter, softened — should be cool but easily dented
- 250 g powdered sugar, sifted — sifting keeps frosting lump-free
- 2–3 tbsp heavy cream or milk — adjust for frosting consistency
- 1 pinch fine salt — makes the vanilla frosting taste richer
Step-by-Step Method
Preheat & Prepare Pan
Preheat the oven to 350°F (175°C). Line a standard 12-cup muffin pan with paper cupcake liners and set it aside. Make certain the oven rack is in the center position for even baking.
Use light-colored pans if possible to prevent over-browning. Gather all ingredients and equipment before you begin mixing the batter.
Combine Dry Ingredients
Whisk together the flour, cocoa powder, baking powder, baking soda, and salt in a medium bowl until evenly blended. Break up any cocoa lumps with the whisk.
Make certain the mixture looks uniform in color and texture. Set the bowl aside. Keeping the dry ingredients well mixed helps the cupcakes rise evenly and bake consistently throughout.
Mix Wet Ingredients
Whisk the sugar, milk, vegetable oil, eggs, and 1 teaspoon vanilla extract in a large mixing bowl until smooth. Mix until the sugar starts to dissolve and the eggs are fully incorporated.
The mixture should look glossy and uniform. This step builds the base of your batter and makes sure even sweetness and moisture in every cupcake.
Combine Wet & Dry Mixtures
Add the dry ingredient mixture to the wet mixture. Whisk gently just until no dry streaks of flour remain.
Avoid overmixing at this stage, as it can make the cupcakes dense and tough. Scrape the sides and bottom of the bowl with a rubber spatula. The batter should be thick and smooth before adding the hot liquid.
Add Hot Liquid Carefully
Pour in the hot water or hot coffee slowly while whisking. Mix until the batter becomes smooth, glossy, and thin.
Take care not to splash, as the mixture will be fluid. Using hot coffee deepens the chocolate flavor without adding a strong coffee taste. Make certain there are no lumps left before filling the cupcake liners.
Fill Liners Evenly
Divide the batter evenly among the 12 cupcake liners, filling each about two-thirds full. Use a measuring cup or ladle for consistency.
Avoid overfilling, as the cupcakes may overflow instead of rising neatly. Tap the pan lightly on the counter to release any air bubbles. The batter will appear thin but bakes up tender.
Bake & Check Doneness
Place the muffin pan in the preheated oven. Bake for 16–18 minutes. Begin checking at 16 minutes by inserting a toothpick in the center of a cupcake.
Look for it to come out clean or with a few moist crumbs. Avoid overbaking to keep them soft. Remove the pan once they’re just set and springy.
Cool Cupcakes Completely
Transfer the pan to a wire rack and let the cupcakes cool in the pan for 5 minutes. Carefully remove each cupcake from the pan and place directly on the rack.
Allow them to cool completely for about 25 minutes. Don’t frost while warm, or the buttercream will melt. Make certain they feel cool to the touch before proceeding.
Cream the Butter
Beat the softened butter in a large bowl using a hand mixer or stand mixer on medium speed for 2–3 minutes. Mix until it becomes creamy, pale, and slightly fluffy.
Scrape the bowl as needed. Properly creamed butter creates a lighter frosting texture. Make sure the butter is soft but not greasy or melted.
Add Sugar & Flavorings
Gradually add the sifted powdered sugar, a pinch of salt, remaining 1 teaspoon vanilla extract, and 2 tablespoons cream or milk. Beat on low speed until incorporated to avoid sugar clouds.
Increase to medium speed and whip until light and fluffy. Scrape down the bowl once or twice. Adjust sweetness by tasting the frosting.
Adjust Consistency
Check the frosting’s texture. If it feels too stiff or thick, add up to 1 more tablespoon of cream or milk, a little at a time. Beat again until smooth and pipeable.
If it becomes too soft, chill briefly, then re-whip. The frosting should hold soft peaks and spread or pipe easily without losing its shape.
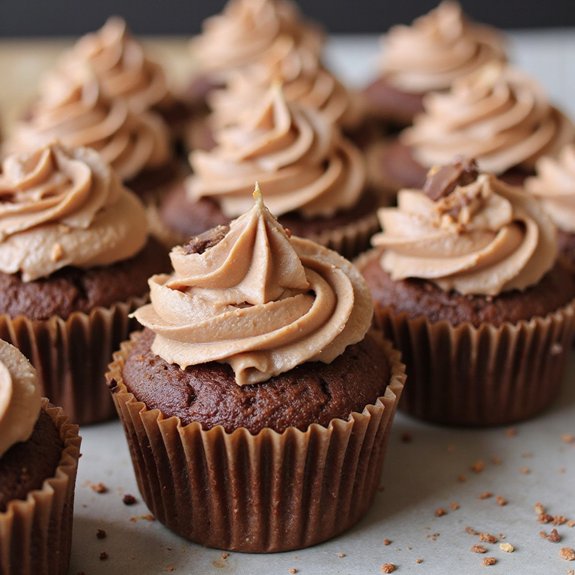
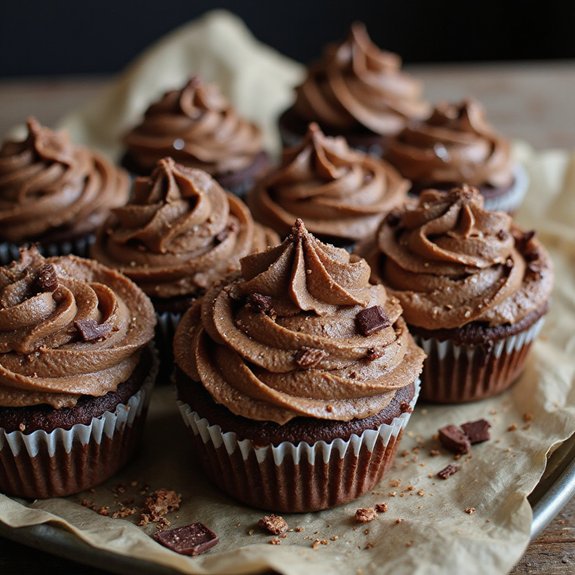
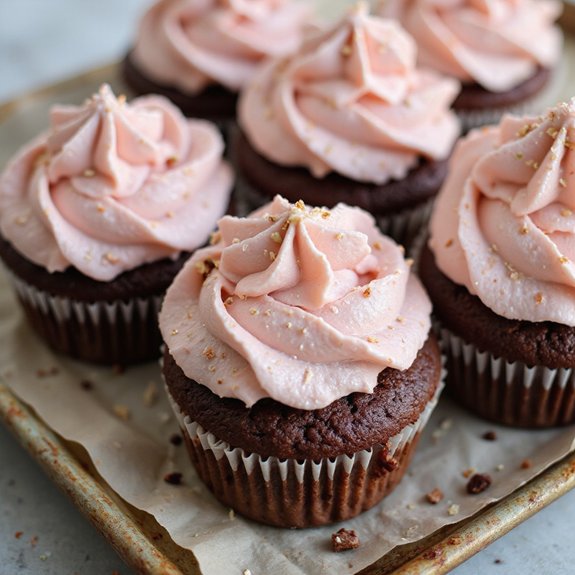
Frost & Decorate Cupcakes
Transfer the frosting to a piping bag fitted with a round or star tip, or use a spatula for a rustic look. Swirl or spread frosting generously on each cooled cupcake.
Decorate with sprinkles or toppings as desired. Serve immediately or store covered. For best texture, enjoy at room temperature, letting chilled cupcakes warm slightly before serving.
Ingredient Swaps
- Use neutral oils like canola or sunflower in place of vegetable oil; swap whole milk with any milk 2% or higher, or an unsweetened non-dairy milk (almond, oat, soy) for a dairy-free batter.
- For gluten-free, use a 1:1 gluten-free all-purpose flour blend; for deeper flavor on a budget, use hot instant coffee dissolved in water instead of brewed coffee.
- Make the cupcakes dairy-free by using plant milk in the batter and a dairy-free margarine or vegan butter plus plant milk in the frosting.
- If you’re low on cocoa, you can use 30 g cocoa plus 10 g extra flour (flavor will be slightly milder); granulated sugar can be swapped with light brown sugar for a slightly moister, more caramel-like crumb.
You Must Know
– Flavor Boost • For deeper chocolate and balanced sweetness, use hot coffee on the higher end of “hot” (around 190°F / 90°C) plus a very small extra pinch of salt in the batter—heat blooms the cocoa, and the added salt sharpens the chocolate notes without making the cupcakes taste salty.
Serving Tips
- Serve on a white platter; garnish with chocolate shavings or sprinkles for contrast.
- Pair with cold milk, hot coffee, or vanilla ice cream for a richer dessert.
- Add fresh berries on the side or a raspberry drizzle on the plate.
- Arrange cupcakes in a circle and frost continuously to resemble a pull-apart cake.
- Top each with a small chocolate square or mini cookie for extra flair.
Storage & Make-Ahead
Store frosted cupcakes in an airtight container in the fridge for up to 4–5 days; bring to room temperature before serving.
Unfrosted cupcakes freeze well for up to 2 months when tightly wrapped.
You can also make the frosting 3–4 days ahead and refrigerate, then re-whip before using.
Reheating
Reheat unfrosted cupcakes briefly in a 300°F (150°C) oven or toaster oven until just warm.
For frosted cupcakes, use a low-power microwave in very short bursts to avoid melting frosting.
Cupcakes in Party Culture
Once those cupcakes are baked, cooled, and ready to reheat if needed, they naturally step into their starring role: the life of the party.
I’ve watched a plain table transform the moment I set down a platter of these chocolate swirls crowned with vanilla peaks.
Conversations loosen, shoulders drop, and suddenly everyone’s circling the dessert like it’s a campfire.
I love how cupcakes quietly solve party problems. No slicing, no wobbling layers, no one stuck holding a knife and a stack of plates.
Guests just reach for a wrapper, feel the soft give of the crumb, and taste that deep cocoa and cool vanilla in a single, neat bite. They’re small, festive, and somehow make every celebration feel more relaxed and inviting.
Final Thoughts
Give these Chocolate Cupcakes with Vanilla Frosting a try and enjoy how simple they’re to make—and how quickly they disappear.
Feel free to tweak the flavors with different extracts, fillings, or sprinkles to make them your own!
Frequently Asked Questions
Can I Make These Cupcakes Gluten-Free and Still Keep the Texture Light and Fluffy?
Yes, you can. I’d swap in a good 1:1 gluten‑free blend, add an extra egg white, and sift everything; you’ll still bite into a tender crumb, airy lift, and moist, delicate, chocolate-kissed softness.
How Can Kids Safely Help With This Cupcake Recipe Without Making a Big Mess?
You can let kids whisk dry ingredients, line tins, and decorate cooled cupcakes. I’d pre-measure, use aprons, keep hot pans off-limits, and hand them spoons and sprinkles—controlled chaos, soft cocoa clouds, vanilla-scented fingers.
What’s the Best Way to Transport Frosted Cupcakes Without Smudging the Decorations?
I nestle each cupcake in a lidded carrier, cups snug so they can’t slide. I chill them first, so the frosting firms—swirls stay crisp, vanilla-sweet, untouched even as the car hums and turns.
How Do I Adjust This Recipe for High-Altitude Baking Conditions?
You’ll tweak this gently: I’d reduce sugar slightly, add 1–2 extra tablespoons flour, increase oven temp about 15°F, and shorten baking a minute or two so your cupcakes rise high and stay tender, not dry.
Can I Turn This Recipe Into a Small, Two-Layer Celebration Cake Instead?
Yes, you can. I’d pour the batter into two greased 6‑inch pans, bake a bit longer, then stack them with swoops of vanilla frosting—soft crumbs, lush layers, candles flickering over a tender, celebratory crumb.

Chocolate Cupcakes with Vanilla Frosting
Equipment
- 1 Standard 12-cup muffin pan
- 12 paper cupcake liners
- 2 medium mixing bowls
- 1 large mixing bowl
- 1 Whisk
- 1 hand mixer or stand mixer
- 1 Rubber spatula
- 1 Measuring cups set
- 1 Measuring spoons set
- 1 wire cooling rack
- 1 piping bag optional
- 1 large round or star piping tip optional
Ingredients
- 160 gram all-purpose flour
- 40 gram unsweetened cocoa powder
- 200 gram granulated sugar
- 1 teaspoon baking powder
- 1/2 teaspoon baking soda
- 1/2 teaspoon fine salt
- 120 milliliter whole milk room temperature
- 60 milliliter vegetable oil
- 2 large eggs room temperature
- 2 teaspoon vanilla extract divided
- 120 milliliter hot water or hot coffee
- 115 gram unsalted butter softened
- 250 gram powdered sugar sifted
- 1 2–3 tbsp heavy cream or milk
- 1 pinch fine salt
Instructions
- Preheat the oven to 350°F (175°C) and line a 12-cup muffin pan with paper cupcake liners.
- In a medium bowl whisk together the flour, cocoa powder, baking powder, baking soda, and salt until well combined.
- In a large bowl whisk the sugar, milk, vegetable oil, eggs, and 1 teaspoon vanilla extract until smooth.
- Add the dry ingredients to the wet ingredients and whisk gently until just combined and no dry streaks remain.
- Pour in the hot water or hot coffee and whisk carefully until the batter is smooth and thin.
- Divide the batter evenly among the 12 liners, filling each about two-thirds full.
- Bake the cupcakes for 16–18 minutes or until a toothpick inserted in the center comes out clean or with a few moist crumbs.
- Transfer the pan to a wire rack and let the cupcakes cool in the pan for 5 minutes.
- Remove the cupcakes from the pan and let them cool completely on the wire rack for about 25 minutes.
- While the cupcakes cool, beat the softened butter with a hand mixer or stand mixer on medium speed until creamy and pale, about 2–3 minutes.
- Gradually add the powdered sugar, 1 pinch salt, remaining 1 teaspoon vanilla extract, and 2 tablespoons cream or milk, beating on low until combined, then on medium until light and fluffy.
- If needed, add up to 1 more tablespoon cream or milk to adjust the frosting to a smooth, pipeable consistency.
- Once the cupcakes are completely cool, transfer the frosting to a piping bag fitted with a tip or use a spatula to spread it on top of each cupcake.
- Decorate as desired and serve immediately or store covered until serving.
Notes

Cynthia Weatherford is a seasoned chef and culinary enthusiast who serves as the Recipe creator of Somonday. With decades of experience in the kitchen and a passion for exploring diverse cuisines, Cynthia brings a blend of creativity and technique to every dish. Known for transforming simple ingredients into show-stopping meals, Cynthia believes that cooking is an art form anyone can master. Dedicated to inspiring home cooks, Cynthia shares approachable recipes, pro tips, and culinary wisdom to make every meal memorable.