There’s something about the smell of bananas and melting chocolate swirling together in the oven that turns an ordinary day into a cozy one.
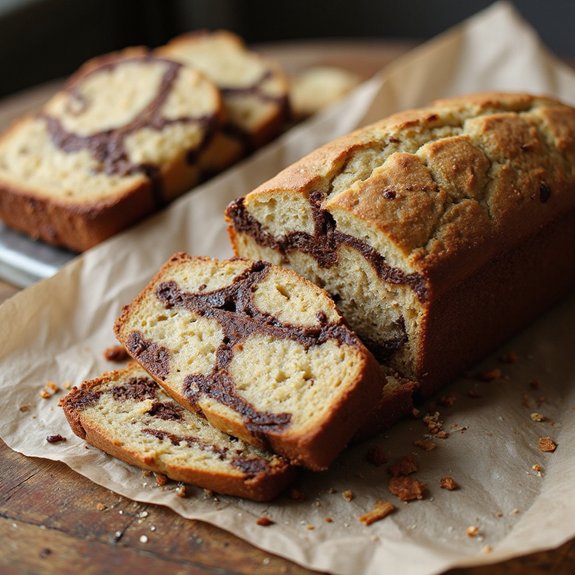
This chocolate marbled banana bread is a soft, tender loaf with ribbons of dark, glossy chocolate running through golden, banana-rich batter—a simple, homey dessert that comes together in under an hour.
It’s perfect for sweet-tooth fans, beginner bakers, and anyone staring at a few overripe bananas on the counter, wondering what to do next.
I first leaned on this recipe during a stressful week when I needed a quick, comforting bake for an unexpected coffee visit with friends.
Ten minutes of stirring, one pan in the oven, and suddenly the house felt warmer, calmer, more welcoming.
This loaf shines for Sunday baking, last-minute cravings, lunchbox treats, or easy entertaining when you don’t have time for a fussy dessert. Ready to bring this dish to life?
Why You’ll Love It
- Delivers rich chocolate-banana flavor with beautiful marbled swirls
- Stays incredibly moist for days, perfect for make-ahead treats
- Uses simple pantry staples and overripe bananas you already have
- Feels bakery-special yet easy enough for beginner bakers
- Freezes beautifully for quick breakfasts, snacks, or lunchbox treats
Ingredients
- 3 medium ripe bananas, mashed — very spotty for maximum sweetness
- 100 g unsalted butter, melted and cooled — real butter, not margarine
- 150 g granulated sugar — standard white caster or granulated
- 2 large eggs, room temperature — room temp helps batter mix evenly
- 5 ml vanilla extract — pure extract, not imitation
- 190 g all-purpose flour — regular plain flour, not self-rising
- 5 g baking soda — make certain it’s fresh for proper rise
- 2 g fine salt — fine-grain disperses more evenly
- 60 ml whole milk — full-fat for best texture
- 80 g dark chocolate, chopped or chips — around 60–70% cocoa
- 10 g unsweetened cocoa powder — natural or Dutch-process both work
Step-by-Step Method
Prep the Pan & Heat the Oven
Preheat the oven to 175°C (350°F). Grease a 9×5-inch loaf pan and line it with parchment paper, leaving an overhang for easy lifting.
Smooth the paper into the corners. Lightly grease the parchment too. Set the pan aside while you prepare the banana bread batters.
Mash the Bananas
Place the peeled bananas in a large mixing bowl. Use a fork or potato masher to mash until mostly smooth with just a few small lumps remaining. Aim for a thick, pourable consistency.
Set aside briefly to let the bananas release some juices before adding the remaining wet ingredients.
Combine the Wet Ingredients
Whisk the melted, cooled butter into the mashed bananas until fully blended. Add the sugar and whisk until the mixture looks thick and glossy.
Crack in the eggs and add the vanilla. Whisk again until smooth and homogenous, assuring no streaks of egg remain in the bowl.
Mix the Dry Ingredients
In a separate mixing bowl, add the flour, baking soda, and salt. Whisk thoroughly to evenly distribute the leavening and salt throughout the flour. Break up any small lumps as you go.
This step helps guarantee the banana bread rises evenly and prevents pockets of baking soda in the baked loaf.
Fold Wet & Dry Together
Tip the dry mixture into the banana mixture. Use a wooden spoon or spatula to gently fold until the flour is just incorporated. Stop as soon as you no longer see dry patches.
Avoid vigorous stirring at this stage to prevent overdeveloping gluten, which can make the banana bread dense.
Loosen the Batter with Milk
Pour in the milk and gently stir until the batter becomes smooth and cohesive. Scrape along the sides and bottom of the bowl to catch any hidden flour.
Keep the mixing minimal. The finished batter should be thick but pourable, without any visible dry streaks or clumps.
Melt the Chocolate
Place the chopped dark chocolate or chips in a small microwave-safe bowl.
Microwave in 20–30 second bursts, stirring well after each interval. Stop as soon as the chocolate is fully melted and smooth.
Let it cool slightly so it’s warm but not hot before mixing into the batter.
Make the Chocolate Batter
Scoop about one-third of the banana batter into a separate bowl. Add the melted chocolate and cocoa powder.
Whisk or stir until the mixture is fully combined and evenly colored. Scrape the sides and bottom of the bowl.
The chocolate batter should be slightly thicker and deeply chocolatey.
Layer the Batters in the Pan
Spoon alternating dollops of plain and chocolate batter into the prepared pan. Create random patches and layers rather than strict stripes.
Continue until all batter is used. Gently level the top with the back of a spoon so the layers are roughly even before marbling.
Swirl to Marble the Batter
Insert a butter knife or skewer into the batter. Drag it through the batter in gentle S-shaped or figure-eight motions. Swirl just enough to create a marbled pattern, avoiding too many passes.
Overmixing here will blend the batters and lose the distinct chocolate and banana swirls.
Bake the Banana Bread
Place the pan on the center rack of the preheated oven. Bake for 50–60 minutes.
Check at 50 minutes by inserting a skewer into the center. Look for just a few moist crumbs, not wet batter.
If the top browns too quickly, loosely tent the pan with foil for the last 10–15 minutes.
Cool, Slice & Serve
Remove the pan from the oven and place it on a cooling rack. Let the banana bread cool in the pan for 10 minutes to set.
Use the parchment overhang to lift it out onto the rack. Cool for at least another 10 minutes, preferably fully, before slicing into neat, tender slices.
Ingredient Swaps
- Use melted coconut oil or neutral vegetable oil instead of butter for a dairy-free version; swap whole milk for any unsweetened plant milk.
- Replace eggs with 2 “flax eggs” (2 tbsp ground flaxseed + 6 tbsp water, rested 5–10 minutes) to make it vegan.
- For a more budget-friendly or regional-friendly bake, use regular cooking chocolate or cocoa-based drinking chocolate (reducing sugar slightly) if dark chocolate chips are hard to find.
- Swap up to half the all-purpose flour with whole wheat or oat flour for added fiber, or use a certified gluten-free all-purpose blend if needed.
You Must Know
– Scale – To serve a crowd, double everything and portion into two 9×5-inch pans; start checking doneness at 45 minutes because two pans can cook slightly faster than one large, dense loaf in some home ovens.
Serving Tips
- Serve slightly warm with a scoop of vanilla ice cream or whipped cream.
- Plate slices with a drizzle of melted chocolate and a sprinkle of sea salt.
- Pair with hot coffee, chai, or cold brew for an afternoon treat.
- Toast leftover slices lightly and spread with cream cheese or nut butter.
- Arrange on a platter with fresh berries and a dusting of powdered sugar.
Storage & Make-Ahead
Chocolate marbled banana bread keeps well, tightly wrapped, in the fridge for up to 5 days.
For make-ahead, cool completely, slice, then wrap pieces individually.
Freeze in an airtight container or freezer bag for up to 3 months.
Thaw at room temperature or gently warm in the microwave or oven.
Reheating
Reheat slices gently.
Microwave 10–15 seconds wrapped in a damp towel.
Warm in a 150°C (300°F) oven for 8–10 minutes.
Or use a lidded skillet on low heat.
Banana Bread Pop-Culture Moments
Every few years, banana bread seems to stroll back into the spotlight, and I’m instantly pulled into the warm, nostalgic glow that follows.
I still remember the early-pandemic photos flooding my feed: loaves lined on windowsills, swirls of chocolate glistening like polished wood, crumb shots framed like portraits.
It felt like everyone was quietly saying, “I’m scared, but I’m still here,” through buttered slices.
Whenever a character in a movie tears into a foil-wrapped slice from home, I swear I can smell it—banana, cocoa, vanilla—rising from the screen.
Banana bread isn’t flashy; it’s the soft-focus montage of baked goods, the background track. But when that marbled loaf appears, it steals the scene with one simple, fragrant slice.
Final Thoughts
Give this chocolate marbled banana bread a try the next time you’ve got ripe bananas on the counter—it’s simple, cozy, and so satisfying.
Feel free to tweak it with your favorite add-ins like nuts, extra chocolate chips, or even a swirl of peanut butter to make it your own.
Frequently Asked Questions
Can I Make This Banana Bread Gluten-Free Without Sacrificing Texture?
Yes, you can. I’d swap the flour for a 1:1 gluten‑free blend, add ½ teaspoon xanthan gum if it’s missing, and let the batter rest; the loaf still bakes tender, fragrant, and wonderfully moist.
How Do High Altitudes Affect Baking Time and Texture for This Recipe?
They make your loaf rise faster, dry out, and bake sooner. I’d lower leavening slightly, add a splash more milk, and start checking doneness early, letting sweet, warm aromas guide you in the thinner mountain air.
Can I Reduce the Sugar Without Ruining the Marbling or Crumb?
Yes, you can. I’d gently cut the sugar by up to one‑third; the crumb stays tender, marbling intact. You’ll taste more banana, a darker cocoa whisper, and feel a softly moist slice against your fingertips.
Is It Safe to Ship This Banana Bread by Mail, and How Should I Pack It?
Yes, it’s safe for short shipping if it’s fully cooled and wrapped tightly in plastic, then foil. I’d nestle it in a snug box with padding, maybe include a cold pack in warm weather.
Can I Convert This Loaf Recipe Into Muffins or Mini Loaves?
Yes, you can. I’d fill muffin or mini‑loaf tins ¾ full, bake at 175°C, then start checking around 18–22 minutes. You’ll smell caramelized banana and chocolate before their domed tops turn golden.

Chocolate Marbled Banana Bread
Equipment
- 2 Mixing bowls
- 1 Whisk
- 1 Wooden spoon or spatula
- 1 Fork or potato masher
- 1 9×5-inch loaf pan
- 1 small microwave-safe bowl
- 1 Cooling rack
- 1 butter knife or skewer
Ingredients
- 3 medium ripe bananas mashed
- 100 gram unsalted butter melted and cooled
- 150 gram granulated sugar
- 2 large eggs room temperature
- 5 milliliter vanilla extract
- 190 gram all-purpose flour
- 5 gram baking soda
- 2 gram fine salt
- 60 milliliter whole milk
- 80 gram dark chocolate chopped or chips
- 10 gram unsweetened cocoa powder
Instructions
- Preheat the oven to 175°C (350°F) and grease and line a 9×5-inch loaf pan with parchment paper.
- In a large bowl, mash the bananas with a fork until mostly smooth.
- Whisk in the melted butter, sugar, eggs, and vanilla until well combined.
- In a separate bowl, whisk together the flour, baking soda, and salt.
- Add the dry ingredients to the banana mixture and stir gently until just combined.
- Stir in the milk until the batter is smooth and no dry pockets remain, avoiding overmixing.
- In a small microwave-safe bowl, melt the dark chocolate in 20–30 second bursts, stirring between each until smooth.
- Transfer about one-third of the banana batter to another bowl and whisk in the melted chocolate and cocoa powder until fully combined.
- Spoon alternating dollops of plain and chocolate batter into the prepared loaf pan to create layers.
- Use a butter knife or skewer to gently swirl the batters together a few times to create a marbled pattern without overmixing.
- Bake for 50–60 minutes, or until a skewer inserted in the center comes out with just a few moist crumbs.
- Let the banana bread cool in the pan for 10 minutes, then carefully lift it out onto a cooling rack and cool for at least another 10 minutes before slicing.
Notes

Cynthia Weatherford is a seasoned chef and culinary enthusiast who serves as the Recipe creator of Somonday. With decades of experience in the kitchen and a passion for exploring diverse cuisines, Cynthia brings a blend of creativity and technique to every dish. Known for transforming simple ingredients into show-stopping meals, Cynthia believes that cooking is an art form anyone can master. Dedicated to inspiring home cooks, Cynthia shares approachable recipes, pro tips, and culinary wisdom to make every meal memorable.