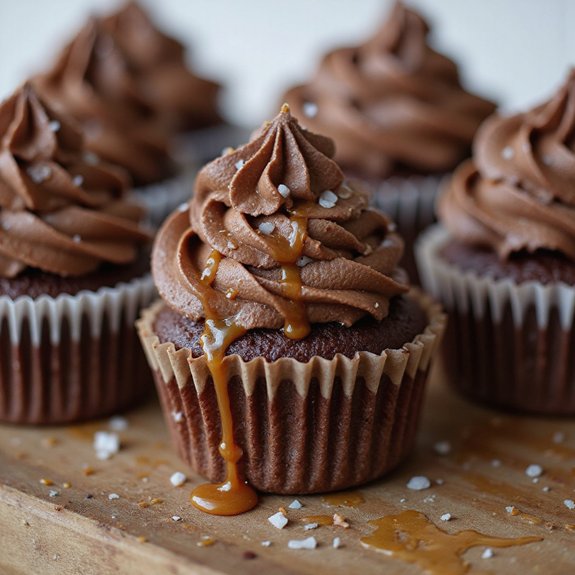
There’s something about peeling back a cupcake wrapper to reveal a swirl of glossy caramel-kissed frosting that instantly feels like a celebration.
These chocolate salted caramel cupcakes are the definition of cozy dessert bliss: dark, tender chocolate crumb, a hidden well of gooey caramel, and a sparkle of flaky sea salt on top.
They come together surprisingly fast, making them perfect for sweet-tooth fans, busy families, and anyone who loves bakery-worthy treats without the fuss.
I still remember a rainy Tuesday when a rough day at work left me drained. I whipped up a batch of these cupcakes on a whim; by the time the kitchen smelled of warm cocoa and buttery caramel, my mood had completely lifted.
They’ve since become my go-to for last-minute cravings, office birthdays, and easy entertaining when guests drop by.
Ready to bring this irresistible little dessert to life?
Why You’ll Love It
- Delivers bold flavor from rich chocolate, gooey caramel, and sea salt
- Impresses guests with bakery-style presentation and hidden caramel centers
- Uses simple, accessible ingredients and basic home baking equipment
- Balances sweetness and saltiness for a not-too-sweet, crowd-pleasing dessert
- Makes ahead easily and stores well for parties or gatherings
Ingredients
- 150 g all-purpose flour, sifted — measure lightly for tender crumb
- 40 g unsweetened cocoa powder, sifted — use good-quality cocoa for richer flavor
- 200 g granulated sugar — fine white sugar dissolves most evenly
- 1 tsp baking powder — check it’s fresh for proper rise
- 1/2 tsp baking soda — balances cocoa’s acidity for lift
- 1/2 tsp fine sea salt — evenly seasons the batter
- 120 ml whole milk, room temperature — room temp helps batter emulsify
- 60 ml neutral vegetable oil — neutral flavor keeps focus on chocolate
- 2 large eggs, room temperature — room temp eggs whip and mix better
- 1 tsp pure vanilla extract — real vanilla boosts chocolate depth
- 120 ml boiling water — thins batter and blooms cocoa flavor
- 150 g granulated sugar — clean, dry sugar prevents crystallization
- 60 ml water — just enough to moisten sugar for caramel
- 90 g unsalted butter, room temperature, cubed — soft cubes melt in smoothly
- 120 ml heavy cream, room temperature — warm cream reduces caramel splatter
- 1 tsp flaky sea salt — adds crunch and bright, salty finish
- 170 g unsalted butter, room temperature — soft but not greasy for best texture
- 250 g powdered sugar, sifted — sifting prevents lumpy frosting
- 30 g unsweetened cocoa powder, sifted — dark cocoa gives deeper chocolate taste
- 30 ml heavy cream, plus more as needed — adjust for smooth piping consistency
- 1 tsp pure vanilla extract — rounds out the chocolate notes
- 1/4 tsp fine sea salt — balances sweetness in the buttercream
Step-by-Step Method
Preheat & Prepare Pan
Preheat the oven to 180°C (350°F). Line a standard 12-cup muffin pan with paper cupcake liners and set aside. Make sure the oven rack is centered for even baking.
Gather all ingredients and equipment so everything is within reach. This helps the batter come together quickly and prevents overmixing once liquids are added.
Whisk Dry Cupcake Ingredients
Combine the flour, cocoa powder, baking powder, baking soda, sugar, and fine sea salt in a medium mixing bowl. Whisk until the mixture looks uniform and no cocoa or flour streaks remain.
Sifting the flour and cocoa guarantees a smoother batter and helps remove any lumps for lighter, more even cupcakes.
Mix Wet Cupcake Ingredients
In a second medium bowl, whisk together the milk, vegetable oil, eggs, and vanilla extract until fully combined and smooth. Make sure the eggs and milk are at room temperature to help the batter emulsify.
Whisk just until uniform; there’s no need to incorporate extra air at this stage of mixing.
Combine Wet & Dry Mixtures
Pour the wet mixture into the bowl of dry ingredients. Whisk gently until no dry flour pockets remain.
Avoid overmixing, which can make the cupcakes dense. Scrape the sides and bottom of the bowl with a rubber spatula to ensure everything is evenly incorporated, creating a smooth, cohesive batter.
Add Boiling Water & Thin Batter
Carefully pour in the boiling water while stirring with a whisk. Mix until the batter is smooth and slightly thin.
The hot water helps bloom the cocoa, intensifying the chocolate flavor. Stir just enough to combine. The batter will be pourable, which is normal and leads to moist, tender cupcakes.
Fill Liners & Bake Cupcakes
Divide the batter evenly among the 12 cupcake liners, filling each about two-thirds full. Use a measuring cup or spoon for even portions.
Place the pan in the preheated oven and bake for 18–20 minutes, or until a toothpick inserted in the center comes out clean or with only a few moist crumbs.
Cool Cupcakes Completely
Remove the pan from the oven and place it on a wire cooling rack. Let the cupcakes cool in the pan for 10 minutes to set their structure.
Carefully transfer the cupcakes from the pan directly onto the wire rack. Allow them to cool completely for 30–35 minutes before filling or frosting.
Cook Sugar & Water for Caramel
While cupcakes bake, combine the granulated sugar and water in a small saucepan. Set over medium heat and gently swirl occasionally until the sugar fully dissolves.
Don’t stir with a spoon. Once dissolved, increase the heat to medium-high and continue cooking, swirling as needed, until the mixture turns a deep amber color.
Finish Caramel & Add Salt
Remove the saucepan from the heat immediately once a deep amber color appears. Carefully whisk in the cubed butter until melted and combined.
Slowly pour in the heavy cream while whisking constantly; the mixture will bubble vigorously. Stir until smooth, then add the flaky sea salt. Transfer the caramel to a bowl and cool about 20 minutes until thickened.
Beat Butter & Cocoa for Frosting
Place softened unsalted butter in a medium bowl or stand mixer bowl. Beat with a handheld or stand mixer on medium speed until pale, smooth, and fluffy, about 3 minutes. Scrape down the sides of the bowl.
Add sifted cocoa powder and mix briefly on low to start incorporating, preventing cocoa from puffing everywhere.
Add Sugar, Cream & Whip Buttercream
Add powdered sugar, salt, vanilla extract, and heavy cream to the butter mixture. Start mixing on low speed until ingredients are moistened and combined.
Increase speed to medium-high and beat until light, creamy, and spreadable. Add a little more cream if needed for a smooth piping consistency. If too soft, chill briefly, then re-whip.
Core Cupcakes & Fill with Caramel
Once cupcakes are completely cool, use a small knife or the back of a piping tip to carefully cut a small core from the center of each. Don’t cut to the bottom.
Spoon or pipe about 1–2 teaspoons of the thickened salted caramel into each cavity. Reserve a small amount of caramel for drizzling over the finished cupcakes.
Pipe Buttercream & Finish Cupcakes
Fit a piping bag with a small round tip and fill it with chocolate buttercream. Pipe a generous swirl over each cupcake, fully covering the caramel center.
Drizzle a small amount of the remaining salted caramel on top of the buttercream. Optionally sprinkle each cupcake with a pinch of flaky sea salt for extra flavor contrast.
Ingredient Swaps
- Use gluten‑free all‑purpose flour (1:1 blend with xanthan gum) in place of regular flour for gluten‑free cupcakes; check that cocoa and baking powder are certified GF.
- For dairy‑free: swap milk and cream with full‑fat oat or soy milk/cream, and use vegan butter sticks in both caramel and buttercream.
- On a budget, replace flaky sea salt with regular fine sea salt (use a bit less by volume) and heavy cream with evaporated milk in the caramel.
- If vegetable oil is unavailable, use any neutral oil (canola, sunflower, light olive); in a pinch, melted and cooled unsalted butter works too.
You Must Know
– Make-Ahead – *For smoother day-of assembly,* prepare the caramel and buttercream up to 2 days in advance, chill covered, then bring both back to cool room temperature (about 20–30 minutes on the counter) and re-whip the frosting briefly.
The caramel should be thick but spoonable—like warm peanut butter—not stiff or runny.
Serving Tips
- Serve on a white platter so caramel drizzle and chocolate frosting visually pop.
- Pair with small glasses of cold milk, espresso, or salted caramel lattes.
- Garnish plates with extra caramel swirls and a light cocoa powder dusting.
- Add a tiny chocolate square or caramel candy atop each swirl for decoration.
- Present in decorative cupcake wrappers for parties, matching colors to the occasion.
Storage & Make-Ahead
These cupcakes keep in the fridge, covered, for 4–5 days.
Bring to room temperature before serving so the crumb softens and buttercream loses its chill.
You can bake cupcakes and make caramel a day ahead.
They also freeze (unfilled and unfrosted) up to 2 months.
Thaw, then fill and frost.
Reheating
Reheat cupcakes gently: bring to room temperature, then warm in a 150°C (300°F) oven for 5–7 minutes.
Avoid microwaving to prevent rubbery texture and melted frosting; stovetop reheating isn’t recommended.
Cupcakes on Birthday TV Shows
Once those cupcakes are gently warmed and the chocolate buttercream softens to a silky cloud again, I always picture them under bright studio lights, ready for a birthday TV moment.
I imagine a set dressed like a cozy living room, cameras gliding past as the salted caramel catches the light, turning each swirl into a tiny golden spotlight.
On a show like that, I’d want you to *see* and almost *taste* them through the screen:
- Glossy chocolate crumb, tender enough to break with a fork’s edge.
- A slow caramel drizzle, oozing from the hidden center.
- Flakes of sea salt sparkling like confetti.
- That first bite, where the crowd hushes, then bursts into warm applause.
Final Thoughts
Give these Chocolate Salted Caramel Cupcakes a try and enjoy the rich, bakery-style flavors right from your own kitchen.
Feel free to tweak the sweetness, salt level, or frosting style to make them perfectly your own.
Frequently Asked Questions
Can I Freeze the Salted Caramel-Filled Cupcakes Without Ruining the Texture?
Yes, you can freeze them, and the texture stays lovely if you’re careful. I’d chill them first, freeze on a tray, then wrap snugly; later, thaw slowly, letting caramel soften like golden silk inside.
How Do I Adjust Baking Time for Mini or Jumbo Cupcake Sizes?
For minis, I’d start checking at 10–12 minutes; for jumbo, I’d bake 24–28. Watch for domed tops, fragrant chocolatey warmth, and a clean toothpick—your kitchen will smell like a tiny, glowing bakery.
What’s the Best Way to Transport These Cupcakes Without Smudging the Frosting?
I nestle each cupcake into a deep, lidded carrier, chilling them first so the frosting firms. I press parchment between rows; when you lift the lid, swirls stand tall, untouched, like little frosted lanterns.
Can I Make This Recipe Dairy-Free Without Sacrificing Flavor and Structure?
You can, and I’d keep structure by using oat milk, vegan butter sticks, and coconut cream. As you mix, the batter still flows like satin, and the baked crumb stays tender, fragrant, and deeply chocolatey.
How Can I Scale This Recipe for a Large Party or Catering Event?
You can safely multiply everything by 3–4 for parties; I’d bake in batches, weighing ingredients. I’d cool completely, then fill and frost close to serving so each bite feels freshly made, soft, and luscious.

Chocolate Salted Caramel Cupcakes
Equipment
- 1 Standard 12-cup muffin pan
- 12 paper cupcake liners
- 3 medium mixing bowls
- 1 Small saucepan
- 1 handheld or stand mixer
- 2 whisks
- 1 Rubber spatula
- 1 Wooden spoon
- 1 wire cooling rack
- 1 piping bag
- 1 small round piping tip
- 1 teaspoon measuring spoon set
- 1 tablespoon measuring spoon set
- 1 set of dry measuring cups
- 1 liquid measuring cup
- 1 toothpick pack
Ingredients
- 150 gram all-purpose flour sifted
- 40 gram unsweetened cocoa powder sifted
- 200 gram granulated sugar
- 1 teaspoon baking powder
- 1/2 teaspoon baking soda
- 1/2 teaspoon fine sea salt
- 120 milliliter whole milk room temperature
- 60 milliliter vegetable oil neutral
- 2 large eggs room temperature
- 1 teaspoon vanilla extract pure
- 120 milliliter boiling water
- 150 gram granulated sugar
- 60 milliliter water
- 90 gram unsalted butter room temperature; cubed
- 120 milliliter heavy cream room temperature
- 1 teaspoon flaky sea salt
- 170 gram unsalted butter room temperature
- 250 gram powdered sugar sifted
- 30 gram unsweetened cocoa powder sifted
- 30 milliliter heavy cream plus more as needed
- 1 teaspoon vanilla extract pure
- 1/4 teaspoon fine sea salt
Instructions
- Preheat the oven to 180°C (350°F) and line the muffin pan with paper cupcake liners.
- In a medium bowl whisk together flour, cocoa powder, baking powder, baking soda, sugar, and salt until well combined.
- In another bowl whisk together milk, vegetable oil, eggs, and vanilla until smooth.
- Pour the wet ingredients into the dry ingredients and whisk until just combined and no flour pockets remain.
- Carefully stir in the boiling water until the batter is smooth and thin.
- Divide the batter evenly among the 12 liners, filling each about two-thirds full.
- Bake the cupcakes for 18–20 minutes or until a toothpick inserted in the center comes out clean.
- Place the pan on a wire rack and let the cupcakes cool in the pan for 10 minutes.
- Transfer the cupcakes from the pan to the wire rack and cool completely for about 30–35 minutes.
- While the cupcakes bake, combine sugar and water in a small saucepan over medium heat, gently swirling until the sugar dissolves.
- Increase heat to medium-high and cook without stirring until the mixture turns a deep amber color.
- Remove the saucepan from heat and carefully whisk in the butter until fully melted.
- Slowly pour in the heavy cream while whisking constantly until smooth and combined.
- Stir in the flaky sea salt, then transfer the caramel to a bowl and let it cool to room temperature for about 20 minutes until thickened.
- For the buttercream, beat the softened butter with a mixer on medium speed until pale and fluffy, about 3 minutes.
- Add powdered sugar, cocoa powder, salt, vanilla, and heavy cream, then beat on low until incorporated and on medium-high until light and creamy, adding a bit more cream if needed for a piping consistency.
- Once the cupcakes are completely cool, use a small knife or the back of a piping tip to cut out a small core from the center of each cupcake.
- Spoon or pipe about 1–2 teaspoons of salted caramel into each cavity, reserving a little caramel for drizzling.
- Fit a piping bag with a round tip and fill it with chocolate buttercream.
- Pipe a generous swirl of buttercream onto each cupcake, covering the caramel-filled center.
- Drizzle a small amount of the remaining salted caramel over the frosted cupcakes.
- Optionally sprinkle a pinch of flaky sea salt on top of each cupcake for extra contrast.
Notes

Cynthia Weatherford is a seasoned chef and culinary enthusiast who serves as the Recipe creator of Somonday. With decades of experience in the kitchen and a passion for exploring diverse cuisines, Cynthia brings a blend of creativity and technique to every dish. Known for transforming simple ingredients into show-stopping meals, Cynthia believes that cooking is an art form anyone can master. Dedicated to inspiring home cooks, Cynthia shares approachable recipes, pro tips, and culinary wisdom to make every meal memorable.


