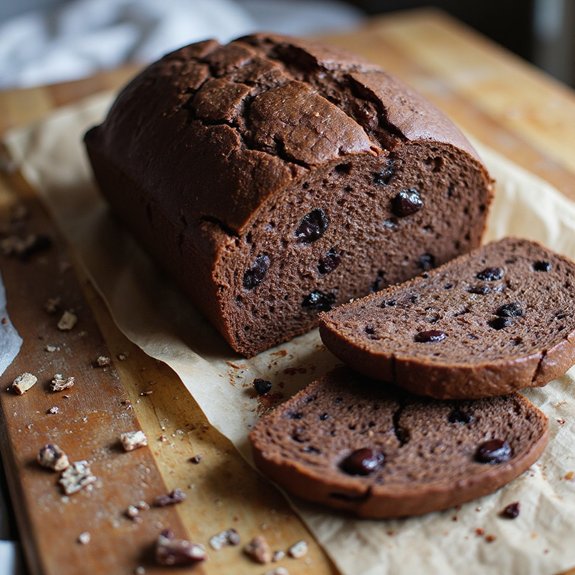
It’s ideal for sweet-tooth fans, sourdough beginners ready to branch out, and anyone who loves a special bread for brunches or simple entertaining.
I first turned to this loaf when I needed something impressive yet soothing for a low-key Sunday gathering; it filled the house with warmth and made simple coffee feel like an occasion.
It shines for holiday breakfasts, chocolate cravings, or giftable loaves.
Ready to bring this chocolate sourdough to life?
Why You’ll Love It
- Delivers rich, chocolatey flavor with a subtle, complex sourdough tang
- Balances dessert indulgence with hearty, naturally leavened artisan bread texture
- Stays moist and tender, thanks to butter, cocoa, and sourdough fermentation
- Feels impressive yet uses simple techniques and mostly pantry-friendly ingredients
- Freezes beautifully in slices for quick, ready-to-toast treats anytime
Ingredients
- 150 g active sourdough starter — 100% hydration and very bubbly
- 320 g water — room temperature for easier mixing
- 400 g bread flour — unbleached for best gluten strength
- 50 g whole wheat flour — adds flavor and structure
- 30 g unsweetened cocoa powder — good-quality, not hot cocoa mix
- 9 g fine sea salt — evenly seasons the dough
- 60 g granulated sugar — balances cocoa’s bitterness
- 80 g dark chocolate chips or chunks — 60–70% cacao melts nicely
- 40 g unsalted butter, melted and cooled — adds richness and softness
- 1 tsp vanilla extract — enhances chocolate flavor
Step-by-Step Method
Mix Starter & Water
Whisk the active sourdough starter with room-temperature water in a large bowl. Break up all lumps so the mixture looks milky and mostly smooth. This helps distribute the yeast and bacteria evenly.
Use a whisk or your fingers. Make certain the starter is truly active so it can handle the cocoa and sugar later.
Combine Flours & Cocoa
Add bread flour, whole wheat flour, and cocoa powder to the bowl. Mix thoroughly until no dry bits remain. Scrape the sides and bottom so everything is hydrated.
The dough will be sticky and shaggy at this stage, which is fine. Cover the bowl and let it rest so the flour absorbs water.
Autolyse the Dough
Cover the bowl with a towel or reusable cover. Let the dough sit at room temperature for about 30 minutes. During this autolyse period, gluten begins forming naturally.
This rest makes the dough easier to handle and improves structure. Avoid adding salt or sugar yet, as they can slow hydration and gluten development.
Add Salt & Sugar
Sprinkle fine sea salt and granulated sugar evenly over the dough. Mix by hand or with a dough whisk until both are well incorporated.
Pinch and fold the dough to distribute them fully. The dough may feel slightly tighter and more cohesive. Continue mixing until the texture is uniform and smooth.
Incorporate Butter & Vanilla
Pour in the melted, cooled butter and add vanilla extract. Knead gently or use stretch-and-fold motions to work them into the dough.
Continue for about 5–7 minutes until the dough becomes smoother and more elastic. Avoid tearing the dough. Stop once it forms a cohesive, slightly tacky ball.
Fold In Chocolate Pieces
Scatter dark chocolate chips or chunks over the dough. Gently fold the dough over itself multiple times to distribute them evenly.
Keep most chocolate pieces inside the dough rather than on the surface to prevent burning in the oven. Continue folding just until the chocolate is spread throughout.
Bulk Ferment & Fold
Cover the bowl and let the dough ferment at room temperature for 4–6 hours. During the first 2 hours, perform 3–4 sets of stretch-and-folds every 30–45 minutes.
Gently lift and fold each side toward the center. This strengthens gluten. Stop folding after the dough feels stronger and more elastic.
Check Rise & Turn Out
Watch the dough rather than the clock. Once it has risen about 50% and feels airy and puffy, it’s ready.
Lightly flour your work surface. Gently turn the dough out, trying not to deflate it completely. Use your hands or a scraper. Preserve as much gas as possible for a light, open crumb.
Pre-Shape the Dough
Use a bench scraper to tuck and rotate the dough into a loose round. Create light surface tension by pulling the dough toward you while turning.
Don’t overwork it. Let the pre-shaped round rest on the counter, uncovered, for 15–20 minutes. This relaxes the gluten and makes final shaping easier.
Shape Into Final Loaf
After the bench rest, perform the final shaping. Form a tight boule or batard, depending on your preference.
Use firm but gentle motions to build surface tension without tearing the dough. Seal the seam well. A well-shaped loaf helps it rise upward and maintain structure during baking.
Prepare for Cold Proof
Lightly flour a proofing basket or line a bowl with a well-floured towel. Place the shaped dough seam-side up into the basket.
Sprinkle a little flour on top if needed to prevent sticking. Cover securely with a towel or plastic. This keeps the surface from drying during the long, cold proof.
Refrigerate Overnight
Transfer the covered basket to the refrigerator. Let the dough proof cold for 8–12 hours.
This slow fermentation develops deeper chocolate and sourdough flavor. It also firms the dough, making scoring easier. Adjust the time if your dough tends to overproof. Aim for a slightly domed, aerated loaf.
Preheat Oven & Dutch Oven
About 30–45 minutes before baking, place your Dutch oven with its lid into the oven. Preheat to 230°C (450°F).
Heating both the pot and lid fully ensures strong oven spring. Use an oven thermometer if possible. Keep the door closed while preheating so you maintain a steady, high temperature.
Score the Chilled Dough
Remove the dough from the fridge. Place a piece of parchment over the basket and invert the dough onto it, seam-side down.
Using a sharp knife or bread lame, score the top confidently. Make at least one deep main slash to control expansion. Work quickly to keep the dough chilled and firm.
Bake Covered for Steam
Carefully lift the parchment with the dough and place it into the preheated Dutch oven. Cover with the hot lid.
Bake for about 20 minutes. The enclosed environment traps steam, allowing the loaf to expand fully and develop a shiny, blistered crust. Avoid opening the oven during this stage.
Finish Baking Uncovered
After 20 minutes, remove the lid. Continue baking the loaf uncovered for another 18–22 minutes. Watch for a deeply browned, chocolatey crust.
If you have a thermometer, check for an internal temperature near 96°C (205°F). Adjust time slightly based on your oven and preferred crust color.
Cool Completely Before Slicing
Use oven mitts to lift the loaf out of the Dutch oven. Transfer it to a wire cooling rack. Let it cool for at least 1–2 hours.
Cooling allows the crumb to set and moisture to redistribute. Slicing too early can make the interior gummy. Once cool, slice with a sharp serrated knife and serve.
Ingredient Swaps
- Use all-purpose flour in place of bread flour if needed; reduce the water by 10–20 g if the dough feels too slack.
- Swap whole wheat flour with rye, spelt, or more bread flour, keeping hydration similar.
- Replace butter with an equal amount of neutral oil or coconut oil for a dairy-free loaf, and use dairy-free chocolate chips to make it fully dairy-free.
- Use light brown sugar instead of granulated for a slightly deeper caramel note, or coconut sugar for a less refined option.
You Must Know
– Flavor Boost – *For a more complex chocolate note,* add 1–2 g (½–1 tsp) espresso powder** and replace 40–60 g of the water with room-temperature coffee**; the loaf won’t taste like coffee, but the cocoa reads darker and richer.
Serving Tips
- Serve slightly warm with a smear of salted butter or mascarpone.
- Pair with fresh berries and a dusting of powdered sugar for brunch.
- Toast slices and top with vanilla ice cream for a quick dessert.
- Plate with espresso or dark coffee to complement the chocolatey sourdough flavors.
- Make indulgent French toast with thick slices and maple syrup.
Storage & Make-Ahead
Chocolate sourdough keeps in the fridge, well-wrapped, for up to 4–5 days, though the crust softens.
For best texture, slice and freeze well-wrapped for up to 2 months.
Reheat slices from frozen in a toaster or low oven.
The overnight cold proof already makes this an excellent make-ahead loaf.
Reheating
Reheat slices gently: in a 150°C (300°F) oven for 8–10 minutes.
Briefly in the microwave wrapped in a damp towel.
Or on a covered skillet over low heat until warmed through.
Chocolate Sourdough Holiday Traditions
When winter settles in and the days turn short and blue, I love turning this chocolate sourdough into a small ritual that anchors the season.
I start the dough the night before a gathering, when the house is quiet and the windows fog with breath and steam.
Cocoa darkens the bowl, and the starter smells softly tangy, like snow in the air.
Final Thoughts
Give this chocolate sourdough bread a try and enjoy the blend of tangy, rich, and sweet flavors in every slice.
Don’t hesitate to tweak the add-ins or sweetness level to make it uniquely your own!
Frequently Asked Questions
Can I Make This Chocolate Sourdough Fully Vegan Without Sacrificing Texture?
Yes, you can. I’d swap butter for refined coconut oil or neutral oil, keep the hydration, and maybe add a splash of plant milk; you’ll still get tender crumb, crackling crust, lush chocolate pockets.
How Do Altitude and Humidity Changes Affect Fermentation and Baking Time?
Altitude speeds fermentation but slows baking, so I’d watch dough, not clocks, and bake a bit longer. High humidity softens dough; I’d use slightly less water, savor its silkiness, and rely on touch and aroma.
Is It Safe to Ferment This Dough for Longer Than 24 Hours Total?
Yes, it’s usually safe, but I’d watch aroma and texture closely. If it smells sharply sour or boozy, feels slack and sticky, or collapses easily, it’s over‑fermented and I wouldn’t bake or eat it.
Can I Use This Dough to Make Sourdough Chocolate Rolls or Buns Instead?
Yes, you can. I’d shape the dough into soft coils or tight little spirals, nestle them shoulder to shoulder in a buttered pan, proof until pillowy, then bake until the chocolate blisters and sighs.
How Do I Troubleshoot a Dense, Gummy Crumb in Chocolate Sourdough Bread?
You’ll fix dense, gummy crumb by fermenting longer, baking fully, and letting the loaf cool completely. I’d watch dough rise, not the clock, aim for 205°F inside, then wait—crackling crust, steam sighing out.
Chocolate Sourdough Bread
Equipment
- 1 large mixing bowl
- 1 medium mixing bowl
- 1 digital kitchen scale
- 1 wooden spoon or dough whisk
- 1 bench scraper
- 1 proofing basket or bowl
- 1 Dutch oven with lid or baking stone
- 1 parchment paper sheet
- 1 sharp knife or bread lame
- 1 wire cooling rack
Ingredients
- 150 gram active sourdough starter 100% hydration
- 320 gram water room temperature
- 400 gram bread flour unbleached
- 50 gram whole wheat flour
- 30 gram unsweetened cocoa powder
- 9 gram fine sea salt
- 60 gram granulated sugar
- 80 gram dark chocolate chips or chunks
- 40 gram unsalted butter melted and cooled
- 1 teaspoon vanilla extract
Instructions
- In a large mixing bowl whisk together the active sourdough starter and water until mostly dissolved.
- Add bread flour, whole wheat flour, and cocoa powder to the bowl and mix until no dry flour remains, then cover and rest for 30 minutes (autolyse).
- Sprinkle in the salt and sugar, then mix by hand or with a dough whisk until well incorporated.
- Add melted butter and vanilla extract and knead or stretch and fold until the dough is smooth and elastic, about 5–7 minutes.
- Gently fold in the dark chocolate chips or chunks until evenly distributed throughout the dough.
- Cover the bowl and let the dough bulk ferment at room temperature for 4–6 hours, performing 3–4 sets of stretch-and-folds every 30–45 minutes during the first 2 hours.
- When the dough has risen by about 50% and feels airy, lightly flour your work surface and gently turn the dough out.
- Pre-shape the dough into a loose round using a bench scraper, then let it rest uncovered for 15–20 minutes.
- Perform a final shaping into a tight boule or batard, creating good surface tension without tearing the dough.
- Place the shaped dough seam-side up into a lightly floured proofing basket or bowl lined with a floured towel.
- Cover and refrigerate for 8–12 hours for a cold overnight proof.
- About 30–45 minutes before baking, place the Dutch oven (with lid) into the oven and preheat to 230°C (450°F).
- Remove the dough from the fridge, place it onto a piece of parchment paper seam-side down, and score the top with a sharp knife or bread lame.
- Carefully transfer the dough on the parchment into the preheated Dutch oven, cover with the lid, and bake for 20 minutes.
- Remove the lid and continue baking for another 18–22 minutes, or until the crust is deeply browned and the internal temperature reaches about 96°C (205°F).
- Transfer the baked loaf to a wire cooling rack and let it cool completely, at least 1–2 hours, before slicing.
Notes

Cynthia Weatherford is a seasoned chef and culinary enthusiast who serves as the Recipe creator of Somonday. With decades of experience in the kitchen and a passion for exploring diverse cuisines, Cynthia brings a blend of creativity and technique to every dish. Known for transforming simple ingredients into show-stopping meals, Cynthia believes that cooking is an art form anyone can master. Dedicated to inspiring home cooks, Cynthia shares approachable recipes, pro tips, and culinary wisdom to make every meal memorable.


