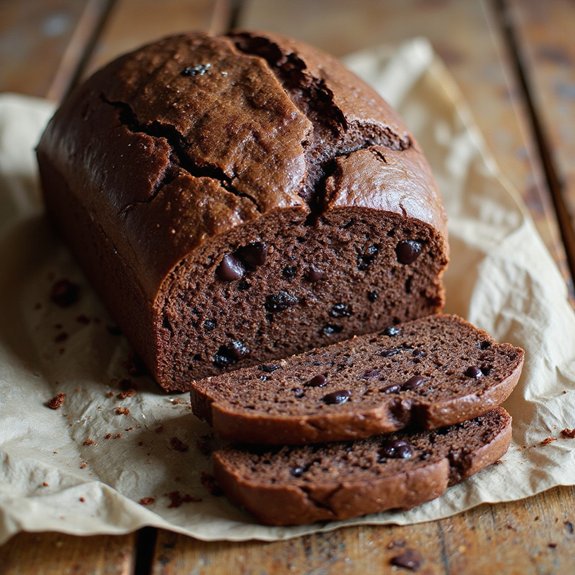
There’s something about cracking open a loaf of chocolate sourdough that feels like pure ceremony.
Picture a burnished, cocoa-brown crust, crackling as you slice, giving way to a tender, marbled crumb threaded with pockets of melted chocolate.
This is a cozy dessert bread, perfect for slow mornings or late-night treats, yet simple enough to fit into a regular sourdough routine—most of the time is hands-off rising.
It’s ideal for sweet-tooth fans, sourdough lovers, and anyone who likes their comfort food with a touch of sophistication.
I first leaned on this loaf during a rough week, when dinner was a thrown-together salad—but dessert felt non-negotiable.
One slice, still warm, with a little butter, turned the whole evening around.
This chocolate sourdough shines at Sunday suppers, easy entertaining, or as an impressive gift that looks far harder than it is.
Ready to bring this loaf to life?
Why You’ll Love It
- Delivers deep, brownie-like chocolate flavor with a subtle sourdough tang
- Creates an ultra-soft, tender crumb with melty pockets of dark chocolate
- Rises overnight, so active time stays low and schedule-friendly
- Uses simple pantry ingredients plus starter—no commercial yeast required
- Slices cleanly for snacking, gifting, or an indulgent breakfast toast
Ingredients
- 150 g active sourdough starter — 100% hydration and recently fed
- 300 g warm water — 80–85°F to keep starter happy
- 60 g granulated sugar — balances cocoa’s bitterness
- 60 g unsalted butter, melted and slightly cooled — adds richness and tenderness
- 1 large egg, room temperature — helps structure and softness
- 400 g bread flour — higher protein for better rise
- 50 g unsweetened cocoa powder — use good-quality Dutch-process if possible
- 8 g fine sea salt — evenly seasons the dough
- 120 g dark chocolate chips (60–70% cacao) — choose quality chocolate that you enjoy eating
- 1 tbsp neutral oil — for greasing pan without adding flavor
- 15 g butter, softened — for brushing warm loaf for a soft, shiny crust (optional)
Step-by-Step Method
Mix the wet ingredients
Whisk the active sourdough starter, warm water, sugar, melted butter, and egg in a large mixing bowl. Combine until the mixture looks smooth and uniform, with no streaks of egg or butter.
Make sure the butter is only slightly warm so it doesn’t scramble the egg or overheat the starter.
Combine the dry ingredients
In a medium mixing bowl, mix the bread flour, cocoa powder, and salt. Use a whisk or fork to break up any cocoa lumps. Stir until the color looks even throughout.
This helps the cocoa and salt distribute properly so the dough ferments and bakes evenly.
Bring dough together
Add the dry mixture to the wet mixture all at once. Stir with a dough whisk or wooden spoon until a rough, shaggy dough forms. Scrape down the sides of the bowl as needed.
Stop mixing when no dry pockets of flour remain and everything is just combined.
Rest the dough
Let the dough rest uncovered for 20–30 minutes. Leave it at room temperature so the flour can fully hydrate.
This short rest, called autolyse, helps the dough relax and become easier to handle. Avoid adding flour at this stage, even if the dough looks sticky.
Stretch and fold the dough
After resting, perform several stretch-and-folds directly in the bowl. Grab a section of dough, gently stretch it up, then fold it back over itself.
Rotate the bowl and repeat 6–8 times. Continue until the dough feels smoother, stronger, and more elastic under your hands.
Fold in chocolate chips
Sprinkle the dark chocolate chips over the dough. Use a bench scraper or your hands to gently fold and turn the dough, tucking chips inside with each motion.
Distribute them as evenly as possible without overworking the dough. Stop once you see chips throughout and the dough still feels airy.
Bulk ferment until puffy
Cover the bowl with plastic wrap or a reusable cover. Leave it at room temperature for 6–8 hours.
Watch for the dough to roughly double, look puffy, and jiggle when the bowl moves. Adjust time as needed for your kitchen temperature, relying more on appearance than the clock.
Shape into a rectangle
Lightly flour your work surface, then gently turn out the dough. Avoid pressing too hard so you keep the air inside.
Pat or stretch the dough into a rough rectangle. Aim for an even thickness so it rolls neatly. Use as little extra flour as possible to maintain a soft crumb.
Roll into a tight loaf
Starting from a short edge, roll the rectangle into a snug log. Gently tighten as you roll to build surface tension.
Pinch the seam firmly to seal and tuck the ends under for a clean shape. Handle the dough gently so you don’t deflate it excessively.
Prepare the pan and place dough
Grease the 9×5 inch loaf pan lightly with neutral oil. Line it with parchment paper, letting some overhang for easy removal.
Place the shaped loaf seam-side down in the pan. Adjust it so it sits evenly and fills the pan lengthwise without twisting.
Proof until risen
Cover the pan loosely and let the dough proof at room temperature for 2–3 hours. Check that it rises close to the top of the pan and looks rounded and puffy.
Gently press the dough with a fingertip; it should spring back slowly, leaving a slight indentation.
Preheat the oven
Near the end of proofing, preheat your oven to 375°F (190°C). Give it enough time to fully heat so the loaf bakes evenly from the start.
Position an oven rack in the center. Avoid opening the door frequently later, which can drop the temperature and affect the rise.
Bake the loaf
Place the loaf pan on the center rack. Bake for 30–35 minutes until the top is well set and slightly firm.
Insert a skewer into the center; it should come out mostly clean, with melted chocolate streaks acceptable. If needed, bake a few extra minutes for doneness.
Finish and cool completely
If desired, brush the hot loaf with softened butter for a soft, shiny crust. Carefully remove the loaf from the pan using the parchment.
Transfer it to a wire cooling rack. Let it cool completely for at least 1–2 hours before slicing so the crumb sets and chocolate firms slightly.
Ingredient Swaps
- Use coconut oil or a quality vegan butter and a flax “egg” (1 tbsp ground flax + 3 tbsp water, rested 10 minutes) to make the loaf dairy-free and egg-free.
- Substitute up to half the bread flour with all-purpose; avoid going 100% whole wheat or rye unless you add 10–20 g extra water and expect a denser loaf.
- Swap dark chocolate chips for chopped chocolate bars, milk or white chocolate (sweeter), or omit entirely for a less rich, more bread‑like loaf.
You Must Know
– Flavor Boost • For deeper chocolate and tang: Let the shaped dough chill in the fridge for 8–12 hours after it has visibly puffed, then bring back toward room temp (45–60 minutes) before baking; the cold retard intensifies both cocoa and sourdough notes without over-acidifying.
Serving Tips
- Serve slightly warm with a smear of salted butter or mascarpone.
- Pair slices with fresh berries and a dollop of lightly sweetened whipped cream.
- Toast and top with hazelnut spread and flaky sea salt.
- Make indulgent French toast with vanilla custard and maple syrup.
- Plate with a scoop of vanilla or coffee ice cream for dessert.
Storage & Make-Ahead
The chocolate sourdough loaf keeps well in the fridge for up to 4–5 days when tightly wrapped or stored in an airtight container.
For make-ahead, bake, cool completely, then slice and freeze up to 2–3 months.
Thaw at room temperature or toast slices directly from frozen.
Reheating
Reheat slices gently: in microwave at 50% power for 10–15 seconds.
In a 300°F (150°C) oven for 5–8 minutes.
Or warm on a covered skillet over low heat.
Chocolate Sourdough in Cafes
On a slow morning in a cozy café, I always notice how a chocolate sourdough loaf turns heads before anyone even takes a bite—its dark, glossy crust, irregular crumb, and pockets of melted chocolate look like something between a rustic bread and a brownie.
I watch baristas slice it into thick slabs, the serrated knife cracking through the crust, releasing a sigh of cocoa and tangy warmth.
When I spot it on a counter, I order it plain, maybe with a cappuccino.
You don’t need frosting or frills; the sourdough’s gentle acidity already sharpens the chocolate, the way espresso does.
One bite, and the café hum fades—just you, the tender crumb, and slow-melting chocolate on your tongue.
Final Thoughts
Give this chocolate sourdough loaf a try and see how beautifully tangy, tender, and chocolaty a simple starter can be.
Once you’ve made it once, have fun tweaking it—swap in different chocolate, add nuts or dried fruit, or adjust the sweetness to make it your own.
Frequently Asked Questions
Can I Convert This Recipe to a Gluten-Free Chocolate Sourdough Loaf?
Yes, you can, but you’ll need a strong gluten‑free sourdough starter and a reliable 1:1 baking blend. I’d add psyllium husk gel for structure so your loaf still slices tender, chocolaty, and fragrant.
How Can I Reduce the Sugar for a Less Sweet Version?
You can cut sugar to 30–40g; I’d keep the butter the same so the crumb stays tender. Taste the dough—it should feel bittersweet, cocoa-forward, with pockets of molten chips carrying most of the sweetness.
Is It Possible to Make This Loaf Fully Vegan?
Yes, you can. I’d swap butter for melted coconut oil, use a flax egg, and choose dark chocolate without dairy. You’ll still slice into tender, steamy, cocoa‑rich bread that smells like a midnight bakery.
How Do I Scale This Recipe for a Commercial Bakery?
You’ll scale this by baker’s percentages: convert each ingredient to a percentage of total flour, then multiply for your desired batch size. I’d test 3–5× first, watching dough temperature, fermentation time, and chocolate distribution.
Which Toppings or Glazes Pair Best for Special Occasions?
For special occasions, I’d crown it with glossy ganache, scatter flaky salt, and add a swirl of espresso glaze; you’ll slice into a fragrant, crackling top that melts into bittersweet, almost truffle‑like richness.
Chocolate Sourdough Loaf
Equipment
- 1 large mixing bowl
- 1 medium mixing bowl
- 1 dough whisk or wooden spoon
- 1 digital kitchen scale
- 1 Measuring spoons set
- 1 bench scraper
- 1 9×5-inch loaf pan
- 1 plastic wrap roll or reusable cover
- 1 parchment paper sheet
- 1 wire cooling rack
Ingredients
- 150 gram active sourdough starter 100% hydration
- 300 gram warm water about 80–85°F
- 60 gram granulated sugar
- 60 gram unsalted butter melted and cooled slightly
- 1 large egg room temperature
- 400 gram bread flour
- 50 gram unsweetened cocoa powder
- 8 gram fine sea salt
- 120 gram dark chocolate chips 60–70% cacao
- 1 tablespoon neutral oil for greasing pan
- 15 gram butter optional; softened; for brushing top
Instructions
- In a large mixing bowl, whisk together the active sourdough starter, warm water, sugar, melted butter, and egg until well combined.
- In a medium mixing bowl, mix the bread flour, cocoa powder, and salt until evenly distributed.
- Add the dry mixture to the wet mixture and stir with a dough whisk or wooden spoon until a rough, sticky dough forms.
- Let the dough rest uncovered for 20–30 minutes to allow the flour to hydrate.
- After the rest, perform several stretch-and-folds in the bowl until the dough feels smoother and more elastic.
- Gently fold in the dark chocolate chips with a bench scraper or your hands until evenly dispersed.
- Cover the bowl with plastic wrap or a reusable cover and leave it to bulk ferment at room temperature for 6–8 hours, or until roughly doubled and puffy.
- Lightly flour your work surface, turn out the dough, and gently shape it into a rectangle.
- Roll the rectangle into a tight log, pinching the seam to seal, and tuck in the ends for a neat loaf shape.
- Grease the loaf pan with neutral oil and line it with parchment paper, then place the shaped dough seam-side down into the pan.
- Cover the pan and proof at room temperature for 2–3 hours, or until the dough has risen near the top of the pan and springs back slowly when gently pressed.
- Near the end of proofing, preheat your oven to 375°F (190°C).
- Place the loaf pan in the center of the oven and bake for 30–35 minutes, until the top is well set and a skewer inserted in the center comes out mostly clean (melted chocolate is fine).
- If using, brush the hot loaf with softened butter for a soft, shiny crust.
- Remove the loaf from the pan, transfer to a wire cooling rack, and cool completely for at least 1–2 hours before slicing.
Notes

Cynthia Weatherford is a seasoned chef and culinary enthusiast who serves as the Recipe creator of Somonday. With decades of experience in the kitchen and a passion for exploring diverse cuisines, Cynthia brings a blend of creativity and technique to every dish. Known for transforming simple ingredients into show-stopping meals, Cynthia believes that cooking is an art form anyone can master. Dedicated to inspiring home cooks, Cynthia shares approachable recipes, pro tips, and culinary wisdom to make every meal memorable.


