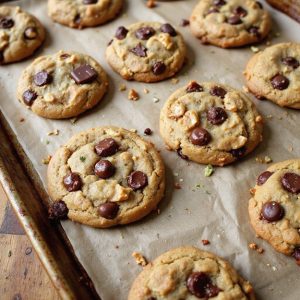
Imagine a tray emerging from the oven, cookies sun-gold at the edges with soft, craggy centers, chocolate glistening like tiny pools, and a buttery-caramel aroma filling the kitchen.
Picture the first bite: tender crumb giving way to melty chips, a whisper of vanilla, and just enough salt to make every note sing—comfort you can hold in your palm.
These classic chocolate chip cookies matter to me because they anchor noisy days with something simple and certain, the kind of sweetness that turns a room into home.
They’re perfect for busy weeknights when homework sprawls across the table, Sunday suppers when you want an easy finish, or last-minute bake sales that call for a sure thing.
Once, a rough Monday tilted back into balance when a warm batch met my kids at the door—silence, then smiles. That’s the power of a great cookie.
Ready? Let’s cook!
Why You’ll Love It
- Delivers iconic, buttery flavor with melty semisweet chocolate pockets
- Uses pantry staples you likely already have on hand
- Achieves crisp edges and perfectly soft, chewy centers
- Comes together quickly with simple, reliable steps
- Chills briefly for thicker, bakery-style cookies
Ingredients
- 2 1/4 cups all-purpose flour — weigh for accuracy (prevents dense cookies)
- 1 teaspoon baking soda — fresh and clump-free
- 1/2 teaspoon fine sea salt — evenly seasons the dough
- 3/4 cup unsalted butter, softened — room temp for proper creaming
- 3/4 cup light brown sugar, packed — adds moisture and chew
- 1/2 cup granulated sugar — balances sweetness and spread
- 1 large egg, room temperature — binds and lifts
- 1 large egg yolk, room temperature — extra richness and chew
- 2 teaspoons vanilla extract — pure vanilla for best flavor
- 1 1/2 cups semisweet chocolate chips — choose good-quality chips
- 1/2 cup chopped walnuts (optional) — toast lightly for better flavor
Step-by-Step Method
Cream the Butter and Sugars
Beat softened butter with brown and granulated sugars until pale and fluffy, about 2 minutes. Start on low to combine, then increase speed. Scrape the bowl and beater to make certain even mixing.
Proper creaming traps air, helping cookies rise and spread correctly. Avoid overmixing once light and fluffy texture is reached.
Whisk the Dry Ingredients
Whisk flour, baking soda, and fine sea salt in a separate bowl until evenly combined. Break up any flour clumps.
Even distribution of leavening makes certain consistent lift and texture. Set the dry mix aside. Keep measurements accurate to prevent dense cookies; weigh flour if possible for best results and consistency.
Emulsify Eggs and Vanilla
Add the egg, egg yolk, and vanilla extract to the creamed butter-sugar mixture. Beat until smooth and fully emulsified, with no streaks.
Scrape down the bowl for uniformity. The extra yolk adds richness and chew. Don’t rush this step; a silky mixture helps the dough come together without overworking the flour later.
Combine Wet and Dry
Add the dry ingredients to the wet mixture. Mix on low just until no dry streaks remain.
Stop as soon as the flour is incorporated to avoid developing excess gluten. Scrape the bowl and fold any pockets. The dough should be soft and cohesive, not sticky or overworked. Keep the mixer speed gentle.
Fold in Mix-Ins
Fold in semisweet chocolate chips and chopped walnuts, if using, until evenly distributed. Use a rubber spatula for control and to prevent overmixing.
Make certain chips are spread throughout for consistent bites. Add a few extra chips on top later for a bakery look. Keep mix-ins at room temperature to avoid firming the dough prematurely.
Chill to Firm
Chill the dough for 30 minutes to slightly firm. If the kitchen is warm, scoop first, then chill the dough balls for faster cooling and better shape.
Chilling controls spread, concentrates flavor, and improves texture. Cover the bowl or tray to prevent drying. Don’t overchill to rock-hard; aim for scoopable firmness.
Preheat and Prep Pans
Preheat the oven to 350°F (175°C). Line baking sheets with silicone mats or parchment paper.
Make certain racks are centered for even heat. Prepare two sheets so one can bake while the other rests. Proper prep minimizes sticking and promotes even browning. Avoid greasing; excess fat encourages excessive spread.
Portion the Dough
Scoop 1.5-tablespoon portions using a cookie scoop for consistent size. Space mounds about 2 inches apart on prepared sheets.
Gently press a few extra chips on top for appearance. Keep portions uniform to ensure even baking. If dough softens, refrigerate briefly. Work quickly to maintain dough structure.
Bake to Just-Set
Bake one sheet at a time for 10 to 12 minutes. Rotate the pan halfway for even browning.
Look for golden edges and centers that appear just set, slightly pale. Avoid overbaking; cookies continue to cook on the sheet. Adjust time slightly for your oven and sheet color. Remove promptly when ready.
Cool and Store
Cool cookies on the sheet for 5 minutes, then transfer to a wire rack to cool completely. This sets structure and keeps bottoms from steaming.
Once cooled, store in an airtight container. Add a slice of bread to maintain softness for days. Freeze leftovers tightly wrapped for longer storage and easy treats.
Ingredient Swaps
- Dairy-free: replace butter with vegan butter or refined coconut oil; use dairy-free chocolate chips.
- Egg-free: use 1 flax egg (1 tbsp ground flax + 3 tbsp water, rested 5–10 min) per egg; keep the extra yolk by adding 1 tbsp non-dairy yogurt for richness.
- Gluten-free: substitute a 1:1 gluten-free all-purpose blend with xanthan gum; chill dough well to reduce spread.
- Nut-free: omit walnuts or swap with pumpkin/sunflower seeds for crunch.
- Budget/availability: use margarine instead of butter (slightly less spread); swap part of chocolate chips with chopped bar chocolate or raisins.
- Flavor twists: brown 3/4 cup butter for nutty depth (cool before using); use dark chocolate or mix chips with butterscotch/peanut butter chips if desired.
You Must Know
- Doneness • If edges are deep golden but centers look pale and puffy, pull the tray now; carryover heat will finish them in 5–7 minutes on the sheet, yielding set edges and soft, chewy centers.
- Troubleshoot • If cookies spread into thin puddles by minute 6–7, chill shaped dough balls until firm to the touch (15–25 minutes) or add 1–2 tablespoons flour; warmer butter or under-measured flour causes excessive spread.
- Scale • For bakery‑size (3 tbsp) cookies, use a 3-tbsp scoop, space 3 inches, and extend time to 12–14 minutes; for minis (1 tbsp), bake 8–9 minutes—look for matte tops and lightly bronzed rims either way.
- Flavor Boost • For deeper butterscotch notes, brown 3/4 cup butter to a toasty hazelnut aroma, cool 15–20 minutes to ~90–95°F, then proceed; the nutty compounds intensify caramel flavor and aroma.
- Make-Ahead • To streamline, portion dough and freeze solid on a sheet (1–2 hours), then bag up to 2 months; bake from frozen at 350°F adding 1–2 minutes, pulling when rims are golden and centers just lose their gloss.
Serving Tips
- Serve slightly warm with cold milk or vanilla bean ice cream.
- Stack on a cake stand; sprinkle extra chips for a bakery look.
- Pair with coffee or hot cocoa; add a pinch of flaky salt.
- Make ice cream sandwiches using two cookies and softened ice cream.
- Crumble over yogurt or pudding for a quick dessert parfait.
Storage & Make-Ahead
Store cooled cookies in an airtight container at room temperature 3–4 days.
Add a slice of bread to keep them soft.
Refrigerate dough up to 3 days.
Bake straight from cold, adding 1–2 minutes.
Scoop dough balls and freeze up to 2 months.
Bake from frozen, adding 2–3 minutes.
Reheating
Reheat gently: microwave 8–12 seconds with a damp paper towel.
Oven at 300°F for 4–6 minutes on a sheet.
Stovetop: covered skillet on low heat 2–3 minutes, flipping once.
Grandma’s After-School Staple
Once you’ve warmed a cookie back to gooey glory, you’ll taste why these were Grandma’s after-school staple: buttery edges, soft centers, and melty chips that smudge your fingertips.
I remember the hushed crunch of paper bags, the steam curling up as I cracked one open, and that first bite—vanilla blooming, brown sugar caramel‑sweet.
You can recreate that moment in minutes.
Keep dough scooped and chilled, ready for sudden cravings.
Bake just until the rims blush gold and the middles look a touch underdone; they’ll finish on the sheet, staying tender.
If walnuts call your name, chop them small so they toast in the same time.
And always press a few chips on top before baking—little beacons that promise exactly what you’re craving.
Final Thoughts
Ready to bake a batch? Give these classic cookies a try as written, or tweak them with different chips, a pinch of cinnamon, or your favorite nuts to make them your own!
Frequently Asked Questions
Can I Freeze the Cookie Dough Balls for Later Baking?
Yes, you can. I scoop, freeze on a tray until firm, then bag airtight for 2–3 months. Bake from frozen, adding 1–2 minutes. I love sprinkling flaky salt before baking—warm pockets, glossy chips, cozy kitchen.
How Do Altitude Adjustments Affect Baking Time and Texture?
At high altitude, I bake hotter and shorter; cookies set faster but spread more. I add flour, reduce sugar, and bump liquid slightly. I expect drier air, crisper edges, chewier centers—watch doneness early, adjust incrementally.
What’s the Best Way to Prevent Cookies From Spreading?
Chill your dough, use cool sheets, and measure flour accurately. I cream butter just until fluffy, then bake from cold. I keep portions small, ovens hot, and parchment ready—your cookies will hold shape like little golden moons.
Are These Cookies Safe for Gluten-Free Adaptations?
Yes—use a quality 1:1 gluten-free flour with xanthan gum. I whisk it well, chill the dough, and bake slightly under. Expect tender centers, crisp edges, and a hint more crumble. Keep tools and add-ins certified gluten-free.
How Can I Make Them Chewier Without Changing Flavor?
Use more brown sugar than white, chill longer, and slightly underbake. I’ll add an extra yolk, swap in bread flour, and melt half the butter. You’ll bite through glossy edges into plush, bendy centers.

Classic Chocolate Chip Cookies
Equipment
- 2 Mixing bowl
- 1 hand mixer or stand mixer
- 1 Rubber spatula
- 2 Baking sheet
- 2 silicone baking mat or sheet of parchment paper
- 1 Cooling rack
- 4 measuring cup
- 5 Measuring spoon
- 1 Cookie scoop 1.5 tablespoons
- 1 wire whisk
Ingredients
- 2 1/4 cup all-purpose flour
- 1 teaspoon baking soda
- 1/2 teaspoon fine sea salt
- 3/4 cup unsalted butter softened
- 3/4 cup light brown sugar packed
- 1/2 cup granulated sugar
- 1 large egg room temperature
- 1 large egg yolk room temperature
- 2 teaspoon vanilla extract
- 1 1/2 cup semisweet chocolate chips
- 1/2 cup chopped walnuts optional
Instructions
- Preheat the oven to 350°F (175°C) and line baking sheets with silicone mats or parchment.
- In a bowl whisk together flour, baking soda, and salt until evenly combined.
- In a separate bowl beat softened butter, brown sugar, and granulated sugar until light and fluffy, about 2 minutes.
- Add the egg, egg yolk, and vanilla to the butter mixture and beat until smooth and emulsified.
- Add the dry ingredients to the wet mixture and mix on low just until no dry streaks remain.
- Fold in the chocolate chips and walnuts, if using, until evenly distributed.
- Chill the dough in the refrigerator for 30 minutes to firm slightly.
- Scoop 1.5-tablespoon portions of dough onto prepared sheets, spacing about 2 inches apart.
- Bake one sheet at a time for 10 to 12 minutes until edges are golden and centers look just set.
- Let cookies cool on the sheet for 5 minutes, then transfer to a cooling rack to cool completely.


