Introduction
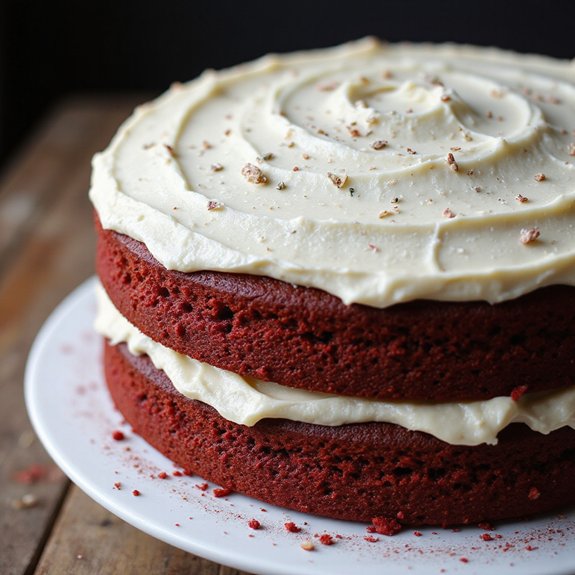
Picture a cake the color of deep ruby velvet, its tender crumb giving way under your fork, crowned with billowy vanilla cream that smells like fresh butter and sugar warming in a cozy kitchen.
Imagine that first bite—soft, cocoa-kissed layers meeting cool, tangy frosting—comforting enough to quiet a long day and celebratory enough to light up a room.
I love this cake because it turns simple pantry staples into something memorable; it’s my go-to when I want elegance without fuss.
It fits so many moments: an effortless finale for busy weeknights, a sweet centerpiece for Sunday suppers, or a reliable showstopper for birthdays and potlucks.
Once, after a chaotic afternoon, this very cake soothed frayed nerves and turned a late dinner into a small family celebration—no stress, just smiles and second slices.
I’ll guide you step by step so it’s just as easy for you.
Ready? Let’s cook!
Why You’ll Love It
- Delivers classic red velvet flavor with creamy vanilla frosting
- Produces tender, moist crumb every single time
- Uses simple pantry staples and easy techniques
- Bakes in two pans for effortless layering
- Frosts smoothly; chills for clean, sharp slices
Ingredients
- 2 1/2 cups all-purpose flour, sifted — spoon-and-level to avoid a dense crumb
- 1 1/2 cups granulated sugar — fine granules dissolve evenly
- 1 teaspoon baking soda — check freshness for proper rise
- 1 teaspoon fine salt — enhances flavor balance
- 1 tablespoon natural unsweetened cocoa powder — classic red velvet cocoa note
- 2 large eggs, room temperature — better emulsification
- 1 1/2 cups vegetable oil — neutral flavor keeps crumb tender
- 1 cup buttermilk, room temperature — tang and tenderness
- 2 teaspoons vanilla extract — use pure extract for best aroma
- 1 teaspoon white vinegar — reacts with cocoa and leavening
- 1 tablespoon red liquid food coloring (or 2 teaspoons gel) — gel gives deeper hue
- 1/2 cup hot water — helps bloom cocoa
- 8 ounces cream cheese, softened — for smooth frosting
- 1/2 cup unsalted butter, softened — balances tang in frosting
- 3 cups powdered sugar, sifted — prevents lumps
- 2 teaspoons vanilla extract — round, creamy finish
- 2 tablespoons heavy cream, cold — adjust for spreadable texture
- 1 pinch fine salt — heightens frosting flavor
Step-by-Step Method
Preheat & Prepare Pans
Preheat oven to 350°F (175°C). Trace and cut two parchment circles for 9-inch pans. Lightly grease sides and line bottoms with parchment. Set a wire rack nearby for cooling. Gather equipment and measure all ingredients. Bring eggs and buttermilk to room temperature. Sift flour and powdered sugar separately to prevent lumps and make certain an even, tender crumb.
Whisk Dry Ingredients
Combine flour, granulated sugar, baking soda, fine salt, and natural cocoa powder in a large bowl. Whisk until evenly mixed and aerated. Break up any cocoa clumps. Keep the bowl wide for easier folding later. Proper dry blending distributes leavening and salt, promoting even rise and consistent flavor throughout both cake layers.
Blend Wet Ingredients
In a separate bowl, whisk eggs, vegetable oil, buttermilk, vanilla extract, white vinegar, and red food coloring. Whisk until smooth and uniformly tinted. Make certain the mixture looks cohesive with no streaks of egg or oil.
Using gel coloring yields a deeper hue without thinning. The vinegar reacts with baking soda for lift and classic red velvet tenderness.
Combine & Form Batter
Pour wet ingredients into the dry ingredients. Whisk gently just until a thick batter forms with no dry pockets. Avoid overmixing to prevent toughness. Scrape the bowl with a rubber spatula to incorporate edges and bottom. Expect a dense, velvety mixture at this stage that will loosen in the next step with added hot water.
Loosen with Hot Water
Stir in the hot water until the batter turns silky and pourable. Mix just to combine. The heat blooms the cocoa, enhancing chocolate notes and color. Don’t overwork the batter. Aim for a smooth flow off the spatula. If using a mixer, keep it on low and finish by hand to maintain a tender crumb.
Divide, Smooth & Bake
Evenly divide batter between prepared pans. Weigh for precision or eyeball carefully. Smooth tops with an offset spatula. Bake 28 to 32 minutes. Check for centers that spring back lightly and a toothpick with a few moist crumbs.
Rotate pans once if needed for even baking, avoiding frequent door opening.
Cool, Release & Rest
Cool cakes in pans on a wire rack for 10 minutes to set structure. Run a thin knife around edges if needed. Invert onto the rack, peel off parchment, and cool completely for 45 to 50 minutes. Avoid frosting warm layers. If domed, wait until fully cool before leveling with a serrated knife for flat stacking.
Beat Cream Cheese & Butter
Make frosting by beating softened cream cheese and unsalted butter on medium-high until fluffy and uniform, about 2 minutes. Scrape the bowl once to make certain no pockets remain. The mixture should look pale and smooth. Proper aeration creates a light, spreadable frosting that holds swirls and sharp edges.
Add Sugar, Vanilla & Cream
Gradually add sifted powdered sugar on low to avoid clouds. Beat until incorporated, then add vanilla extract, a pinch of fine salt, and cold heavy cream. Increase speed to medium-high until light and spreadable. Adjust consistency: chill 10 to 15 minutes to firm or add a teaspoon of cream to loosen if too stiff.
Level, Fill & Stack
Level cooled cake layers if domed. Place the first layer on a stand. Spread about 1 cup frosting evenly to the edges. Set the second layer on top, aligning edges. Press gently to secure. Check for level. Use a small amount of frosting to fill any side gaps before starting the crumb coat for a cleaner finish.
Crumb Coat & Chill
Apply a thin crumb coat over sides and top to trap loose crumbs. Smooth lightly with an offset spatula. Chill the cake for 15 minutes to set the coat. This stabilizes the surface and makes final frosting easier. If your kitchen is warm, chill slightly longer to keep edges neat during the final coat.
Finish Frosting & Serve
Apply a generous final coat, smoothing or creating swirls as desired. Clean edges with the spatula for a polished look. Slice with a warm, dry serrated knife for clean cuts. For extra moisture, optionally brush layers with simple syrup before frosting.
Refrigerate covered up to 4 days; bring slices to room temperature before serving.
Ingredient Swaps
- Buttermilk: 1 cup milk + 1 tbsp lemon juice or white vinegar (rest 5–10 min); dairy-free use unsweetened almond or soy milk + acid.
- Eggs: 2 flax eggs (2 tbsp ground flax + 6 tbsp water, rest 10 min) or commercial egg replacer; note slightly denser crumb.
- Vegetable oil: same amount of neutral oil (canola, sunflower) or 1 1/4 cups melted coconut oil; budget option: 1 1/4 cups melted butter for richer flavor.
- Cocoa powder: natural preferred; if only Dutch-processed, keep vinegar to maintain acidity and color.
- Red coloring: 1–2 tsp gel for strong hue; natural options include beet powder (2–3 tbsp) or boiled beet puree (reduce added water slightly).
- Cream cheese: use Neufchâtel (lighter) or dairy-free cream cheese for vegan; mascarpone for a milder, richer frosting.
- Heavy cream (frosting): swap with milk or dairy-free milk; add gradually to reach spreadable consistency.
- Gluten-free: replace flour with a 1:1 gluten-free baking blend that includes xanthan gum; rest batter 10 minutes before baking.
You Must Know
- Doneness • If centers look set but edges pull too far from the pan, tap the pan lightly; action: listen for a faint jiggle-thud and check with a toothpick for moist crumbs, not wet batter; why: prevents overbaking dryness; anchor: pull between 200–205°F internal or when a fingertip spring leaves no indentation.
- Troubleshoot • When batter seems too thick after coloring, action: add 1–2 teaspoons hot water to loosen; why: red gel can stiffen batter; anchor: target a ribbon that dissolves in 2–3 seconds when lifted.
- Avoid • Avoid dull or grayish red layers, action: use natural cocoa and keep baking soda at 1 tsp with 1 tsp vinegar balance; why: excess alkali mutes red; anchor: pH balance keeps a vibrant scarlet when using 1 Tbsp liquid color or 2 tsp gel.
- Scale • For a 3-layer 6-inch cake, action: make 75% of the recipe and divide into three 6-inch pans; why: matches volume without doming; anchor: about 16–18 oz batter per pan, bake roughly 24–28 minutes to 200–205°F.
- Flavor Boost • To deepen vanilla-chocolate notes, action: bloom 1 tsp espresso powder in the 1/2 cup hot water and add 1/2 tsp extra vanilla; why: enhances cocoa without coffee taste; anchor: expect a slightly darker crumb and warmer aroma when cakes cool to room temp (~68–72°F).
Serving Tips
- Serve at cool room temperature for the creamiest, softest crumb and frosting.
- Pair with hot coffee, black tea, or a glass of cold milk.
- Add fresh berries and a light dusting of powdered sugar on each slice.
- Drizzle plates with raspberry coulis or white chocolate sauce for contrast.
- Garnish with chocolate shavings or toasted coconut for texture and flair.
Storage & Make-Ahead
Refrigerate covered for up to 4 days.
Bring slices to room temperature before serving for best texture.
Layers can be baked 1–2 days ahead, wrapped airtight.
Cream cheese frosting keeps 3–4 days chilled.
The unfrosted cake layers freeze well up to 2 months.
Thaw wrapped in the fridge overnight.
Reheating
Reheat slices gently: microwave at 50% power in 15–20 second bursts.
Oven: 300°F, covered 8–10 minutes.
Stovetop: steam briefly in a covered pan.
Always thaw chilled cake first.
Juneteenth Potluck Staple
Often, I bring this Vanilla Red Velvet Cake to a Juneteenth potluck because its bold crimson crumb and silky vanilla cream feel celebratory and look stunning on a shared table. The color pops beside smoky ribs and bright salads, and the vanilla cream cuts through rich, spicy plates with cool sweetness.
I slice generous wedges so everyone can see the tender, velvety layers—moist from buttermilk, lightly cocoa-kissed, and capped with lush swirls.
I bake the layers the night before, chill them, and frost right before I head out so the edges stay sharp. A dusting of fine crumbs on the sides nods to tradition, while the aroma of vanilla and cocoa floats over the crowd. Plates clink, conversations rise, and this cake disappears first.
Final Thoughts
Ready to bake? Give this Vanilla Red Velvet Cake a try, then make it your own—swap in gel coloring, add a touch of orange zest, or brush the layers with simple syrup for extra moisture.
Happy baking!
Frequently Asked Questions
How Do I Convert This Recipe for Cupcakes or a Sheet Cake?
Make 24 cupcakes: fill liners two-thirds, bake 18–22 minutes. For a 9×13-inch sheet: pour all batter, bake 30–36 minutes. I watch for springy centers, rosy aroma, and a toothpick with moist crumbs.
Can I Make It Gluten-Free Without Sacrificing Texture?
Yes—you can. I swap the flour for a quality 1:1 gluten-free blend with xanthan gum, add 1 tablespoon cornstarch, and rest the batter 15 minutes. The crumb stays tender, moist, and beautifully velvety.
What’s the Best Natural Alternative to Red Food Coloring?
Beet powder’s my favorite: it delivers a vibrant ruby hue without bitterness. I whisk it into the wet ingredients, then add a touch of cocoa and lemon juice to brighten color, yielding velvety crumbs and a naturally rosy slice.
How Do I Prevent Cream Cheese Frosting From Becoming Runny?
Chill your ingredients, beat cream cheese and butter until fluffy, then add sifted sugar slowly. I keep cream cold, avoid overmixing, and thicken with extra sugar or cornstarch. If it softens, I briefly refrigerate before spreading.
Which Brand of Cocoa Works Best for Vibrant Color and Flavor?
I reach for Valrhona or Guittard natural cocoa—deep, aromatic, and richly chocolatey. They keep color bright with gel dye. On a budget, Ghirardelli works beautifully. I sift it, bloom with hot water, and savor that velvety perfume.

Cynthia Weatherford is a seasoned chef and culinary enthusiast who serves as the Recipe creator of Somonday. With decades of experience in the kitchen and a passion for exploring diverse cuisines, Cynthia brings a blend of creativity and technique to every dish. Known for transforming simple ingredients into show-stopping meals, Cynthia believes that cooking is an art form anyone can master. Dedicated to inspiring home cooks, Cynthia shares approachable recipes, pro tips, and culinary wisdom to make every meal memorable.


