There’s something about pulling a tray of golden, buttery bread from the oven that instantly makes a kitchen feel like home.
Cream cheese garlic bread is that perfect in‑between: it’s not a full meal, but it turns the simplest dinner—like soup, salad, or pasta—into something special.
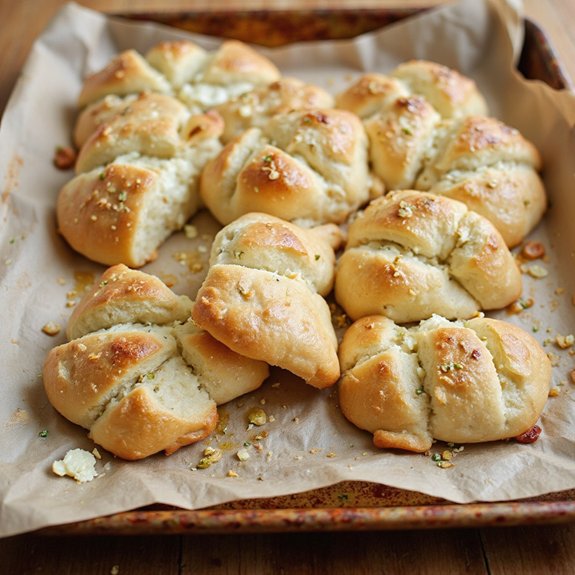
Picture thick slices with crisp, blistered edges, a soft, pillowy center, and a creamy garlic-cheese layer that melts into every nook.
It’s ready in about 20 minutes, ideal for busy weeknights, beginner cooks, and anyone who craves easy comfort food.
I still remember a rainy evening when a plain pot of tomato soup felt too bare. A quick batch of this bread transformed it into a cozy, “everyone linger at the table” kind of night.
It shines for Sunday suppers, last-minute guests, potlucks, or those late-night cravings when you need something warm and satisfying fast. Ready to bring this dish to life?
Why You’ll Love It
- Delivers bold flavor: sweet cream cheese meets savory, buttery garlic richness.
- Feels special yet simple: bakery-style snack with basic, easy-to-find ingredients.
- Bakes quickly: ready in about 30 minutes, start to finish.
- Offers great texture contrast: crisp edges, soft bread, and creamy filling.
- Perfect for sharing: pull-apart, hand-held rolls ideal for gatherings or snacking.
Ingredients
- 4 pieces bread rolls or small brioche buns — soft, slightly sweet bread works best
- 200 g cream cheese, softened — full-fat for the creamiest texture
- 3 tbsp granulated sugar — adjust to taste based on bread sweetness
- 2 tbsp heavy cream — loosens and enriches the filling
- 1 tsp vanilla extract — adds warmth to the sweet cream cheese
- 80 g unsalted butter, melted — cool slightly before mixing with egg
- 4 cloves garlic, minced — fresh garlic for strong flavor
- 3 tbsp milk — thins the garlic butter mixture as needed
- 1 tbsp honey — balances the savory garlic with mild sweetness
- 1 tbsp mayonnaise — helps the coating cling and stay rich
- 1 large egg — binds the garlic butter mixture
- 1 tbsp chopped parsley, fresh or dried — adds color and herbiness
- 1 pinch salt — enhances both sweet and savory flavors
Step-by-Step Method
Preheat the oven to 180°C (350°F). Line a baking sheet with parchment paper to prevent sticking and make cleanup easier. Set the tray aside while you prepare the fillings and butter mixture.
Starting with a hot, ready oven guarantees the bread bakes evenly and develops a golden, crisp exterior without drying out.
Mix the Cream Cheese Filling
Whisk softened cream cheese, sugar, heavy cream, and vanilla extract in a medium bowl. Beat until the mixture is smooth, fluffy, and free of lumps.
Scrape down the sides of the bowl as needed for an even texture. Taste and adjust the sweetness if desired. The mixture should be thick yet pipeable or spoonable for easy filling.
Chill the Filling Briefly
Transfer the cream cheese mixture to the fridge to firm up slightly. Let it chill while you prepare the garlic butter, about 10–15 minutes.
This helps the filling hold its shape when piped or spooned into the bread. Avoid over-chilling, as it can become too stiff and difficult to spread between the wedges.
Melt and Cool the Butter
Melt the unsalted butter in a small saucepan over low heat or in a microwave-safe bowl in short bursts. Stir until fully melted and smooth.
Allow the butter to cool slightly so it doesn’t scramble the egg added later. The butter should be warm, not hot, when you whisk in the remaining garlic butter ingredients.
Whisk the Garlic Butter Mixture
Add minced garlic, milk, honey, mayonnaise, egg, chopped parsley, and a pinch of salt to the melted butter. Whisk until fully combined and emulsified.
Ensure the egg is well incorporated and no streaks remain. If the mixture seems too thick for brushing, add a small splash of milk. Don’t over-thin, or it will run off the bread.
Slice the Bread Rolls
Use a serrated knife to slice each bread roll into 6–8 wedges, like a blooming flower. Cut from the top down, stopping just before the bottom so the roll stays intact.
Turn the roll as you slice to keep the wedges even. The goal is deep pockets that hold plenty of cream cheese without separating completely.
Fill the Bread with Cream Cheese
Retrieve the chilled cream cheese filling from the fridge. Spoon or pipe it generously between each wedge of the cut rolls.
Push the filling slightly down into the slits so it stays in place while baking. Aim for even distribution so every bite has a balance of creamy sweetness and garlicky exterior. Place filled rolls on the tray.
Coat the Rolls with Garlic Butter
Brush or spoon the garlic butter mixture over the top and sides of each stuffed roll. Let some of the mixture seep into the cuts for maximum flavor.
Turn the rolls gently to coat all surfaces. Use any remaining garlic butter to top the rolls again, focusing on exposed bread so it bakes up golden and flavorful.
Bake Until Golden
Place the baking sheet in the preheated oven. Bake for 12–15 minutes, or until the rolls are golden brown, slightly crisp on the outside, and the filling is warmed through.
Rotate the tray halfway if your oven has hot spots. Avoid overbaking, which can dry the bread and make the cream cheese grainy.
Rest Briefly and Serve
Remove the rolls from the oven and let them cool for a few minutes on the tray. This short rest helps the cream cheese set slightly and prevents burns from the hot filling.
Serve warm for the best contrast of crisp exterior and soft, creamy interior. Enjoy as a snack or appetizer straight from the oven.
Ingredient Swaps
- Bread: Use any soft rolls, milk bread, or even thick-cut sandwich bread; whole wheat works but will be a bit denser.
- Dairy: Swap heavy cream with milk or half-and-half; use vegan cream cheese, plant milk, and vegan butter for a dairy-free version (and skip the egg or use a flax egg).
- Sweeteners: Replace sugar with brown sugar, coconut sugar, or a sugar substitute; switch honey for maple syrup or agave.
- Garlic & herbs: Garlic powder can replace fresh garlic (about ½ tsp per clove); swap parsley with chives, green onion, or dried Italian herbs.
- Mayo/egg: Greek yogurt or sour cream can stand in for mayonnaise; for egg-free, omit the egg and add 1–2 extra tablespoons milk to loosen the garlic butter.
You Must Know
– Make-Ahead • For stress-free entertaining… keep the assembled but unbaked stuffed rolls refrigerated for up to 6 hours and let them stand at room temperature for 10–15 minutes before going into the 180°C (350°F) oven.
This prevents the centers from being cold while the exterior browns.
Serving Tips
- Serve warm on a wooden board, garnished with extra chopped parsley for color.
- Pair with creamy soups like potato or mushroom for a cozy, comforting meal.
- Offer as a shareable appetizer, cutting each roll fully into wedges before serving.
- Balance richness with a crisp side salad dressed in a light vinaigrette.
- Present in individual cast-iron skillets for a bistro-style, rustic touch.
Storage & Make-Ahead
Cream cheese garlic bread keeps in the fridge, tightly wrapped, for up to 2 days.
Reheat in an oven or air fryer until warm and crisp.
For make-ahead, prepare fillings and assemble rolls, then chill unbaked up to 12 hours.
It also freezes well, tightly wrapped, for 1 month.
Reheating
Reheat gently: in an oven at 160°C (320°F) for 5–8 minutes, or microwave briefly on low.
You can also warm covered on a dry pan over low heat until just heated through.
Street-Food Craze in Seoul
Long before we worry about reheating leftovers, this kind of cream cheese garlic bread already feels like it belongs under the neon glow of Seoul’s night streets.
I picture you and me drifting past sizzling tteokbokki and skewers, then suddenly catching that sweet‑garlicky perfume that stops our feet mid‑step.
In Seoul, this bread isn’t just a snack; it’s a tiny performance. Vendors split the glossy buns like flowers, pipe in snowy cream cheese, then drench everything in buttery garlic.
While it bakes, the air gets thick with warmth and sugar and toasted bread. You take a bite, and it’s crisp, sticky, soft, and custardy all at once—messy fingers, full hands, nowhere urgent to be but right there.
Final Thoughts
Give this Cream Cheese Garlic Bread a try and enjoy that perfect mix of garlicky, buttery, and sweet-creamy goodness in every bite.
Feel free to tweak the sweetness, garlic level, or herbs to make it just right for your taste.
Frequently Asked Questions
Can I Make This Cream Cheese Garlic Bread Gluten-Free or Low-Carb?
Yes, you can. I’d swap in your favorite gluten‑free or low‑carb rolls, then keep the creamy, garlicky filling just as written—rich butter, sweet vanilla, warm oven scents wrapping you in that cozy bakery nostalgia.
How Can I Scale This Recipe for a Large Party or Catering?
You can easily scale this by multiplying all ingredients per 4 guests, then baking in staggered batches. I’d whisk huge bowls of filling, line trays like old bake sales, and serve them warm, fragrant, and overflowing.
Is This Recipe Suitable for Children or People Sensitive to Strong Garlic Flavors?
Yes, it can be, but only if you tame the garlic. I’d halve the cloves, cook them gently first, then taste the buttery mixture—soft, cozy aroma instead of sharp bite—before brushing it onto the rolls.
What Drinks Pair Best With Korean Cream Cheese Garlic Bread?
I’d pour you iced milk tea, mellow coffee with cream, or cold barley tea; each sip softens the garlic’s bite, lets the sweet cheese linger, and feels like slow weekend mornings at a sunlit kitchen table.
Are There Common Mistakes Beginners Make With This Recipe, and How to Avoid Them?
You might cut too deep, use cold cream cheese, or overbake. I’d keep the bottoms intact, whip truly soft cheese, and pull the bread when it’s just golden, still tender like bakery-fresh rolls from childhood.

Cream Cheese Garlic Bread
Equipment
- 1 large mixing bowl
- 1 medium mixing bowl
- 1 Whisk
- 1 Rubber spatula
- 1 small saucepan or microwave-safe bowl
- 1 Baking sheet
- 1 parchment paper sheet
- 1 Serrated knife
- 1 pastry brush
- 1 measuring cup set
- 1 measuring spoon set
Ingredients
- 4 piece bread rolls or small brioche buns
- 200 gram cream cheese softened
- 3 tablespoon granulated sugar
- 2 tablespoon heavy cream
- 1 teaspoon vanilla extract
- 80 gram unsalted butter melted
- 4 clove garlic minced
- 3 tablespoon milk
- 1 tablespoon honey
- 1 tablespoon mayonnaise
- 1 large egg
- 1 tablespoon chopped parsley fresh or dried
- 1 pinch salt
Instructions
- Preheat the oven to 180°C (350°F) and line a baking sheet with parchment paper.
- In a medium bowl, whisk together softened cream cheese, sugar, heavy cream, and vanilla extract until smooth and fluffy.
- Transfer the cream cheese mixture to the fridge to firm up slightly while preparing the garlic butter.
- In a small saucepan or microwave-safe bowl, melt the butter and let it cool slightly.
- Add minced garlic, milk, honey, mayonnaise, egg, chopped parsley, and salt to the melted butter and whisk until well combined.
- Using a serrated knife, slice each bread roll into 6–8 wedges like a blooming flower, making sure not to cut all the way through the bottom.
- Spoon or pipe the chilled cream cheese filling generously between each wedge of the cut rolls.
- Place the stuffed rolls on the prepared baking sheet.
- Brush or spoon the garlic butter mixture all over the top and sides of each roll, letting some seep into the cuts.
- Bake the rolls in the preheated oven for 12–15 minutes or until golden brown and slightly crisp on the outside.
- Remove from the oven and let cool for a few minutes before serving to allow the cream cheese to set slightly.
Notes

Cynthia Weatherford is a seasoned chef and culinary enthusiast who serves as the Recipe creator of Somonday. With decades of experience in the kitchen and a passion for exploring diverse cuisines, Cynthia brings a blend of creativity and technique to every dish. Known for transforming simple ingredients into show-stopping meals, Cynthia believes that cooking is an art form anyone can master. Dedicated to inspiring home cooks, Cynthia shares approachable recipes, pro tips, and culinary wisdom to make every meal memorable.


