
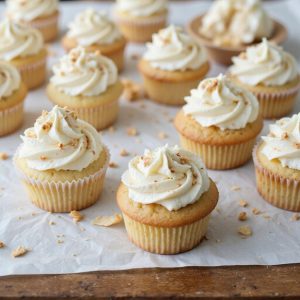
There’s something about a tray of cream cupcakes cooling on the counter that instantly softens the day. Picture golden, tender cakes, domed and delicate, each crowned with a swirl of cloud-light cream that holds soft peaks, gleaming ivory against pale crumb.
A cozy dessert at heart, these cupcakes come together surprisingly fast—perfect when you need something sweet in under an hour.
They’re ideal for busy weeknights, beginner bakers, and anyone with a serious sweet tooth. Once, after a long, rainy Monday, I whipped up a batch with pantry staples; by the time the cupcakes were frosted, the kitchen smelled like vanilla and sugar, and the whole mood of the evening had lifted.
These shine at casual gatherings, Sunday suppers, or those last-minute “we need dessert” moments. They’re pretty enough for guests, yet simple enough for an after-dinner treat. Ready to bring this dish to life?
Why You’ll Love It
- Delivers rich, buttery vanilla flavor with ultra-light, tender crumb
- Feels bakery-quality yet uses simple, everyday ingredients
- Whips up quickly for last-minute parties or weeknight treats
- Piles high with freshly whipped cream instead of heavy frosting
- Stays moist and soft, even after chilling in the fridge
Ingredients
- 190 g all-purpose flour, sifted — measure after sifting for accuracy
- 150 g granulated sugar — standard white sugar works best
- 8 g baking powder — make sure it’s fresh for proper rise
- 2 g fine salt — fine grain distributes more evenly
- 120 ml whole milk, at room temperature — don’t use skim for best texture
- 60 ml heavy cream, at room temperature — adds richness to the batter
- 115 g unsalted butter, softened — should indent easily when pressed
- 2 large eggs, at room temperature — room temp helps them emulsify
- 5 ml vanilla extract — choose pure extract for better flavor
- 240 ml heavy cream, very cold — chill well for faster whipping
- 30 g powdered sugar — helps stabilize the whipped cream
- 3 ml vanilla extract — for flavoring the whipped topping
Step-by-Step Method
Preheat & Prepare Pan
Preheat the oven to 350°F (175°C). Line a standard 12-cup muffin tin with paper cupcake liners. Set the pan aside on a flat surface near your workspace.
Gather all equipment and ingredients so they’re within reach. Ensure butter, eggs, milk, and cream for the batter are at room temperature before you begin mixing.
Combine Dry Ingredients
Measure and sift the all-purpose flour into a medium mixing bowl. Add the baking powder and fine salt.
Whisk the mixture thoroughly until the leavening and salt are evenly distributed throughout the flour. Set this dry mixture aside. Keeping the dry ingredients well blended helps ensure even rise and consistent texture in all cupcakes.
Cream Butter & Sugar
Place the softened unsalted butter and granulated sugar in another medium bowl. Beat with a hand mixer or stand mixer on medium speed.
Continue mixing for 2 to 3 minutes until the mixture appears pale, light, and fluffy. Scrape down the sides of the bowl once or twice. Proper creaming helps create tender, airy cupcakes.
Add Eggs & Vanilla
Crack the eggs into a small bowl to check for shells, then add them to the butter-sugar mixture one at a time. Beat well after each addition so the eggs fully incorporate.
Pour in the vanilla extract and mix briefly on low speed. Stop mixing as soon as the mixture looks smooth and uniform, avoiding overbeating at this stage.
Mix Milk & Cream
In a small mixing bowl or measuring jug, combine the whole milk with 60 ml heavy cream. Stir gently with a spoon or small whisk until the liquids are completely blended.
Set this milk-cream mixture aside. Using both milk and cream adds richness and moisture, contributing to a soft, tender crumb in the finished cupcakes.
Alternate Dry & Wet Additions
Turn the mixer to low speed. Add about one-third of the dry ingredients to the butter mixture and mix just until combined.
Pour in half of the milk-cream mixture and blend briefly. Repeat with another third of dry ingredients, the remaining milk-cream, then the final dry portion. Mix only until no dry streaks remain each time.
Scrape & Finish Batter
Use a rubber spatula to scrape down the sides and bottom of the bowl. Fold the batter gently to ensure everything is evenly combined.
Look for a smooth, thick batter without visible flour pockets. Avoid vigorous stirring at this point. Overmixing can develop gluten, which may make the cupcakes dense rather than light.
Fill Cupcake Liners
Use a spoon, scoop, or measuring cup to divide the batter evenly among the 12 cupcake liners. Fill each liner about two-thirds full to allow room for rising.
Level the batter gently if needed, but don’t tap the pan excessively. Ensuring even portions helps the cupcakes bake uniformly and finish at the same time.
Bake Until Just Done
Place the muffin tin on the center rack of the preheated oven. Bake for 16 to 18 minutes.
Begin checking a little early. Insert a toothpick into the center of a cupcake; it should come out clean or with a few moist crumbs, not wet batter. Remove the pan from the oven as soon as they’re done.
Cool Completely on Rack
Let the cupcakes cool in the muffin tin for about 5 minutes to set their structure. Carefully lift each one out and transfer to a wire cooling rack.
Arrange them with space between for airflow. Allow the cupcakes to cool completely, about 25 minutes. Ensure there’s no warmth left before adding whipped cream topping.
Whip the Cream Topping
Chill a mixing bowl and whisk or mixer beaters in the refrigerator for a few minutes. Pour very cold heavy cream into the chilled bowl.
Add powdered sugar and vanilla extract. Whip on medium-high speed until medium-stiff peaks form. Stop immediately once the cream holds its shape. Overwhipping may turn the cream grainy and unstable.
Pipe or Spoon & Serve
Once cupcakes are fully cooled, prepare a piping bag fitted with a round or star tip, if using. Fill the bag with whipped cream.
Pipe decorative swirls onto each cupcake, or spoon the cream on top and swirl with the back of a spoon. Refrigerate the cupcakes and serve soon for the freshest taste and best whipped-cream stability.
Ingredient Swaps
- Flour: Swap all-purpose flour with a 1:1 gluten‑free baking blend for gluten‑free cupcakes (avoid straight almond/coconut flour without a tested recipe).
- Dairy: Use plant milk (oat, soy, or almond) and a plant‑based cream for the batter; for topping, choose a whippable non‑dairy cream or full‑fat coconut cream.
- Butter: Replace with vegan butter sticks or high‑fat margarine in equal weight for a dairy‑free version.
- Eggs: For each egg, use 1 tbsp ground flax + 3 tbsp water (rest 5–10 minutes) or a commercial egg replacer, noting the crumb will be slightly denser.
- Sugar: Granulated sugar can be swapped 1:1 by weight with caster sugar; use organic cane sugar if you need a vegan‑friendly option.
You Must Know
- Doneness – If the tops look pale but spring back when lightly tapped and a toothpick has just a few moist crumbs (no wet streaks), pull them at around 16–18 minutes; waiting for browning can over-dry this pale, high‑cream batter.
- Avoid – To prevent dense or gummy cupcakes, stop the mixer as soon as the dry streaks disappear and the batter looks smooth and slightly thick; extra agitation for even 30–60 seconds can overdevelop gluten.
- Troubleshoot – If your whipped cream looks grainy or starts to form tiny clumps, immediately splash in 5–10 ml cold cream and beat on low just a few seconds; this can rescue it before it turns into butter.
- Make-Ahead – For less last‑minute stress, bake cupcakes up to 24 hours in advance, cool completely, then store covered at cool room temp; keep whipped cream in the fridge no more than 24 hours and re‑whip briefly if it softens.
- Flavor Boost – For extra depth without extra sweetness, replace 5–10 g of the sugar with light brown sugar or add 1–2 ml almond or vanilla bean paste; you’ll get a warmer, more complex flavor while keeping the same texture.
Serving Tips
- Top with fresh berries and a light dusting of powdered sugar for color.
- Serve on a tiered stand with mixed mini desserts for a dessert buffet.
- Drizzle cupcakes with caramel or chocolate sauce just before serving.
- Pair with hot coffee, black tea, or cold brew for contrast.
- Garnish each plate with a mint sprig and a few fresh berry halves.
Storage & Make-Ahead
Cream cupcakes keep in the fridge for up to 3 days; store them in an airtight container.
For best texture, bake cupcakes a day ahead and add whipped cream the day of serving.
Unfrosted cupcakes freeze well for about 2 months; thaw in the fridge, then top with fresh cream.
Reheating
Reheat plain cupcakes only.
In a 300°F (150°C) oven, warm 5–7 minutes.
Or microwave 5–10 seconds.
Avoid stovetop; always add fresh whipped cream after reheating, never before.
Cupcakes in American Celebrations
Often woven into the heart of American celebrations, cream cupcakes feel like tiny, frosted invitations to linger a little longer at the table.
I see them lined up on birthday stands, each swirl of whipped cream catching candlelight like soft snowdrifts.
At weddings, they replace towering cakes, their neat paper wrappers rustling as guests lean in, choosing vanilla flecked with cream over another drink.
On the Fourth of July, I’ll crown them with berries—ruby strawberries, inky blueberries—so every bite tastes like fireworks softened by dairy and sugar.
At baby showers and office parties, they travel easily, arriving without ceremony yet stealing the spotlight, one creamy, melting bite at a time, turning casual gatherings into gentle, shared rituals.
Final Thoughts
Give these cream cupcakes a try and see just how light, tender, and fluffy they turn out.
Feel free to tweak the flavors—add citrus zest, a hint of almond, or your favorite fruit topping—to make them your own.
Frequently Asked Questions
Can I Make These Cream Cupcakes Gluten-Free or Dairy-Free Without Affecting Texture?
You can, but texture will shift slightly. I’d use a 1:1 gluten‑free blend and dairy‑free butter, milk, and cream. Expect a tender, slightly crumblier crumb, still soft, fragrant, and beautifully swirled with cool “cream.”
How Do I Scale This Recipe for Mini or Jumbo Cupcakes?
You’ll double the yield and bake 10–12 minutes for minis; for jumbo, fill ⅔ full, bake 22–26 minutes. I watch for domed tops, fragrant butter-vanilla scent, and a clean, tender crumb on the tester.
What’s the Best Way to Transport Frosted Cream Cupcakes Without Smudging?
I nestle frosted cupcakes into a deep, lidded container, each in its own snug cavity or ramekin, then chill them. Cold frosting firms up, so they travel like little snow-topped mountains, untouched and perfect.
Can I Color or Flavor the Whipped Cream for Themed Parties?
Yes, you can, and I do it often. I swirl in gel food colors, then fold in flavors—peppermint, citrus zest, cocoa, or strawberry puree—until the cream tastes like little clouds dressed for your party.
How Do I Troubleshoot Cupcakes That Sink in the Middle?
I fix sunken centers by baking fully—your kitchen should smell nutty, tops spring back. I don’t overmix, cream butter and sugar well, avoid opening the oven early, and fill liners only two‑thirds—soft, steady domes follow.
Cream Cupcakes
Equipment
- 1 standard 12-cup muffin tin
- 12 paper cupcake liners
- 2 medium mixing bowls
- 1 Small mixing bowl
- 1 hand mixer or stand mixer with whisk attachment
- 1 Rubber spatula
- 1 Whisk
- 1 Measuring cups set
- 1 Measuring spoons set
- 1 wire cooling rack
- 1 piping bag with round or star tip (optional)
Ingredients
- 190 gram all-purpose flour sifted
- 150 gram granulated sugar
- 8 gram baking powder
- 2 gram fine salt
- 120 milliliter whole milk at room temperature
- 60 milliliter heavy cream at room temperature
- 115 gram unsalted butter softened
- 2 large eggs at room temperature
- 5 milliliter vanilla extract
- 240 milliliter heavy cream for whipped cream topping; very cold
- 30 gram powdered sugar for whipped cream topping
- 3 milliliter vanilla extract for whipped cream topping
Instructions
- Preheat the oven to 350°F (175°C) and line a 12-cup muffin tin with paper liners.
- In a medium bowl whisk together the flour, baking powder, and salt until well combined.
- In another bowl beat the softened butter and granulated sugar with a mixer on medium speed until light and fluffy, about 2 to 3 minutes.
- Add the eggs to the butter mixture one at a time, beating well after each addition, then mix in the vanilla extract.
- In a small bowl combine the milk and 60 ml heavy cream and stir to blend.
- Add the dry ingredients to the butter mixture in three additions, alternating with the milk-cream mixture, beginning and ending with dry ingredients, mixing on low just until combined.
- Scrape down the sides of the bowl with a spatula to ensure the batter is evenly mixed, being careful not to overmix.
- Divide the batter evenly among the 12 cupcake liners, filling each about two-thirds full.
- Bake the cupcakes for 16 to 18 minutes, or until a toothpick inserted into the center comes out clean.
- Remove the muffin tin from the oven and let the cupcakes cool in the pan for 5 minutes.
- Transfer the cupcakes to a wire rack and let them cool completely for about 25 minutes before topping.
- While the cupcakes cool, whip 240 ml cold heavy cream with powdered sugar and vanilla in a chilled bowl on medium-high speed until medium-stiff peaks form.
- Once the cupcakes are fully cooled, spoon or pipe the whipped cream onto each cupcake in a decorative swirl.
Notes

Cynthia Weatherford is a seasoned chef and culinary enthusiast who serves as the Recipe creator of Somonday. With decades of experience in the kitchen and a passion for exploring diverse cuisines, Cynthia brings a blend of creativity and technique to every dish. Known for transforming simple ingredients into show-stopping meals, Cynthia believes that cooking is an art form anyone can master. Dedicated to inspiring home cooks, Cynthia shares approachable recipes, pro tips, and culinary wisdom to make every meal memorable.


