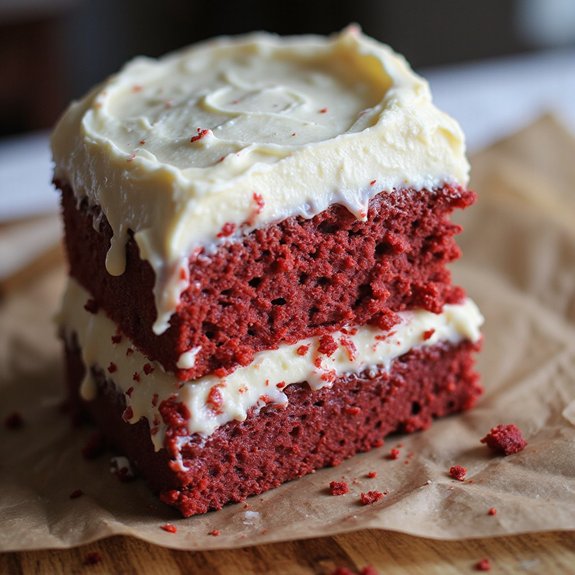
Imagine a towering slice that gleams ruby-red against a cloud of cream, each forkful slipping from velvety crumbs to a cool, custardy cheesecake middle.
Picture the scent of vanilla and cocoa drifting through a warm kitchen, the kind that makes conversation soften and time slow.
This cake matters to me because it blends celebration with comfort: the nostalgic tang of red velvet wrapped around a creamy, bakery-level cheesecake, all in one showpiece that turns an ordinary day into an occasion.
It’s the dessert I reach for when I need a guaranteed crowd-pleaser—perfect for birthdays, potlucks, busy weeknights that deserve a sweet finish, or lingering Sunday suppers.
Once, it saved me when I needed a make-ahead centerpiece for a last-minute family gathering; chilling the layers overnight meant effortless, stunning slices the next day.
I’ll walk you through each step so it’s stress-free and spectacular.
Ready? Let’s cook!
Why You’ll Love It
- Delivers bold flavor: tangy cheesecake meets classic cocoa red velvet
- Impresses guests with dramatic layers and bakery-style presentation
- Stays ultra-moist thanks to buttermilk and oil-rich batter
- Slices cleanly when chilled; perfect for make-ahead entertaining
- Cream cheese frosting balances sweetness with silky, tangy finish
Ingredients
- 16 oz cream cheese softened — for cheesecake layer (use full-fat for best texture)
- 1/2 cup granulated sugar — for cheesecake batter (superfine dissolves easily)
- 1/4 cup sour cream room temperature — adds tang and silkiness
- 1 tsp vanilla extract — pure extract for best flavor
- 1 large egg room temperature — don’t overbeat once added
- 2 1/2 cups all-purpose flour — spoon and level to avoid dense cake
- 1 1/2 cups granulated sugar — for red velvet layers (standard granulation)
- 2 tbsp unsweetened cocoa powder — natural style for classic flavor
- 1 tsp baking soda — check freshness for proper rise
- 1 tsp fine salt — balances sweetness
- 1 cup buttermilk room temperature — real cultured buttermilk preferred
- 2 large eggs room temperature — for structure and moisture
- 1 cup vegetable oil — neutral oil like canola
- 2 tsp vanilla extract — pure extract if possible
- 1 tbsp red gel food coloring — gel for vivid color without thinning
- 1 tsp white vinegar — reacts with baking soda for lift
- 16 oz cream cheese softened — for frosting (full-fat, brick style)
- 1/2 cup unsalted butter softened — for frosting (room temp, not melted)
- 3 cups powdered sugar sifted — ensures smooth, lump-free frosting
- 1 tsp vanilla extract — for frosting (adjust to taste)
- 1–2 tbsp heavy cream — add as needed for spreadable consistency
Step-by-Step Method
Preheat, Prep Pans, and Start Cheesecake
Preheat oven to 325°F. Line a 9-inch springform pan with parchment and lightly grease the sides. Soften cream cheese to room temperature. Gather mixing bowls, whisk, and mixer. Prepare a wire rack for cooling. This setup guarantees sticking and speeds assembly later. Keep ingredients measured and nearby to work efficiently through the cheesecake batter steps.
Beat Cheesecake Batter Smoothly
Beat 16 ounces cream cheese with 1/2 cup granulated sugar until silky and lump-free. Mix in 1/4 cup sour cream and 1 teaspoon vanilla. Add 1 egg and beat just until combined to avoid overaeration. Scrape the bowl and fold once more. Aim for a glossy, pourable batter that holds soft peaks without visible streaks.
Bake Cheesecake Gently
Pour batter into the springform pan and smooth the top. Bake 30–35 minutes until edges are set and the center jiggles slightly. Avoid browning. Don’t overbake to maintain creaminess. Cool on a wire rack in the pan for 1 hour. Then refrigerate until cold, at least 2 hours, to firm for stacking.
Prep Red Velvet Pans and Oven
Increase oven temperature to 350°F. Grease two 9-inch round cake pans and line bottoms with parchment for clean release. Lightly flour if desired. Set pans aside. Position oven racks to the center. This guarantees even heat circulation and consistent rise. Prepare a cooling rack to receive the cakes promptly after baking.
Whisk Dry Red Velvet Ingredients
In a large bowl whisk 2 1/2 cups all-purpose flour, 1 1/2 cups sugar, 2 tablespoons cocoa powder, 1 teaspoon baking soda, and 1 teaspoon fine salt. Break up any cocoa lumps. Create a uniform mixture for even leavening. Keep the bowl large to allow space for combining with wet ingredients without overmixing.
Combine Vibrant Wet Mixture
In another bowl whisk 1 cup buttermilk, 2 large eggs, 1 cup vegetable oil, 2 teaspoons vanilla, 1 tablespoon red gel food coloring, and 1 teaspoon white vinegar. Whisk until smooth and boldly red. Use gel color for intensity without thinning. Guarantee eggs and buttermilk are room temperature for a cohesive emulsion.
Bring Batter Together Briefly
Pour wet ingredients into the dry. Whisk just until a smooth batter forms with no dry pockets. Stop as soon as combined to preserve tenderness. Scrape the bowl and fold once to incorporate any hidden flour. Avoid vigorous mixing that can develop gluten and toughen the crumb. The batter should be pourable and glossy.
Divide, Bake, and Cool Cake Layers
Divide batter evenly between prepared pans. Smooth tops and tap lightly to release bubbles. Bake 24–28 minutes until a toothpick shows a few moist crumbs. Cool in pans 10 minutes. Turn out onto a wire rack to cool completely. Don’t frost warm cakes. Let them reach room temperature for clean assembly.
Mix Lush Cream Cheese Frosting
Beat 16 ounces cream cheese and 1/2 cup unsalted butter until creamy and uniform. Gradually add 3 cups sifted powdered sugar. Beat until fluffy. Blend in 1 teaspoon vanilla and 1–2 tablespoons heavy cream to reach a spreadable consistency. Keep frosting slightly cool to prevent slipping during stacking.
Level Layers and Prep Cheesecake
Use a serrated knife to level any domes from cake layers, reserving crumbs for garnish. Release chilled cheesecake from the springform pan and peel off parchment. If edges cling, run a warm thin knife around the sides. Guarantee all layers are cold and flat. Set an offset spatula and turntable ready for neat assembly.
Stack and Center the Cheesecake
Place one red velvet layer on a board. Spread a very thin swipe of frosting to act as glue. Center the cheesecake layer on top. Adjust gently with an offset spatula. Press lightly to settle without squeezing. Top with the second red velvet layer. Confirm vertical alignment for straight sides before frosting.
Crumb Coat, Chill, and Finish Frosting
Apply a thin crumb coat over the entire cake to trap loose crumbs. Chill 20 minutes to set. Frost generously with remaining cream cheese frosting, smoothing tops and sides. Garnish sides with reserved cake crumbs or leave sleek. Chill at least 30 minutes before slicing. Warm and wipe the knife between cuts for clean slices.
Ingredient Swaps
- Dairy-free: Use vegan cream cheese and plant butter; swap buttermilk with 1 cup plant milk + 1 tbsp lemon juice or vinegar; replace sour cream with coconut or almond-based yogurt.
- Egg-free: Replace each egg in cake with 1/4 cup unsweetened applesauce or 3 tbsp aquafaba; for cheesecake, use a vegan no-bake style or add 1–2 tbsp cornstarch to stabilize vegan cream cheese.
- Gluten-free: Substitute a 1:1 gluten-free all-purpose blend with xanthan gum.
- Lower sugar: Reduce cake sugar by 1/4 cup and use 25–50% less powdered sugar in frosting, balancing with a pinch of salt and extra vanilla; consider erythritol/monk fruit blends.
- Oil/butter swaps: Use neutral oil (canola, light olive) or 1/2 oil + 1/2 unsweetened applesauce; salted butter works—omit added salt slightly.
- Cocoa/coloring: Natural cocoa works; for dye-free, use beet powder/puree (1–2 tbsp powder or 2–3 tbsp puree), noting a browner-red hue.
- Regional availability: If buttermilk is scarce, make sour milk (milk + 1 tbsp vinegar/lemon per cup).
- Regional availability: If cream cheese is firmer/European style, soften well and add 1–2 tbsp cream for smoother mixing.
You Must Know
Doneness • If the cheesecake looks set at the edges but wobbly in the very center, stop; carryover firming happens in the chill. Aim for a 1–2 inch jiggly core after 30–35 minutes at 325°F to keep the texture creamy, not chalky.
Troubleshoot • When cake layers stick or tear on release, slide a thin knife around the rim, chill pans 10–15 minutes, then invert with parchment still attached; cooler cakes contract slightly and release cleaner, preventing crumbling.
Scale • For a taller celebration cake, increase all cake and cheesecake ingredients by 50% and use 3 9-inch red velvet layers plus the cheesecake; adjust bakes to +4–6 minutes per cake and +8–10 minutes for cheesecake, checking the same visual cues.
Flavor Boost • For deeper cocoa notes without losing the red hue, add 1 teaspoon espresso powder to the dry ingredients and 1/4 teaspoon almond extract to the frosting; you’ll taste a rounder chocolate profile while keeping the color vibrant.
Make-Ahead • To streamline, prepare the cheesecake up to 48 hours early and the cake layers up to 24 hours early; wrap each tightly and chill, then bring frosting to 65–68°F before assembly for smooth spreading and stable stacking.
Serving Tips
- Slice with a hot, dry knife; wipe between cuts for clean layers.
- Serve chilled but not cold; 15 minutes at room temp softens frosting.
- Pair with fresh berries and a drizzle of warm chocolate sauce.
- Offer coffee or black tea to balance the cake’s richness.
- Plate with a dollop of lightly sweetened whipped cream.
Storage & Make-Ahead
Refrigerate the assembled cake, covered, for 4–5 days; the cream cheese and cheesecake layers stay moist but firm.
Make ahead by baking cake layers and cheesecake a day or two early; wrap and chill separately.
The frosted cake freezes well for up to 2 months; thaw overnight in the fridge.
Reheating
Reheat slices gently: microwave at 50% power 15–25 seconds.
Whole cake: oven 275°F, loosely tented, 8–12 minutes.
Saucepan bain-marie: warm covered slices over simmering water 5–8 minutes.
Avoid overheating.
Juneteenth Potluck Favorite
Often, I bring this red velvet cheesecake layered cake to a Juneteenth potluck, and it lands on the table like a celebration in crimson and cream. Neighbors lean in, eyes bright, and someone always asks for the first slice.
I nod, steady and proud, because this dessert honors the day with color, care, and crowd-pleasing comfort.
I assemble it ahead so the layers settle: plush red velvet, a cool, silky cheesecake middle, and swirls of tangy cream cheese frosting. The knife glides through like a ribbon, revealing clean bands that sparkle under summer light.
I offer you a plate, whispering to try the edge with crumb garnish. It’s tender, balanced, not too sweet—built for seconds and shared stories under warm evening air.
Final Thoughts
Ready to bake? Give this Red Velvet Cheesecake Layered Cake a try, and don’t hesitate to tweak the frosting sweetness or the food coloring to make it perfectly yours.
Happy baking!
Frequently Asked Questions
Can I Bake the Cheesecake and Cakes Simultaneously in One Oven?
You can, but I wouldn’t. Different temps and moisture clash. I bake the cheesecake first at 325°F, chill it, then bake the cakes at 350°F. Your kitchen will smell dreamy, and the textures stay perfect.
How Do I Prevent Red Food Coloring Stains on Countertops?
I cover counters with parchment, don gloves, and mix coloring over a sheet pan. I wipe splashes fast with diluted bleach or baking soda paste, then finish with dish soap. Mineral oil pre-coat helps stains slide off.
What Altitude Adjustments Are Needed for the Cake Layers?
At 3,000+ feet, I reduce sugar 1–2 tablespoons, increase flour 1–2 tablespoons, add 1–2 tablespoons buttermilk, and bake slightly hotter. Above 6,500 feet, I add another tablespoon flour and reduce leavening by 1/8 teaspoon.
Can I Make This Gluten-Free Without Gritty Texture?
Yes—you can. I’d use a fine, 1:1 gluten-free baking blend with xanthan, sift well, add 1 tablespoon cornstarch, and let batter rest 20 minutes. I promise it bakes plush, tender, and dreamy, not gritty.
How Do I Transport the Layered Cake Safely?
Secure it chilled in a snug cake carrier; I anchor the base with non-slip mat, dowel through layers, and park it level. I drive gently, shade it cool, and finish with touch-up frosting on arrival.

Creamy Cheesecake Layered Red Velvet Cake
Equipment
- 1 9-inch round cake pan
- 1 9-inch round cake pan
- 1 9-inch springform pan
- 3 Mixing bowl
- 1 stand mixer or hand mixer
- 1 Whisk
- 1 Rubber spatula
- 1 Wire rack
- 1 parchment paper sheet
- 1 Serrated knife
- 1 offset spatula
- 1 Measuring cups set
- 1 Measuring spoons set
Ingredients
- 16 ounce cream cheese softened
- 1/2 cup granulated sugar
- 1/4 cup sour cream room temperature
- 1 teaspoon vanilla extract
- 1 large egg egg room temperature
- 2 1/2 cup all-purpose flour
- 1 1/2 cup granulated sugar
- 2 tablespoon unsweetened cocoa powder
- 1 teaspoon baking soda
- 1 teaspoon fine salt
- 1 cup buttermilk room temperature
- 2 large egg egg room temperature
- 1 cup vegetable oil
- 2 teaspoon vanilla extract
- 1 tablespoon red gel food coloring
- 1 teaspoon white vinegar
- 16 ounce cream cheese softened, for frosting
- 1/2 cup unsalted butter softened, for frosting
- 3 cup powdered sugar sifted
- 1 teaspoon vanilla extract for frosting
- 1-2 tablespoon heavy cream as needed
Instructions
- Preheat the oven to 325°F and line the bottom of a 9-inch springform pan with parchment, then lightly grease the sides.
- Beat 16 ounces cream cheese with 1/2 cup sugar until smooth, then mix in 1/4 cup sour cream, 1 teaspoon vanilla, and 1 egg just until combined.
- Pour cheesecake batter into the springform pan and bake for 30-35 minutes until set at the edges and slightly jiggly in the center.
- Cool the cheesecake in the pan on a rack for 1 hour, then chill until cold, at least 2 hours.
- Increase oven temperature to 350°F and grease two 9-inch round cake pans, lining bottoms with parchment.
- In a large bowl whisk flour, 1 1/2 cups sugar, cocoa powder, baking soda, and salt until combined.
- In another bowl whisk buttermilk, 2 eggs, oil, 2 teaspoons vanilla, red gel food coloring, and vinegar until smooth and vibrant.
- Add wet ingredients to dry and whisk just until a smooth red batter forms without overmixing.
- Divide batter evenly between the two pans and bake 24-28 minutes until a toothpick comes out with a few moist crumbs.
- Cool cakes in pans 10 minutes, then turn out onto a wire rack and cool completely.
- For frosting, beat 16 ounces cream cheese and 1/2 cup butter until creamy, then gradually add powdered sugar, vanilla, and enough cream for a spreadable texture.
- Level cake layers with a serrated knife if domed, reserving crumbs for garnish if desired.
- Release chilled cheesecake from the springform pan and carefully remove parchment.
- Place one red velvet layer on a serving board, spread a thin layer of frosting, and set the cheesecake layer on top centered.
- Top with the second red velvet layer and apply a thin crumb coat of frosting over the entire cake.
- Chill the crumb-coated cake 20 minutes, then frost generously with the remaining cream cheese frosting.
- Garnish sides with reserved cake crumbs or leave smooth, then chill at least 30 minutes before slicing.
Notes

Cynthia Weatherford is a seasoned chef and culinary enthusiast who serves as the Recipe creator of Somonday. With decades of experience in the kitchen and a passion for exploring diverse cuisines, Cynthia brings a blend of creativity and technique to every dish. Known for transforming simple ingredients into show-stopping meals, Cynthia believes that cooking is an art form anyone can master. Dedicated to inspiring home cooks, Cynthia shares approachable recipes, pro tips, and culinary wisdom to make every meal memorable.


