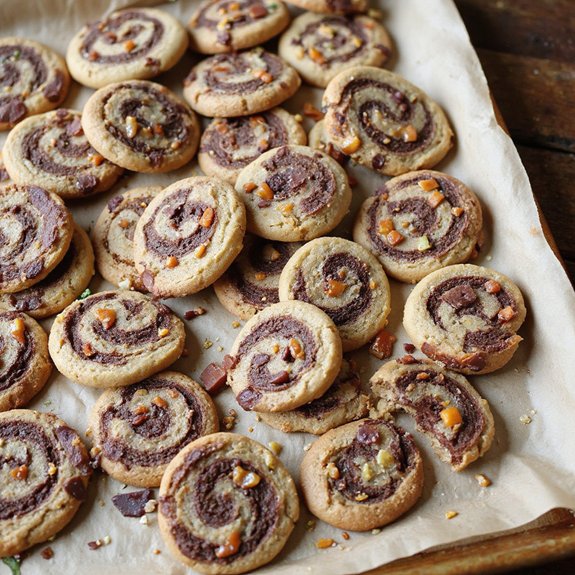
Picture a tray of spiraled cookies, dark mahogany ribbons hugging buttery vanilla, the edges crisp and the centers tender. Imagine the scent of cocoa blooming in the oven, mingling with warm caramel from melting toffee and a whisper of vanilla—comfort that feels like a soft blanket and a shared smile.
These pinwheels matter to me because they turn simple pantry staples into something celebratory, the kind of cookie that looks bakery-fancy yet brings that homey, just-for-us feeling.
They’re showstoppers for cookie swaps, easy to slice-and-bake for busy weeknights, and perfect for Sunday suppers when you want dessert to feel special without fuss.
Once, a last-minute school bake sale landed in my lap; this chilled dough saved the day—swift slices, gorgeous swirls, grateful kids. Ready? Let’s cook!
Why You’ll Love It
- Delivers bold flavor with dark chocolate and buttery toffee swirls
- Slices cleanly after chilling, yielding picture-perfect pinwheel spirals
- Freezes beautifully; bake from frozen with minimal extra time
- Balances crisp edges and chewy centers to your preference
- Impresses guests while using simple, accessible pantry ingredients
Ingredients
- 2 1/4 cups all-purpose flour — measure accurately for best texture
- 1/2 teaspoon baking powder — guarantees light lift
- 1/2 teaspoon fine sea salt — balances sweetness
- 3/4 cup unsalted butter, softened — room temp for proper creaming
- 3/4 cup granulated sugar — standard white sugar
- 1 large egg, room temperature — blends more evenly
- 2 teaspoons vanilla extract — pure vanilla for best flavor
- 3 tablespoons dark Dutch-processed cocoa powder — deep chocolate color and taste
- 1 tablespoon whole milk — helps cocoa dough come together
- 3/4 cup toffee bits, finely chopped — chop smaller for easier slicing
- 2 ounces dark chocolate, finely chopped — 60–70% cacao melts nicely
Step-by-Step Method
Make the Dough Base
Whisk flour, baking powder, and salt in a bowl.
Beat butter and sugar until light and fluffy, 2 to 3 minutes.
Add egg and vanilla.
Beat until combined, scraping the bowl.
Add dry ingredients on low.
Mix just until a soft dough forms.
Assure overmixing to keep cookies tender and prevent excess spreading.
Split & Flavor the Dough
Divide dough in half.
Leave one half plain in a bowl.
Return the other half to the mixer.
Add cocoa powder and milk.
Mix on low until evenly chocolaty.
Pat each half into a rectangle.
Wrap each tightly in plastic.
Chill for 30 minutes to firm slightly for easier rolling and clean layers.
Roll the Vanilla Layer
Place vanilla dough between two parchment sheets.
Roll to a 9×12-inch rectangle, about 1/4-inch thick.
Square edges with a bench scraper if needed.
Keep thickness even to ensure uniform baking.
Slide onto a sheet pan to keep flat.
Chill briefly if it softens to prevent sticking and stretching.
Roll the Chocolate Layer
Place chocolate dough between fresh parchment.
Roll to matching 9×12 inches and 1/4-inch thickness.
Align edges to the vanilla layer size.
Trim any uneven sides.
Keep dough cool but pliable.
If cracks appear, let rest 2 to 3 minutes, then patch gently.
Avoid adding flour, which can toughen the dough.
Layer & Sprinkle Fillings
Remove top parchment from vanilla sheet.
Sprinkle evenly with finely chopped toffee bits and dark chocolate.
Leave a 1/2-inch clean border along one long edge.
Press lightly to adhere.
Keep distribution even for tidy swirls and smooth slicing.
Avoid overloading to prevent tearing during rolling.
Stack the Sheets
Carefully invert the chocolate sheet onto the vanilla layer.
Align edges along the long sides and corners.
Peel away the top parchment.
Gently press to adhere without compressing.
Smooth out any air pockets.
Ensure the clean border remains exposed on one long edge to help seal the log.
Roll into a Tight Log
Start from the long edge opposite the border.
Use the parchment underneath to lift and roll tightly.
Tuck as you go to prevent gaps.
If cracks appear, pause and let dough warm slightly.
Seal the seam along the border.
Trim ragged ends for a neat cylinder and even slices later.
Chill Firm for Clean Slices
Wrap the log tightly in parchment, then plastic.
Chill for 2 hours until very firm.
This sets the swirl and minimizes spread.
Rotate the log halfway through chilling to keep it round.
If planning ahead, freeze up to 2 months.
Slice from frozen, adding 1 to 2 minutes to bake time.
Preheat & Prep Pans
Heat oven to 350°F (175°C).
Line two rimmed baking sheets with parchment.
Position racks in the upper and lower thirds if baking multiple batches.
Keep the dough log in the fridge while the oven heats.
Prepare a sharp thin knife for slicing.
Wipe blade between cuts for clean rounds.
Slice the Pinwheels
Unwrap the chilled log.
Using a sharp knife, slice into 1/4-inch rounds.
Rotate the log a quarter turn after every few slices to prevent flat spots.
Arrange cookies 2 inches apart on the prepared sheets.
If the log softens, re-chill 10 minutes.
Keep remaining dough chilled between batches.
Bake Until Just Set
Bake one sheet at a time for 9 to 11 minutes.
Look for set edges and soft centers.
Pull earlier for chewier centers or bake to light browning for crisper edges.
Avoid overbaking to keep the toffee from melting out excessively.
Rotate the sheet once for even color if needed.
Cool & Finish
Let cookies cool on the sheet for 5 minutes to set.
Transfer to a cooling rack to cool completely.
Repeat slicing and baking with remaining dough, keeping the log chilled.
Store cooled cookies airtight at room temperature for up to 4 days.
Enjoy the swirled contrast and toffee crunch.
Ingredient Swaps
- Flour: Use 1:1 gluten-free all-purpose blend; for nuttier flavor, swap 1/2 cup with almond flour (reduce milk slightly if dough feels soft).
- Butter: Replace with plant-based butter sticks; for budget, use 1/2 butter + 1/2 neutral oil shortening (chill dough well).
- Sugar: Sub coconut sugar or light brown sugar (slightly deeper flavor, a touch chewier).
- Egg: Use 1 flax egg (1 tbsp ground flax + 3 tbsp water, rested 5 min) or commercial egg replacer.
- Cocoa: Natural cocoa works in a pinch; add 1/8 tsp baking soda to compensate for acidity.
- Milk: Any unsweetened non-dairy milk works (almond, oat, soy).
- Toffee bits: For nut-free or kosher/halal needs, use caramel bits or butterscotch chips; for crunch, chopped roasted nuts (pecan, almond, hazelnut).
- Dark chocolate: Use dairy-free dark chocolate for vegan; mini chips if chopping isn’t convenient.
- Vanilla: Swap in 1/2 tsp almond extract for a twist; or 1 tsp espresso powder to boost chocolate flavor.
You Must Know
- Doneness • If edges look dry but centers still look glossy and soft at 9 minutes, give 1–2 more minutes; pull when edges are set and bottoms show the faintest golden ring—carryover heat finishes them for chewy centers.
- Troubleshoot • If slices squash or smear the swirl, chill the log until firm to the touch (at least 40°F/4°C in the center) and use a thin knife warmed under hot water, wiped dry; colder dough + clean blade prevents drag lines.
- Scale • For 12 cookies, halve every ingredient by weight; roll to the same 9×12 inches but slice 1/2-inch thick instead of 1/4-inch to keep portions consistent—increase time by 1–2 minutes, watching edges.
- Flavor Boost • For deeper chocolate and toffee contrast, sprinkle 1/8 teaspoon flaky salt across the vanilla layer before rolling; you’ll get brighter snap and clearer caramel notes in each bite.
- Make-Ahead • To stagger batches, hold the wrapped log in the fridge up to 48 hours or freeze solid up to 2 months; slice from frozen at 1/4 inch and add 1–2 minutes, pulling when edges are set and centers soft.
Serving Tips
- Serve with small glasses of cold milk or cappuccinos for contrast.
- Plate alongside salted caramel sauce for dipping to echo the toffee.
- Crumble over vanilla bean ice cream; drizzle with warm chocolate ganache.
- Arrange on a dessert board with fresh raspberries and roasted salted nuts.
- Gift in cellophane bags tied with ribbon; include reheating note for chewier centers.
Storage & Make-Ahead
Store baked cookies airtight at room temperature 4–5 days or in the fridge up to 1 week.
For make-ahead, refrigerate the wrapped dough log up to 48 hours.
This dough freezes beautifully: freeze the log (or baked cookies) up to 2 months.
Slice and bake from frozen, adding 1–2 minutes.
Reheating
Reheat gently to preserve texture.
Microwave 5–8 seconds per cookie.
Oven at 300°F for 3–5 minutes on a sheet.
Or stovetop in covered skillet low heat 2–3 minutes.
Holiday Cookie Swap Favorite
Once they’re warm again and the chocolate smells lush, I’m packing these pinwheels for a holiday cookie swap because they always steal the table.
I nestle spirals into a tin lined with parchment, like ornaments, their dark-and-vanilla coils promising crunch and chew.
Toffee freckles glint, and a hint of cocoa drifts up when I lift the lid—instant crowd magnet.
I set them out and watch hands hover, then commit.
First bite: buttery crumb, silky chocolate, a toffee snap that melts back into caramel.
Someone always asks for the recipe, then another slips one into a napkin “for later.”
I bring extra, sliced evenly so the swirls look tailored.
They travel like champs, hold their shape, and disappear faster than any gingerbread.
Final Thoughts
Give these Dark Chocolate Toffee Pinwheel Cookies a whirl—you’ll love the buttery swirls, pops of toffee, and rich chocolate.
Try them as written or tweak the fillings with nuts, espresso powder, or a drizzle of caramel to make them your own.
Frequently Asked Questions
How Do I Scale the Recipe for a Smaller or Larger Batch?
Multiply every ingredient by your desired factor: half for 12 cookies, double for 48. Keep thickness, chill times, and bake time per sheet the same. I’ll savor the spirals scaling up—or treasure a petite batch.
Can I Make This Recipe Gluten-Free Without Gritty Texture?
Yes—you can. I swap in a 1:1 gluten‑free flour blend with xanthan, add 1 tablespoon milk, and chill longer. I feel the dough turn silky, slices cleanly, and bakes tender, not gritty, with crisp, fragrant edges.
What’s the Best Way to Ship These Cookies Intact?
Pack them snug: I stack cooled cookies in pairs, bottoms touching, wrapped in plastic, nestled in a tin with bubble wrap. Cushion tin inside a sturdy box, add cold pack if warm, and ship priority. Your treats arrive whole.
How Do Altitude Adjustments Affect Baking Time and Texture?
At high altitude, I bake longer, lower, and moister. I add a tablespoon flour, reduce sugar slightly, bump oven 15°F, and watch edges set. The crumb tightens, spread lessens, and flavors concentrate—crisp rims, tender centers.
Are There Dairy-Free Substitutions That Still Swirl Well?
Yes—use vegan butter, coconut milk, and dairy-free chocolate. I keep dough cold for crisp swirls, add a teaspoon extra milk if crumbly, and chill the log hard. The slices glide, marbled like evening clouds.
Dark Chocolate Toffee Pinwheel Cookies
Equipment
- 2 Mixing bowl
- 1 stand mixer or hand mixer
- 1 Whisk
- 1 Rubber spatula
- 1 Measuring cups set
- 1 Measuring spoons set
- 1 Kitchen scale optional
- 1 Rolling Pin
- 2 parchment sheet
- 1 plastic wrap roll
- 2 rimmed baking sheet
- 1 sharp knife or bench scraper
- 1 Cooling rack
Ingredients
- 2 1/4 cup all-purpose flour
- 1/2 teaspoon baking powder
- 1/2 teaspoon fine sea salt
- 3/4 cup unsalted butter softened
- 3/4 cup granulated sugar
- 1 large egg room temperature
- 2 teaspoon vanilla extract
- 3 tablespoon dark cocoa powder Dutch-processed
- 1 tablespoon milk whole
- 3/4 cup toffee bits finely chopped
- 2 ounce dark chocolate finely chopped
Instructions
- Whisk together flour, baking powder, and salt in a bowl and set aside.
- Beat butter and sugar in a mixer on medium speed until light and fluffy, 2 to 3 minutes.
- Add egg and vanilla to the butter mixture and beat until fully combined, scraping the bowl as needed.
- Add dry ingredients to the mixer on low speed and mix just until a soft dough forms.
- Divide the dough in half, leaving one half plain and returning the other half to the bowl.
- Add cocoa powder and milk to the dough in the bowl and mix on low just until evenly chocolaty.
- Pat each dough half into a rectangle, wrap separately in plastic, and chill for 30 minutes to firm slightly.
- Roll the vanilla dough between parchment to a 9×12-inch rectangle about 1/4 inch thick.
- Roll the chocolate dough between parchment to a matching 9×12-inch rectangle.
- Sprinkle the vanilla sheet evenly with toffee bits and chopped dark chocolate, leaving a 1/2-inch border on one long edge.
- Carefully place the chocolate sheet on top, aligning edges, and gently press to adhere.
- Starting from the long edge opposite the border, roll the stacked dough into a tight log, using the parchment to help.
- Seal the seam, trim ragged ends, wrap the log tightly in parchment then plastic, and chill for 2 hours until very firm.
- Preheat the oven to 350°F (175°C) and line baking sheets with parchment.
- Using a sharp knife, slice the chilled log into 1/4-inch rounds and arrange 2 inches apart on prepared sheets.
- Bake one sheet at a time for 9 to 11 minutes until set at the edges but still soft in the centers.
- Cool on the sheet for 5 minutes, then transfer cookies to a rack to cool completely.
- Repeat slicing and baking with remaining dough, keeping the log chilled between batches.
Notes

Cynthia Weatherford is a seasoned chef and culinary enthusiast who serves as the Recipe creator of Somonday. With decades of experience in the kitchen and a passion for exploring diverse cuisines, Cynthia brings a blend of creativity and technique to every dish. Known for transforming simple ingredients into show-stopping meals, Cynthia believes that cooking is an art form anyone can master. Dedicated to inspiring home cooks, Cynthia shares approachable recipes, pro tips, and culinary wisdom to make every meal memorable.


