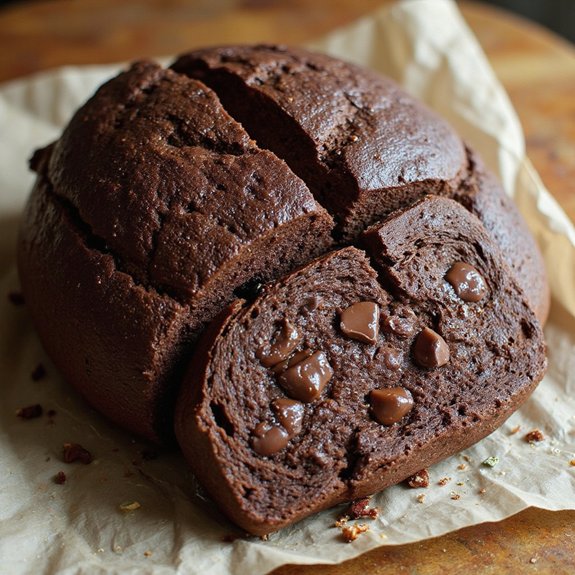
There’s something about the deep, cocoa-brown swirl of double chocolate sourdough, crackling as it cools, that makes the whole kitchen feel warmer.
This is a cozy, bakery-style treat—part rustic loaf, part indulgent dessert bread—with a tender, chewy crumb, melting chocolate pockets, and the gentle tang of sourdough.
It’s not instant, but most of the time is hands-off, making it perfect for planners, sweet-tooth fans, and anyone who loves a special weekend bake.
I first baked this when a rough week needed a quiet, chocolatey reset. The smell alone—rich cocoa, toasted crust, a hint of vanilla—turned an ordinary Sunday afternoon into something comforting and calm.
This loaf shines for slow Sunday suppers, relaxed brunches, easy entertaining, or late-night “I need something special” cravings. Sliced thick and served warm, it feels like a treat and a hug in one.
Ready to bring this loaf to life?
Why You’ll Love It
- Delivers deep, brownie-like chocolate flavor with a tangy sourdough finish
- Elevates simple ingredients into an impressive bakery-style dessert loaf
- Balances rich cocoa with pockets of melty dark chocolate pieces
- Stays moist and tender for days thanks to sourdough fermentation
- Slices cleanly for stunning toast, French toast, or dessert boards
Ingredients
- 120 g active sourdough starter — 100% hydration, recently peaked for best rise
- 360 g water — lukewarm to keep fermentation active
- 80 g whole milk — at room temperature for easier mixing
- 500 g bread flour — high-protein for good gluten strength
- 40 g cocoa powder — unsweetened, good-quality for rich flavor
- 10 g fine sea salt — evenly distribute to avoid salty pockets
- 80 g granulated sugar — balances cocoa’s bitterness slightly
- 40 g unsalted butter — softened so it incorporates smoothly
- 120 g dark chocolate chips or chunks — at least 60–70% cacao if possible
- 1 tbsp neutral oil — for lightly greasing the fermentation bowl
- 10 g rice flour — for dusting the banneton to prevent sticking
Step-by-Step Method
Mix the Starter and Liquids
Whisk the active sourdough starter, lukewarm water, and room-temperature milk in a large mixing bowl. Blend until the mixture looks mostly smooth, with only small streaks of starter remaining. This guarantees even fermentation later.
Avoid using very cold or hot liquids, which can slow or damage the yeast and bacteria in your starter.
Combine the Dry Ingredients
Add the bread flour and unsweetened cocoa powder to the starter mixture. Stir with a wooden spoon or spatula until no dry patches of flour or cocoa remain.
Scrape the sides and bottom of the bowl as you mix. The dough will look shaggy and rough at this stage, which is exactly what you want for now.
Rest the Dough (Autolyse)
Cover the bowl with a towel or plastic wrap and let the dough rest for 30–45 minutes at room temperature. This rest, called autolyse, allows the flour to fully hydrate.
It also begins gluten development with no kneading. Expect the dough to soften slightly and become easier to work with after this period.
Incorporate Salt and Sugar
Sprinkle the fine sea salt and granulated sugar evenly over the dough’s surface. Use your hands to pinch the dough repeatedly, then fold portions of it over itself.
Continue until both the salt and sugar disappear into the dough. This step balances flavor and strengthens the gluten without overworking the dough.
Work in the Butter
Add the softened butter in small pieces over the dough. Gently knead or perform stretch-and-fold motions in the bowl.
Keep working until the butter is fully absorbed and the dough becomes smoother, glossier, and more cohesive. Avoid adding extra flour; the dough will feel richer but should hold together nicely once the butter is incorporated.
Build Strength with Stretch-and-Folds
Cover the bowl and let the dough rest at room temperature. Every 30 minutes for 1.5–2 hours, perform a set of stretch-and-folds.
Grab one edge of the dough, stretch it upward, and fold it over the center. Rotate the bowl and repeat several times.
This gradually builds strength and structure without traditional kneading.
Fold in the Chocolate
During the final set of stretch-and-folds, gently sprinkle the dark chocolate chips or chunks over the dough. Fold the dough repeatedly to distribute the chocolate evenly without tearing.
If the chocolate starts melting, work quickly with cool hands. Aim for an even spread so each slice later has visible chocolate pieces throughout.
Bulk Ferment the Dough
Lightly oil a clean mixing bowl and transfer the dough into it seam side down. Cover the bowl and let the dough bulk ferment at room temperature until puffy and roughly doubled in volume, about 4–6 hours.
Judge by how airy and jiggly it feels rather than time alone. Enriched cocoa dough may rise a bit slower.
Pre-Shape the Dough
Gently turn the dough out onto a lightly floured work surface. Use a bench scraper to gather the edges toward the center, forming a loose round.
Handle it carefully to preserve gas bubbles. Cover the pre-shaped dough with a towel and let it rest for 20–30 minutes. This relaxes the gluten and prepares it for final shaping.
Shape into a Tight Loaf
After resting, shape the dough into a tight boule or batard. Use gentle tension to create a smooth outer surface without tearing.
Tuck and roll as needed, using your hands and bench scraper for support. A firm, well-shaped loaf helps it rise upward in the oven, giving better structure and a more attractive final appearance.
Prepare the Proofing Basket
Generously dust your proofing basket or a medium bowl lined with a clean towel using rice flour. This prevents sticking, especially important with enriched, cocoa-rich dough.
Place the shaped loaf seam side up into the basket. Adjust it so it sits evenly, then lightly dust the top if it looks sticky or overly moist.
Cold-Proof the Dough
Cover the proofing basket with a plastic bag or wrap to prevent drying. Place it in the refrigerator for 8–12 hours to cold-proof.
This slow rise improves flavor and makes the dough easier to score. During this time, the loaf will relax and expand slightly, becoming firmer and more manageable for baking the next day.
Preheat the Oven and Dutch Oven
About 45 minutes before baking, place your Dutch oven with its lid inside your oven. Preheat to 475°F (245°C).
Heating the Dutch oven thoroughly guarantees strong initial oven spring and helps create steam. This step is vital for a good rise and a crisp, well-formed crust on your chocolate sourdough loaf.
Invert and Score the Loaf
Cut a piece of parchment paper large enough to lift the dough. Place it over the basket, then invert the basket so the dough releases onto the parchment, now seam side down.
Use a sharp lame or serrated knife to score the top with a confident, slightly deeper slash. This directs expansion and prevents random splitting during baking.
Bake with Steam in the Dutch Oven
Carefully lift the parchment with the dough and place it into the preheated Dutch oven. Cover with the hot lid and return it to the oven.
Bake covered for 20 minutes at 475°F (245°C). The enclosed steam encourages strong oven spring and helps the cocoa crust develop before it begins to firm and darken.
Finish Baking Uncovered
Remove the Dutch oven lid and reduce the oven temperature to 430°F (220°C). Continue baking for 15–20 minutes, until the crust is set and the loaf sounds hollow when tapped on the bottom.
Watch the color; it will be deep brown due to cocoa. Remove carefully once baked through, avoiding over-darkening the crust.
Cool Completely Before Slicing
Transfer the baked loaf from the Dutch oven to a wire cooling rack using the parchment. Let it cool completely for at least 2 hours before slicing.
This rest allows the crumb to set and moisture to redistribute. Cutting too early can make the interior gummy. Once cooled, slice to reveal the chocolate-studded, tender crumb.
Ingredient Swaps
- Use 2% or whole milk for best texture; swap with equal-weight water or unsweetened plant milk for dairy-free.
- Replace butter 1:1 with a neutral oil, coconut oil, or vegan butter for a dairy-free loaf.
- Any unsweetened cocoa powder works; Dutch-process gives a smoother, darker flavor, natural cocoa a sharper, fruitier note.
- Granulated sugar can be swapped by weight with light brown sugar, coconut sugar, or evaporated cane sugar.
- Use semisweet or milk chocolate chips instead of dark for a sweeter loaf; for budget or regional limits, chop any solid chocolate bar.
You Must Know
– Doneness • If the loaf seems done but you’re unsure
Use an instant-read thermometer and pull it at 205–210°F (96–99°C) in the center; cocoa makes the crust look “finished” early, but the temperature confirms the crumb is fully set and not gummy.
– Troubleshoot • If the dough feels too stiff during gluten development
Lightly dampen your hands and work in 5–10 g water at a time during early folds; cocoa absorbs liquid and can fake stiffness, so a touch more hydration helps it stretch without tearing.
– Troubleshoot • If the loaf comes out dense or doesn’t rise well
Next time, let bulk fermentation run longer until the dough looks roughly 75–100% bigger, domed, and jiggly**, even if that takes 6–7 hours**; enriched, cocoa dough ferments slower and needs visual cues more than the clock.
– Scale • For a smaller test loaf (about 5 slices)
Use 60 g starter, 180 g water, 40 g milk, 250 g bread flour, 20 g cocoa, 5 g salt, 40 g sugar, 20 g butter, 60 g chocolate, and keep all timing and temps the same; this fits better in a 3-qt Dutch oven.
– Flavor Boost • For deeper chocolate and aroma
Lightly toast the cocoa in a dry pan over low heat for 2–3 minutes until it smells fragrant, then cool completely before adding; this enhances chocolate notes without extra sugar.
Serving Tips
- Serve slightly warm with a smear of salted butter or mascarpone.
- Pair slices with espresso, cold brew, or red wine for dessert.
- Top with fresh berries and a dollop of lightly sweetened whipped cream.
- Toast leftovers and add vanilla ice cream for a quick sundae-style treat.
- Cut into cubes for chocolate sourdough bread pudding or fondue dipping.
Storage & Make-Ahead
Double chocolate sourdough keeps in the fridge for up to 5 days, well wrapped to prevent drying.
For make-ahead, refrigerate shaped dough up to 24 hours before baking.
The baked loaf freezes beautifully for 2–3 months; slice before freezing and wrap tightly in plastic, then a freezer bag.
Reheating
For best texture, reheat slices briefly.
Microwave 10–15 seconds wrapped in a damp towel, warm in a 300°F (150°C) oven 5–8 minutes, or toast lightly in a covered skillet.
Holiday Brunch Showstopper
On crisp holiday mornings, I love setting this deeply chocolatey sourdough in the center of the table, its crackled cocoa crust catching the light like wrapping paper just torn open.
The loaf still whispers warmth, perfuming the room with cocoa, butter, and toasted tang from the starter.
I slice into it and the crumb reveals molten pockets of dark chocolate, like little ornaments hidden just for you. A knob of soft butter melts instantly, trailing shiny rivulets into each airy tunnel.
Beside coffee, clementines, and maybe a bowl of jewel-toned berries, this bread feels festive without effort.
You don’t need elaborate plating—just a wooden board, a good knife, and a few quiet moments to savor each tender, chocolate-laced bite.
Final Thoughts
Give this double chocolate sourdough a try and see just how magical a homemade chocolate loaf can be.
Don’t hesitate to tweak the add-ins—try nuts, orange zest, or dried cherries—to make it your own.
Frequently Asked Questions
Can I Make This Bread Without a Dutch Oven or Banneton?
You can, and I have. I nestle the dough in a towel‑lined mixing bowl instead of a banneton, then bake it on a preheated sheet pan, adding a separate pan of steaming water for crust.
How Do I Adapt This Recipe for Gluten-Free Baking?
You can, but you’ll need a gluten‑free bread blend, a binder like psyllium husk, extra hydration, and shorter ferment. I’d watch the dough like a thick brownie batter, then bake until your kitchen smells deeply chocolatey.
What’s the Best Way to Freeze Individual Slices for Later?
You’ll get the best results if you cool fully, slice, then freeze on a tray. I then wrap slices snugly in parchment, tuck into a freezer bag, and reheat, breathing in that warm, chocolatey aroma.
Can I Use Discard Starter Instead of Active Starter Here?
You can, but I wouldn’t as‑is; discard won’t lift the dough. Instead, feed it, let it bubble and dome, then use it. You’ll taste deeper flavor and get a taller, softer, fragrant loaf.
How Can I Turn This Dough Into Individual Rolls or Buns?
You can, and I’d divide the dough after bulk, gently shape 8–10 tight buns, nestle them close on a buttered pan, proof until pillowy, then bake until their glossy, chocolatey domes scent your kitchen.

Double Chocolate Sourdough Bread
Equipment
- 1 large mixing bowl
- 1 medium mixing bowl
- 1 digital kitchen scale
- 1 Measuring spoons set
- 1 Dough scraper
- 1 wooden spoon or silicone spatula
- 1 bench scraper
- 1 proofing basket (banneton) or medium bowl
- 1 Dutch oven with lid (4–5 quart)
- 1 sharp lame or serrated knife
- 1 wire cooling rack
- 1 piece parchment paper
Ingredients
- 120 gram active sourdough starter 100% hydration
- 360 gram water lukewarm
- 80 gram whole milk room temperature
- 500 gram bread flour
- 40 gram cocoa powder unsweetened
- 10 gram fine sea salt
- 80 gram granulated sugar
- 40 gram unsalted butter softened
- 120 gram dark chocolate chips or chunks
- 1 tablespoon neutral oil for greasing bowl
- 10 gram rice flour for dusting banneton or as needed
Instructions
- In the large mixing bowl, whisk together the active sourdough starter, water, and milk until mostly smooth.
- Add bread flour and cocoa powder to the bowl and mix with a wooden spoon or spatula until no dry spots remain, forming a shaggy dough.
- Cover the bowl and let the dough rest (autolyse) for 30–45 minutes at room temperature.
- Sprinkle salt and sugar evenly over the dough and use your hands to pinch and fold until both are fully incorporated.
- Add softened butter in small pieces and knead or stretch-and-fold in the bowl until the butter is fully absorbed and the dough is smooth and cohesive.
- Cover and perform 3–4 sets of stretch-and-folds every 30 minutes over 1.5–2 hours, keeping the dough covered between sets.
- During the final set of folds, gently sprinkle in the chocolate chips or chunks and fold until they are evenly distributed.
- Lightly oil a clean bowl, transfer the dough into it seam side down, cover, and bulk ferment at room temperature until roughly doubled and puffy, 4–6 hours depending on temperature.
- Once bulk fermentation is complete, gently turn the dough out onto a lightly floured surface.
- Pre-shape the dough into a loose round using a bench scraper, cover, and let it rest for 20–30 minutes.
- Shape the dough into a tight boule or batard, being careful not to tear the surface.
- Dust the proofing basket generously with rice flour and place the shaped dough seam side up into the basket.
- Cover the basket and place it in the refrigerator to cold-proof for 8–12 hours.
- About 45 minutes before baking, place the Dutch oven with its lid into the oven and preheat to 475°F (245°C).
- Cut a piece of parchment paper large enough to lift the dough and place it over the basket, then invert the dough onto the parchment.
- Score the top of the dough with a lame or sharp knife to allow controlled expansion.
- Carefully transfer the dough on the parchment into the preheated Dutch oven, cover with the lid, and place it back in the oven.
- Bake covered for 20 minutes at 475°F (245°C).
- Remove the lid, reduce the temperature to 430°F (220°C), and bake for an additional 15–20 minutes until the crust is set and the loaf sounds hollow when tapped.
- Lift the bread out of the Dutch oven and cool completely on a wire rack for at least 2 hours before slicing.
Notes

Cynthia Weatherford is a seasoned chef and culinary enthusiast who serves as the Recipe creator of Somonday. With decades of experience in the kitchen and a passion for exploring diverse cuisines, Cynthia brings a blend of creativity and technique to every dish. Known for transforming simple ingredients into show-stopping meals, Cynthia believes that cooking is an art form anyone can master. Dedicated to inspiring home cooks, Cynthia shares approachable recipes, pro tips, and culinary wisdom to make every meal memorable.


