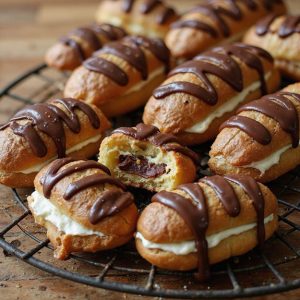
Picture a tray of golden eclairs, their shells crisp and airy, the scent of butter and vanilla curling through the kitchen as glossy ribbons of chocolate set to a soft shine.
Imagine the first bite: delicate crackle, cool clouds of vanilla cream, and a rich cocoa finish—comfort you can hold in your hand.
That’s why this recipe matters to me: it turns simple pantry staples into a bakery-level treat without fuss, the kind you can pull together for busy weeknights, Sunday suppers, or a last-minute celebration.
When a surprise guest once arrived after dinner, these easy eclairs saved the evening—twenty minutes of whisking and piping later, we’d dessert that felt like a small party.
We’ll walk step by step so you get tall, hollow shells, smooth cream, and a shiny glaze every time. You’ll learn the cues, not just the steps—so success becomes repeatable.
Ready? Let’s cook!
Why You’ll Love It
- Delivers bakery-quality eclairs with simple, step-by-step guidance
- Achieves tall, crisp shells and silky, cloud-light filling
- Uses easy-to-find ingredients and basic kitchen tools
- Adapts fillings and toppings for endless flavor variations
- Freezes beautifully for make-ahead desserts and quick entertaining
Ingredients
- 120 ml water — filtered if possible (use cold, clean water)
- 120 ml whole milk — full-fat for best texture
- 115 g unsalted butter, cubed — good European-style butter if available
- 5 g granulated sugar — fine grain dissolves evenly
- 3 g fine salt — sea or kosher, finely ground
- 150 g all-purpose flour, sifted — weigh for accuracy
- 4 large eggs, room temperature — fresh, high-quality
- 480 ml heavy cream, cold — minimum 36% fat for stable whip
- 50 g powdered sugar — 10x confectioners for smoothness
- 5 ml vanilla extract — pure, not imitation
- 170 g semi-sweet chocolate, chopped — 55–60% cacao melts smoothly
- 80 ml heavy cream, warm — heat until steaming, not boiling
Step-by-Step Method
Preheat & Prep
Heat oven to 400°F (200°C). Line a baking sheet with parchment. Gather tools and ingredients. Fit one piping bag with a 1/2-inch round tip and another with a small round tip. Sift flour. Cube butter. Chill 480 ml heavy cream for whipping later. This organization speeds the process and helps guarantee the choux dough is piped and baked promptly.
Boil Liquids
Combine water, milk, butter, sugar, and salt in a medium saucepan. Set over medium heat and bring to a gentle boil, stirring occasionally. Guarantee butter fully melts and mixture just simmers. Avoid a rolling boil that can evaporate too much liquid.
Proper hydration is essential for steam-driven rise in the oven and a smooth panade.
Add Flour & Stir
Dump in the sifted flour all at once. Stir vigorously with a wooden spoon until a cohesive dough forms. Cook 1 to 2 minutes, pressing and turning to dry excess moisture.
Look for a thin film on the pan and a smooth, steamy dough ball. Proper drying prevents runny batter and improves structure for hollow, crisp shells.
Cool the Dough
Scrape dough into a mixing bowl. Spread slightly to release steam. Cool about 5 minutes until warm, not hot. Touch should feel comfortable.
Overly hot dough can scramble eggs; too cool dough resists blending. This brief rest balances temperature for smooth incorporation and a glossy, pipeable choux consistency.
Beat In Eggs
Beat in eggs one at a time with a mixer on medium speed. Fully incorporate each before adding the next. Aim for batter that’s smooth, shiny, and falls in a thick V from the spoon.
If too stiff, add a teaspoon of beaten egg. If too loose, chill briefly. Proper texture guarantees clean piping and strong oven spring.
Pipe the Shells
Transfer choux to the piping bag fitted with a large round tip. Pipe 4 to 5 inch logs, spaced about 2 inches apart. Keep steady pressure for even thickness.
Finish with a quick flick to minimize peaks. Uniform size guarantees even baking and filling. Work swiftly so dough doesn’t skin over before baking.
Smooth & Mist
Dip a finger in water and gently pat down any peaks or rough edges. Lightly mist the piped logs with water to encourage expansion. Avoid soaking.
A smooth surface bakes more evenly and prevents cracks. The added moisture supports steam generation for taller, well-shaped éclairs with crisp exterior walls.
Bake & Dry
Bake 15 minutes at 400°F (200°C). Without opening the oven, reduce to 350°F (175°C) and bake 15 to 20 minutes more until deep golden and hollow-sounding. Don’t open the door in the first 20 minutes.
Proper browning prevents collapse. If needed, bake an extra few minutes to fully set and dry.
Cool & Vent
Transfer shells to a wire rack immediately. Pierce each end or the bottom with a small tip to create vents. Let cool completely to room temperature. Venting releases trapped steam and keeps interiors dry.
If shells feel soft after cooling, return to a 300°F (150°C) oven for 10 minutes to re-crisp.
Whip the Cream
Combine cold heavy cream, powdered sugar, and vanilla in a chilled bowl. Whip to medium-stiff peaks with a stand or hand mixer. Peaks should hold shape with slight curl.
Avoid overwhipping to butter. Chill briefly if needed. This stable whipped cream fills shells neatly and holds texture without weeping.
Fill the Shells
Fit a clean piping bag with a small round tip. Fill with whipped cream. Insert tip into the pierced holes and pipe until the shell feels slightly heavy and filled.
Avoid overfilling which can split shells. Wipe any excess. Keep filled éclairs cool while preparing the glaze to maintain structure and freshness.
Make Chocolate Glaze
Warm heavy cream until steaming, not boiling. Pour over chopped semi-sweet chocolate in a small bowl. Let sit 2 minutes.
Whisk gently from center outward until smooth and glossy. If needed, briefly warm to loosen. Proper emulsion yields a silky glaze that sets nicely without dulling or streaking.
Dip & Set
Dip the tops of filled éclairs into the chocolate glaze. Let excess drip off. Place on a wire rack to set. Allow 30 minutes at cool room temperature until the glaze firms.
Avoid stacking or refrigerating immediately to prevent condensation. Serve fresh the same day for best texture and snap.
Ingredient Swaps
- Dairy-free: Replace milk with unsweetened almond, oat, or soy milk; use plant butter for the dough; fill with coconut whipped cream or a dairy-free pastry cream; glaze with dairy-free chocolate and coconut cream.
- Gluten-free: Use a 1:1 gluten-free all-purpose blend (with xanthan gum). Pipe slightly shorter logs and bake well for structure.
- Low-sugar: Reduce powdered sugar in whipped cream to taste or use a sugar substitute; choose 70% dark chocolate for glaze.
- Budget/availability: Use all water (240 ml) instead of half milk—slightly less richness but good rise. Swap semi-sweet chocolate with chocolate chips.
- Flavor swaps: Add citrus zest or espresso powder to the dough or cream; use flavored extracts (almond, hazelnut) in the filling.
- Filling alternatives: Pastry cream, diplomat cream (pastry + whipped), or custard pudding mix for speed.
You Must Know
Doneness • If the dough ribbon falls in clumps instead of a thick V from the spoon, add 1–2 teaspoons beaten egg until it forms a continuous, glossy ribbon; guarantees proper steam expansion and prevents cracks.
Avoid • To prevent collapse, keep the oven closed until shells are deeply browned and feel firm; use color and sound as anchors—deep golden-brown and hollow when tapped after about 30–35 minutes total.
Troubleshoot • If baked shells feel soft or soggy after cooling, dry them at 300°F (150°C) for 8–12 minutes; drives off residual moisture so interiors stay crisp for at least 2 hours before filling.
Scale • For half or double batches, maintain the same hydration ratio: dough should hold ridges and barely slump after 10 seconds; pipe test a 2-inch log, and if it spreads more than 20%, chill 5–10 minutes before continuing.
Flavor Boost • For a deeper finish, add 1–2 teaspoons espresso powder to the chocolate glaze or 1/4 teaspoon almond extract to the cream; enhances cocoa notes or adds aroma without changing texture.
Serving Tips
- Dust with powdered sugar and garnish with fresh berries for color.
- Serve chilled alongside espresso or strong black tea.
- Plate with a drizzle of raspberry coulis and chopped pistachios.
- Offer a trio: classic chocolate, white chocolate, and caramel glaze.
- Add a dollop of lightly sweetened whipped cream on the side.
Storage & Make-Ahead
Unfilled choux shells keep 1 day at room temp, lightly covered.
Filled eclairs refrigerate up to 2 days; glaze may dull slightly.
For make-ahead, bake shells, cool, and pierce, then store airtight.
Freeze unfilled shells up to 2 months; re-crisp at 325°F for 5–8 minutes, cool, then fill and glaze.
Reheating
Reheat unfilled shells: oven 300°F (150°C) 5–10 minutes until crisp.
Filled eclairs: brief microwave 5–10 seconds, or stovetop steam 20–30 seconds covered.
Avoid overheating to prevent soggy shells or melted cream.
Marie-Antoinette’s Favorite Pastry
Though history wraps her in myth, Marie-Antoinette adored airy, delicate pastries—and choux stood right at that sweet spot of elegance and indulgence.
I imagine her savoring a feather-light shell that shatters with a sigh, then melts into silken cream and glossy chocolate. That’s the spirit I chase with eclairs: refined, playful, and irresistibly French.
Picture a tray emerging deep golden, hollow, and fragrant with butter. I cool them, hear that papery whisper, then pipe in billowy vanilla cream until each feels just heavy enough.
The final dip in warm, satiny glaze gives a royal sheen. Serve them on a simple platter—let aroma do the inviting. Bite, pause, and notice the contrast: crisp shell, cloudlike filling, gentle sweetness. Court-worthy, yet wonderfully doable at home.
Final Thoughts
Ready to bake? Give these easy eclairs a try and enjoy that crisp shell with silky filling and glossy chocolate.
Feel free to tweak the flavors—swap in pastry cream, add a hint of espresso to the glaze, or flavor the whipped cream with citrus or almond!
Frequently Asked Questions
Can I Make Gluten-Free Choux Pastry for Eclairs?
Yes—you can. I swap in a cup‑for‑cup gluten‑free flour blend with xanthan gum, add one extra egg, and beat longer. The dough feels silky, pipes cleanly, bakes golden, and stays crisp yet airy. Try it!
How Do Altitude Differences Affect Baking Eclairs?
Altitude makes eclairs dry faster and rise quicker. I’d add moisture, reduce leavening from steam loss, bake hotter initially, then lower. I watch color, extend bake to set structure, cool gradually, and fill only after shells feel crisp.
What’s the Best Way to Transport Filled Eclairs?
Chill them first, then nestle eclairs in a shallow, lidded container lined with parchment. I space snugly, avoid stacking, and keep them cool with ice packs. I transport level, gentle, and glaze set, for crisp shells and lush centers.
Can I Pipe Eclairs Without a Piping Bag?
Yes—you can. I’d spoon choux into a zip-top bag, snip a 1/2-inch corner, and pipe smooth logs. For crisp edges, chill briefly. Lightly mist, bake hot, then lower heat. It’ll smell buttery, puff gorgeously.
How Do I Prevent Soggy Bottoms After Glazing?
Dry the shells first: I bake them 10 minutes at 300°F to crisp, cool completely, then glaze only the tops and let set on a rack. I fill last minute and avoid pooling glaze.

Easy Eclairs
Equipment
- 1 Medium saucepan
- 1 Wooden spoon
- 1 Mixing bowl
- 1 stand mixer or hand mixer
- 1 Baking sheet
- 1 parchment paper sheet
- 1 piping bag
- 1 large round tip 1/2 inch
- 1 small round tip for filling
- 1 Wire rack
- 1 Small saucepan
- 1 Whisk
- 1 instant-read thermometer optional
Ingredients
- 120 milliliter water
- 120 milliliter whole milk
- 115 gram unsalted butter cubed
- 5 gram granulated sugar
- 3 gram fine salt
- 150 gram all-purpose flour sifted
- 4 large eggs room temperature
- 480 milliliter heavy cream cold
- 50 gram powdered sugar
- 5 milliliter vanilla extract
- 170 gram semi-sweet chocolate chopped
- 80 milliliter heavy cream warm
Instructions
- Preheat oven to 400°F (200°C) and line a baking sheet with parchment paper.
- Combine water, milk, butter, sugar, and salt in a saucepan over medium heat and bring to a gentle boil.
- Add flour all at once, stir vigorously until a smooth dough forms and a film coats the pan, about 2 minutes.
- Transfer dough to a bowl and cool 5 minutes until warm, not hot to the touch.
- Beat in eggs one at a time until the batter is smooth, glossy, and falls in a thick V from the spoon.
- Fill a piping bag fitted with a large round tip and pipe 4 to 5 inch logs, spacing 2 inches apart.
- Smooth any peaks with a damp finger and mist lightly with water for better oven spring.
- Bake 15 minutes at 400°F (200°C), then reduce to 350°F (175°C) and bake 15 to 20 minutes until deep golden and hollow-sounding.
- Cool shells on a wire rack, then pierce ends or bottoms with a small tip to create filling holes.
- Whip cold heavy cream with powdered sugar and vanilla to medium-stiff peaks.
- Fit a piping bag with a small round tip, fill with whipped cream, and pipe into each shell until slightly heavy.
- Warm heavy cream until steaming, pour over chopped chocolate, wait 2 minutes, and whisk until smooth.
- Dip the tops of filled eclairs in the chocolate glaze and let excess drip off.
- Set glazed eclairs on a rack to set for 30 minutes before serving.


