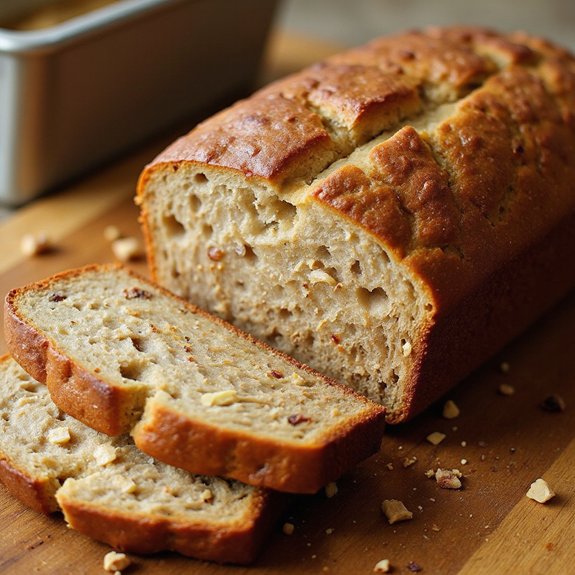
There’s something about the smell of banana bread in the oven—warm, sweet, and toasty—that makes a kitchen feel like home.
Golden-brown on top with a soft, tender crumb inside, this cozy dessert (or anytime snack) comes together quickly and bakes into a loaf that tastes like a hug.
It’s ideal for busy weeknights, beginner bakers, and anyone who hates wasting overripe bananas.
I still remember a rainy Sunday when friends dropped by unannounced.
I’d nothing “fancy” to serve, just a bowl of spotty bananas on the counter.
An hour later, we were passing around thick slices of warm banana bread, butter melting into every bite, and the whole room relaxed.
This is the kind of recipe that shines for last‑minute cravings, easy entertaining, or comforting Sunday suppers.
Ready to bring this banana bread to life?
Why You’ll Love It
- Delivers rich banana flavor with perfectly soft, moist crumb
- Uses simple pantry ingredients and one bowl for easy cleanup
- Stays tender for days and tastes even better the next day
- Customizes easily with nuts, chocolate chips, or warm spices
- Freezes beautifully for quick snacks or make-ahead desserts
Ingredients
- 3 pieces ripe bananas, mashed — very ripe with brown spots for best flavor
- 75 g unsalted butter, melted and cooled — cooling prevents curdling the egg
- 100 g granulated sugar — adds sweetness and structure
- 50 g light brown sugar, packed — adds moisture and caramel notes
- 1 piece large egg, room temperature — mixes more evenly into batter
- 5 ml vanilla extract — use pure extract for better aroma
- 190 g all-purpose flour — measure accurately to avoid dense bread
- 5 g baking soda — guarantees proper rise with acidic bananas
- 2 g salt — balances sweetness and enhances flavor
- 60 ml milk, room temperature — helps create a tender crumb
- 80 g chopped walnuts (optional) — toast lightly for deeper nutty flavor
Step-by-Step Method
Preheat and Prepare Pan
Heat the oven to 175°C (350°F). Grease a 9×5-inch loaf pan or line it with parchment for easy removal. Make sure the rack is in the center of the oven. Set out your egg and milk to reach room temperature. Assemble your bowls, whisk, spatula, and measuring tools before you start mixing.
Mash the Ripe Bananas
Place peeled ripe bananas in a large mixing bowl. Mash them thoroughly with a fork until mostly smooth, leaving a few small lumps for texture. Assure there are no large chunks that might create wet pockets in the bread. Use a sturdy fork or potato masher if you prefer a finer consistency.
Combine Bananas and Butter
Pour the melted, cooled unsalted butter over the mashed bananas. Whisk or stir until the mixture looks cohesive and glossy. Make sure the butter isn’t hot, or it could partially cook the egg later. This step helps distribute the fat evenly, giving the banana bread a tender, moist crumb.
Whisk in Sugars, Egg, and Vanilla
Add granulated sugar, light brown sugar, the room-temperature egg, and vanilla extract to the banana-butter mixture. Whisk until the mixture is smooth, slightly thick, and no streaks of egg remain. Break the yolk early to help it incorporate. Assure the sugars dissolve as much as possible for an even, uniform batter.
Mix Dry Ingredients Separately
In a medium bowl, whisk together all-purpose flour, baking soda, and salt. Break up any clumps of flour or baking soda. This distributes the leavening and salt evenly so the bread rises uniformly. Mixing dry ingredients separately prevents overworking the batter once they’re combined with the wet ingredients.
Start Combining Wet and Dry
Add about half of the dry ingredient mixture to the wet banana base. Gently stir with a spatula or wooden spoon just until you no longer see large pockets of dry flour. Avoid vigorous stirring. Keeping this first addition light and brief helps maintain a soft, tender texture in the finished loaf.
Add Milk and Remaining Dry Mix
Pour in the room-temperature milk and stir until smoothly incorporated into the batter. Add the remaining dry ingredients. Fold gently, scraping the bottom and sides of the bowl, until no visible dry flour remains. Stop as soon as the batter looks uniform. Overmixing at this stage can toughen the banana bread.
Fold in Walnuts (Optional)
Sprinkle chopped walnuts over the batter. Use a spatula to fold them in with broad, gentle strokes. Distribute the nuts evenly so every slice gets some texture. Avoid stirring too long. If desired, reserve a few walnut pieces to press lightly on top of the batter for a decorative finish before baking.
Fill Pan and Bake
Pour the batter into the prepared loaf pan. Smooth the surface with a spatula so it bakes evenly. Place the pan in the center of the oven. Bake for 55–65 minutes, checking near the end. If the top browns too quickly, tent it loosely with foil to prevent over-browning while the center finishes.
Test Doneness and Cool
Insert a toothpick into the center of the loaf. Check that it comes out clean or with a few moist crumbs, not wet batter. Remove the pan to a wire rack. Let the bread cool in the pan for 10–15 minutes to set. Then carefully lift or turn out the loaf and cool at least 15 minutes more before slicing.
Ingredient Swaps
- Use melted coconut oil or a neutral vegetable oil instead of butter for a dairy-free loaf.
- Replace the egg with a “flax egg” (1 tbsp ground flaxseed + 3 tbsp water, rested 5–10 minutes) for a vegan option.
- Swap up to half the all-purpose flour with whole wheat flour for a heartier texture, or use gluten-free all-purpose blend for gluten-free needs.
- Substitute walnuts with chocolate chips, pecans, sunflower seeds, or leave them out entirely for a nut-free version.
- Use all brown sugar for deeper flavor and more moisture, or all white sugar if that’s what you have on hand.
You Must Know
– Scale • To make two loaves, double everything but keep the same oven temperature and start checking doneness around 55 minutes; depending on your oven’s hot spots and rack crowding, total time might extend to about 70 minutes, so rely on the center-toothpick test over the clock.
Serving Tips
- Serve warm slices with a pat of butter or a drizzle of honey.
- Pair with hot coffee, tea, or a glass of cold milk for breakfast.
- Top with Greek yogurt and fresh fruit for a more filling snack or brunch.
- Lightly toast leftover slices and spread with peanut butter or cream cheese.
- Cut into cubes and use in a simple trifle with whipped cream and berries.
Storage & Make-Ahead
Banana bread keeps well in the fridge for up to 5 days when tightly wrapped or stored in an airtight container.
It’s perfect for making ahead: bake, cool completely, then refrigerate or freeze.
For longer storage, freeze whole or sliced, well-wrapped, for up to 3 months; thaw overnight.
Reheating
Reheat slices gently: in the microwave at 50% power in 10–15 second bursts.
In a 150°C (300°F) oven wrapped in foil.
Or on a covered skillet over low heat.
Banana Bread in Pop Culture
When I think back on childhood movies and TV shows, I can almost smell the scenes where a character pulls a golden loaf of banana bread from the oven, steam curling up like a soft invitation to gather close.
Banana bread always seems to show up at moments when people need comfort—breakups, snow days, late-night study sessions. It’s never flashy, just quietly generous.
You’ve probably noticed it, too:
- A sitcom kitchen, where a parent slices warm banana bread as kids spill secrets.
- A cozy drama, with a neighbor arriving at the door holding a foil-wrapped loaf.
- A baking show, celebrating “nostalgic recipes,” with banana bread front and center.
- A coming-of-age story, where someone bakes banana bread to feel closer to home.
Final Thoughts
Now that you’ve got the basics down, it’s time to grab those ripe bananas and give this banana bread a try.
Don’t hesitate to tweak it with your favorite mix-ins—like chocolate chips, pecans, or a sprinkle of sugar on top—until it’s your perfect loaf.
Frequently Asked Questions
Can I Make This Banana Bread Recipe Gluten-Free, and How?
Yes, you can. I’d swap the flour for equal-weight 1:1 gluten-free blend, add ½ teaspoon xanthan gum if needed, then bake as written. Picture warm, tender slices, steam curling up like childhood Sunday mornings.
Is This Banana Bread Suitable for People With Diabetes or on Low-Sugar Diets?
It’s not ideal as written for diabetes or low-sugar diets, but you can swap sugars for approved sweeteners, use whole‑wheat or almond flour, and savor a smaller, warmly spiced slice with tea.
How Can I Turn This Banana Bread Into Muffins or Mini Loaves?
You can pour the same batter into greased muffin tins or mini loaf pans, then bake at 175°C for about 18–25 minutes, until golden, domed, and your kitchen smells like warm childhood mornings.
What Are Some Fun Ways Kids Can Safely Help Make This Recipe?
Kids can mash speckled bananas, whisk sugars, and sprinkle nuts while you handle heat. I’d let them butter the pan, sniff warm vanilla, and watch the loaf rise like a golden memory in the oven.
How Do I Adjust Baking Time for High-Altitude Locations?
You’ll likely reduce baking time by 5–10 minutes and start checking early. I’d also raise the oven temperature slightly, remembering those mountain kitchens where warm, fragrant loaves cooled beside frosted windowpanes.

Easy Homemade Banana Bread
Equipment
- 1 large mixing bowl
- 1 medium mixing bowl
- 1 9×5-inch loaf pan
- 1 whisk or fork
- 1 wooden spoon or rubber spatula
- 1 Measuring cups set
- 1 Measuring spoons set
- 1 wire cooling rack
Ingredients
- 3 piece ripe bananas mashed
- 75 gram unsalted butter melted and cooled
- 100 gram granulated sugar
- 50 gram light brown sugar packed
- 1 piece large egg room temperature
- 5 milliliter vanilla extract
- 190 gram all-purpose flour
- 5 gram baking soda
- 2 gram salt
- 60 milliliter milk room temperature
- 80 gram chopped walnuts optional
Instructions
- Preheat the oven to 175°C (350°F) and lightly grease or line a 9×5-inch loaf pan with parchment paper.
- In a large mixing bowl, mash the ripe bananas with a fork until mostly smooth with a few small lumps.
- Whisk the melted and cooled butter into the mashed bananas until fully combined.
- Add the granulated sugar, light brown sugar, egg, and vanilla extract to the banana mixture and whisk until smooth.
- In a medium bowl, whisk together the all-purpose flour, baking soda, and salt.
- Add half of the dry ingredients to the wet mixture and stir gently with a spatula until just combined.
- Stir in the milk until incorporated, then add the remaining dry ingredients and mix until no dry flour remains, avoiding overmixing.
- Fold in the chopped walnuts if using, distributing them evenly through the batter.
- Pour the batter into the prepared loaf pan and smooth the top with a spatula.
- Bake the banana bread for 55 to 65 minutes, or until a toothpick inserted into the center comes out clean or with a few moist crumbs.
- Remove the pan from the oven and place it on a wire rack, allowing the bread to cool in the pan for 10 to 15 minutes.
- Carefully lift or turn out the banana bread onto the wire rack and let it cool for at least another 15 minutes before slicing.
Notes

Cynthia Weatherford is a seasoned chef and culinary enthusiast who serves as the Recipe creator of Somonday. With decades of experience in the kitchen and a passion for exploring diverse cuisines, Cynthia brings a blend of creativity and technique to every dish. Known for transforming simple ingredients into show-stopping meals, Cynthia believes that cooking is an art form anyone can master. Dedicated to inspiring home cooks, Cynthia shares approachable recipes, pro tips, and culinary wisdom to make every meal memorable.


