
There’s something about tearing into a crackling loaf of flavored sourdough that instantly slows the day down.
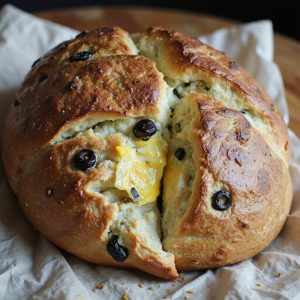
Picture a golden crust, blistered and rustic, giving way to a soft, chewy crumb laced with roasted garlic, sharp cheddar, fresh herbs—or even pockets of dried fruit and toasted nuts.
It’s the kind of cozy, versatile bread that turns simple meals into something special, whether you’re pairing it with a hearty stew, a quick skillet dinner, or just good butter and jam.
Though sourdough feels artisanal, these flavored loaves fit beautifully into busy weeknights, comforting Sunday suppers, and easy entertaining, especially for home bakers who like to prep dough ahead.
I still remember a stormy evening when a warm jalapeño-cheddar sourdough, pulled from the oven at the last minute, turned a basic soup into a gathering my family still talks about.
Ready to bring this bread to life in your own kitchen?
Why You’ll Love It
- Delivers bold, savory flavor from cheese, olives, and fresh herbs
- Builds a chewy, open crumb with crisp, blistered crust
- Ferments slowly for better digestibility and complex, tangy aroma
- Fits easily into your schedule with overnight cold proofing
- Freezes beautifully, so you can bake once and enjoy for days
Ingredients
- 100 g active sourdough starter 100% hydration — use recently fed and bubbly
- 350 g water room temperature — filtered if possible
- 450 g bread flour — high-protein for better structure
- 50 g whole wheat flour — adds flavor and color
- 10 g fine sea salt — avoid iodized table salt
- 40 g grated hard cheese such as cheddar or parmesan — use dry, aged cheese
- 40 g chopped olives pitted — well-drained to avoid excess moisture
- 20 g chopped fresh herbs such as rosemary and thyme — use leaves only, finely chopped
- 20 g olive oil — good-quality extra virgin for best flavor
Step-by-Step Method
Mix Starter and Water
Whisk the active sourdough starter with room-temperature water in a large bowl.
Stir until the starter is mostly dissolved and the liquid looks milky and uniform. This helps distribute the yeast and bacteria evenly.
Scrape down the sides of the bowl so everything is incorporated before adding flour.
Combine Flours and Autolyse
Add the bread flour and whole wheat flour to the bowl. Mix with your hand or a dough scraper until no dry spots remain.
The dough will look shaggy and rough. Cover the bowl and let it rest for 30 minutes.
This autolyse relaxes gluten and improves dough strength and flavor.
Add Salt and Olive Oil
Sprinkle the sea salt evenly over the dough surface. Drizzle in the olive oil.
Use your fingers to pinch, squeeze, and fold the dough repeatedly until both salt and oil are fully incorporated. Continue until the dough becomes smoother and slightly more cohesive, with no visible oily streaks remaining.
Fold in Cheese, Olives, and Herbs
Scatter the grated cheese, chopped olives, and chopped fresh herbs over the dough. Gently fold the dough over itself several times.
Turn the bowl as you fold to distribute add-ins evenly. Avoid tearing the dough too much.
Stop once the mix-ins are mostly uniform throughout the dough.
Perform Stretch-and-Fold Sets
Over two hours, perform 3–4 sets of stretch-and-folds every 30 minutes. To do this, grab one edge of the dough, stretch it upward, then fold it over to the opposite side.
Rotate the bowl and repeat around the dough. Cover the bowl between sets. This builds structure without heavy kneading.
Bulk Ferment Until Doubled
After the final fold, cover the bowl and leave the dough at room temperature. Let it bulk ferment until roughly doubled in size.
Look for a slightly domed surface and a jiggly, airy feel when you shake the bowl. Depending on room temperature, this usually takes 3–5 hours.
Pre-Shape the Dough
Lightly flour your work surface. Gently turn the dough out onto the counter using a dough scraper.
Handle it carefully to preserve gas. Use the scraper and your hands to tuck the edges under and form a loose round. Avoid over-tightening.
Let the dough sit to relax before final shaping.
Rest the Dough Briefly
Cover the pre-shaped round with a clean kitchen towel. Let it rest on the counter for 20–30 minutes.
This bench rest allows the gluten to relax, making final shaping easier. The dough will spread slightly. If it flattens too much, it may need a bit more strength during shaping.
Shape into a Tight Loaf
Shape the dough into a tight round or oval. Gently flatten it slightly, then fold the sides toward the center.
Roll or tuck the dough to create surface tension. Pull the loaf toward you on the counter to tighten the skin. Rotate and repeat until the surface feels smooth and taut.
Prepare and Fill the Banneton
Generously flour your banneton or towel-lined bowl, especially the sides. Make certain an even coating to prevent sticking with the moist dough.
Place the shaped loaf seam side up in the banneton. Adjust its position so it sits centered and supported. Lightly dust the exposed dough surface with flour.
Cold Proof in the Fridge
Cover the banneton with a towel or plastic wrap. Place it in the refrigerator for 8–12 hours.
This cold proof slows fermentation, deepens flavor, and helps the dough firm up for scoring. The dough should rise noticeably but not overproof. Bake directly from cold for best shape.
Preheat the Dutch Oven
About 45 minutes before baking, place your Dutch oven with its lid in the oven. Preheat to 250°C (480°F).
Heating the pot thoroughly ensures strong oven spring. Use oven mitts when handling. Make sure your rack is set in the middle to allow space above the loaf as it rises.
Transfer and Invert the Dough
Carefully remove the hot Dutch oven from the oven and set it on a heat-safe surface. Gently invert the chilled dough onto parchment paper or directly into the pot, seam side down.
Work quickly but carefully. Adjust the loaf so it sits centered. Avoid deflating the dough during transfer.
Score the Top for Expansion
Use a sharp bread lame or serrated knife to score the top of the dough. Make one deep slash or several decorative cuts, about 0.5–1 cm deep.
This directs the loaf’s expansion and prevents random bursting. Score confidently in a single motion to avoid dragging or tearing the dough.
Bake Covered for Steam
Cover the Dutch oven with its lid and place it back into the hot oven. Bake at 250°C (480°F) for 20 minutes.
The closed environment traps steam, helping the loaf rise and develop a glossy, blistered crust. Avoid opening the oven during this phase to maintain heat and steam.
Finish Baking Uncovered
Remove the lid carefully after 20 minutes. Lower the oven temperature to 220°C (430°F).
Continue baking the bread uncovered for another 20 minutes. Watch for a deep golden-brown crust and slightly darkened edges. The loaf should feel light for its size and sound hollow when tapped.
Cool Completely Before Slicing
Use oven mitts to lift the loaf from the Dutch oven. Transfer it to a cooling rack.
Let it cool for at least 1 hour before slicing. This resting time allows the crumb to set and moisture to distribute evenly. Cutting too early can result in a gummy texture and uneven slices.
Ingredient Swaps
- For a vegan version, replace the cheese with 30–40 g toasted nuts or seeds (such as walnuts, sunflower, or pumpkin seeds) and increase the olive oil by 5 g for extra richness.
- Swap olives for chopped sun-dried tomatoes, roasted peppers, or caramelized onions in the same weight if olives are unavailable or too pricey.
- If you don’t have bread flour, use all-purpose flour and reduce the water by 10–20 g to compensate for the lower protein content; you can also substitute the whole wheat flour with rye or spelt for a deeper, earthier flavor.
You Must Know
– Doneness – If you’re unsure the loaf is fully cooked, use an instant‑read thermometer in the center: 94–98°C / 201–208°F means done; below 93°C / 199°F, give it another 5–10 minutes.
This prevents a gummy center under a dark crust.
- Troubleshoot – When the dough spreads like a pancake after shaping, tighten the shape again and give it 15–20 extra minutes at room temp before the fridge; the extra tension and short bench time help it hold height and improve oven spring.
- Avoid – Avoid packing in too many add‑ins: keep total cheese + olives + herbs at ≤90–100 g for this formula; beyond ~20% of flour weight the loaf gets dense and may not rise well.
- Flavor Boost – For a deeper tang, extend the cold proof to up to 18 hours at 3–5°C / 37–41°F.
Watch that the dough doesn’t more than slightly rise in the fridge or you’ll risk overproofing and a flatter loaf.
– Scale – To make 2 loaves, multiply every ingredient by 2 but divide the dough into two ~500–520 g pieces before shaping; smaller loaves finish in about 5 minutes less uncovered time, so start checking color earlier.
Serving Tips
- Serve warm slices with olive oil, balsamic vinegar, and cracked black pepper for dipping.
- Pair with creamy tomato soup or hearty vegetable stew for a comforting meal.
- Use as a base for open-faced sandwiches topped with cured meats and fresh greens.
- Toast and spread with garlic butter for a flavorful side to pasta dishes.
- Cube and bake into herbed croutons for salads or savory bread pudding.
Storage & Make-Ahead
Flavored sourdough keeps in the fridge about 3–4 days, well wrapped to prevent drying and odor absorption.
For make-ahead, cool completely, slice, and freeze up to 2 months in an airtight bag.
Toast slices straight from frozen or thaw at room temperature inside the bag to retain moisture.
Reheating
Reheat sliced sourdough gently: in a 160°C (320°F) oven for 5–10 minutes.
Briefly reheat in a covered skillet over low heat.
Use the microwave only very briefly to avoid drying.
Sourdough in Mediterranean Culture
Across sunlit coasts and hilltop villages, sourdough has long been the quiet backbone of Mediterranean life, turning simple flour, water, and salt into loaves that carry stories as much as flavor.
When I tear into a crusty slice, I picture narrow streets, stone ovens, and tables pulled close at dusk.
- I taste briny olives and fragrant herbs and think of seaside markets, where bakers tuck yesterday’s wisdom into today’s dough, feeding starters like beloved plants.
- I smell roasted garlic, sharp cheese, and olive oil, and I’m in a village kitchen, doors open, bread cooling while neighbors wander in.
- I hear the crackle of the crust and feel how sourdough turns ordinary meals into lingering, communal rituals.
Final Thoughts
Give this flavored sourdough a try and see how the cheese, olives, and herbs transform a simple loaf into something special.
Once you’ve made it once, have fun tweaking the add-ins to create your own signature version.
Frequently Asked Questions
Can I Make This Flavored Sourdough Entirely Without a Dutch Oven?
Yes, you can. I’d preheat a baking stone or steel, slide your loaf onto it, and place a tray of hot water below. You’ll still get crackling crust, fragrant herbs, molten cheese.
How Do Altitude and Humidity Affect Sourdough Fermentation and Baking Times?
Altitude speeds fermentation and baking, while dry or humid air shifts dough feel and crust. I watch dough, not clocks—seeking a billowy, jiggly rise and a loaf that sounds hollow, smells nutty, shatters beneath my knife.
Is This Flavored Sourdough Suitable for People With Lactose Intolerance?
It’s only partly suitable, because the cheese still brings lactose. I’d tell you to swap in aged, lactose-free hard cheese or skip it entirely; you’ll still get crackling crust, herb perfume, and tender, olive-studded crumbs.
Can I Convert This Recipe to a Same-Day, No-Cold-Proof Schedule?
Yes, you can. I’d skip the fridge, let it fully proof at room temperature 2–4 hours, then bake. Watch for a pillowy, jiggly dough and a soft fingertip dent that slowly springs back.
How Do I Scale This Recipe for a Bakery or Large Batch Production?
You’ll scale by baker’s percentages: I’d convert each ingredient to a percentage of total flour, then multiply for your desired dough weight, mixing in larger troughs, extending bulk slightly, and staggering bakes for steady oven flow.
Flavored Sourdough Bread
Equipment
- 1 large mixing bowl
- 1 medium mixing bowl
- 1 digital kitchen scale
- 1 measuring spoon set
- 1 Dough scraper
- 1 clean kitchen towel
- 1 banneton basket or 1 medium bowl lined with a towel
- 1 Dutch oven with lid or 1 baking stone and 1 tray for steam
- 1 sharp bread lame or serrated knife
- 1 Cooling rack
Ingredients
- 100 gram active sourdough starter 100% hydration
- 350 gram water room temperature
- 450 gram bread flour
- 50 gram whole wheat flour
- 10 gram fine sea salt
- 40 gram grated hard cheese such as cheddar or parmesan
- 40 gram chopped olives pitted
- 20 gram chopped fresh herbs such as rosemary and thyme
- 20 gram olive oil plus extra for greasing
Instructions
- In a large mixing bowl whisk together sourdough starter and water until mostly dissolved.
- Add bread flour and whole wheat flour to the bowl and mix until no dry flour remains, then cover and rest for 30 minutes (autolyse).
- Sprinkle salt and olive oil over the dough and mix by pinching and folding until fully incorporated.
- Add grated cheese, chopped olives, and chopped herbs and gently fold them into the dough until evenly distributed.
- Over the next 2 hours perform 3–4 sets of stretch-and-folds every 30 minutes, keeping the dough covered between sets.
- After the final fold, cover the bowl and let the dough bulk ferment at room temperature until roughly doubled, slightly domed, and jiggly, 3–5 hours depending on temperature.
- Lightly flour your work surface, gently turn out the dough, and pre-shape it into a loose round using a dough scraper.
- Cover the dough with a towel and let it rest for 20–30 minutes to relax the gluten.
- Shape the dough into a tight round or oval loaf, creating surface tension by pulling it toward you against the counter.
- Generously flour the banneton or towel-lined bowl and place the dough seam side up inside.
- Cover the dough and refrigerate for 8–12 hours for a cold final proof and enhanced flavor.
- About 45 minutes before baking, place the Dutch oven with lid into the oven and preheat to 250°C (480°F).
- Carefully remove the hot Dutch oven, gently invert the proofed dough onto a piece of parchment or directly into the pot so it is seam side down.
- Score the top of the dough with a sharp lame or serrated knife to allow controlled expansion.
- Cover with the lid and bake for 20 minutes at 250°C (480°F).
- Remove the lid, reduce the oven temperature to 220°C (430°F), and bake for another 20 minutes or until deep golden brown.
- Carefully remove the loaf from the Dutch oven and place it on a cooling rack.
- Let the bread cool completely for at least 1 hour before slicing to set the crumb and preserve moisture.
Notes

Cynthia Weatherford is a seasoned chef and culinary enthusiast who serves as the Recipe creator of Somonday. With decades of experience in the kitchen and a passion for exploring diverse cuisines, Cynthia brings a blend of creativity and technique to every dish. Known for transforming simple ingredients into show-stopping meals, Cynthia believes that cooking is an art form anyone can master. Dedicated to inspiring home cooks, Cynthia shares approachable recipes, pro tips, and culinary wisdom to make every meal memorable.


