
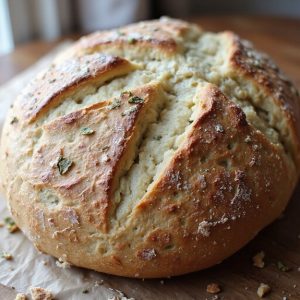
There’s something about tearing into a loaf of fluffy sourdough bread that feels like coming home.
Picture a crackling golden crust, still warm, giving way to a cloud-soft, airy crumb that smells faintly tangy and buttery.
This is cozy comfort food at its best—a versatile, everyday loaf that turns simple meals into something special, whether it’s paired with a hearty stew, piled with sandwich fillings, or toasted for a quick breakfast.
This recipe is perfect for curious beginners and busy home cooks who don’t have all day to fuss, but still want real sourdough flavor and texture.
On one hectic weeknight, a loaf of this on the table turned leftover soup into a comforting, linger-at-the-table dinner for my family.
It shines at Sunday suppers, casual gatherings, or whenever you need a low-effort, high-reward bake.
Ready to bring this loaf to life in your own kitchen?
Why You’ll Love It
- Delivers a soft, pillowy crumb with classic tangy sourdough flavor
- Builds strong structure for beautiful oven spring and open interior
- Uses simple pantry ingredients and your favorite active starter
- Fits easily into an overnight schedule for fresh bread by morning
- Bakes reliably in a Dutch oven—no specialty bakery gear needed
Ingredients
- 100 g sourdough starter, active and bubbly — use at peak rise for best lift
- 350 g water, room temperature — filtered if your tap water is heavily chlorinated
- 500 g bread flour, unbleached — higher protein helps a taller, fluffier loaf
- 10 g fine sea salt — don’t skip; it strengthens gluten and improves flavor
- 10 g olive oil (optional) — adds softness to the crumb and a tender bite
- 10 g rice flour — for dusting the basket so the dough won’t stick
Step-by-Step Method
Feed & Activate Starter
Feed your sourdough starter 4–8 hours before mixing. Keep it in a warm spot until it’s bubbly and doubled in size.
Check that it passes the float test by dropping a small spoonful into water; it should float. Use it at peak activity for best rise and a light, fluffy crumb.
Mix Starter & Water
Combine the active starter and room-temperature water in a medium bowl. Whisk until the starter mostly dissolves and the mixture looks milky.
Break up any large clumps. This step distributes the yeast and bacteria evenly, ensuring consistent fermentation and better structure in your final loaf.
Hydrate the Flour
Add bread flour to a large mixing bowl, then pour in the starter-water mixture. Mix with a dough whisk, spoon, or hands until no dry flour remains. Scrape the sides and bottom of the bowl. Create a shaggy, sticky dough.
Don’t knead yet; you only want everything evenly moistened.
Rest for Autolyse
Cover the bowl and let the dough rest for 30–60 minutes at room temperature. Allow the flour to fully hydrate.
Let gluten begin forming naturally during this pause. Keep the bowl away from drafts. Use this time to prepare your workspace and measure the salt and olive oil for the next step.
Add Salt & Optional Oil
Sprinkle fine sea salt and olive oil (if using) evenly over the dough’s surface. Pinch the dough repeatedly between your fingers, then fold it over itself to distribute the salt. Continue until no grains of salt remain.
Expect the dough to tighten slightly as the salt strengthens the gluten network.
Begin Bulk Fermentation
Cover the bowl and leave the dough at warm room temperature, around 24–26°C (75–78°F). Let fermentation begin undisturbed for the first 20–30 minutes. Maintain a stable temperature if possible. This stage builds flavor, gas, and strength.
Plan to stay nearby for periodic stretch-and-folds.
Perform Stretch & Folds
Every 30 minutes for the first 2 hours, perform a set of stretch-and-folds. Wet your hand, lift one side of the dough up, then fold it over the center. Rotate the bowl and repeat on all sides. Complete 3–4 rounds total. Develop gluten gently without heavy kneading or deflating the dough.
Finish Bulk Rise
After the last folds, let the dough rest undisturbed until risen by about 50–75%. Look for visible bubbles along the sides and a domed, airy surface. Expect this to take 3–6 hours total, depending on temperature.
Avoid over-proofing; the dough should feel light yet still resilient when gently poked.
Pre-Shape the Dough
Lightly flour your work surface. Gently turn the dough out, trying not to deflate it. Use a bench scraper to tuck and turn the dough into a loose round. Keep movements quick and confident. Add only minimal flour.
Aim to gather the dough into a cohesive shape without building tight tension yet.
Bench Rest the Round
Let the pre-shaped dough rest uncovered for 15–20 minutes. Allow the gluten to relax so final shaping is easier. Watch for the dough to slightly spread but still hold form. Use this time to prepare your proofing basket or bowl.
Keep the dough away from drafts to prevent skin formation.
Shape into Final Loaf
Shape the dough into a tight boule or batard. Gently stretch and fold the edges toward the center, building surface tension without tearing. Use your hands or bench scraper to drag and tighten the outer surface.
Aim for a smooth, taut top that will support good oven spring and defined scoring.
Prepare & Fill Basket
Dust a proofing basket or towel-lined medium bowl generously with rice flour. Coat all surfaces that will touch the dough. Place the shaped dough seam-side up into the basket. Adjust to center it.
Rice flour helps prevent sticking, preserving your loaf’s structure during proofing and unmolding.
Cold-Proof Overnight
Cover the basket with plastic wrap, a reusable cover, or a towel. Place it in the refrigerator for 8–12 hours. Let the dough proof slowly and develop deeper flavor. Chilling also firms the dough, making scoring easier.
Avoid moving or jostling the basket excessively during this cold proof.
Preheat the Oven & Dutch Oven
About 45–60 minutes before baking, place a Dutch oven with its lid inside your oven. Preheat to 250°C (480°F). Allow enough time for both the oven and Dutch oven to thoroughly heat. This high initial temperature and stored heat create powerful oven spring and a well-developed crust.
Unmold & Invert Dough
When ready to bake, carefully remove the chilled dough from the refrigerator. Place a piece of parchment over the basket and invert it so the dough releases onto the paper, seam-side down. Adjust gently if off-center. Handle the dough minimally to preserve gas and maintain its airy structure.
Score the Loaf
Use a sharp lame or serrated knife to score the top of the dough. Make at least one deep, confident central slash to direct expansion. Add smaller decorative cuts if desired. Hold the blade at a slight angle.
Aim for a smooth motion to avoid dragging and collapsing the surface.
Load into Hot Dutch Oven
Lift the dough using the parchment as a sling. Carefully lower it into the preheated Dutch oven. Work quickly but calmly to retain heat. Ensure the parchment sits flat and doesn’t fold onto the dough’s top. Replace the lid immediately to trap steam and encourage strong oven spring.
Steam-Bake Covered
Bake the covered loaf at 250°C (480°F) for 20 minutes. Let steam build inside the Dutch oven. Allow the dough to expand fully before the crust sets. Don’t open the oven during this time.
This covered phase is essential for a tall, fluffy interior and a thin, crisp initial crust.
Finish Baking Uncovered
After 20 minutes, reduce the oven temperature to 230°C (450°F) and remove the Dutch oven lid. Continue baking for 15–20 minutes. Watch for a deep golden-brown crust and even color. Check doneness by ensuring the internal temperature reaches about 96°C (205°F) or the bottom sounds hollow.
Cool & Slice
Transfer the baked loaf carefully to a wire cooling rack. Let it cool completely for at least 1–2 hours before slicing. Resist cutting while hot, as the crumb is still setting and may turn gummy. Once fully cooled, slice with a serrated knife to reveal the fluffy, well-structured interior.
Ingredient Swaps
- Use up to 50% whole wheat or spelt in place of bread flour; add 15–25 g extra water to keep the crumb soft.
- For a chewier, more budget-friendly loaf, substitute all-purpose flour for bread flour and reduce water by 10–20 g if the dough feels too slack.
- Replace olive oil with melted butter for richer flavor, or omit it entirely for a classic, chewier sourdough.
You Must Know
– Avoid – Avoid adding lots of flour to “fix” stickiness; instead, keep your hands and bench scraper lightly damp and dust just a thin veil of flour on the surface—excess flour can tighten hydration and reduce the open, fluffy crumb you’re aiming for.
Serving Tips
- Serve warm slices with salted butter and a drizzle of honey.
- Pair with soft cheeses, olives, and cured meats for a simple antipasto board.
- Toast and top with smashed avocado, lemon, and chili flakes.
- Use thick slices for grilled cheese with sharp cheddar and caramelized onions.
- Accompany hearty soups or stews, lightly toasted and rubbed with garlic.
Storage & Make-Ahead
Store sourdough, well wrapped, in the fridge for up to 5–6 days; slice as needed and rewarm to refresh the crust.
For make-ahead, slice the fully cooled loaf, freeze up to 2 months in an airtight bag, and toast slices straight from frozen for best texture.
Reheating
Reheat sourdough gently to preserve moisture.
Briefly microwave slices wrapped in a damp towel.
Warm in a 150°C/300°F oven.
Or toast in a covered skillet on low heat until soft and fragrant.
Sourdough in American Traditions
Although sourdough feels timeless, it’s deeply woven into distinctly American stories—from gold rush camps and frontier homesteads to modern city bakeries.
When I mix starter and flour, I picture miners in chilly Alaskan cabins cradling their “mother” crock like a treasure, or wagon-train cooks waking up to dawn’s blue light, knuckles dusted in flour, shaping dough before the trail heated up.
In my kitchen, your fluffy loaf continues that lineage. The tang in each slice whispers of San Francisco fog, prairie winds, and Brooklyn brownstones.
When you stretch that soft, elastic dough and feel it spring back, you’re touching the same living tradition: humble ingredients, long patience, and the shared comfort of warm bread passed from hand to hand.
Final Thoughts
Now that you know the steps, you’re ready to bake your own fluffy sourdough bread at home.
Give this recipe a try as written the first time, then have fun tweaking the fermentation time, shaping, or add-ins to make it truly your own.
Frequently Asked Questions
Can I Freeze the Dough Instead of Baking It Right After Cold Proofing?
Yes, you can, but I wouldn’t. Freezing tightens that tender, airy crumb you’re chasing. I’d bake after cold proof, then freeze the cooled loaf, wrapped snugly, so you still slice into a soft, steamy interior.
How Do I Adapt This Recipe for High-Altitude Baking Conditions?
You’ll shorten fermentation slightly, add 5–10% more water, and reduce oven temperature about 10–15°C. I watch the dough closely—smooth, domed, softly springing back—then bake before it overproofs in the thinner mountain air.
What Adjustments Are Needed When Using Whole Grain or Rye Starters?
Use a bit more water and shorten fermentation, since whole grain or rye starters work hotter and thirstier. I watch the dough: when it feels airy, satiny, and softly domed, I shape and chill.
How Can I Troubleshoot a Loaf That Consistently Bakes up Dense and Gummy?
I’d first lengthen fermentation so your dough feels airy, not heavy. Then I’d bake longer, to 205°F inside. Watch for a deep caramel crust, cool completely, and adjust hydration until the crumb feels tender, not pasty.
Is It Possible to Bake This Sourdough in a Loaf Pan Instead?
Yes, you can bake it in a loaf pan. I’d grease the tin, gently nestle the dough inside, let it crown over the rim, then bake uncovered for a tender, sliceable, sandwich-friendly crumb.
Fluffy Sourdough Bread
Equipment
- 1 digital kitchen scale
- 2 medium mixing bowls
- 1 large mixing bowl
- 1 Dough scraper
- 1 dough whisk or wooden spoon
- 1 bench scraper
- 1 Kitchen towel
- 1 plastic wrap or reusable cover
- 1 proofing basket or 1 medium bowl
- 1 Dutch oven with lid or 1 baking stone and 1 oven-safe pan for steam
- 1 sharp lame or serrated knife
- 1 wire cooling rack
- 1 measuring jug
Ingredients
- 100 gram sourdough starter active and bubbly
- 350 gram water room temperature
- 500 gram bread flour unbleached
- 10 gram fine sea salt
- 10 gram olive oil optional for a softer crumb
- 10 gram rice flour for dusting basket
Instructions
- Feed your sourdough starter 4–8 hours before mixing the dough so it is at peak activity and bubbly.
- In a medium bowl, whisk together 100 g active sourdough starter and 350 g room-temperature water until mostly dissolved.
- Add 500 g bread flour to a large mixing bowl, pour in the starter-water mixture, and mix with a dough whisk or hands until no dry flour remains.
- Cover the bowl and let the dough rest (autolyse) for 30–60 minutes at room temperature.
- Sprinkle 10 g fine sea salt and 10 g olive oil (if using) over the dough and pinch and fold the dough until the salt is fully incorporated.
- Begin bulk fermentation by covering the bowl and leaving it at warm room temperature (around 24–26°C / 75–78°F).
- During the first 2 hours of bulk fermentation, perform 3–4 sets of stretch-and-folds every 30 minutes, lifting each side of the dough and folding it over itself.
- After the last set of folds, let the dough rest undisturbed until it has risen 50–75%, looks airy, and shows bubbles along the sides, usually 3–6 hours total depending on temperature.
- Lightly flour your work surface, gently turn the dough out, and use a bench scraper to pre-shape it into a loose round.
- Let the pre-shaped dough rest uncovered for 15–20 minutes to relax the gluten.
- Shape the dough into a tight boule or batard by gently stretching and folding to create surface tension without tearing.
- Dust a proofing basket or medium bowl lined with a towel with rice flour, then place the dough seam-side up in the basket.
- Cover the dough and cold-proof it in the refrigerator for 8–12 hours for improved flavor and easier scoring.
- About 45–60 minutes before baking, place a Dutch oven with its lid in the oven and preheat to 250°C / 480°F.
- When ready to bake, carefully remove the hot Dutch oven from the oven and remove the lid.
- Invert the chilled dough carefully onto a piece of parchment paper so it is seam-side down.
- Score the top of the dough with a sharp lame or serrated knife with at least one deep central slash to allow expansion.
- Lift the dough using the parchment and place it carefully into the hot Dutch oven.
- Cover with the lid and bake at 250°C / 480°F for 20 minutes to generate steam and oven spring.
- After 20 minutes, reduce the oven temperature to 230°C / 450°F, remove the lid, and continue baking for 15–20 minutes until the crust is deep golden brown.
- Check that the loaf is done by ensuring the internal temperature reaches about 96°C / 205°F or the bottom sounds hollow when tapped.
- Transfer the bread to a wire cooling rack and let it cool completely for at least 1–2 hours before slicing to preserve its fluffy interior.
Notes

Cynthia Weatherford is a seasoned chef and culinary enthusiast who serves as the Recipe creator of Somonday. With decades of experience in the kitchen and a passion for exploring diverse cuisines, Cynthia brings a blend of creativity and technique to every dish. Known for transforming simple ingredients into show-stopping meals, Cynthia believes that cooking is an art form anyone can master. Dedicated to inspiring home cooks, Cynthia shares approachable recipes, pro tips, and culinary wisdom to make every meal memorable.


