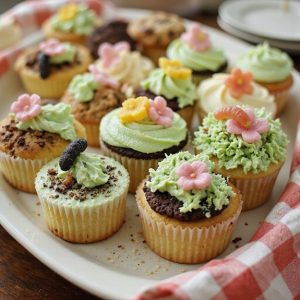
Picture a tray of tiny flowerbeds, each one frosted with swirls of “grass,” dotted with candy blossoms, and smelling faintly of vanilla and warm butter.
These garden cupcakes are a cozy, whimsical dessert—simple to bake, fun to decorate, and ready in under an hour from mixing bowl to finished blooms. They’re perfect for families, beginners, and anyone who loves a sweet, creative project that doubles as dessert.
I still remember a rainy Sunday when plans for the park fell through and kids were disappointed.
We turned the afternoon around by baking these cupcakes together—little hands piping “petals,” choosing colors, and proudly arranging our “garden” on a platter. By the time the oven cooled, so had the grumbles.
They shine at birthday parties, spring gatherings, baby showers, or last‑minute “I promised I’d bring something” moments. Ready to bring this edible garden to life?
Why You’ll Love It
- Delivers tender, bakery-style vanilla cupcakes with rich, buttery crumb
- Creates a stunning garden design that’s fun to decorate and serve
- Uses simple, familiar ingredients you likely already have on hand
- Makes a kid-friendly project perfect for parties, holidays, or bake sales
- Adapts easily with different colors, candies, and themed decorations
Ingredients
- 1 1/2 cups all-purpose flour, sifted — measure after sifting for accuracy
- 1 1/2 teaspoons baking powder — make sure it’s fresh for proper rise
- 1/4 teaspoon fine salt — fine grain disperses more evenly
- 1/2 cup unsalted butter, softened — should indent easily when pressed
- 3/4 cup granulated sugar — standard white sugar works best
- 2 large eggs, room temperature — leave out 30 minutes before using
- 2 teaspoons vanilla extract — pure vanilla gives best flavor
- 1/2 cup whole milk, room temperature — adds tenderness and moisture
- 1/4 cup sour cream, room temperature — helps create a soft crumb
- 1 cup unsalted butter, softened, for frosting — use high-quality for smooth texture
- 3 cups powdered sugar, sifted, for frosting — sifting prevents lumpy frosting
- 2 tablespoons heavy cream, for frosting — adjust for desired frosting consistency
- 1 teaspoon vanilla extract, for frosting — enhances overall frosting flavor
- 1 pinch fine salt, for frosting — balances sweetness
- 3 to 4 drops green gel food coloring — gel won’t thin the frosting
- 2 to 3 drops pink gel food coloring — add gradually for precise shade
- 2 to 3 drops yellow gel food coloring — brightens flower details
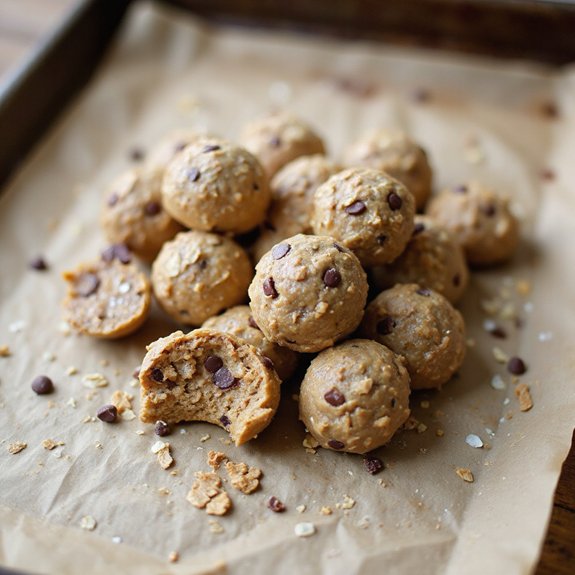
- 1/4 cup chocolate cookie crumbs, for soil decoration — crush to fine crumbs
- 12 small gummy worms, optional, for decoration — press gently into “soil”
- 1/4 cup assorted sprinkles, flower-shaped, for decoration — choose pastel colors for a garden look
Step-by-Step Method
Preheat the Oven & Prepare the Tin
Preheat the oven to 350°F (175°C). Line a 12-cup muffin tin with paper cupcake liners and set aside.
Make sure the oven rack is centered for even baking. Gather all ingredients and equipment before you start mixing so the process moves smoothly and the batter doesn’t sit too long.
Combine the Dry Ingredients
Whisk the sifted flour, baking powder, and fine salt together in a medium bowl.
Break up any remaining lumps with the whisk. Keep the mixture light and airy by not pressing it down. Set the bowl aside near your mixer so you can easily add it to the wet ingredients later.
Cream the Butter & Sugar
Beat the softened butter and granulated sugar in a large mixing bowl with a mixer on medium speed.
Continue for 2 to 3 minutes until the mixture looks pale, light, and fluffy. Scrape down the sides of the bowl once or twice to guarantee everything is evenly combined and creamy before adding the eggs.
Add Eggs & Vanilla
Add the eggs one at a time to the butter mixture, beating well after each addition.
Make sure the first egg is fully incorporated before adding the second. Mix in the vanilla extract until just combined. Scrape the bowl again to catch any streaks of egg or butter clinging to the sides.
Mix the Milk & Sour Cream
Stir the whole milk and sour cream together in a small bowl until smooth and uniform.
Ensure both ingredients are at room temperature to prevent curdling. This mixture adds moisture and tenderness to the cupcakes. Keep it nearby so you can easily alternate it with the dry ingredients in the next step.
Alternate Dry & Wet Additions
Add half of the dry ingredients to the butter mixture and mix on low just until combined.
Pour in half of the milk-sour cream mixture and mix again briefly. Repeat with the remaining dry ingredients and then the remaining milk mixture. Avoid overmixing once the flour is added to keep the cupcakes tender.
Fill the Cupcake Liners
Divide the batter evenly among the 12 prepared liners.
Fill each liner about two-thirds full to allow room for the cupcakes to rise. Use a spoon or scoop for more even portions. Smooth the tops lightly with the back of the spoon if needed, but don’t press down the batter.
Bake the Cupcakes
Place the muffin tin in the preheated oven on the center rack.
Bake for 16 to 18 minutes. Check for doneness by inserting a toothpick into the center of a cupcake; it should come out clean or with a few moist crumbs. Avoid opening the oven too often to maintain even heat.
Cool in the Pan, Then on Rack
Transfer the muffin tin to a wire cooling rack.
Let the cupcakes cool in the pan for about 10 minutes to set their structure. Carefully remove each cupcake from the tin and place directly on the rack. Allow them to cool completely for at least 35 minutes before adding any frosting or decorations.
Beat the Butter for Frosting
Place the softened butter for the frosting into a large mixing bowl.
Beat on medium speed for about 2 minutes until the butter becomes creamy, pale, and slightly fluffy. Scrape down the sides and bottom of the bowl to ensure no firm pieces remain. Properly creamed butter creates a smooth frosting texture.
Add the Powdered Sugar Gradually
Add the sifted powdered sugar to the butter in small portions, about 1/2 cup at a time.
Start the mixer on low to avoid a sugar cloud, then increase to medium once it begins to combine. Continue until all the sugar is incorporated and the mixture looks thick and smooth, scraping the bowl as needed.
Incorporate Cream, Vanilla & Salt
Pour in the heavy cream, vanilla extract, and a pinch of fine salt.
Beat the mixture on medium-high speed for 2 to 3 minutes. Look for a light, fluffy, spreadable consistency. If the frosting seems too stiff, add a few extra drops of cream; if too soft, chill briefly to firm it up.
Divide & Tint the Frosting
Divide the finished frosting evenly into three medium bowls.
Tint one bowl green with gel food coloring, one pink, and one yellow. Start with 2 to 3 drops and add more gradually until the colors look vibrant. Stir each bowl thoroughly so the color is uniform with no streaks remaining.
Prepare the Piping Bags
Fit three piping bags with the chosen tips: a grass tip for greenery, a leaf tip for leaves, and a small round tip for flowers and dots.
Fill each bag with a different colored frosting. Twist the tops of the bags to keep frosting from squeezing out the back and to maintain even pressure while piping.
Base-Coat the Cupcakes
Spread a thin layer of any remaining frosting over the tops of the cooled cupcakes using a small knife or spatula.
This acts as a base so decorations stick securely. Smooth the surface lightly; it doesn’t need to be perfect. Confirm cupcakes are completely cool so the frosting doesn’t melt or slide.
Add “Soil” & Grass
Sprinkle chocolate cookie crumbs over the centers of some cupcakes to create soil patches.
Press gently so they adhere. Pipe green grass over others using the grass tip, covering the surface fully with short, quick squeezes. Vary the height and angle of the grass to make the garden look more natural.
Pipe Flowers & Buds
Use the pink and yellow frostings in the round and leaf tips to pipe small flowers, buds, and leaves.
Create simple dots for flower centers, then add petals around them. Add small leaves near flowers for extra detail. Work slowly to control the pressure and keep shapes neat and distinct.
Finish with Worms & Sprinkles
Decorate the cupcakes with gummy worms, tucking them partly into the “soil” so they look like they’re emerging.
Scatter flower-shaped sprinkles around the grass and flowers for extra color and texture. Arrange the finished garden cupcakes on a platter and serve at room temperature for the best flavor.
Ingredient Swaps
- Use plant-based butter, non-dairy milk, and dairy-free sour cream to make the cupcakes and frosting fully dairy-free; choose gelatin-free gummy worms for a vegetarian option.
- Swap up to half the all-purpose flour with whole-wheat pastry flour for a slightly heartier cupcake, or use a gluten-free 1:1 baking blend if needed.
- Plain Greek yogurt can replace sour cream, and in a pinch, milk plus a bit of extra butter can stand in for heavy cream in the frosting.
You Must Know
- Doneness – If you’re unsure the cupcakes are ready, gently tap the top: it should spring back and a toothpick in the center should come out with a few moist crumbs, not wet batter, at around 16–18 minutes. This keeps them soft instead of dry.
- Troubleshoot – If cupcakes sink in the middle, you likely used too much leavening or opened the oven in the first 10–12 minutes. Next time, level off the baking powder at 1 ½ teaspoons and keep the door closed until the tops look set and matte.
- Avoid – To prevent dense, gummy cupcakes, stop the mixer as soon as you no longer see dry flour; overworking the batter for even 30–60 seconds extra can develop gluten and toughen the crumb.
- Flavor Boost – For a more “garden‑like” flavor, stir 1–2 teaspoons finely grated lemon zest or ½ teaspoon almond extract into the batter with the vanilla, and let it sit 5–10 minutes so the aromatics infuse.
- Make-Ahead – For party timing, cool cupcakes fully and store in an airtight container at room temperature up to 24 hours; frosting can be chilled up to 3 days, then brought back to cool room temp (about 68–72°F / 20–22°C) and re‑whipped 1–2 minutes until fluffy before coloring and piping.
Serving Tips
- Serve on a wooden board “garden” scattered with cookie-crumb soil and gummy worms.
- Arrange cupcakes in a circle around a small potted plant centerpiece.
- Use pastel cupcake wrappers and floral napkins for a spring or garden-party theme.
- Display on a tiered stand, alternating “grass” and “soil” designs for contrast.
- Add edible flower sprinkles just before serving to keep colors bright and crisp.
Storage & Make-Ahead
Garden cupcakes keep covered at room temperature for 1 day or refrigerated up to 3–4 days.
Bring to room temperature before serving.
You can bake cupcakes a day ahead and frost later.
Unfrosted cupcakes freeze well, tightly wrapped, for up to 2 months.
Thaw in the fridge, then decorate.
Reheating
Reheat cupcakes gently: in the microwave 5–10 seconds, just until slightly warm.
Or use a 300°F oven for 5–8 minutes.
Avoid stovetop; it dries and unevenly heats baked goods.
Cupcake Gardens in Media
Everywhere I look lately, cupcake gardens seem to bloom across screens and pages—tiny frosted landscapes turning simple desserts into storybook scenes.
I’ll spot them in baking shows first: slow pans over trays of “soil” crumbs and buttercream petals, judges leaning in as if they smell real blossoms instead of vanilla and cocoa.
When I read magazines or scroll recipes online, I notice how stylists stage them like miniature yards—crumb paths, sprinkle stones, shy gummy worms half-buried in chocolate earth.
Children’s cookbooks turn them into edible quests, each cupcake a little plot to explore.
Even commercials borrow the look, promising that one bite transports you to a backyard in late spring, where the air tastes like sugar and sunshine.
Final Thoughts
Now that you know how to make these cute Garden Cupcakes, it’s your turn to bring your own “garden” to life—try them as written or mix up the colors, candies, and decorations to fit any season or celebration.
Have fun experimenting and making them your own!
Frequently Asked Questions
Can I Make These Garden Cupcakes Gluten-Free or Vegan Without Sacrificing Texture?
You can, and I’d guide you to swap in a 1:1 gluten‑free flour, plant butter, plant milk, and flax “eggs.” The cupcakes still rise softly, smelling sweet and warm, with tender, moist crumbs.
How Can Kids Safely Help Decorate the Garden-Themed Cupcakes?
Kids can safely help by sprinkling “soil,” placing gummy worms, and adding flower sprinkles while I handle knives and piping bags. I clear cluttered counters, tie back hair, wash little hands, and savor their sugar-dusted giggles.
What Drink Pairings Work Best With Sweet, Buttercream-Heavy Garden Cupcakes?
I love pouring you cold milk, lightly sweetened iced tea with lemon, or a floral chamomile tea. Their gentle chill or warmth cuts the buttercream’s richness, so each bite feels soft, bright, and beautifully balanced.
How Do I Price and Package Garden Cupcakes for Selling at Events?
I’d price each cupcake by totaling ingredient, labor, and packaging costs, then adding 30–50% profit. I’d nestle them in kraft boxes, tissue-lined, each swirl protected by snug inserts and softly crinkling parchment.
Can I Scale This Recipe for a Large Party or Wedding Dessert Table?
You can absolutely scale this recipe; I’d simply multiply every ingredient by your needed servings, then test a half‑batch first. Picture trays of fragrant, pastel‑topped treats, soft crumbs and creamy swirls glowing under twinkling lights.
Garden Cupcakes
Equipment
- 1 12-cup muffin tin
- 12 paper cupcake liners
- 2 medium mixing bowls
- 1 large mixing bowl
- 1 handheld mixer or stand mixer
- 1 Whisk
- 1 Rubber spatula
- 1 measuring cup set
- 1 measuring spoon set
- 1 wire cooling rack
- 3 piping bags
- 3 small piping tips (grass tip, leaf tip, small round tip)
- 1 Oven
Ingredients
- 1 1/2 cup all-purpose flour sifted
- 1 1/2 teaspoon baking powder
- 1/4 teaspoon fine salt
- 1/2 cup unsalted butter softened
- 3/4 cup granulated sugar
- 2 large eggs room temperature
- 2 teaspoon vanilla extract
- 1/2 cup whole milk room temperature
- 1/4 cup sour cream room temperature
- 1 cup unsalted butter softened; for frosting
- 3 cup powdered sugar sifted; for frosting
- 2 tablespoon heavy cream for frosting
- 1 teaspoon vanilla extract for frosting
- 1 pinch fine salt for frosting
- 3 to 4 drops green gel food coloring
- 2 to 3 drops pink gel food coloring
- 2 to 3 drops yellow gel food coloring
- 1/4 cup chocolate cookie crumbs for soil decoration
- 12 small gummy worms optional; for decoration
- 1/4 cup assorted sprinkles flower-shaped; for decoration
Instructions
- Preheat the oven to 350°F (175°C) and line the muffin tin with paper cupcake liners.
- In a medium mixing bowl whisk together the flour, baking powder, and salt until well combined.
- In a large mixing bowl beat the softened butter and granulated sugar with a mixer on medium speed until light and fluffy, about 2 to 3 minutes.
- Add the eggs to the butter mixture one at a time, beating well after each addition, then mix in the vanilla extract.
- In a separate small bowl stir together the milk and sour cream until smooth.
- Add the dry ingredients to the butter mixture in two additions, alternating with the milk mixture, beginning and ending with the dry ingredients, mixing on low until just combined.
- Divide the batter evenly among the 12 cupcake liners, filling each about two-thirds full.
- Bake the cupcakes for 16 to 18 minutes, or until a toothpick inserted in the center comes out clean.
- Transfer the muffin tin to a wire cooling rack and let the cupcakes cool in the pan for 10 minutes.
- Remove the cupcakes from the pan and allow them to cool completely on the wire rack for at least 35 minutes.
- To make the frosting, beat the softened butter in a large mixing bowl until creamy and pale, about 2 minutes.
- Gradually add the powdered sugar, 1/2 cup at a time, beating on low at first and then increasing to medium until fully incorporated.
- Add the heavy cream, vanilla extract, and pinch of salt, then beat on medium-high speed for 2 to 3 minutes until light and fluffy.
- Divide the frosting evenly into three medium bowls.
- Tint one bowl of frosting with green gel food coloring, one with pink, and one with yellow, adjusting the color intensity as desired and mixing until uniform.
- Fit three piping bags with the grass tip, leaf tip, and small round tip respectively, then fill each bag with a different color of frosting.
- Using a small knife, spread a thin layer of any leftover frosting on top of each cooled cupcake to help decorations stick.
- Sprinkle the centers of some cupcakes with chocolate cookie crumbs to resemble soil.
- Pipe green grass over the tops of some cupcakes using the grass tip, covering the surface fully.
- Pipe small flowers and buds using the pink and yellow frostings with the round and leaf tips to create a garden look.
- Decorate with gummy worms and flower-shaped sprinkles as desired to complete the garden theme.
Notes

Cynthia Weatherford is a seasoned chef and culinary enthusiast who serves as the Recipe creator of Somonday. With decades of experience in the kitchen and a passion for exploring diverse cuisines, Cynthia brings a blend of creativity and technique to every dish. Known for transforming simple ingredients into show-stopping meals, Cynthia believes that cooking is an art form anyone can master. Dedicated to inspiring home cooks, Cynthia shares approachable recipes, pro tips, and culinary wisdom to make every meal memorable.