There’s something about tearing into a warm slice of garlic butter bread that instantly makes any meal feel special.
Picture golden, blistered edges, a soft, pillowy center, and butter sizzling into every nook as it melts, carrying the rich aroma of garlic and herbs through your kitchen.
This is the ultimate quick side—ready in about 20 minutes—and it turns simple soups, pastas, salads, or weeknight roasted chicken into a cozy, restaurant-worthy spread.
It’s perfect for busy weeknights, beginners who want a no-fail recipe, and comfort seekers who crave something warm and familiar.
I still remember a rushed Tuesday when dinner was just canned tomato soup; this garlic butter bread saved the meal, made the table feel abundant, and everyone lingered a little longer to talk.
It shines at Sunday suppers, last-minute gatherings, or whenever you need an easy crowd-pleaser. Ready to bring this dish to life?
Why You’ll Love It
- Delivers bold, garlicky, buttery flavor in every soft, tender bite
- Uses simple pantry staples you probably already have on hand
- Offers a lighter, fresher alternative to store-bought garlic bread
- Pairs effortlessly with pasta, soups, salads, and cozy weeknight dinners
- Freezes beautifully for quick, impressive bread anytime you’d like
Ingredients
- 240 ml warm water — about 40–43°C so it activates yeast without killing it
- 7 g active dry yeast — check date so it foams properly
- 10 g granulated sugar — helps feed the yeast for a good rise
- 390 g all-purpose flour — standard protein content gives tender crumb
- 7 g fine salt — seasons dough evenly throughout
- 30 ml olive oil — adds moisture and flavor to the bread
- 113 g unsalted butter, softened — room temperature so it spreads easily
- 6 cloves garlic, minced — use fresh cloves for best aroma
- 4 g fine salt (for garlic butter) — balances rich butter and garlic
- 2 g freshly ground black pepper — adds mild heat and depth
- 10 g fresh parsley, finely chopped — gives color and freshness
- 20 g grated Parmesan cheese (optional) — adds a savory, cheesy boost
Step-by-Step Method
Activate the Yeast
Warm the water to about 40–43°C. Pour it into a large mixing bowl. Sprinkle in the active dry yeast and sugar. Whisk briefly to combine. Let the mixture sit undisturbed for 5–10 minutes. Watch for a foamy, bubbly surface.
This shows the yeast is active and ready to raise your dough.
Mix the Dough
Add the flour, salt, and olive oil to the foamy yeast mixture. Stir with a wooden spoon until a shaggy, rough dough forms. Scrape the sides and bottom of the bowl as you mix.
Assure no dry flour pockets remain. The dough should look messy but evenly moistened and starting to come together.
Knead Until Smooth
Turn the dough onto a lightly floured surface. Knead firmly for 8–10 minutes. Push the dough away with your palm, fold it back, and rotate slightly.
Continue until the dough becomes smooth, elastic, and slightly tacky but not sticky. Add only minimal flour as needed to prevent sticking while kneading.
Let the Dough Rise
Lightly oil a clean mixing bowl. Place the kneaded dough inside and turn it once to coat with oil. Cover the bowl with a clean kitchen towel. Set it in a warm, draft-free spot.
Allow the dough to rise for about 1 hour. Check that it has doubled in size and feels airy when gently pressed.
Prepare the Garlic Butter
Combine softened butter and minced garlic in a small bowl. Add the salt, black pepper, parsley, and Parmesan if using. Mix thoroughly with a spoon until smooth and evenly speckled with herbs and garlic.
Assure the butter is soft enough to spread easily. Set aside at room temperature while the dough finishes rising.
Shape the Dough Rectangle
Punch down the risen dough to release excess air. Transfer it to a lightly floured surface. Use your hands or a rolling pin to shape it into a rectangle about 1–1.5 cm thick.
Aim for even thickness so it bakes uniformly. Keep the edges neat, as this will help when rolling the dough later.
Spread the Garlic Butter
Use a spatula or knife to spread an even layer of garlic butter over the surface of the dough. Leave a small border around the edges to prevent excess butter from leaking out.
Work gently to avoid tearing the dough. Assure each area is coated for consistent flavor in every slice of bread.
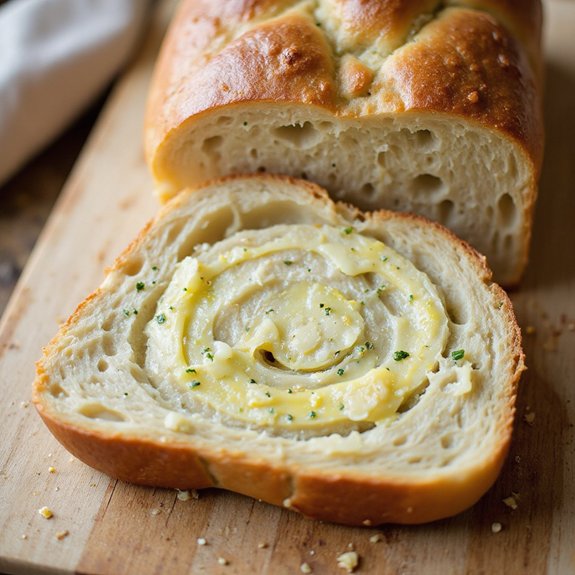
Roll and Seal the Loaf
Start at the long side of the rectangle and roll the dough up tightly into a log. Keep the roll firm but not overly tight. Pinch the seam along the length of the log to seal it.
Tuck the ends slightly under if needed. This helps the loaf maintain its shape during the final rise and baking.
Proof the Shaped Loaf
Lightly grease your loaf pan or baking sheet. Place the dough log seam side down into the prepared pan or onto the sheet. Cover it again with the kitchen towel.
Let it rest and rise for 20–30 minutes. Meanwhile, preheat the oven to 190°C. The loaf should puff slightly and feel lighter to the touch.
Bake and Serve Warm
Optionally, brush the top of the loaf with any remaining garlic butter. Place the pan in the preheated oven. Bake for 18–22 minutes until golden brown and the loaf sounds hollow when tapped on the bottom.
Remove and cool on a cutting board or rack for at least 10 minutes. Slice with a sharp knife and serve warm.
Ingredient Swaps
- Use bread flour instead of all-purpose for a chewier texture, or whole-wheat flour for up to 50% of the total for a heartier loaf (add a splash more water if the dough feels dry).
- Swap butter with vegan butter and Parmesan with nutritional yeast or a dairy-free hard cheese for a fully vegan version.
- If fresh parsley isn’t available, use 1–2 tsp dried Italian seasoning or dried parsley; if you’re out of olive oil, any neutral vegetable oil works.
- Fresh garlic can be replaced with 1–1½ tsp garlic powder in the butter mixture; adjust salt slightly since some powders are salted.
You Must Know
– Make-Ahead – To save time on the day of serving, refrigerate the shaped, filled loaf before its final rise for up to 12 hours, then bring to room temperature until it visibly puffs (usually 30–45 minutes) so it bakes up light instead of compact.
Serving Tips
- Serve warm slices in a basket lined with a cloth to keep them soft.
- Pair with tomato-based pastas, creamy soups, or hearty stews for dipping.
- Cut into small cubes and serve as garlic croutons with salad.
- Plate alongside antipasto: olives, cured meats, cheeses, and marinated vegetables.
- Slice, toast lightly, and top with bruschetta or pesto for appetizers.
Storage & Make-Ahead
Garlic butter bread keeps in the fridge, well wrapped or in an airtight container, for up to 3–4 days.
For make-ahead, you can refrigerate the shaped, unbaked loaf up to 12 hours, then bake.
It also freezes well (baked or unbaked) for up to 2 months; wrap tightly.
Reheating
Reheat slices gently: wrap in foil and warm in a 150°C oven.
For quick reheating, use a low‑power microwave with a damp towel.
On stovetop, cover and toast over low heat.
Garlic Bread in Cinema
Once you’ve mastered baking and reheating your own loaf, it’s hard not to notice how often movies use garlic bread as shorthand for comfort, chaos, or pure indulgence.
I watch a scene with a basket of glistening slices on a crowded table, and I can almost hear the crackle as someone tears in, butter pooling onto the plate like melted gold.
Directors know that one close-up of a buttery crust signals safety, appetite, and desire without a single line of dialogue.
- Notice how family dramas use garlic bread to anchor tense conversations at the dinner table.
- Watch romantic comedies turn a shared slice into a soft, buttery icebreaker.
- Pay attention when messy crumbs echo emotional unraveling on screen.
Final Thoughts
Give this garlic butter bread a try and enjoy how simple ingredients turn into something irresistibly delicious.
Feel free to tweak the garlic, herbs, or cheese to make it perfectly your own.
Frequently Asked Questions
Can I Make This Garlic Butter Bread Completely Vegan?
Yes, you can. I’d swap in plant milk, olive or vegan butter, and vegan Parmesan or nutritional yeast. As it bakes, you’ll smell garlicky, herby warmth bloom through your kitchen like cozy candlelight.
How Do I Scale This Recipe for a Crowd?
You can scale it easily: just multiply every ingredient by the number of batches you need. I’d bake multiple loaves instead of one giant one, so each emerges golden, fragrant, and perfectly tender for your guests.
Is This Recipe Suitable for People With Lactose Intolerance?
It isn’t fully suitable as written, since the buttery richness comes from dairy. You could swap in lactose‑free butter or olive oil; you’ll still tear into warm, fragrant slices without upsetting sensitive stomachs.
Can I Use a Bread Machine for the Dough?
Yes, you can. I’d load the wet ingredients, then dry, into the machine and run a dough cycle. Let it knead and rise, then you’ll shape, butter, roll, and bake by hand.
How Can Kids Safely Help With This Recipe?
Kids can safely mix, whisk, sprinkle parsley, and gently spread butter while you handle knives and the hot oven. I’d sit them beside me, letting tiny hands press dough and breathe in that warm, garlicky cloud.

Garlic Butter Bread
Equipment
- 1 large mixing bowl
- 1 Small mixing bowl
- 1 Wooden spoon
- 1 Whisk
- 1 Measuring cups set
- 1 Measuring spoons set
- 1 loaf pan or baking sheet
- 1 pastry brush
- 1 clean kitchen towel
- 1 sharp knife or bread knife
- 1 Cutting board
Ingredients
- 240 milliliter warm water about 40–43°C
- 7 gram active dry yeast
- 10 gram granulated sugar
- 390 gram all-purpose flour
- 7 gram fine salt
- 30 milliliter olive oil
- 113 gram unsalted butter softened
- 6 clove garlic minced
- 4 gram fine salt for garlic butter
- 2 gram black pepper freshly ground
- 10 gram fresh parsley finely chopped
- 20 gram grated Parmesan cheese optional
Instructions
- Combine warm water, yeast, and sugar in the large mixing bowl, whisk briefly, and let sit for 5–10 minutes until foamy.
- Add flour, salt, and olive oil to the yeast mixture and stir with a wooden spoon until a shaggy dough forms.
- Knead the dough on a lightly floured surface for 8–10 minutes until smooth and elastic.
- Place the dough in a lightly oiled bowl, cover with a clean kitchen towel, and let rise in a warm place for about 1 hour or until doubled in size.
- While the dough rises, mix softened butter, minced garlic, salt, pepper, parsley, and Parmesan (if using) in the small bowl until well combined.
- Lightly grease the loaf pan or baking sheet with a bit of butter or oil.
- Punch down the risen dough, transfer it to a floured surface, and shape it into a rectangle about 1–1.5 cm thick.
- Spread an even layer of garlic butter over the surface of the dough, leaving a small border around the edges.
- Roll the dough up tightly from the long side into a log and pinch the seam to seal.
- Place the dough log seam side down in the prepared loaf pan or on the baking sheet and cover with the towel.
- Let the shaped loaf rest for 20–30 minutes while you preheat the oven to 190°C.
- Optionally, brush the top of the loaf with any remaining garlic butter.
- Bake the bread for 18–22 minutes or until golden brown and it sounds hollow when tapped on the bottom.
- Remove the bread from the oven and let it cool on a cutting board or rack for at least 10 minutes before slicing.
- Slice with a sharp knife and serve warm.
Notes

Cynthia Weatherford is a seasoned chef and culinary enthusiast who serves as the Recipe creator of Somonday. With decades of experience in the kitchen and a passion for exploring diverse cuisines, Cynthia brings a blend of creativity and technique to every dish. Known for transforming simple ingredients into show-stopping meals, Cynthia believes that cooking is an art form anyone can master. Dedicated to inspiring home cooks, Cynthia shares approachable recipes, pro tips, and culinary wisdom to make every meal memorable.


