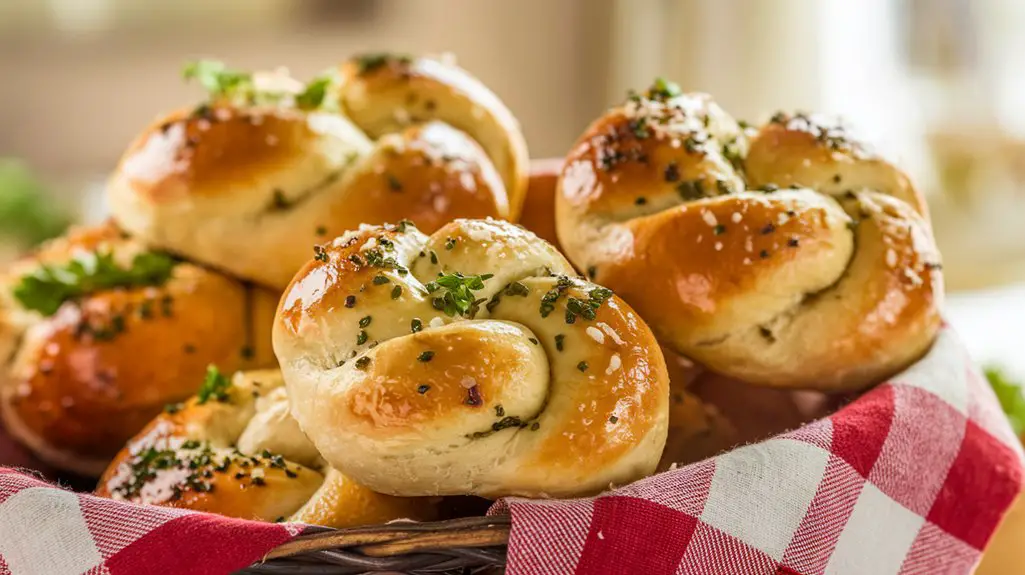
Imagine the aroma of freshly baked garlic knots wafting through your kitchen, enticing everyone with their soft, golden allure.
You’ll find crafting these Italian delicacies as satisfying as savoring them, with simple ingredients transforming into something extraordinary.
Each knot carries the rich essence of garlic and parsley, making them irresistible.
Curious about how to serve them perfectly or store any leftovers?
Let’s explore these culinary delights further and discover their secrets together.
Kitchen Tools Required
- 1 Baking sheet
- 1 Mixing bowl
- 1 Whisk
- 1 Pastry brush
- 1 Measuring cup set
- 1 Measuring spoon set
- 1 Rolling pin
Ingredients
- 1 cup warm water
- 2 1/4 teaspoons active dry yeast
- 2 tablespoons sugar
- 3 cups all-purpose flour
- 1 teaspoon salt
- 1/4 cup olive oil
- 4 tablespoons unsalted butter, melted
- 3 cloves garlic, minced
- 2 tablespoons fresh parsley, chopped
- 1/4 cup grated Parmesan cheese
Cook & Prep Time
To efficiently manage your time while making garlic knots, you can follow the timeline below:
- Preparation (20 minutes):
- 0:00 – 0:05: Gather all necessary equipment and ingredients.
- 0:05 – 0:10: In a mixing bowl, combine warm water, yeast, and sugar. Let it sit until foamy.
- 0:10 – 0:15: Add flour, salt, and olive oil to the yeast mixture and mix until a dough forms.
- 0:15 – 0:20: Knead the dough on a floured surface until smooth and elastic.
- Resting Time (1 hour):
- 0:20 – 1:20: Place the dough in a greased bowl, cover, and let it rise in a warm place for 1 hour.
- Preheating and Shaping (15 minutes):
- 1:20 – 1:25: Preheat the oven to 400°F (200°C).
- 1:25 – 1:30: Punch down the dough and divide it into 8 equal pieces.
- 1:30 – 1:35: Roll each piece into a rope and tie it into a knot.
- 1:35 – 1:40: Place the knots on a baking sheet lined with parchment paper.
- Baking and Preparing Garlic Butter (15 minutes):
- 1:40 – 1:55: Bake the knots in the preheated oven for 12-15 minutes until golden brown.
- 1:40 – 1:45: While the knots are baking, mix melted butter, minced garlic, and parsley in a small bowl.
- Finishing Touches (5 minutes):
- 1:55 – 2:00: Brush the baked knots with the garlic butter mixture and sprinkle with Parmesan cheese.
Following this timeline, you should have your garlic knots ready to serve in approximately 2 hours.
Remember to adjust any steps if necessary to fit your pace and guarantee all steps are completed efficiently.
Recipe
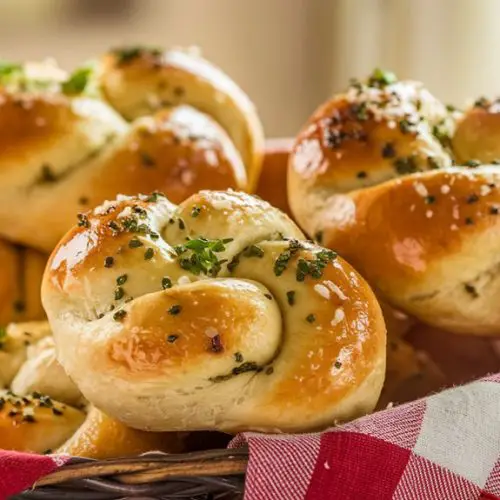
Garlic knots are a delicious and popular Italian appetizer, perfect for serving at gatherings or enjoying as a snack.
These soft and fluffy knots are infused with the rich flavors of garlic and parsley, making them a crowd favorite.
They’re easy to make using basic ingredients like flour, yeast, and olive oil, and are finished off with a delectable garlic butter topping sprinkled with Parmesan cheese.
The knots are baked to a golden brown, filling your kitchen with an irresistible aroma.
To begin, you’ll need to prepare a simple yeast dough that requires time to rise.
Once the dough has doubled in size, it’s divided into smaller portions, which are then shaped into knots.
The knots are baked until they’re perfectly golden, and while still warm, they’re brushed generously with a garlic butter mixture.
The final touch is a sprinkle of Parmesan cheese, adding a savory finish.
With minimal effort, you can create these delightful garlic knots that are sure to impress family and friends.
To make the garlic knots, start by combining the warm water, yeast, and sugar in a mixing bowl, allowing it to sit until it becomes foamy.
Add the flour, salt, and olive oil to the yeast mixture and mix until a dough forms.
Knead the dough on a floured surface until it’s smooth and elastic, then place it in a greased bowl, cover it, and let it rise in a warm place for about an hour.
Preheat your oven to 400°F (200°C).
Once the dough has risen, punch it down and divide it into eight equal pieces.
Roll each piece into a rope and tie it into a knot, placing them on a baking sheet lined with parchment paper.
Bake the knots for 12-15 minutes until they’re golden brown.
Meanwhile, prepare the garlic butter by mixing melted butter, minced garlic, and parsley.
Brush the baked knots with the garlic butter and sprinkle with Parmesan cheese before serving.
For the best results, make sure that your dough rises in a warm, draft-free area to double in size properly.
If you prefer a softer texture, cover the freshly baked knots with a clean kitchen towel after brushing them with the garlic butter.
This will allow them to steam slightly.
For an extra kick of flavor, consider adding a pinch of red pepper flakes to the garlic butter mixture.
Enjoy these garlic knots warm as an appetizer or a side dish with your favorite meal.
Cooking Steps
You start your garlic knots journey by whisking together warm water, yeast, and sugar until you witness the magic of frothy bubbles forming.
As you blend in the flour and olive oil, your hands transform the mixture into a smooth, elastic dough, ready to rise and reach its full potential.
While the dough rests, filling the kitchen with anticipation, you preheat your oven to 400°F, setting the stage for golden perfection.
Step 1. Combine Yeast, Water, Sugar
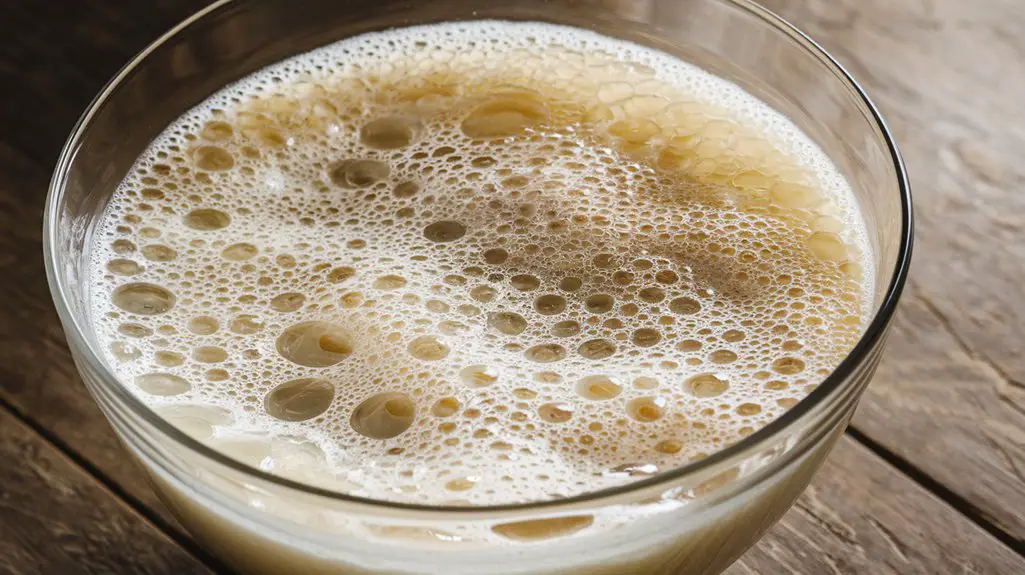
As the foundation of your garlic knots begins, you’ll combine the essential elements that breathe life into the dough.
Start by pouring warm water into a mixing bowl, a nurturing bath for the yeast.
Sprinkle the active dry yeast over the surface, watching as it slowly dissolves, awakening with potential.
Add the sugar, a crucial catalyst that feeds this living organism, coaxing it into a frothy bloom.
Below is a simple yet powerful symphony of ingredients:
| Ingredient | Quantity | Purpose |
|---|---|---|
| Water | 1 cup | Activates yeast |
| Yeast | 2 1/4 tsp | Leavening agent |
| Sugar | 2 tbsp | Feeds yeast |
With patience, let the mixture sit until it becomes foamy, a sign of life stirring in your creation.
Step 2. Mix in Flour and Oil
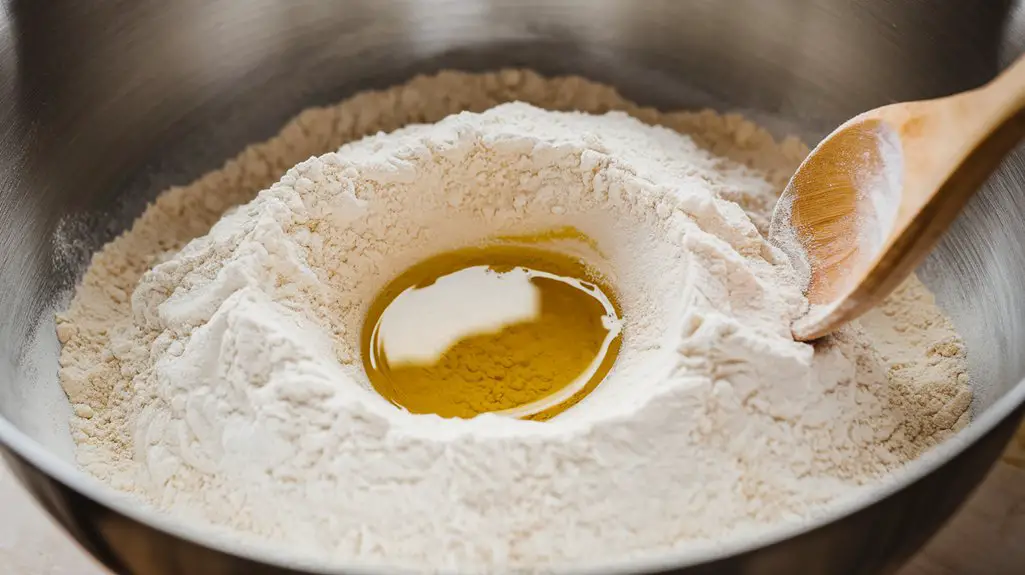
With three basic ingredients, the dough begins to take shape.
As you gently fold in the all-purpose flour, a soft cloud of white dust rises, bringing with it the promise of delicious garlic knots.
The olive oil follows, weaving its silky texture through the mixture, adding richness and depth.
With each stir, the ingredients unite, forming a pliable, cohesive dough.
The salt, though modest, plays its vital part, enhancing flavors and fortifying the structure.
As you work, the bowl becomes a canvas of culinary art.
The transformation is almost magical—what was once a disparate collection of elements now feels alive under your fingertips.
The dough, supple and fragrant, is ready for its next journey, whispering secrets of the feast to come.
Step 3. Knead Dough Until Elastic
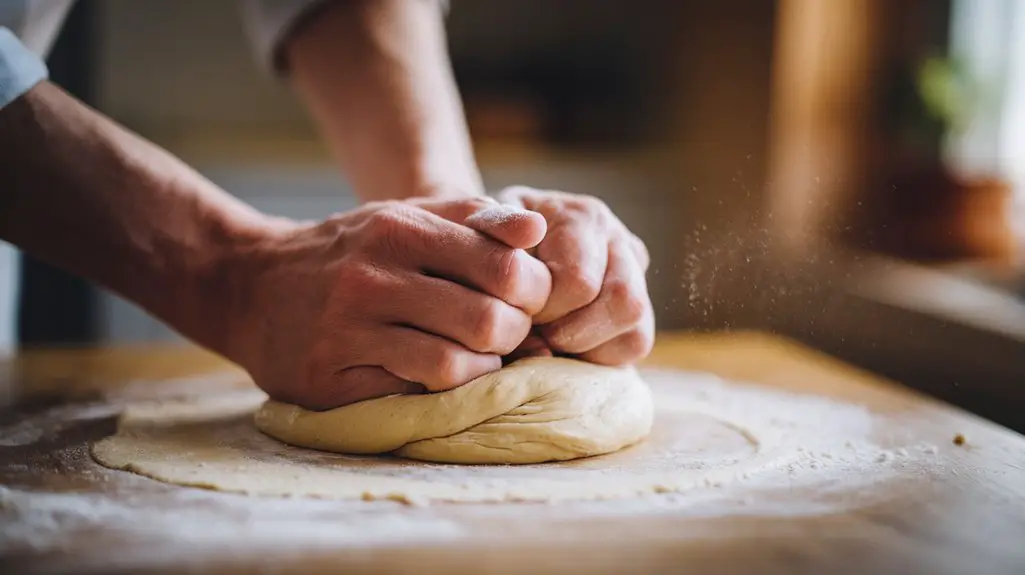
Transforming the dough into a silken masterpiece, kneading becomes your personal dance with this living ingredient.
As your palms press into the soft, pliable dough, you’ll feel its initial resistance give way.
With each fold and push, the mixture transforms, becoming supple beneath your fingertips.
The rhythm of kneading is therapeutic, a tactile meditation as you stretch and fold, coaxing the gluten to develop its magical elasticity.
Dust the surface lightly with flour, ensuring the dough doesn’t cling too stubbornly.
Allow your hands to guide the dough, feeling for that perfect smoothness.
When you pull the dough gently, it should stretch without tearing, a sign it’s ready.
This artful process sets the stage for fluffy, aromatic garlic knots that await.
Step 4. Let Dough Rise; 1 Hour
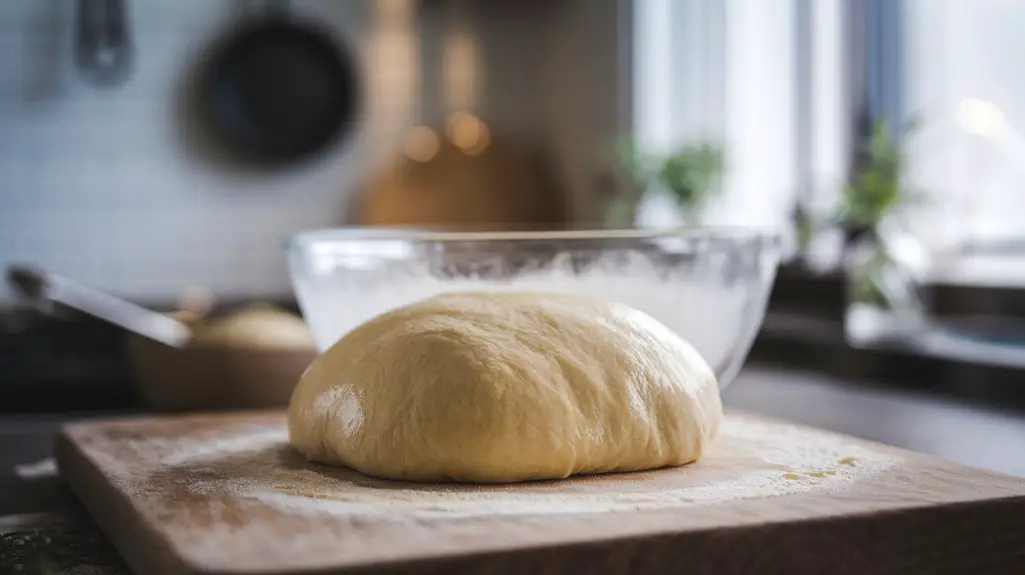
One hour can make all the difference in the world when it comes to letting your dough rise to perfection.
Imagine the dough, nestled snugly in its greased bowl, quietly transforming as it rests.
The yeast works its magic, releasing tiny bubbles that stretch and soften the gluten strands, turning the dough pillowy and airy.
Find a warm, draft-free spot in your kitchen—perhaps near a sunlit window or atop a warm appliance—and let nature take its course.
Cover the bowl with a clean cloth, allowing the dough to breathe and expand.
You’ll witness it nearly doubling in size, a demonstration of the alchemy happening within.
This patient, unhurried rise is essential for achieving the light, tender texture that defines the perfect garlic knot.
Step 5. Preheat Oven to 400°F
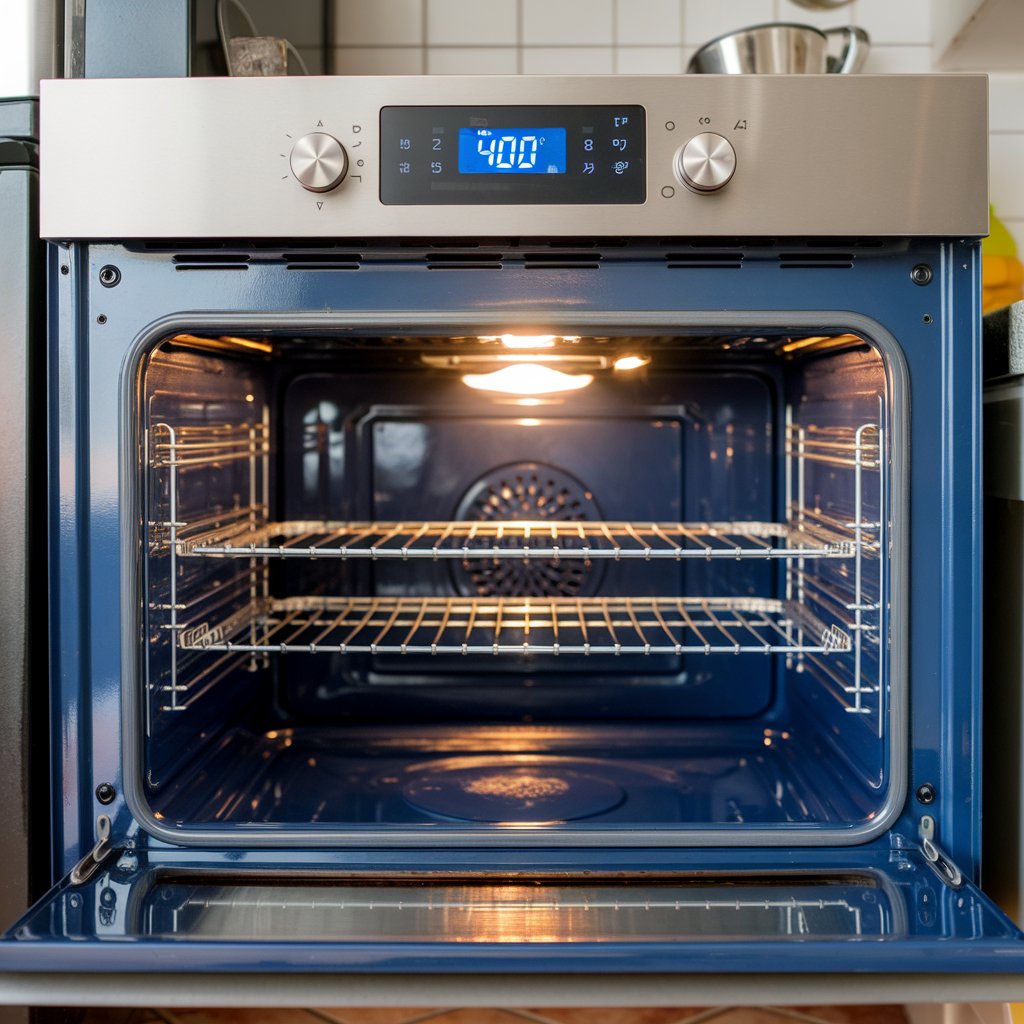
As you approach the final stages of creating your garlic knots, the next essential step is to preheat your oven to a precise 400°F.
This temperature is the sweet spot where your dough transforms into golden, aromatic knots of delight.
Set your oven with care, ensuring the temperature gauge reads accurately.
As the oven warms, it fills your kitchen with anticipation, a prelude to the symphony of flavors that’s about to unfold.
While you wait, visualize your knots rising to perfection, their surfaces crisping to a golden-brown hue.
The heat will coax out their natural sweetness, setting the stage for the garlic butter’s rich embrace.
With the oven ready, you’re on the cusp of a culinary masterpiece that’s both simple and sublime.
Serving Tips
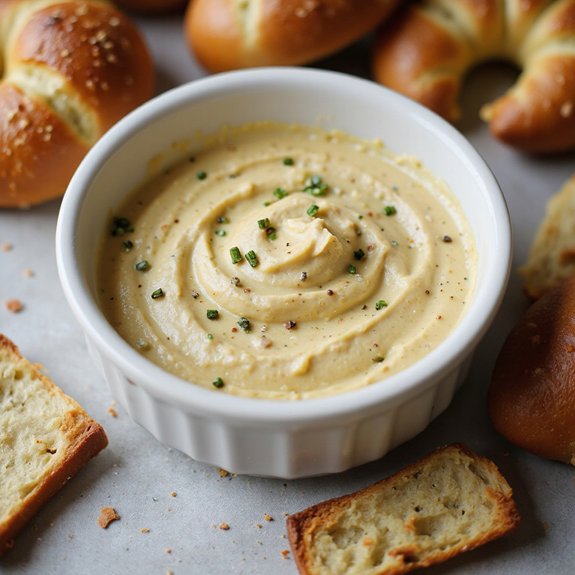
- Marinara Sauce: Serve with a side of warm marinara sauce for dipping to complement the garlic flavor.
- Caesar Salad: Pair with a fresh Caesar salad for a balanced meal that combines crispy greens with the savory knots.
- Pasta Dish: Accompany with your favorite pasta dish, such as spaghetti or fettuccine, for an Italian-themed meal.
- Soup: Serve alongside a hearty bowl of tomato or minestrone soup for a comforting and warming option.
- Antipasto Platter: Enhance your appetizer spread by serving with an antipasto platter featuring cured meats, olives, and cheese.
Storage/Freezing/Reheating
Storage: Store garlic knots in an airtight container at room temperature for up to 2 days.
Confirm they’re completely cooled before sealing to prevent moisture buildup and maintain freshness.
Freezing: To freeze garlic knots, place them in a single layer on a baking sheet and freeze until solid.
Transfer to a freezer-safe bag or container for up to 3 months.
Reheating: Reheat garlic knots in a preheated oven at 350°F (175°C) for 5-7 minutes.
Alternatively, microwave them on a microwave-safe plate for 20-30 seconds to restore softness.
Final Thoughts
Garlic knots aren’t just another appetizer; they’re a tribute to the magic of simple ingredients transformed through the art of baking.
You’ve woven together flour, yeast, and time—each component harmonizing to create an inviting aroma.
As you pull them from the oven, their golden-brown crust whispers promises of soft, garlicky goodness within.
The butter seeps into every crevice, carrying the pungent allure of minced garlic and the fresh vibrancy of parsley.
Parmesan crowns each knot with a salty kiss.
This isn’t just about making bread; it’s about crafting a moment.
As you bite into a warm knot, you’re reminded of the joy found in simplicity and tradition.
Let each knot be a celebration of your culinary journey.
Frequently Asked Questions
Can I Use Whole Wheat Flour Instead of All-Purpose Flour?
You can definitely use whole wheat flour, but expect a denser texture. Whole wheat can absorb more liquid, so add extra water if needed. The earthy flavor will complement the other ingredients beautifully, creating a rustic charm.
How Can I Make the Garlic Knots Gluten-Free?
To make them gluten-free, swap all-purpose flour with a gluten-free blend. Confirm your yeast and other ingredients are gluten-free certified. You’ll craft delightful, aromatic knots that melt in your mouth, satisfying even the most discerning palate.
Is It Possible to Make the Dough Ahead of Time?
Absolutely, you can make the dough ahead! Just prepare it, let it rise, and then refrigerate overnight. This enhances the flavor. Next day, shape, bake, and enjoy freshly baked deliciousness. Your patience will be rewarded!
What Are Some Dipping Sauces That Pair Well With Garlic Knots?
You’ll love dipping into a rich marinara sauce, velvety Alfredo, or zesty pesto. Each sauce enhances flavors, turning each bite into a savory delight. Experiment with spicy aioli or balsamic glaze for a gourmet twist.
Can I Add Cheese Into the Dough for Extra Flavor?
Absolutely, you can fold cheese into the dough for an extra burst of flavor! Try incorporating shredded mozzarella or cheddar to enhance the richness. It adds a delightful gooey surprise with every bite, making each knot irresistibly tempting.
Garlic Knots
Equipment
- 1 Baking sheet
- 1 Mixing bowl
- 1 Whisk
- 1 pastry brush
- 1 measuring cup set
- 1 measuring spoon set
- 1 Rolling Pin
Ingredients
- 1 cup warm water
- 2 1/4 teaspoons active dry yeast
- 2 tablespoons sugar
- 3 cups all-purpose flour
- 1 teaspoon salt
- 1/4 cup olive oil
- 4 tablespoons unsalted butter melted
- 3 cloves garlic minced
- 2 tablespoons fresh parsley chopped
- 1/4 cup grated Parmesan cheese
Instructions
- In a mixing bowl, combine warm water, yeast, and sugar, and let it sit until foamy.
- Add flour, salt, and olive oil to the yeast mixture and mix until a dough forms.
- Knead the dough on a floured surface until smooth and elastic.
- Place the dough in a greased bowl, cover, and let it rise in a warm place for 1 hour.
- Preheat the oven to 400°F (200°C).
- Punch down the dough and divide it into 8 equal pieces.
- Roll each piece into a rope and tie it into a knot.
- Place the knots on a baking sheet lined with parchment paper.
- Bake in the preheated oven for 12-15 minutes until golden brown.
- While baking, mix melted butter, minced garlic, and parsley in a small bowl.
- Brush the baked knots with the garlic butter mixture and sprinkle with Parmesan cheese.
Notes

Cynthia Weatherford is a seasoned chef and culinary enthusiast who serves as the Recipe creator of Somonday. With decades of experience in the kitchen and a passion for exploring diverse cuisines, Cynthia brings a blend of creativity and technique to every dish. Known for transforming simple ingredients into show-stopping meals, Cynthia believes that cooking is an art form anyone can master. Dedicated to inspiring home cooks, Cynthia shares approachable recipes, pro tips, and culinary wisdom to make every meal memorable.