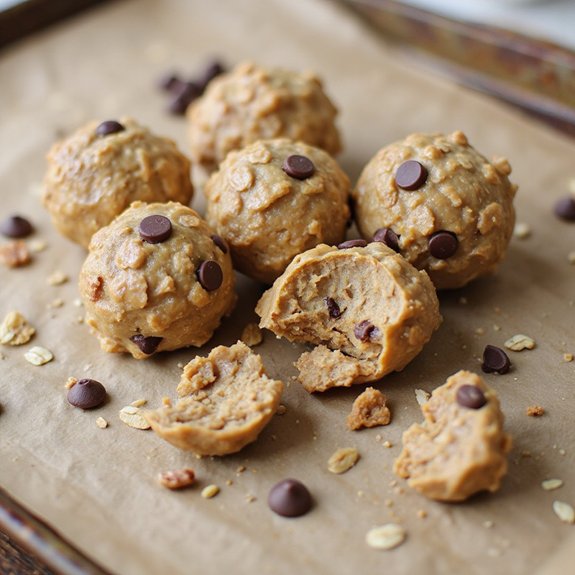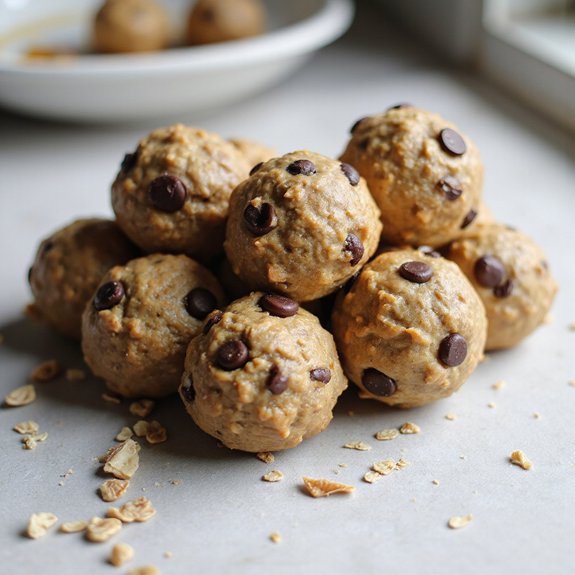
Picture a plate of bite-sized, softly rounded treats—creamy, pale ivory centers speckled with oats and chocolate chips, chilled just enough that they’re cool to the touch but tender when you bite in.
These Greek Yogurt Protein Balls are a quick, no-bake snack that tastes like dessert but fuels like a mini meal, ready in about 15 minutes.
They’re perfect for busy mornings, post-workout refuels, after-school bites, or late-night sweet-tooth moments.
I first leaned on them during a hectic week of back-to-back meetings; instead of skipping lunch, I grabbed two from the fridge, and that gentle tang of yogurt, mellow sweetness of honey, and hint of vanilla carried me through the afternoon.
They’re ideal for meal-preppers, families, and beginners who want something wholesome, portable, and comforting without turning on the oven.
Ready to bring this simple, protein-packed snack to life?
Why You’ll Love It
- Packs 6–8 grams of protein into each satisfying bite
- Mixes up in minutes with simple pantry and fridge staples
- Delivers creamy, cookie-dough flavor with a hint of chocolate
- Easily customizable with different nut butters, proteins, and mix-ins
- Stores and freezes well for grab-and-go, make-ahead snacks
Ingredients
- 1 cup rolled oats — use old-fashioned oats for best texture
- 1⁄2 cup plain Greek yogurt — choose thick, strained yogurt to avoid runniness
- 1⁄2 cup creamy peanut butter — natural peanut butter with no added sugar works well
- 1⁄4 cup honey — adjust to taste for preferred sweetness
- 1⁄3 cup vanilla protein powder — pick a brand you enjoy the flavor of
- 1⁄4 cup mini chocolate chips — mini chips distribute more evenly than regular
- 1 teaspoon vanilla extract — pure vanilla gives better flavor than imitation
- 1⁄8 teaspoon fine sea salt — enhances sweetness and overall flavor
Step-by-Step Method
Line the Tray
Line a baking sheet with parchment paper. Smooth it flat so there are no deep creases that could misshape the balls.
Set the tray aside within easy reach of your workspace.
This step keeps the protein balls from sticking and makes transferring them to a container simple after chilling.
Combine Dry Ingredients
Add the rolled oats, vanilla protein powder, mini chocolate chips, and fine sea salt to a medium mixing bowl.
Stir well with a wooden spoon or spatula until the ingredients are evenly distributed.
Break up any clumps of protein powder. Ensuring the dry mixture is uniform helps the balls hold together better later.
Add Wet Ingredients
Spoon in the Greek yogurt and peanut butter, then drizzle the honey over the dry mixture. Pour in the vanilla extract.
Aim to distribute these ingredients around the bowl rather than in one spot.
This makes mixing easier and helps prevent dry pockets of oats or protein powder from remaining unmixed.
Mix into a Dough
Stir the mixture steadily with a wooden spoon or spatula. Scrape along the sides and bottom of the bowl to incorporate everything.
Continue until you have a thick, sticky dough and no visible dry patches remain.
Press the mixture with the spoon to blend stubborn oats or protein powder into the wet ingredients.
Adjust the Texture
Check the dough with clean hands or the spoon. If it feels too sticky to roll, sprinkle in a small handful of oats and stir again.
If it crumbles or seems dry, add a spoonful of Greek yogurt and mix.
Adjust gradually until the dough is pliable, moist, and easy to shape without sticking excessively.
Shape the Balls
Scoop about one tablespoon of dough at a time using a measuring spoon or a small scoop.
Roll the portion between your palms to form a smooth ball. Apply gentle pressure so it compacts and holds together.
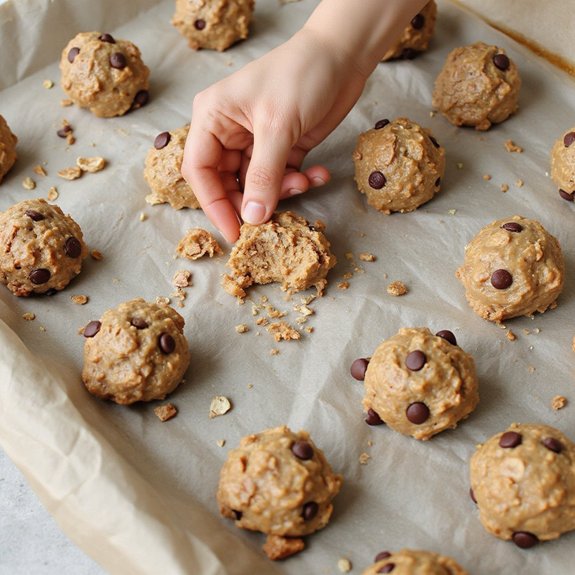
Place each finished ball on the parchment-lined baking sheet. Repeat until you have used all the mixture.
Chill to Firm
Slide the baking sheet into the refrigerator. Chill the protein balls for at least 30 minutes, or until they feel firm to the touch.
This resting time helps them set and improves their texture.
Avoid stacking the balls while they chill so they keep their round shape and don’t stick together.
Store for Later
Transfer the chilled protein balls to an airtight container. Arrange them in a single layer, or separate layers with parchment if stacking.
Seal the container tightly and refrigerate. Keep them chilled for best texture, and let them sit at room temperature a few minutes before eating so they soften slightly and taste their best.
Ingredient Swaps
- Use almond, cashew, or sunflower seed butter instead of peanut butter (great for peanut-free or school-safe snacks).
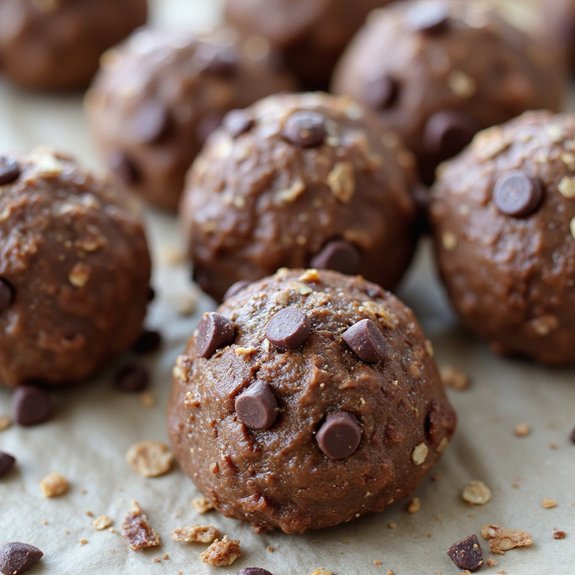
- Swap vanilla protein powder for chocolate, unflavored, or a plant-based protein to make it vegetarian/vegan-friendly (pair with dairy-free yogurt and maple syrup instead of honey).
- Replace mini chocolate chips with chopped nuts, seeds, dried fruit, or cacao nibs for less sugar or to use what you have on hand.
You Must Know
- Troubleshoot • If the dough sticks all over your hands: Lightly coat your palms with a tiny amount of oil or roll each portion in a spoonful of extra oats before shaping. This keeps the surface from clinging while still giving a smooth ball that holds its shape for at least 10–15 seconds in your hand.
- Troubleshoot • If the balls flatten out in the fridge: Work in 1–2 tablespoons more oats or 1 tablespoon more protein powder, then chill a test ball for 10 minutes. It should come out firm and round, not slumped like a cookie.
- Flavor Boost • For more peanut butter or dessert-like flavor: Swap 1–2 tablespoons of the Greek yogurt for extra peanut butter or use chocolate protein powder. The mixture should still feel like cookie dough—soft but not so loose that it spreads when you set a ball on the tray.
- Make-Ahead • When freezing for later: Freeze in a single layer on a tray for about 1–2 hours until solid, then move to a container. They should feel rock-hard straight from the freezer and soften to chewy, fudgy texture after 20–30 minutes in the fridge or 5–10 minutes at room temp.
- Safety • To keep the yogurt and peanut butter fresh: Limit room-temperature time to about 2 hours total while shaping and serving. After that, they should feel cool to the touch again from the fridge and be stored chilled for up to 7 days.
Serving Tips
- Arrange in mini cupcake liners, then drizzle lightly with melted dark chocolate.
- Serve alongside fresh berries and banana slices for a snack-plate style presentation.
- Pair with a small latte or iced coffee for an energizing afternoon pick-me-up.
- Skewer protein balls with fresh fruit on toothpicks for grab-and-go party bites.
- Pack in a bento-style container with nuts and veggie sticks for balanced snacking.
Storage & Make-Ahead
These protein balls keep well in the fridge for up to 1 week in an airtight container.
They’re perfect for weekend meal prep—make a batch ahead for grab-and-go snacks.
They also freeze well for about 1 month; freeze on a baking sheet, then transfer to a container or bag.
Reheating
These are best chilled, but to gently warm, briefly microwave 5–10 seconds.
Or place on a low‑heat oven tray a few minutes; stovetop reheating isn’t recommended for these no‑bake bites.
Protein Balls on Social Media
Once your protein balls are chilling in the fridge instead of the microwave, they’re ready for their close‑up online. I imagine you opening the door, cool air drifting out, rows of oat‑flecked, chocolate‑studded bites catching the light. Let’s make them as scroll‑stopping as they’re satisfying.
- Set the scene: Place the balls on parchment, next to your mixing bowl and a spoon streaked with yogurt and peanut butter for a behind‑the‑scenes feel.
- Play with texture: Snap a close shot of one bitten ball, creamy center visible, crumbs scattered.
- Use natural light: Shoot near a window, morning or late afternoon, for a soft, cozy glow.
- Tell a story: In your caption, share when you reach for these—post‑workout, afternoon slump, or late‑night nibble.
Final Thoughts
Give these Greek Yogurt Protein Balls a try and see how easy (and tasty) homemade snacks can be.
Have fun tweaking the mix-ins and flavors to make them your own perfect grab-and-go bite!
Frequently Asked Questions
Can I Make These Protein Balls Without Any Added Sweeteners Like Honey?
Yes, you can. I’d skip the honey, then slowly add extra yogurt or nut butter until the mixture clumps like damp sand. Taste as you go; if you miss sweetness, stir in mashed banana.
How Can I Calculate the Exact Macros per Protein Ball?
You’ll add each ingredient’s calories, protein, carbs, and fat from labels, total them, then divide by 16 balls. I’d tuck that neat macro snapshot beside your recipe, like a handwritten note in a beloved cookbook.
What Kitchen Tools Help if the Mixture Sticks to My Hands?
You’ll want a small cookie scoop, a silicone spatula, and a bowl of cold water or lightly oiled hands. I smooth each portion with the spatula, scoop, then roll quickly—everything stays neat, cozy, and manageable.

Greek Yogurt Protein Balls
Equipment
- 1 medium mixing bowl
- 1 Wooden spoon or spatula
- 1 measuring cup set
- 1 measuring spoon set
- 1 Baking sheet
- 1 sheet parchment paper
- 1 airtight container
Ingredients
- 1 cup rolled oats
- 1/2 cup Greek yogurt plain
- 1/2 cup peanut butter creamy
- 1/4 cup honey
- 1/3 cup protein powder vanilla
- 1/4 cup mini chocolate chips
- 1 teaspoon vanilla extract
- 1/8 teaspoon fine sea salt
Instructions
- Line a baking sheet with parchment paper and set aside.
- In a medium mixing bowl, combine the rolled oats, protein powder, chocolate chips, and sea salt.
- Add the Greek yogurt, peanut butter, honey, and vanilla extract to the bowl.
- Stir the mixture with a wooden spoon or spatula until it forms a thick, sticky dough and all dry spots are gone.
- If the mixture is too sticky, stir in a small handful of oats; if too dry, add a spoonful of Greek yogurt.
- Scoop out about 1 tablespoon of dough and roll it between your palms to form a ball.
- Place each ball on the prepared baking sheet, repeating until all the mixture is used.
- Refrigerate the baking sheet for at least 30 minutes to firm up the protein balls.
- Transfer the chilled protein balls to an airtight container and store in the refrigerator.
Notes

Cynthia Weatherford is a seasoned chef and culinary enthusiast who serves as the Recipe creator of Somonday. With decades of experience in the kitchen and a passion for exploring diverse cuisines, Cynthia brings a blend of creativity and technique to every dish. Known for transforming simple ingredients into show-stopping meals, Cynthia believes that cooking is an art form anyone can master. Dedicated to inspiring home cooks, Cynthia shares approachable recipes, pro tips, and culinary wisdom to make every meal memorable.