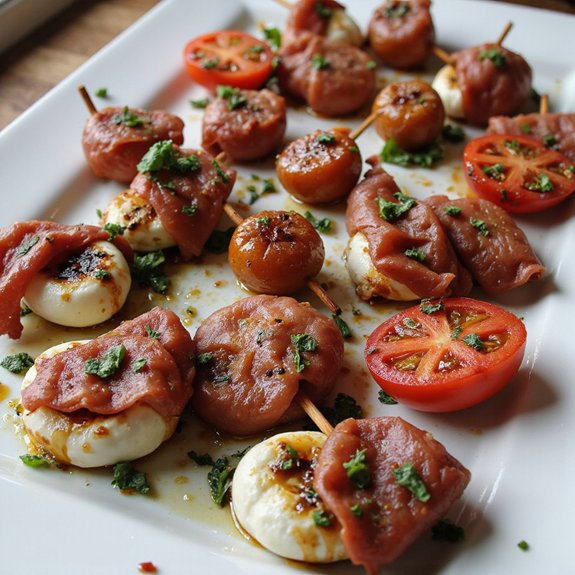
There’s something about a platter of Italian skewers—glistening with olive oil, ruby cherry tomatoes, creamy mozzarella, ribbons of salami, and bright basil—that instantly feels like a celebration.
These are light, fresh party bites that come together in minutes, making them perfect for busy hosts, beginners in the kitchen, and anyone who loves bold Mediterranean flavors without fuss.
I still remember a summer evening when friends texted, “We’re five minutes away!” and I hadn’t prepared a thing.
A quick raid of the fridge—cheese, olives, artichokes, and prosciutto—plus a drizzle of balsamic, and those skewers saved the night.
We grazed, talked, and no one guessed it was a last‑minute spread.
These Italian skewers shine at casual gatherings, game days, holiday parties, or whenever you need an easy appetizer that looks as good as it tastes.
Ready to bring this dish to life?
Why You’ll Love It
- Delivers bold Italian flavor in a fun, bite-sized presentation
- Requires zero cooking, perfect for quick last-minute entertaining
- Adapts easily with different meats, cheeses, or veggies
- Preps ahead beautifully, ideal for parties and potlucks
- Looks colorful and elegant with minimal effort on your part
Ingredients
- 24 pieces cherry tomatoes — choose sweet, ripe ones for best flavor
- 12 balls fresh mozzarella (bocconcini), small — use fresh, moist cheese packed in brine
- 12 slices salami, thin — pick a good-quality Italian salami with balanced seasoning
- 12 leaves fresh basil, large — look for vibrant green leaves without dark spots
- 3 tbsp extra-virgin olive oil — use a fruity, good-quality oil for better taste
- 1 tbsp balsamic vinegar — a syrupy, aged-style vinegar gives richer flavor
- 1/4 tsp dried oregano — rub between fingers to release aroma
- 1/4 tsp kosher salt — adjust to taste just before serving
- 1/8 tsp black pepper, freshly ground — grind fresh for brighter spice
- 2 tbsp pesto, prepared (optional) — choose a basil pesto with real Parmesan cheese
Step-by-Step Method
Soak the Skewers
Soak wooden skewers in water for about 10 minutes if you’re preparing the appetizers in advance.
Submerge them completely so they absorb enough moisture.
This helps prevent the wood from drying and splintering.
Drain them on a clean towel while you prepare the other ingredients and the dressing.
Prep Tomatoes and Basil
Rinse cherry tomatoes briefly under cold water and pat them dry with paper towels.
Handle gently to avoid splitting the skins.
Rinse basil leaves and spread them out to dry fully so they don’t dilute the dressing.
Keep leaves whole and intact, removing any damaged or discolored pieces before assembling.
Mix the Dressing
Whisk together extra-virgin olive oil, balsamic vinegar, dried oregano, kosher salt, and freshly ground black pepper in a small bowl.
Mix until the seasoning is fully dispersed and the vinaigrette looks glossy.
Taste and adjust salt or acidity if needed.
Set aside near your work area, ready for marinating the mozzarella balls.
Marinate the Mozzarella
Add mozzarella balls to the bowl with the dressing.
Toss gently with a spoon so they’re evenly coated without tearing.
Let them sit for several minutes to absorb flavor.
Turn them once or twice as they marinate.
Keep any remaining dressing in the bowl for drizzling over the finished skewers later.
Fold the Salami
Lay salami slices flat on a small cutting board.
If the slices are large, fold each one into quarters to make a tidy, bite-size stack.
Align the edges so they thread easily onto the skewers.
Work carefully to maintain their shape.
Set the folded pieces aside in a neat pile for quick assembly.
Assemble the Skewers
Thread one cherry tomato onto the pointed end of a skewer.
Add a folded slice of salami, then a basil leaf, followed by one marinated mozzarella ball.
Repeat the pattern if space allows, keeping the order consistent.
Finish with a cherry tomato on top for a colorful presentation.
Continue until all skewers are assembled.
Arrange and Drizzle
Lay the finished skewers in a single layer on a serving platter so they’re easy to grab.
Spoon or drizzle any remaining dressing lightly over the skewers, avoiding heavy pooling on the platter.
If using pesto, drizzle a small amount over the top just before serving to keep the flavors bright and basil fresh.
Chill and Serve
Refrigerate the platter for about 10 minutes to chill and let flavors meld slightly.
Don’t leave them too long uncovered, to protect the basil and salami.
Serve the Italian skewers slightly chilled or at cool room temperature.
Present them neatly arranged so guests can easily pick up individual skewers.
Ingredient Swaps
- Use marinated tofu cubes or grilled zucchini in place of salami for a vegetarian option; omit cheese or use dairy-free mozzarella for vegan/dairy-free needs.
- Swap bocconcini with cubed provolone, feta, or budget-friendly low-moisture mozzarella if fresh isn’t available.
- Try grape tomatoes instead of cherry, prosciutto or pepperoni instead of salami, and red wine vinegar or lemon juice if you don’t have balsamic.
You Must Know
- Flavor Boost – If the mozzarella tastes a bit flat, toss it again with a pinch more salt and a splash (½–1 tsp) extra balsamic just before serving; the brief 5–10 minute contact brightens flavor without making the skewers soggy.
- Avoid – Avoid overdressing the skewers; if the platter looks glossy and you see oil pooling, dab with a paper towel until surfaces look just lightly shiny—too much oil makes them slippery to pick up and mutes acidity.
- Make-Ahead – For making several hours early, keep basil and any pesto separate; assemble skewers up to 4 hours in advance, then add basil leaves and drizzle pesto in the last 10–15 minutes so the herbs stay bright green instead of darkening.
- Swap – For milder or pork-free skewers, swap salami for thin turkey, chicken, or roasted red pepper strips at a 1:1 slice count; check one skewer and taste, then add a tiny pinch of salt over the whole platter if the replacement meat/veg is less seasoned.
- Scale – To feed a crowd, multiply all ingredients by the number of dozens you want (e.g., 3× for 36 skewers); once assembled, lay them slightly overlapping in a single wide layer on a sheet pan so each skewer still has some air space and herbs don’t steam or wilt.
Serving Tips
- Arrange skewers in a circular “sunburst” on a white platter for color contrast.
- Serve alongside a small bowl of extra pesto or balsamic glaze for optional dipping.
- Pair with crisp Prosecco, Pinot Grigio, or sparkling water with lemon for refreshment.
- Add a cluster of mixed olives and marinated artichokes in the center of the platter.
- Use tiered stands for height and easy grabbing at buffets or cocktail parties.
Storage & Make-Ahead
Italian skewers keep well in the fridge for up to 2 days.
For best texture, assemble up to 4 hours ahead, cover tightly, and chill.
Add pesto or extra drizzle just before serving to keep basil fresh.
This appetizer doesn’t freeze well; freezing damages tomatoes and mozzarella.
Reheating
Reheat gently to avoid drying.
Briefly microwave on low in 10‑second bursts, or warm in a 275°F (135°C) oven.
For best texture, remove meat and cheese before stovetop warming.
Antipasti at Italian Gatherings
On a bustling Sunday in my nonna’s kitchen, antipasti always set the mood before anyone even sat down.
I remember the table first filling with colors and aromas: ruby tomatoes, silky salami, glistening mozzarella, that sharp whisper of balsamic in the air.
Before we exchanged real conversation, we’d reach for a skewer or olive, just to “taste” if everything was ready.
That’s what I want for you when you serve Italian skewers. Let them greet your guests before you do.
Arrange them on a wide platter, tuck in extra basil leaves, maybe a small bowl of olives nearby. Antipasti shouldn’t feel formal; they’re an invitation to linger, nibble, and relax into the evening together.
Final Thoughts
Give these Italian skewers a try for your next gathering—they’re quick to make, beautiful on a platter, and always a crowd-pleaser.
Have fun customizing them with your favorite meats, cheeses, or veggies to make the recipe your own!
Frequently Asked Questions
Can I Make These Italian Skewers Vegetarian or Vegan-Friendly?
Yes, you can. I swap salami for marinated artichokes and use mozzarella or vegan “mozzarella” cubes. I drizzle extra pesto, heap on basil, and the platter still feels rustic, abundant, and wonderfully inviting.
What Wine Pairs Best With Italian Skewers Appetizers?
I’d pour a chilled Pinot Grigio or dry Prosecco; their brightness flatters the salty, creamy bites. I always think of late-summer evenings on my porch, clinking glasses while tomatoes and basil perfume the air.
How Can I Scale This Recipe for a Large Party?
You can easily scale it: I’d multiply everything by three for 36 guests. I picture overflowing platters on my grandmother’s table—just keep skewers snug but not crowded, and taste the dressing as you go.
Are These Italian Skewers Safe for People With Gluten Intolerance?
Yes, they’re naturally gluten-free if the salami and pesto don’t contain hidden wheat. I’d double-check labels like I do for my celiac friend, then serve them proudly, like cozy little antipasto jewels.
Can I Prepare a Kid-Friendly Version With Milder Flavors?
Yes, you can. I swap salami for mild turkey, use extra mozzarella, sweet cherry tomatoes, and just olive oil with a pinch of salt. My nieces devour them; they feel like tiny, friendly picnic wands.

Italian Skewers Appetizers
Equipment
- 12 wooden skewers (6–8 inch)
- 1 small cutting board
- 1 Chef's knife
- 1 Small bowl
- 1 serving platter
Ingredients
- 24 piece cherry tomatoes
- 12 balls fresh mozzarella bocconcini; small
- 12 slices salami thin
- 12 leaves fresh basil large
- 3 tablespoon extra-virgin olive oil
- 1 tablespoon balsamic vinegar
- 1/4 teaspoon dried oregano
- 1/4 teaspoon kosher salt
- 1/8 teaspoon black pepper freshly ground
- 2 tablespoon pesto optional, for drizzling; prepared
Instructions
- Soak the wooden skewers in water for 10 minutes if you plan to serve the skewers later so they do not dry out.
- Rinse and pat dry the cherry tomatoes and fresh basil leaves on a paper towel.
- In a small bowl whisk together the olive oil, balsamic vinegar, dried oregano, salt, and black pepper to make a quick dressing.
- Place the mozzarella balls in the bowl with the dressing and gently toss to coat them evenly.
- Lay out the salami slices on the cutting board and, if large, fold each slice into quarters to create neat, bite-size pieces.
- Assemble each skewer by threading on one cherry tomato, then one folded slice of salami, one basil leaf, and one marinated mozzarella ball.
- Repeat the layering pattern until all skewers are assembled, ending with a cherry tomato on top for presentation if desired.
- Arrange the finished skewers on a serving platter in a single layer.
- Lightly drizzle any remaining dressing over the skewers, avoiding excess so they do not become soggy.
- If using, drizzle a small amount of pesto over the skewers just before serving.
- Let the skewers rest in the refrigerator for about 10 minutes to chill and allow flavors to meld.
- Serve the Italian skewers slightly chilled or at cool room temperature.
Notes

Cynthia Weatherford is a seasoned chef and culinary enthusiast who serves as the Recipe creator of Somonday. With decades of experience in the kitchen and a passion for exploring diverse cuisines, Cynthia brings a blend of creativity and technique to every dish. Known for transforming simple ingredients into show-stopping meals, Cynthia believes that cooking is an art form anyone can master. Dedicated to inspiring home cooks, Cynthia shares approachable recipes, pro tips, and culinary wisdom to make every meal memorable.