
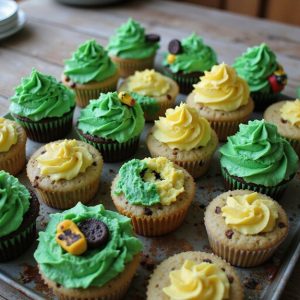
Picture a tray of cupcakes dressed like a country field—bright John Deere green swirls of frosting, sunshine-yellow accents, and tiny tractor toppers rolling across soft, tender vanilla cake.
These are cozy, whimsical desserts that come together faster than you’d think, perfect for when you need something festive in under an hour.
They’re ideal for families, kids’ birthday parties, tractor-loving adults, and anyone with a sweet tooth who loves a touch of nostalgia.
I still remember the night before my nephew’s farm-themed birthday, when the cake order fell through.
These John Deere cupcakes saved the day—simple to decorate, easy to transport, and an instant hit with every guest.
They shine at themed parties, school events, last-minute celebrations, or anytime you need a cheerful dessert that doubles as decor.
Ready to bring this charming batch of John Deere cupcakes to life?
Why You’ll Love It
- Delivers a fun, farm-themed treat kids and adults adore
- Uses simple pantry staples and easy-to-find decorating supplies
- Bakes into soft, tender vanilla cupcakes with rich buttercream frosting
- Decorates easily with piping bags for impressive, tractor-topped designs
- Perfect for farm birthdays, tractor lovers, and John Deere fans
Ingredients
- 1 1/2 cups all-purpose flour — spoon and level for accuracy
- 1 cup granulated sugar — standard white sugar works best
- 1 1/2 teaspoons baking powder — check that it’s fresh and active
- 1/4 teaspoon baking soda — helps with lift and browning
- 1/2 teaspoon fine salt — fine grain blends more evenly
- 1/2 cup unsalted butter, softened — leave at room temp 30–45 minutes
- 2 large eggs, room temperature — room temp helps batter emulsify
- 2 teaspoons vanilla extract — pure vanilla for best flavor
- 1/2 cup whole milk, room temperature — don’t use cold from the fridge
- 1/4 cup sour cream, room temperature — adds moisture and tenderness
- 1 cup unsalted butter, softened (for frosting) — very soft but not melted
- 3 1/2 cups powdered sugar, sifted — sifting prevents lumpy frosting
- 1/4 teaspoon fine salt (for frosting) — balances sweetness
- 2 teaspoons vanilla extract (for frosting) — adds rich flavor
- 2–3 tablespoons heavy cream or milk — adjust for pipeable consistency
- 1/2 teaspoon green gel food coloring — use gel so frosting stays thick
- 1/4 teaspoon yellow gel food coloring — adjust for bright “John Deere” yellow
- 6 miniature toy John Deere-style tractors, cleaned and dried — make certain food-safe/washable
- 2 tablespoons chocolate sprinkles (optional) — for “dirt” effect
- 6 chocolate sandwich cookies, crushed (optional) — for “soil” topping
Step-by-Step Method
Preheat and Prepare Pan
Preheat the oven to 350°F (175°C). Line a standard 12-cup muffin tin with paper cupcake liners. Set the pan aside on a level surface.
Gather all ingredients and equipment so everything is within reach. This helps the batter come together quickly and bake evenly once mixed.
Combine Dry Ingredients
Whisk together the flour, granulated sugar, baking powder, baking soda, and salt in a medium bowl.
Break up any lumps as you whisk. Make certain everything is evenly distributed, as this helps the cupcakes rise uniformly and prevents pockets of unmixed leavening or sugar in the finished cakes.
Cream Butter and Eggs
Beat the softened butter in a large mixing bowl with an electric mixer until creamy and smooth, about 1 minute. Add the eggs and vanilla extract.
Beat again until the mixture looks lighter in color and slightly fluffy, about 2 minutes. Scrape the bowl as needed so everything is evenly combined.
Mix Milk and Sour Cream
Whisk the milk and sour cream together in a small bowl until completely smooth. Make sure there are no lumps of sour cream.
Use room-temperature dairy so it blends easily into the batter. This mixture keeps the cupcakes moist and tender, adding richness without making the batter too heavy.
Alternate Wet and Dry Additions
Add half of the dry ingredients to the butter mixture. Mix on low just until combined; avoid overbeating.
Pour in the milk–sour cream mixture and mix again on low until incorporated. Add the remaining dry ingredients and mix on low just until no streaks of flour remain in the bowl.
Finish Folding and Fill Liners
Use a rubber spatula to fold the batter a few times, scraping the sides and bottom of the bowl. Stop as soon as the batter looks uniform.
Divide the batter evenly among the 12 cupcake liners, filling each about two-thirds full. Tap the pan gently to release any large air bubbles.
Bake and Cool Completely
Place the muffin tin in the preheated oven and bake 16–18 minutes. Check doneness with a toothpick; it should come out clean or with a few moist crumbs.
Let cupcakes cool in the pan for 5 minutes. Transfer them to a wire rack and cool completely, at least 40 minutes, before decorating.
Beat Butter for Frosting
While cupcakes cool, make the frosting. Beat the softened butter in a large bowl until pale and fluffy, about 2–3 minutes. Scrape the bowl as you go.
Properly creamed butter creates a smoother, lighter frosting. Make certain the butter is truly soft so it incorporates air easily and doesn’t form lumps.
Add Sugar and Liquids
Gradually add the powdered sugar, about 1 cup at a time, mixing on low after each addition. Once incorporated, add the salt, vanilla, and 2 tablespoons of cream or milk.
Beat on medium-high for 2–3 minutes until light and fluffy. Add a little more cream if needed for a smooth, pipeable consistency.
Tint and Bag the Frosting
Scoop about one-third of the frosting into a medium bowl and color it yellow with gel food coloring, mixing until evenly tinted. Color the remaining frosting John Deere green.
Fit one piping bag with a large round tip and fill with yellow frosting. Fit another bag with a grass or small star tip and fill with green frosting.
Create Dirt and Fields
If desired, sprinkle cooled cupcake tops lightly with crushed chocolate sandwich cookies or chocolate sprinkles to resemble dirt. Pipe a yellow circle or field shape on each cupcake using the round tip.
Place the yellow area in the center or to one side, leaving space around it for green grass piping.
Pipe Grass and Add Tractors
Pipe green grass or short star swirls around the yellow section of each cupcake using the grass or star tip. Cover all visible “dirt” outside the field.
Gently press a miniature tractor into the yellow field so it looks like it’s driving. Use a small offset spatula to neaten the frosting and secure each tractor.
Ingredient Swaps
- Use half or all brown sugar instead of white for a deeper, “molasses-y” flavor; margarine can replace butter in a pinch, but texture and taste will be slightly different.
- Swap sour cream with plain Greek yogurt, and whole milk with 2% milk (or a dairy-free milk plus a neutral dairy-free yogurt) for similar moisture.
- Make them egg-free with a commercial egg replacer or 2 tablespoons of yogurt per egg; use a vegan butter and plant milk for dairy-free.
- If you can’t find gel food coloring, use liquid coloring sparingly and add a bit more powdered sugar if the frosting gets too thin.
You Must Know
– Make-Ahead • To keep decorations vivid and neat: store undecorated cupcakes covered at room temperature for up to 24 hours, and refrigerate colored frosting in piping bags up to 2 days; let the bags sit at room temp 20–30 minutes, then knead gently to smooth the texture before piping.
Serving Tips
- Arrange cupcakes on a wooden board with toy farm animals for a rustic “farmyard” display.
- Serve each cupcake on a green napkin to echo the John Deere color theme.
- Pair with cold milk or lemonade for a kid-friendly farm party treat.
- Display on a tiered stand, alternating tractor directions for a “moving across fields” effect.
- Add small name flags or tractor-shaped tags as place cards for each guest.
Storage & Make-Ahead
Store decorated John Deere cupcakes in an airtight container in the fridge for up to 4 days.
Bring to room temperature before serving.
Cupcakes (unfrosted) freeze well for up to 2 months—wrap tightly.
Frosting can be made 3 days ahead and refrigerated.
Re-whip briefly before piping.
Reheating
Reheat cupcakes gently to preserve moisture.
Use a microwave at 50% power for 8–10 seconds, or a 300°F oven for 5–7 minutes.
Avoid stovetop reheating to prevent drying.
John Deere on Birthday Tables
I like to keep the setup simple so the colors really pop. You don’t need much to make it magical:
- A burlap runner that feels like a barn floor under your fingertips
- Mason jars of daisies, echoing the butter‑yellow frosting
- Scattered pretend hay or shredded kraft paper for “straw”
- A few weathered toy tractors trundling between cupcake “fields”
- Small name cards stuck into cupcakes like miniature field signs
Every time, the kids lean in first with their eyes, then with their hands.
Final Thoughts
Give these John Deere Cupcakes a try for your next farm-themed party or family gathering—they’re simple to make and always a hit.
Feel free to tweak the colors, toppings, or tractor decorations to match your own farm style or favorite equipment brand.
Frequently Asked Questions
Can I Make These John Deere Cupcakes Gluten-Free for Guests With Celiac Disease?
Yes, you can—I’d swap in a trusted 1:1 gluten-free flour blend and certified gluten-free cookies. I’ve done this for my niece’s farm‑themed party, and everyone savored them around the kitchen table.
What Age Range Is Appropriate for Cupcakes Decorated With Small Tractor Toys?
I’d keep these toy-topped cupcakes for kids 4 and up, and remove tractors for toddlers. I still picture my nephew at five, chubby fingers steering frosting “fields,” while we hovered close, sipping cocoa and laughing.
How Far in Advance Can I Decorate the Cupcakes Without Colors Fading?
You can safely decorate them 24–36 hours ahead; gel colors rarely fade that quickly. I tuck mine in a cool, dim corner of the kitchen, and every time I pass, they look freshly frosted and bright.
Are There Kid-Friendly Activities That Pair Well With a John Deere Cupcake Theme?
Yes, I’d plan tractor “parades,” a sandbox dig site, hay-bale obstacle course, and corn-kernel sensory bins. I once set up a mini “farm stand” where kids weighed plastic veggies—it kept them charmingly busy for ages.
Can I Scale This Recipe for a Large Farm-Themed Party or School Event?
Yes, you can scale it; I’d simply double or triple the batter and frosting in separate bowls. When I baked for a school fair, I mixed in batches, labeled them, and decorated assembly-line style.
John Deere Cupcakes
Equipment
- 1 standard 12-cup muffin tin
- 12 paper cupcake liners
- 2 medium mixing bowls
- 1 large mixing bowl
- 1 electric hand mixer or stand mixer
- 1 Rubber spatula
- 1 Whisk
- 1 Measuring cups set
- 1 Measuring spoons set
- 1 wire cooling rack
- 2 piping bags
- 2 piping tips (1 large round, 1 grass or small star tip)
- 1 small offset spatula or butter knife
Ingredients
- 1 1/2 cup all-purpose flour
- 1 cup granulated sugar
- 1 1/2 teaspoon baking powder
- 1/4 teaspoon baking soda
- 1/2 teaspoon fine salt
- 1/2 cup unsalted butter softened
- 2 large eggs room temperature
- 2 teaspoon vanilla extract
- 1/2 cup whole milk room temperature
- 1/4 cup sour cream room temperature
- 1 cup unsalted butter softened for frosting
- 3 1/2 cup powdered sugar sifted
- 1/4 teaspoon fine salt for frosting
- 2 teaspoon vanilla extract for frosting
- 1 2–3 tablespoons heavy cream or milk
- 1/2 teaspoon green gel food coloring
- 1/4 teaspoon yellow gel food coloring
- 6 miniature toy John Deere-style tractors cleaned and dried
- 2 tablespoon chocolate sprinkles optional for “dirt”
- 6 chocolate sandwich cookies crushed optional for “soil”
Instructions
- Preheat the oven to 350°F (175°C) and line the muffin tin with 12 paper cupcake liners.
- In a medium bowl whisk together the flour, granulated sugar, baking powder, baking soda, and salt until well combined.
- In a large bowl beat the softened butter with an electric mixer until creamy and smooth, about 1 minute.
- Add the eggs and vanilla extract to the butter and beat until the mixture is light and slightly fluffy, about 2 minutes.
- In a small bowl whisk together the milk and sour cream until smooth.
- Add half of the dry ingredients to the butter mixture and mix on low just until combined.
- Pour in the milk–sour cream mixture and mix on low until incorporated.
- Add the remaining dry ingredients and mix on low until just combined, then finish folding with a spatula to avoid overmixing.
- Divide the batter evenly among the 12 liners, filling each about two-thirds full.
- Bake the cupcakes for 16–18 minutes or until a toothpick inserted in the center comes out clean.
- Remove the cupcakes from the oven and let them cool in the pan for 5 minutes.
- Transfer the cupcakes to a wire rack and cool completely for at least 40 minutes before decorating.
- While the cupcakes cool, make the frosting by beating the softened butter in a large bowl until pale and fluffy, about 2–3 minutes.
- Gradually add the powdered sugar, about 1 cup at a time, mixing on low after each addition until combined.
- Add the salt, vanilla extract, and 2 tablespoons of cream or milk, then beat on medium-high for 2–3 minutes until light and fluffy, adding more cream if needed for a pipeable consistency.
- Divide about one-third of the frosting into a separate bowl and color it yellow with gel food coloring, mixing until evenly tinted.
- Color the remaining two-thirds of the frosting green with gel food coloring, adjusting the shade until it resembles bright John Deere green.
- Fit one piping bag with a large round tip and fill it with the yellow frosting.
- Fit the second piping bag with a grass tip or small star tip and fill it with the green frosting.
- If using, sprinkle the tops of the cooled cupcakes lightly with crushed chocolate cookies or chocolate sprinkles to create a “dirt” base.
- Pipe a yellow circle or “field” shape in the center or one side of each cupcake, leaving room around it for green “grass.”
- Pipe green grass or star swirls around the yellow area to resemble a grassy field surrounding a farm.
- Gently press a miniature tractor into the center of the yellow area of each cupcake so it looks like it is driving across the field.
- Adjust any frosting around the tractor with a small offset spatula to secure it and tidy the design.
Notes

Cynthia Weatherford is a seasoned chef and culinary enthusiast who serves as the Recipe creator of Somonday. With decades of experience in the kitchen and a passion for exploring diverse cuisines, Cynthia brings a blend of creativity and technique to every dish. Known for transforming simple ingredients into show-stopping meals, Cynthia believes that cooking is an art form anyone can master. Dedicated to inspiring home cooks, Cynthia shares approachable recipes, pro tips, and culinary wisdom to make every meal memorable.


