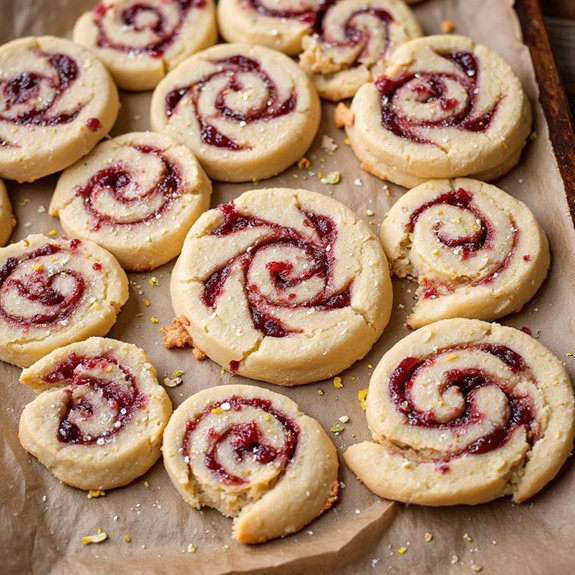
Picture a swirl of sunshine and ruby ribbons: buttery cookies speckled with lemon zest, their tender crumb wrapping a glossy streak of bright raspberry.
As they bake, the kitchen fills with the perfume of citrus and warm sugar, and that first bite—soft, lightly crisp at the edges—tastes like a hug in cookie form.
These pinwheels matter to me because they turn simple pantry staples into something celebratory, the kind of treat that makes a Tuesday feel like a holiday.
They’re perfect for busy weeknights when you need a make-ahead dessert, festive enough for Sunday suppers, and charming in lunchboxes or on a tea tray.
Once, before a last-minute school concert, this dough chilled while we got dressed; we sliced and baked afterward, arriving with warm cookies that disappeared in minutes.
They’re reliable, pretty, and unfussy—exactly what home baking should be. Ready? Let’s cook!
Why You’ll Love It
- Delivers bright lemon zing with sweet-tart raspberry swirls
- Bakes into crisp-edged, tender butter cookies every time
- Chills and slices cleanly for picture-perfect spiral rings
- Freezes beautifully; slice and bake straight from frozen
- Uses simple pantry staples and seedless jam for ease
Ingredients
- 1 cup unsalted butter, softened — room temp for easy creaming
- 3/4 cup granulated sugar — fine cane sugar mixes evenly
- 1/4 cup powdered sugar — adds tender texture
- 1 large egg — room temperature for better emulsifying
- 2 teaspoons pure vanilla extract — real vanilla for best flavor
- 1 tablespoon lemon zest, finely grated — zest only, no pith bitterness
- 2 tablespoons fresh lemon juice — freshly squeezed, not bottled
- 2 3/4 cups all-purpose flour — measure by weight or spoon-and-level
- 1/2 teaspoon baking powder — assures light lift
- 1/2 teaspoon fine sea salt — balances sweetness
- 1/3 cup raspberry jam, seedless and thick — use a sturdy, not runny, jam
- 1 teaspoon cornstarch — helps set the jam swirl
- 1 drop pink or red gel food coloring, optional — enhances the swirl color
- 2 tablespoons coarse sanding sugar, optional — sparkly edges for crunch
Step-by-Step Method
Cream the Butter and Sugars
Beat softened butter with granulated and powdered sugars on medium speed until pale and fluffy, 2 to 3 minutes. Scrape the bowl halfway. Create an airy base so cookies bake tender. Avoid overbeating, which can cause spreading. Use a stand mixer with the paddle for even creaming and consistent texture.
Incorporate Egg, Vanilla, and Lemon
Add the egg, vanilla, lemon zest, and lemon juice. Beat until smooth and fully combined. Scrape the bowl and paddle for even mixing. The zest perfumes the dough while the juice adds brightness. Mix just until emulsified to prevent excess aeration and spreading.
Whisk Dry Ingredients Separately
Whisk flour, baking powder, and fine sea salt in a separate bowl. Break up any lumps for a smooth dough. Pre-mixing guarantees the leavener and salt distribute evenly. Keep the whisked mixture nearby and ready to add on low speed to avoid flour plumes.
Combine to Form a Soft Dough
Add the dry ingredients to the mixer on low speed. Mix just until a soft, smooth dough forms with no dry streaks. Avoid overmixing to keep cookies tender. Stop as soon as the dough pulls from the bowl sides. Overworking develops gluten and toughens the crumb.
Chill Dough into Flat Packs
Divide dough in half. Shape each into a 6×8-inch rectangle. Wrap tightly in plastic and chill 45 minutes. Flattening speeds chilling and makes rolling easier later. Label them if helpful. Cold dough rolls cleaner and resists sticking, which preserves sharp pinwheel lines.
Thicken and Tint the Jam
Stir seedless raspberry jam with cornstarch until thick and cohesive. Add a tiny drop of gel color if desired. Mix until uniform. Thick jam prevents leaks and oozing during baking. If jam seems loose, reduce it briefly on the stove, cool completely, then proceed.
Roll the First Dough Rectangle
On parchment or a silicone mat, roll one dough half to a 9×12-inch rectangle, about 1/4 inch thick. Dust lightly with flour only if needed. Use a ruler for clean edges and even thickness. Rotate the dough and parchment to maintain a neat rectangle and prevent sticking.
Spread a Thin Jam Layer
Spread half the jam evenly over the dough, leaving a 1/2-inch border along the far long edge. Keep the layer thin to avoid squish-out. Use an offset spatula for control. Make certain corners are covered for uniform spirals. Wipe any smears from the border to help seal.
Roll Into a Tight Log
Using the parchment to help, roll from the long edge nearest you into a tight log. Pinch the seam lightly to seal. Keep tension even as you roll for continuous, snug spirals. Square the ends by pressing gently. Wrap the log firmly in plastic to hold shape.
Repeat with Remaining Dough
Roll the second dough half the same way. Spread the remaining jam, leave the border, and roll tightly into a log. Seal the seam. Wrap in plastic. Consistency between logs ensures even cookie sizes and bake times. Keep everything cool to maintain clean layers.
Chill and Re-Round the Logs
Chill the wrapped logs for 1 hour. Unwrap and gently roll on the counter to re-round and even their diameter. Rewrap and chill 30 minutes more to firm. This step sets the spiral and prevents flattening. Cold, firm logs slice into neat rounds without smearing.
Prep the Oven and Pans
Preheat the oven to 350°F (175°C). Line baking sheets with silicone mats or parchment. Clear space for cooling racks. Arrange an area to slice and transfer cookies quickly. A properly heated oven and prepared pans help the cookies set and bake evenly.
Coat with Sanding Sugar (Optional)
Brush the chilled logs lightly with water. Roll in coarse sanding sugar to coat the exterior evenly. Press gently so crystals adhere. This adds sparkle and a delicate crunch. Return the coated logs to the fridge briefly if they warm during handling.
Slice Clean, Even Rounds
Using a sharp knife, slice logs into 1/4-inch rounds with a gentle sawing motion. Wipe the blade between cuts to keep spirals crisp. Rotate the log occasionally to maintain roundness. Arrange slices 2 inches apart on lined sheets to allow for slight spread.
Bake to Just-Set Edges
Bake one sheet at a time for 10 to 12 minutes until edges are set and just barely golden. Avoid overbaking to keep centers tender and colors bright. Rotate the pan once if your oven has hot spots. Remove promptly to prevent additional browning on the sheet.
Cool and Finish
Cool cookies on the sheet for 5 minutes to set, then transfer to a wire rack to cool completely. Letting them firm prevents breakage. Store in an airtight container once cool. For the neatest spirals, keep dough cold during each step and re-chill whenever needed.
Ingredient Swaps
- Dairy-free: use vegan butter; guarantee jam is dairy-free.
- Gluten-free: swap all-purpose flour for a 1:1 gluten-free baking blend; add 1–2 tsp milk or water if dough seems crumbly.
- Egg-free: replace egg with 1 tbsp ground flax + 3 tbsp water (rest 5 minutes) or 3 tbsp aquafaba.
- Citrus/Jam swaps: lemon → lime or orange (keep zest amounts; reduce added juice if dough softens). Raspberry jam → strawberry, cherry, or blackberry; use thick/seedless or reduce on the stove.
- Flavor boosts: add 1/2 tsp almond extract with raspberry; omit food coloring or use beet powder.
- Budget/Regional: regular granulated sugar for sanding sugar; any neutral sea salt; cornstarch can sub with arrowroot or potato starch.
You Must Know
- Doneness • If edges look pale and centers feel glossy-wet after the timer, leave them in longer by 1–2 minutes; you want matte tops with just-kissed golden rims and a slight set when nudged—carryover firming finishes on the rack.
- Troubleshoot • When the spiral smears while slicing, chill the log 10–15 minutes and slice with a thin, hot knife (dip in hot water, wipe dry) using gentle sawing; this prevents jam drag and keeps 1/4-inch rounds clean.
- Avoid • To prevent jam leaks and bubbling blowouts, keep the filling to a translucent veil—about 1 1/2–2 tablespoons per sheet of dough—leaving a 1/2-inch clean border; excess moisture forces gaps and sugar bleed at 350°F.
- Scale • For a double batch, divide into four smaller logs instead of two; shorter 9–10-inch logs chill faster and slice cleaner, yielding ~56 cookies while keeping diameters uniform for even 10–12 minute bakes.
- Flavor Boost • For brighter citrus without softening the dough, add up to +1 teaspoon extra lemon zest and a pinch (1/16 teaspoon) citric acid to the sugar; you’ll get sharper snap and aroma without extra liquid.
Serving Tips
- Arrange on a tiered stand with fresh raspberries and thin lemon slices.
- Pair with Earl Grey tea or sparkling lemonade for a bright, citrusy match.
- Drizzle lightly with lemon glaze; finish with a pinch of lemon zest.
- Serve alongside vanilla bean ice cream for a creamy, tart-sweet contrast.
- Gift in clear bags tied with yellow ribbon and a “slice and smile” tag.
Storage & Make-Ahead
Store baked cookies airtight at room temperature 4–5 days.
Or in the fridge up to 1 week.
Dough logs can be made ahead, wrapped tightly, and chilled 2 days.
Freeze dough logs or baked cookies up to 2 months.
Slice-and-bake from frozen, adding 1–2 minutes.
Refresh baked cookies briefly in a 300°F oven.
Reheating
Reheat gently: Microwave 1–2 cookies 5–8 seconds.
Oven: 300°F, 5–7 minutes on a sheet.
Stovetop: warm in covered skillet on low 2–3 minutes.
Avoid overbaking to preserve swirl.
County-Fair Bake-Sale Favorite
Once you’ve warmed a few for yourself, let’s talk about making these Lemon Raspberry Pinwheel Cookies the star of a county-fair bake sale. I think like a vendor: bright color, clear labels, swift service.
I roll the chilled logs in sparkling sanding sugar so the edges catch the light, then slice uniform rounds for that tight, showy spiral.
I package four cookies per sleeve, stacked so the pinwheels face outward—instant curb appeal. I add a neat tag: Lemon-Raspberry Pinwheels—Buttery, Zesty, Jammy.
Allergen note, price, and quantity are obvious. I set samples in bite-size quarters; the lemon aroma and jammy tang seal the deal. Keep refills cold in a cooler so the spirals stay crisp, and rotate trays often to look freshly baked.
Final Thoughts
Ready to bake a batch? Give these Lemon Raspberry Pinwheel Cookies a try, and feel free to tweak the zest or jam to make them perfectly yours!
Frequently Asked Questions
Can I Make These Cookies Gluten-Free Without Gritty Texture?
Yes—you can. I swap in a 1:1 gluten-free flour with xanthan gum, add 1 tablespoon milk, and rest the dough 30 minutes. The dough rolls smoothly, bakes tender, and tastes buttery without sandy grit.
How Do High-Altitude Adjustments Change Chilling and Baking Times?
At high altitude, I chill dough longer (15–30 minutes extra) and bake slightly hotter and shorter. I watch edges: set but pale. I reduce leavening a touch, add a splash more liquid, and prevent overly dry, puffy results.
What’s the Best Way to Ship These Without Smudging the Swirls?
Pack fully cooled cookies in snug layers: parchment between, then nest in a tin. I cushion with bubble wrap, double-box, and choose 2‑day shipping. I avoid heat, add cold packs, and label “this side up.”
Which Tools Help Achieve Perfectly Even 1/4-Inch Slices?
Use a ruler and a sharp, thin-bladed chef’s knife; I also love adjustable slice guides or a multi-wheel pastry cutter. Chill logs firm, then saw gently—cleaning the blade between cuts—so slices stay crisp, even, and gorgeous.
How Do I Scale the Recipe for Large Batch Consistency?
I scale by weight: multiply ingredients by your desired yield ratio, mixing single batches sequentially. I chill logs overnight, rotate oven racks, bake one sheet at a time, and keep jam thickness consistent for uniform swirls and texture.

Lemon Raspberry Swirl Pinwheel Cookies
Equipment
- 1 stand mixer with paddle attachment
- 2 Mixing bowl
- 1 microplane zester
- 1 measuring cup set
- 1 measuring spoon set
- 1 Rubber spatula
- 1 Whisk
- 2 Baking sheet
- 2 silicone baking mat or sheet of parchment
- 1 Rolling Pin
- 1 ruler
- 1 sharp knife or bench scraper
- 1 plastic wrap roll
- 1 wire cooling rack
Ingredients
- 1 cup unsalted butter softened
- 3/4 cup granulated sugar
- 1/4 cup powdered sugar
- 1 large egg
- 2 teaspoon pure vanilla extract
- 1 tablespoon lemon zest finely grated
- 2 tablespoon fresh lemon juice
- 2 3/4 cup all-purpose flour
- 1/2 teaspoon baking powder
- 1/2 teaspoon fine sea salt
- 1/3 cup raspberry jam seedless, thick
- 1 teaspoon cornstarch
- 1 drop pink or red gel food coloring optional
- 2 tablespoon coarse sanding sugar optional, for edges
Instructions
- In a stand mixer, cream the butter, granulated sugar, and powdered sugar on medium speed until pale and fluffy, 2 to 3 minutes.
- Beat in the egg, vanilla, lemon zest, and lemon juice until smooth, scraping the bowl once.
- Whisk together the flour, baking powder, and salt in a separate bowl.
- Add the dry ingredients to the mixer on low speed and mix just until a soft, smooth dough forms.
- Divide the dough in half and flatten each half into a 6×8-inch rectangle, wrap in plastic, and chill for 45 minutes.
- Stir the raspberry jam with cornstarch (and a tiny drop of gel color if using) until evenly combined and thick.
- On parchment or a silicone mat, roll one dough half into a 9×12-inch rectangle about 1/4-inch thick.
- Spread half the jam thinly over the dough, leaving a 1/2-inch border on the long edge farthest from you.
- Using the parchment to help, tightly roll the dough from the long edge nearest you into a log, sealing the seam with a light pinch.
- Wrap the log firmly in plastic, repeat rolling and filling with the second dough half, and chill both logs for 1 hour.
- After chilling, roll each log gently on the counter to re-round and even the diameter, then chill 30 minutes more to firm.
- Preheat the oven to 350°F (175°C) and line baking sheets with silicone mats or parchment.
- If using sanding sugar, brush the logs lightly with water and roll them in the sugar to coat.
- Using a sharp knife, slice each log into 1/4-inch thick rounds and arrange 2 inches apart on prepared sheets.
- Bake one sheet at a time for 10 to 12 minutes until edges are set and just barely golden.
- Cool on the sheet for 5 minutes, then transfer cookies to a wire rack to cool completely.
Notes

Cynthia Weatherford is a seasoned chef and culinary enthusiast who serves as the Recipe creator of Somonday. With decades of experience in the kitchen and a passion for exploring diverse cuisines, Cynthia brings a blend of creativity and technique to every dish. Known for transforming simple ingredients into show-stopping meals, Cynthia believes that cooking is an art form anyone can master. Dedicated to inspiring home cooks, Cynthia shares approachable recipes, pro tips, and culinary wisdom to make every meal memorable.


