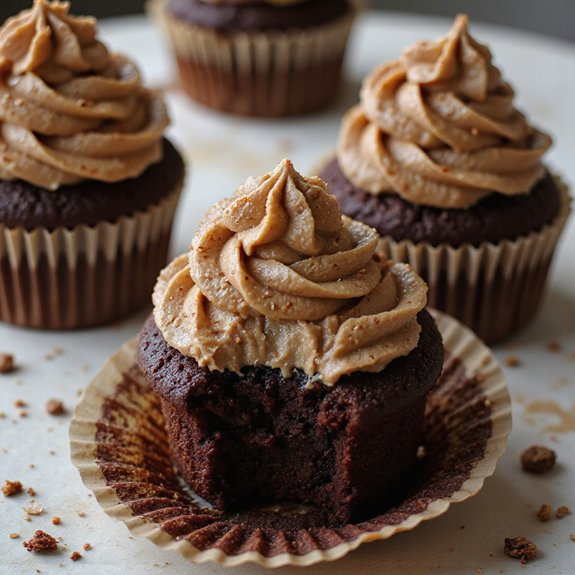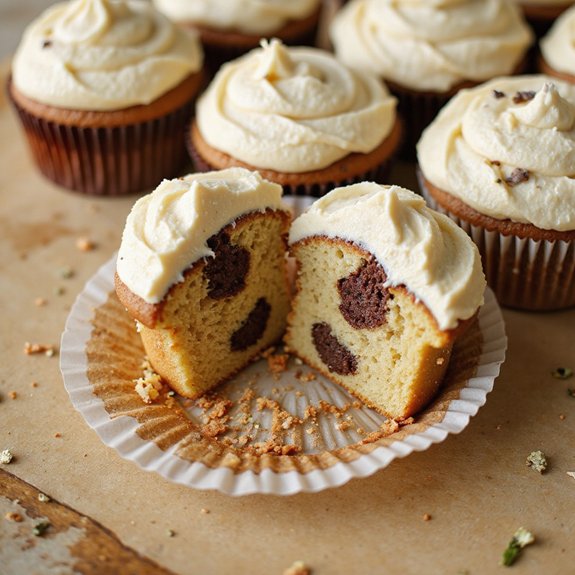
Picture a golden cupcake topped with silky frosting, and when you peel back the wrapper, there it is: a playful leopard print pattern baked right into the cake.
This is a cozy dessert with a stylish twist—sweet, moist vanilla-and-chocolate bites that look like they came from a boutique bakery, yet they’re ready in under an hour.
Leopard Print Cupcakes are perfect for sweet-tooth fans, beginners wanting an impressive bake, and busy hosts who need a showstopping treat without the stress.
I still remember the first time I brought a batch to a friend’s last-minute birthday get-together. The room went quiet for a second, then everyone leaned in—“Wait, the spots are inside the cupcake?”
They became the instant centerpiece, and I’d thrown them together after work. These cupcakes shine at kids’ parties, girls’ nights, casual gatherings, or whenever you’re craving something fun and comforting.
Ready to bring this dessert to life?
Why You’ll Love It
- Delivers bold flavor with buttery vanilla cake and cocoa accents.
- Creates stunning hidden leopard print patterns inside every slice.
- Uses simple pantry ingredients and basic mixing techniques.
- Offers customizable colors and patterns for any party theme.
- Impresses guests with bakery-style results from a home kitchen.
Ingredients
- 1 1/4 cups all-purpose flour, sifted — provides structure; sift for a lighter crumb
- 1 teaspoon baking powder — fresh, active leavener for proper rise
- 1/4 teaspoon fine salt — balances sweetness and enhances flavor
- 1/2 cup unsalted butter, softened — room temperature for easy creaming
- 3/4 cup granulated sugar — standard white sugar for light, tender cupcakes
- 2 large eggs, room temperature — mix in one at a time for stable batter
- 1 teaspoon vanilla extract — pure vanilla for best flavor
- 1/2 cup whole milk, room temperature — full-fat milk keeps crumb moist
- 1 tablespoon unsweetened cocoa powder — creates the medium-brown leopard spots
- 1 teaspoon dark cocoa powder, optional — deepens color for darker outlines
- 1 tablespoon milk — loosens the cocoa batters to piping consistency
- 1 1/2 cups powdered sugar — sifted for smooth, lump-free frosting
- 1/2 cup unsalted butter, softened — base for creamy vanilla buttercream
- 1 teaspoon vanilla extract — flavors the frosting delicately
- 1–2 tablespoons heavy cream or milk — adjust for spreadable frosting texture
- 1 pinch salt — sharpens and balances the sweetness in frosting
Step-by-Step Method
Preheat & Prepare Pan
Preheat your oven to 350°F (175°C). Line a standard 12-cup muffin pan with paper cupcake liners. Make certain the rack is centered in the oven for even baking.
Set out your butter, eggs, and milk to come to room temperature. Gather all equipment so the batter can be mixed and piped without delays.
Mix Dry Ingredients
Whisk together sifted all-purpose flour, baking powder, and fine salt in a medium bowl. Break up any lumps so the mixture is light and even. Set this bowl aside.
Keeping dry ingredients well combined makes sure the cupcakes rise uniformly. Don’t add cocoa yet; that will be mixed into separate batter portions later.
Cream Butter & Sugar
Beat softened unsalted butter and granulated sugar in a large mixing bowl. Use a hand mixer or stand mixer on medium speed.
Continue for 2–3 minutes until the mixture looks pale, fluffy, and slightly increased in volume. Proper creaming incorporates air, which helps create a tender, light cupcake crumb when baked.
Add Eggs & Vanilla
Add the eggs one at a time to the creamed mixture. Beat well after each addition so the mixture stays smooth and emulsified.
Mix in the vanilla extract until fully incorporated. Scrape the sides of the bowl with a rubber spatula as needed. Avoid overbeating once everything looks uniform and glossy.
Alternate Dry & Milk
Add the dry ingredients to the butter mixture in two additions, alternating with the milk. Begin with dry, then milk, mixing on low speed after each addition.
Stop as soon as the batter is just combined. Overmixing at this stage can create dense cupcakes. Scrape the bowl bottom to catch any unmixed flour.
Divide & Color Batters
Divide the plain batter evenly into three medium bowls. Leave the first bowl as is for the light base.
In the second bowl, mix in unsweetened cocoa powder and 1–2 teaspoons of milk to create a smooth medium-brown batter. In the third bowl, mix in dark cocoa (or extra cocoa) with only a few milk drops.
Adjust Consistency Carefully
Thicken or loosen each colored batter slightly as needed. Keep the light batter soft but not runny.
Keep the medium-brown batter smooth and pipeable. Make sure the dark-brown batter is a bit thicker so outlines hold shape. Stir gently to avoid overmixing. Aim for distinct, separate colors that won’t blend together.
Fill Piping Bags
Transfer each colored batter into its own small piping bag or squeeze bottle fitted with a small round tip. Push batter down toward the tip and twist the top closed.
Practice piping a few dots and lines onto a plate. Adjust pressure so you can control the size and shape of spots easily while working.
Create Base Layer
Pipe a thin layer of plain batter into each cupcake liner. Cover just the bottom surface, not more. This layer forms the background for your first set of leopard spots.
Keep it even so spots sit flat. Don’t overfill at this stage. You’ll be layering more batter and want to stay under two-thirds full total.
Pipe First Leopard Spots
Pipe irregular medium-brown spots over the plain base layer. Leave small gaps between spots for the dark outlines.
Vary the sizes slightly to mimic a natural leopard pattern. Avoid making perfect circles. Aim for organic blobs instead. Keep spots relatively thin so there’s room for outlines and more batter above.
Outline Spots Darkly
Pipe the dark-brown batter around each medium spot in loose, partial outlines or crescent shapes. Don’t fully encircle every spot.
Leave breaks in the outline to resemble true leopard rosettes. Vary the arcs and positions so the pattern feels random. Work steadily, applying gentle pressure to keep lines clean.
Cover with Plain Batter
Gently pipe a thin layer of plain batter on top to cover the first pattern. Use just enough to conceal the spots without disturbing them.
Don’t push the batter around with tools; let it settle naturally. Keep the liner from reaching more than halfway full now. Extra space is needed for a second patterned layer.
Repeat Pattern Layering
Repeat the process by piping another set of medium-brown spots on the light batter, leaving space between each. Add dark-brown outlines in partial rings, again making irregular shapes.
Finish with a final light batter layer on top. Make certain each cup is about two-thirds full in total to prevent excessive doming.
Tap & Bake Cupcakes
Tap the muffin pan lightly on the counter to release air bubbles without smearing the internal design. Place the pan in the preheated oven.
Bake for 16–18 minutes, or until a toothpick inserted into the center comes out clean. Avoid opening the oven early, as this can cause sinking or uneven baking.
Cool Completely
Remove the pan from the oven and place it on a wire rack. Let the cupcakes cool in the pan for about 5 minutes.
Carefully transfer each cupcake directly to the rack. Cool completely for about 25 minutes before frosting. Cooling prevents the buttercream from melting and preserves the internal leopard pattern.
Prepare Buttercream Frosting
Beat softened butter in a bowl until smooth and creamy. Gradually add powdered sugar and a pinch of salt, mixing on low to avoid a sugar cloud.
Add vanilla extract and 1 tablespoon of cream or milk. Increase speed and beat until fluffy. Add more liquid, a little at a time, until spreadable but not runny.
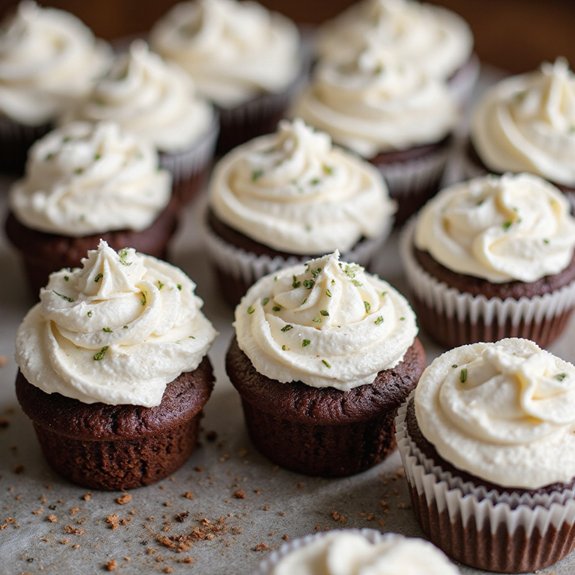
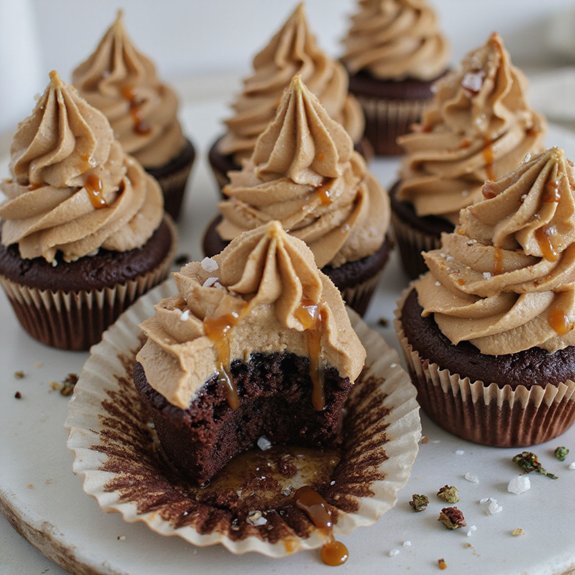
Frost & Decorate Tops
Spread or pipe a thin layer of vanilla buttercream over each cooled cupcake. Keep the frosting modest so focus stays on the internal leopard print when cut.
If desired, tint small portions of frosting brown and dark brown. Pipe tiny spots and partial outlines on top to echo the leopard pattern externally.
Ingredient Swaps
- Flour: Use a 1:1 gluten‑free all‑purpose blend for gluten‑free cupcakes; sift well and don’t overmix.
- Dairy: Swap butter and milk with plant‑based butter and unsweetened oat/soy milk for a dairy‑free version (same amounts).
- Eggs: Replace each egg with 1 tablespoon ground flax + 3 tablespoons water (rest 5–10 minutes) or a commercial egg replacer for vegan cupcakes.
- Sugar: Coconut sugar can replace granulated sugar 1:1 (crumb will be slightly darker, which works well with the leopard effect).
- Cocoa: If you can’t find dark cocoa, just use regular unsweetened cocoa for both brown shades and adjust depth by adding a tiny pinch more for the darker batter.
You Must Know
– Make-Ahead – *For easier decorating or party prep,* store fully cooled, unfrosted cupcakes in an airtight container at room temperature for up to 24 hours or freeze up to 1 month.
Thaw at room temp 30–45 minutes before frosting so the crumb isn’t cold and damp.
Serving Tips
- Slice one cupcake in half to showcase the leopard pattern on a serving plate.
- Arrange on a tiered stand with gold accents to echo the “wild” animal print theme.
- Serve with vanilla or caramel ice cream to complement the buttery, subtly chocolatey cupcake flavors.
- Plate alongside fresh berries for color contrast and a light, tangy counterpoint to the sweetness.
- Add animal-print napkins or cupcake wrappers for a cohesive safari-inspired dessert table.
Storage & Make-Ahead
Leopard print cupcakes keep in the fridge, covered, for 3–4 days.
Bring to room temperature before serving for best texture.
Bake the cupcakes (unfrosted) up to 1 day ahead.
Then frost before serving.
They also freeze well, tightly wrapped, for up to 2 months.
Reheating
Reheat cupcakes gently to preserve moisture.
In the microwave, warm 5–10 seconds.
In a 300°F oven, heat 5–8 minutes.
Avoid stovetop; it dries and heats unevenly.
Leopard Print Baking Trends
Every time I swirl those cocoa batters into a cupcake liner, I’m tapping into one of the boldest baking trends to hit home kitchens: edible animal print that looks runway-ready but still feels playful and cozy.
Leopard spots aren’t just decoration; they’re a tiny reveal of personality when you slice into the crumb and show off that hidden pattern.
I’ve noticed a few clear directions this trend is taking:
- Bold interiors: surprise patterns baked inside cakes, loaves, and cupcakes.
- Maximalist frosting: buttercream “fur” textures and painted cocoa spots on top.
- Neutral glam: tan, caramel, and dark chocolate tones instead of neon colors.
- Everyday celebration: leopard print moving from party showpieces to casual “just because” bakes.
Final Thoughts
Give these leopard print cupcakes a try and have fun playing with the spot shapes and colors to make them your own.
Once you’ve mastered the basic pattern, tweak the flavors, fillings, or frosting to match any party theme or craving.
Frequently Asked Questions
Can I Make These Leopard Print Cupcakes Gluten-Free or Dairy-Free?
Yes, you can. I swap in a 1:1 gluten‑free flour blend and use dairy‑free butter, milk, and cream. The batter still ribbons, bakes tender, and reveals those wild, cocoa‑swirled spots when you bite in.
How Do I Scale This Recipe for a Large Party or Event?
You’ll scale it by multiplying every ingredient by your desired batches—say 3× for 36 guests. I’d bake in rounds, label bowls by color, and line cooling racks like glowing, golden runways of cupcakes.
What Piping Tip Sizes Work Best for Sharp Leopard Spots?
I’d use tiny round tips: about #1–2 for the dark outlines, #3 for the caramel centers. You’ll see crisp, inky rings hugging soft, velvety spots that stay sharp as the batter slowly rises.
Can I Color the Batter With Gel Food Coloring Instead of Cocoa?
You can, and I often do. I tint small portions with rich gel colors, keeping the batter thick and smooth, then swirl and dot it so each cut cupcake reveals vibrant, jungle-bright spots inside.
How Can Kids Safely Help With the Leopard Print Decorating?
Kids can safely help by squeezing soft piping bags while you steady their hands, feeling the batter swirl like paint. I’d keep oven duty mine, but let them layer spots, lick spoons, and admire warm, speckled crumbs.

Leopard Animal Print Cupcake
Equipment
- 1 Standard 12-cup muffin pan
- 12 paper cupcake liners
- 3 medium mixing bowls
- 1 large mixing bowl
- 1 hand mixer or stand mixer
- 3 small piping bags or squeeze bottles
- 3 small round piping tips
- 1 Rubber spatula
- 1 wire cooling rack
- 1 toothpick or cake tester
Ingredients
- 1 1/4 cup all-purpose flour sifted
- 1 teaspoon baking powder
- 1/4 teaspoon fine salt
- 1/2 cup unsalted butter softened
- 3/4 cup granulated sugar
- 2 large eggs room temperature
- 1 teaspoon vanilla extract
- 1/2 cup whole milk room temperature
- 1 tablespoon unsweetened cocoa powder
- 1 teaspoon dark cocoa powder optional
- 1 tablespoon milk for cocoa batters
- 1 1/2 cup powdered sugar for frosting
- 1/2 cup unsalted butter softened; for frosting
- 1 teaspoon vanilla extract for frosting
- 1 1–2 tablespoons heavy cream or milk for frosting
- 1 pinch salt for frosting
Instructions
- Preheat the oven to 350°F (175°C) and line the muffin pan with paper cupcake liners.
- In a medium bowl whisk together the all-purpose flour, baking powder, and salt, then set aside.
- In a large bowl beat the softened butter and granulated sugar with a mixer until light and fluffy, about 2–3 minutes.
- Add the eggs one at a time to the butter mixture, beating well after each addition, then mix in the vanilla extract.
- Add the dry ingredients to the wet mixture in two additions, alternating with the milk, mixing on low just until combined.
- Divide the batter evenly into three medium bowls.
- Leave the first bowl plain for the light base color.
- In the second bowl mix in the unsweetened cocoa powder and 1–2 teaspoons of milk to make a smooth medium-brown batter.
- In the third bowl mix in the dark cocoa powder (or extra cocoa) and enough milk drops to create a slightly thicker dark-brown batter.
- Transfer each colored batter into separate piping bags fitted with small round tips.
- Pipe a thin layer of plain batter into the bottom of each cupcake liner, just enough to cover the base.
- Pipe irregular medium-brown spots over the plain batter, leaving space between each spot.
- Pipe dark-brown batter in rough outlines or crescent shapes partially around each medium-brown spot to mimic leopard rosettes.
- Gently cover the pattern with a thin layer of plain batter, being careful not to overfill the cups (about 2/3 full total).
- Repeat the layering of medium-brown spots, dark outlines, and a light cover layer once more, finishing with plain batter on top.
- Tap the pan lightly on the counter to release any large air bubbles without disturbing the pattern too much.
- Bake the cupcakes for 16–18 minutes or until a toothpick inserted in the center comes out clean.
- Remove the pan from the oven and let the cupcakes cool in the pan for 5 minutes.
- Transfer the cupcakes to a wire rack to cool completely for about 25 minutes before frosting.
- For the frosting, beat the softened butter in a bowl until creamy, then gradually add powdered sugar and salt.
- Mix in the vanilla extract and 1 tablespoon of cream or milk, adding more as needed until the frosting is smooth and spreadable.
- Once the cupcakes are completely cool, frost the tops with a thin layer of vanilla buttercream.
- If desired, use leftover colored batters (baked as cookies or discarded) or colored frosting to pipe small leopard spots on top for decoration.
Notes

Cynthia Weatherford is a seasoned chef and culinary enthusiast who serves as the Recipe creator of Somonday. With decades of experience in the kitchen and a passion for exploring diverse cuisines, Cynthia brings a blend of creativity and technique to every dish. Known for transforming simple ingredients into show-stopping meals, Cynthia believes that cooking is an art form anyone can master. Dedicated to inspiring home cooks, Cynthia shares approachable recipes, pro tips, and culinary wisdom to make every meal memorable.