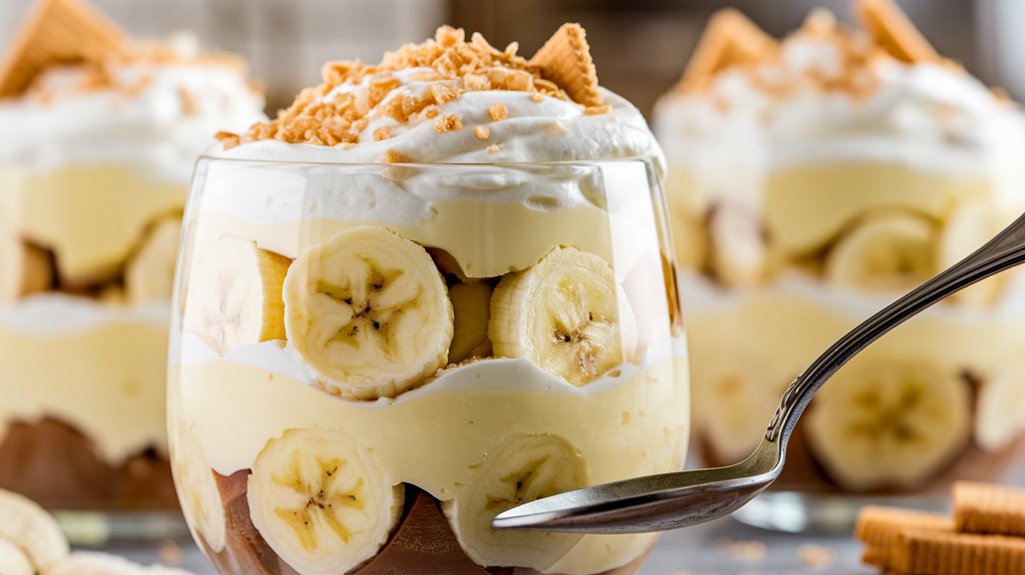
Imagine yourself savoring a spoonful of Magnolia Bakery’s famous banana pudding, where creamy vanilla pudding meets the ripe sweetness of fresh bananas and the delightful crunch of Nilla wafers.
Its velvety, melt-in-your-mouth texture is the result of sweetened condensed milk and whipped cream, creating an indulgent treat that’s both nostalgic and comforting.
This no-bake dessert is perfect for any occasion, inviting you to explore its layers of flavor and texture.
Kitchen Tools Required
Creating the luscious layers of this banana pudding requires more than just ingredients; you’ll need the right kitchen tools to bring everything together seamlessly.
Start with a large mixing bowl for whisking the creamy, sweetened condensed milk and cold water.
You’ll feel the silky mixture thicken as you work in the instant vanilla pudding with a whisk, its aroma wafting through your kitchen.
A medium mixing bowl comes into play for whipping the heavy cream into soft, fluffy peaks.
A sturdy spatula is essential for gently folding the whipped cream into the pudding, preserving its airy texture.
A 9×13 inch baking dish or trifle bowl awaits the assembly of layers.
Finally, a sharp knife guarantees each banana slice is perfectly uniform.
Recipe
Magnolia Bakery Banana Pudding is a classic American dessert that combines the creamy texture of vanilla pudding with the delightful sweetness of bananas and the crunch of Nilla wafers.
This no-bake treat is perfect for gatherings or a simple indulgence at home.
The preparation involves layering these ingredients to create a harmonious blend of flavors that improves with time as the pudding chills and the flavors meld together.
The recipe requires minimal effort, but some patience is needed as the dish needs to rest in the refrigerator for a few hours to reach its full potential.
With a total prep and rest time of around 4 hours and 20 minutes, this dessert can be made ahead of time, making it convenient for hosting events or preparing for a busy week.
Below are the ingredients and instructions to create this beloved dessert, ensuring a delightful experience with each serving.
Ingredients:
- 1 1/2 cups Cold water
- 1 14-ounce can Sweetened condensed milk
- 3.4 ounces Instant vanilla pudding mix
- 3 cups Heavy cream
- 4 cups Sliced bananas
- 1 box Nilla wafers
To prepare Magnolia Bakery Banana Pudding, start by whisking together cold water and sweetened condensed milk in a large mixing bowl until well combined.
Add the instant vanilla pudding mix, whisking for about 2 minutes until fully blended.
Cover and refrigerate this mixture for at least 4 hours.
In a separate medium mixing bowl, whip the heavy cream until stiff peaks form, then gently fold it into the chilled pudding mixture.
In a 9×13 inch baking dish, begin the layering process by placing one-third of the Nilla wafers as the base, followed by a layer of one-third of the sliced bananas, and then one-third of the pudding mixture.
Repeat the layers twice more, ending with the pudding mixture on top.
Cover the dish and refrigerate for another 4 hours before serving.
For the best results, allow the banana pudding to sit overnight in the refrigerator to intensify the flavors.
When ready to serve, you can garnish the top with additional Nilla wafers or banana slices for enhanced presentation.
This not only improves the taste but also the visual appeal of the dish, making it a crowd-pleaser at any gathering.
Cook & Prep Time
Crafting the perfect Magnolia Bakery Banana Pudding is delightfully straightforward, requiring just twenty minutes of prep time and no cooking at all.
Imagine the sweet anticipation as you gather fresh bananas, velvety heavy cream, and crunchy Nilla wafers, ready to create a classic American dessert.
You’ll revel in the simplicity, whisking ingredients together to form a luscious pudding that promises rich, creamy texture without any need for heat.
The magic lies in the preparation—the gentle folding of whipped cream into the chilled pudding, each stir bringing you closer to a harmonious blend of flavors.
This no-fuss process allows the bananas to ripen further, their aroma mingling with the silky pudding.
Your patience will be rewarded after a few hours of fridge time.
Cooking Steps
Begin your culinary journey by whisking together cold water and the silky sweetness of condensed milk until they become one harmonious blend.
As you incorporate the pudding mix, feel the texture transform into a luscious, creamy delight, which you’ll then allow to chill for four hours, ensuring it reaches the perfect consistency.
Meanwhile, whip the heavy cream to stiff peaks, and gently fold it into the pudding, creating a rich, airy masterpiece ready for layering.
Step 1. Whisk Water With Condensed Milk
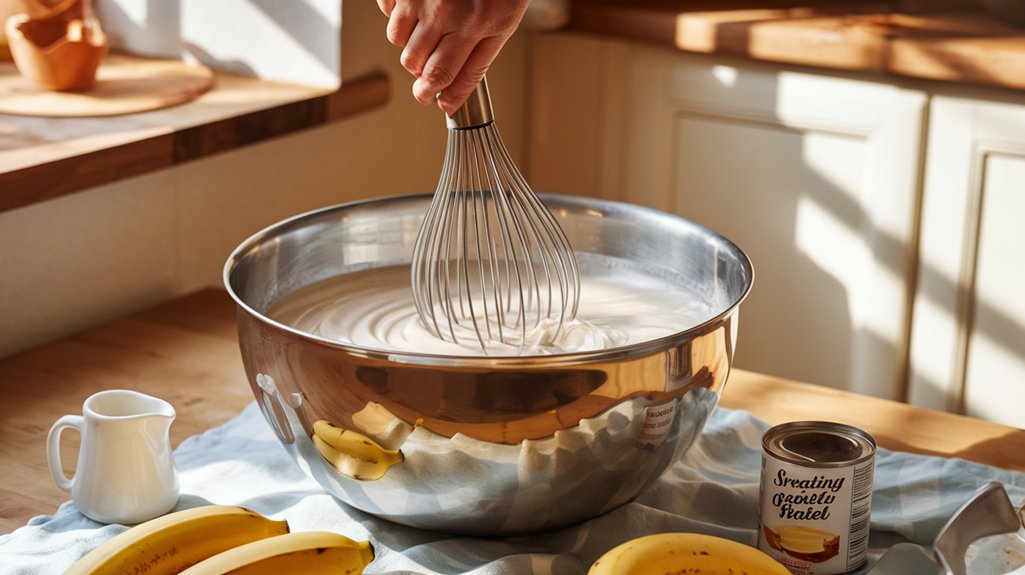
Immerse yourself in the initial step of crafting Magnolia Bakery’s iconic banana pudding by whisking together cold water and sweetened condensed milk.
Feel the smooth texture of the condensed milk as it ribbons into the bowl, merging with the crisp, invigorating cold water.
With each whisking motion, the mixture begins to harmonize into a creamy, velvety base, offering hints of sweetness that will define your dessert.
| Element | Sensory Detail | Expert Insight |
|---|---|---|
| Cold Water | Crisp, invigorating | Guarantees smooth consistency |
| Condensed Milk | Sweet, rich | Adds depth to the flavor |
| Whisking Action | Gentle, rhythmic | Essential for smooth blend |
As you whisk, imagine the layers yet to come, each building upon this luscious foundation.
Step 2. Blend Pudding Mix Thoroughly
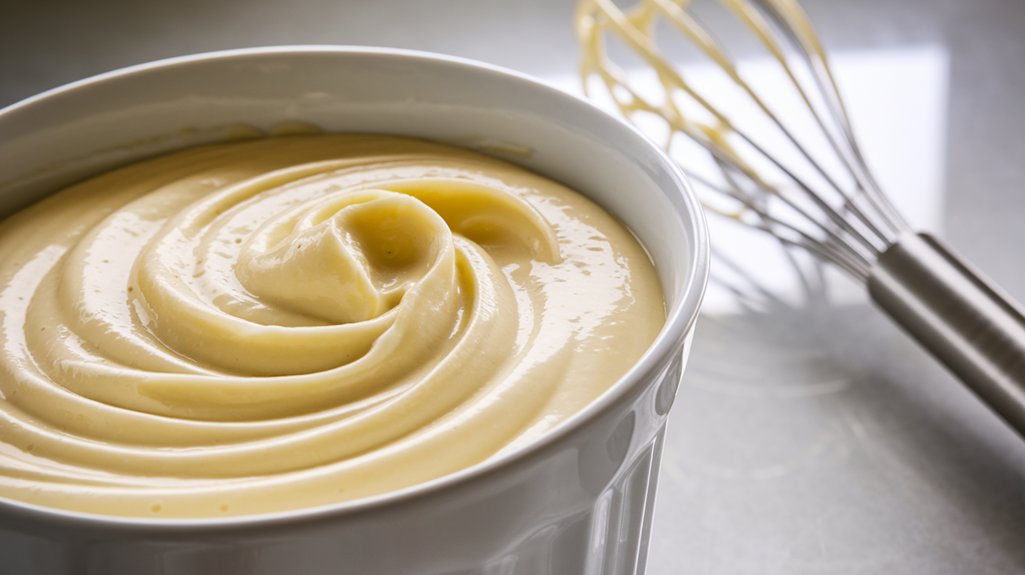
Awaken the magic of your dessert by seamlessly blending the instant vanilla pudding mix into the creamy base.
As you whisk, feel the mixture transform beneath your hands, thickening into a luscious, velvety consistency.
The sweet aroma of vanilla wafts up, hinting at the decadent experience to come.
Ensuring the pudding mix is thoroughly dissolved is essential—any lumps will disrupt the smooth texture that defines Magnolia Bakery’s iconic dessert.
Expertly wield your whisk, making swift, steady strokes to integrate every grain of powder into the liquid canvas.
As the mixture begins to set, its glossy surface hints at the rich, indulgent treat awaiting your guests.
This step is your foundation, setting the stage for layers of flavor and texture to follow.
Step 3. Chill Mixture for 4 Hours
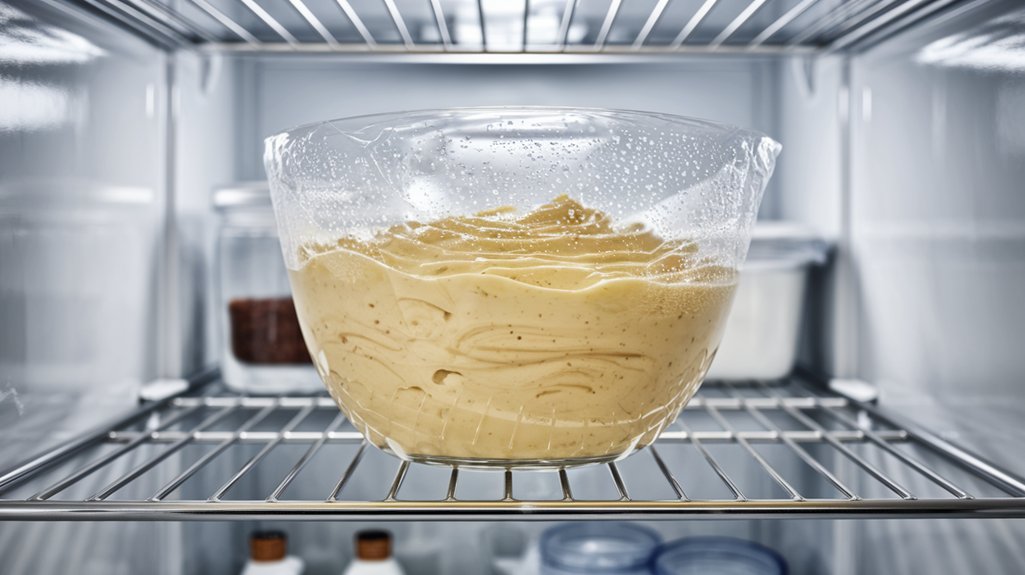
Once you’ve expertly whisked the pudding mix into a silky blend, it’s time to let patience work its magic—this mixture needs to chill for at least four hours.
During this rest, the pudding transforms.
The coolness of the refrigerator melds the sweetened condensed milk and vanilla pudding mix into a smooth consistency, enhancing its luscious flavor.
As you wait, imagine the rich, creamy texture that awaits you.
The cold helps everything settle and thicken, promising a dessert that will hold its form and impress.
It’s a critical step; skipping it might leave you with a runny disappointment.
So, cover your bowl securely.
Letting it sit for four hours isn’t just a step—it’s the secret to achieving that perfect, indulgent dessert.
Step 4. Whip Cream to Stiff Peaks
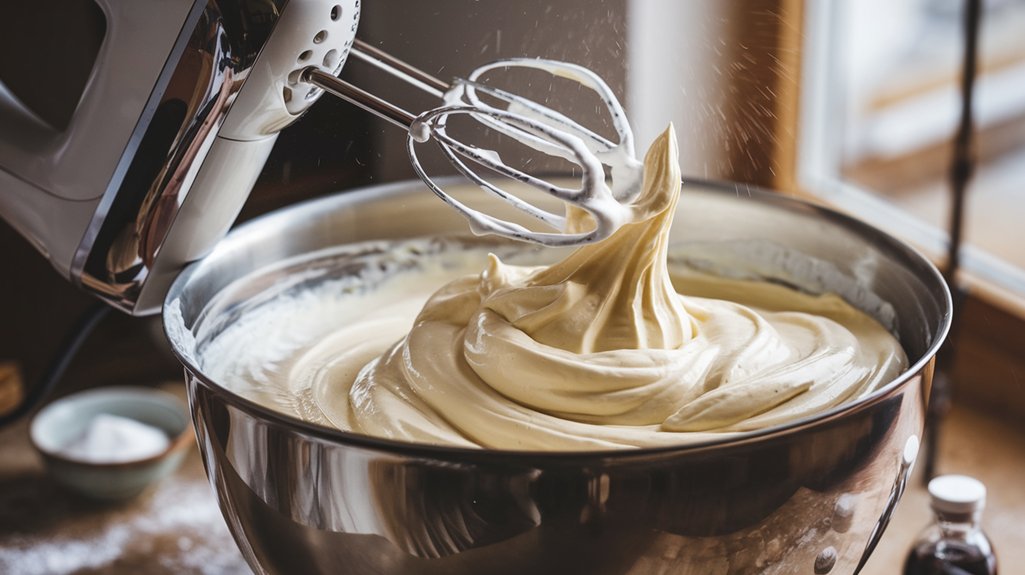
As your pudding mixture rests and thickens in the cool embrace of the refrigerator, it’s time to prepare the next luscious component of your dessert—the whipped cream.
In a medium mixing bowl, pour the heavy cream.
With a whisk, begin to beat the cream, feeling the gradual transformation as it thickens.
Continue whipping until you notice the cream forming stiff peaks.
This means the cream holds its shape and stands tall when you lift the whisk.
The texture is smooth, rich, and voluptuously inviting.
Remember these essential tips:
- Chill your bowl and whisk ahead of time for quicker results.
- Use a steady hand and consistent speed to avoid over-whipping.
- Look for glossy peaks—a sign of perfectly whipped cream.
- Taste for smoothness before proceeding.
Step 5. Fold Cream Into Pudding Mixture

Delicately, fold the whipped cream into the chilled pudding mixture, transforming it into a harmonious blend of textures and flavors.
Picture your spatula gliding gently through the creamy landscape, each turn revealing a luscious swirl of vanilla-scented clouds merging seamlessly with the pudding’s silky embrace.
The cream, now tenderly combined, enhances the pudding’s velvety consistency, elevating each spoonful to a sublime experience.
Notice how the cream’s airy lightness complements the pudding’s richness, creating a balanced, irresistible delight.
Your careful folding guarantees the whipped cream maintains its volume, adding a delightful fluffiness to the dessert.
Be patient and precise. It’s this step that infuses the dessert with its signature smoothness, guaranteeing your banana pudding is worthy of admiration and indulgence.
Final Thoughts
Although this Magnolia Bakery Banana Pudding takes time to prepare, the results are well worth the wait.
You’ll revel in the creamy texture and discover how the flavors meld beautifully, creating a dessert that delights the senses. As you dig in, the sweet aroma of bananas and vanilla fills the air, while the smooth pudding and crunchy wafers create a satisfying contrast.
This dessert isn’t just a treat for the taste buds; it’s an experience that transports you to a place of comfort and nostalgia.
- Texture: Enjoy the delightful contrast between creamy pudding and crunchy wafers.
- Flavor: Allow the rich banana and vanilla notes to melt in your mouth.
- Presentation: Garnish with extra wafers or banana slices.
- Patience: Let it sit overnight for the best taste.
Frequently Asked Questions
Can I Make Banana Pudding Without Bananas?
You can make banana pudding without bananas, but you’ll miss that sweet, creamy texture and iconic flavor. Consider substitutes like strawberries or peaches for a fruity twist. Guarantee the pudding sets well, preserving that luscious, layered delight.
What Is the Shelf Life of Banana Pudding?
You’ll find banana pudding stays fresh for about 3-4 days when chilled properly. Its creamy texture softens, while flavors harmonize, but beware of browning bananas. Keep it covered in the fridge to maintain its delightful aroma.
Can I Use Different Cookies Instead of Nilla Wafers?
You can absolutely swap in different cookies! Consider using buttery shortbread or crispy graham crackers for a delightful twist. Their textures contrast with the creamy pudding, and each bite brings a unique flavor profile to your dessert.
Is There a Vegan Version of This Banana Pudding?
You can create a vegan version by using coconut milk for creaminess, a plant-based sweetened condensed milk, and a vegan pudding mix. Replace Nilla wafers with vegan cookies, and enjoy the creamy, banana goodness guilt-free.
How Can I Prevent Bananas From Browning in the Pudding?
To prevent bananas from browning, gently coat slices in lemon juice, ensuring each piece glistens with citrus. The acidity brightens their color, halting oxidation. Your dessert will maintain vibrant yellow slices, enhancing both taste and presentation.

Magnolia Bakery Banana Pudding
Equipment
- 1 large mixing bowl
- 1 medium mixing bowl
- 1 Whisk
- 1 Spatula
- 1 9×13 inch baking dish or trifle bowl
- 1 measuring cup set
- 1 Knife
Ingredients
- 1 1/2 cups Cold water
- 1 14- ounce can Sweetened condensed milk
- 3.4 ounces Instant vanilla pudding mix
- 3 cups Heavy cream
- 4 cups Sliced bananas
- 1 box Nilla wafers
Instructions
- In a large mixing bowl, whisk together cold water and sweetened condensed milk until combined.
- Add the instant vanilla pudding mix and whisk for about 2 minutes until fully blended.
- Cover the bowl and refrigerate for at least 4 hours, or overnight if possible.
- In a medium mixing bowl, whip the heavy cream until stiff peaks form.
- Gently fold the whipped cream into the chilled pudding mixture until well combined.
- In a 9×13 inch baking dish or trifle bowl, layer one-third of the Nilla wafers.
- Add a layer of one-third of the sliced bananas over the wafers.
- Spread one-third of the pudding mixture over the bananas.
- Repeat the layering process two more times, ending with the pudding mixture on top.
- Cover the dish and refrigerate for at least 4 hours before serving.
Notes

Cynthia Weatherford is a seasoned chef and culinary enthusiast who serves as the Recipe creator of Somonday. With decades of experience in the kitchen and a passion for exploring diverse cuisines, Cynthia brings a blend of creativity and technique to every dish. Known for transforming simple ingredients into show-stopping meals, Cynthia believes that cooking is an art form anyone can master. Dedicated to inspiring home cooks, Cynthia shares approachable recipes, pro tips, and culinary wisdom to make every meal memorable.


