There’s something about the scent of maple and cinnamon drifting from the oven that makes a house feel instantly like home.
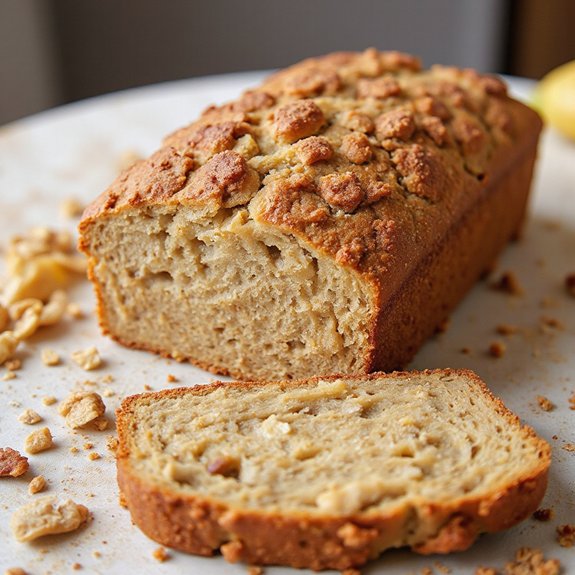
This maple cinnamon banana bread is a cozy, sweet loaf with a caramel-gold crust and a tender, speckled interior—perfect as a simple dessert, lazy weekend breakfast, or afternoon pick‑me‑up.
It comes together in just a few minutes of mixing, then the oven does the rest.
It’s ideal for beginners, busy families, and anyone who hates wasting spotty bananas.
I first leaned on this recipe on a hectic Sunday night, when a lonely bunch of overripe bananas and a bottle of maple syrup turned into warm slices that quieted a long week and doubled as easy breakfasts for days.
Serve it at casual brunches, tuck it into lunchboxes, or bake it whenever a last‑minute craving for something comforting hits.
Ready to bring this loaf to life?
Why You’ll Love It
- Delivers cozy maple-cinnamon flavor in every soft, moist slice
- Turns overripe bananas into a bakery-style loaf with minimal effort
- Stays tender and fresh for days; slices and reheats beautifully
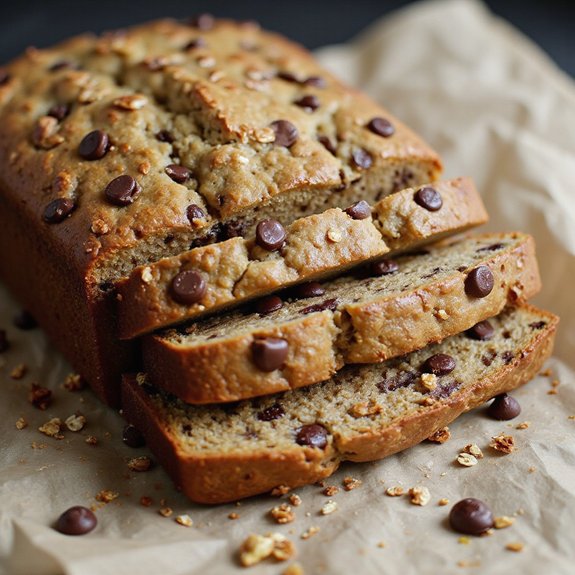
- Offers easy customization with nuts, chocolate chips, or whole wheat flour
- Fills your kitchen with warm, nostalgic, cinnamon-banana aroma
Ingredients
- 3 pieces bananas, very ripe, mashed — use with many brown spots for sweetness
- 80 milliliters maple syrup, pure — real maple, not pancake syrup
- 100 grams granulated sugar — keeps crumb tender
- 75 grams light brown sugar, packed — adds moisture and caramel flavor
- 115 grams unsalted butter, melted and cooled — cooling prevents scrambling eggs
- 2 large eggs, room temperature — mix more evenly into batter
- 80 milliliters milk, room temperature — dairy at room temp helps texture
- 5 milliliters vanilla extract — real vanilla deepens flavor
- 250 grams all-purpose flour — don’t pack; level your measuring cup
- 5 milliliters baking soda — reacts with banana acidity for lift
- 5 milliliters baking powder — supports rise for a lighter loaf
- 3 milliliters fine salt — sharpens sweetness and spice
- 10 milliliters ground cinnamon — adjust to taste if you love spice
- 1 milliliter ground nutmeg (optional) — a pinch gives warmth
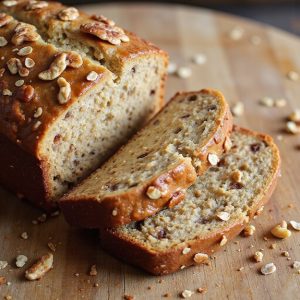
- 60 grams chopped walnuts (optional) — toast lightly for extra flavor
- 30 grams rolled oats (optional, for topping) — adds rustic, crunchy top
- 15 milliliters maple syrup (optional, for brushing) — gives glossy finish
Step-by-Step Method
Prepare the pan and oven
Preheat the oven to 175°C (350°F). Grease a 9×5-inch loaf pan with butter or nonstick spray, or line it with parchment paper for easy removal.
Make sure the rack is in the center of the oven for even baking. Set the pan aside while you mix the batter so it’s ready to fill.
Mash the ripe bananas
Place the peeled ripe bananas in a large mixing bowl. Use a fork or potato masher to mash them until mostly smooth, leaving only small lumps for texture.
Be certain there are no large chunks, as they can create wet pockets in the finished bread. Set the bowl aside briefly.
Combine bananas with sweeteners and butter
Add the cooled melted butter, maple syrup, granulated sugar, and light brown sugar to the mashed bananas.
Whisk thoroughly until the mixture looks smooth and glossy and the sugars begin to dissolve.
Make sure the butter isn’t hot, or it can partially cook the eggs later. Keep whisking until everything is fully blended.
Whisk in eggs, milk, and vanilla
Crack in the eggs one at a time, whisking well after each addition until fully incorporated. Pour in the milk and add the vanilla extract.
Whisk again until the mixture is smooth and uniform. Be certain there are no streaks of egg.
This wet base should look creamy and slightly thick before adding the dry ingredients.
Mix the dry ingredients separately
In a separate medium bowl, whisk together the flour, baking soda, baking powder, salt, cinnamon, and nutmeg.
Break up any lumps in the flour and distribute the spices and leaveners evenly.
This step makes certain the bread rises uniformly and the warm spices are balanced throughout each slice.
Fold dry ingredients into wet mixture
Tip the dry ingredient mixture into the bowl with the wet ingredients. Using a wooden spoon or spatula, gently fold everything together.
Scrape the sides and bottom of the bowl so no pockets of flour remain. Stop as soon as the batter is just combined. Avoid overmixing to keep the crumb tender and light.
Add walnuts if using
Sprinkle the chopped walnuts over the batter. Fold them in gently with a spatula, making only a few turns to distribute them evenly.
Keep the mixing minimal to avoid toughening the bread. If you prefer, substitute chocolate chips or omit the add-ins entirely for a smoother, nut-free loaf.
Fill the loaf pan and add topping
Pour the batter into the prepared loaf pan, scraping the bowl to use it all. Smooth the surface with a spatula so it bakes evenly.
If using, sprinkle rolled oats evenly over the top for texture and a rustic look. Gently tap the pan on the counter to release any large air bubbles.
Bake until cooked through
Place the filled loaf pan on the center oven rack. Bake for 50 to 60 minutes, checking near the end.
Insert a toothpick into the center; it should come out clean or with a few moist crumbs, not wet batter. If the top browns too quickly, tent it loosely with foil while it finishes baking.
Cool briefly in the pan
Remove the pan from the oven and set it on a wire cooling rack. Let the banana bread cool in the pan for about 10 minutes.
This brief resting time helps the structure set, making it easier to remove without breaking. Avoid cutting immediately, as it will be too soft and crumbly.
Turn out and finish cooling
Run a knife around the edges of the loaf to loosen it from the pan. Carefully turn the loaf out onto the wire rack.
Let it cool for another 10 minutes so steam can escape and the crumb firms slightly. This makes neater slices while still allowing you to enjoy the bread pleasantly warm.
Brush with maple and slice to serve
If desired, lightly brush the warm top with a little maple syrup for extra shine and flavor. Allow the glaze to soak in for a few minutes.
Use a serrated knife to slice the bread gently into even pieces. Serve slightly warm or at room temperature, and store any leftovers wrapped airtight.
Ingredient Swaps
- Use melted coconut oil or a neutral vegetable oil instead of butter for a dairy-free loaf; swap milk with any unsweetened plant milk.
- Replace eggs with 2 “flax eggs” (2 tbsp ground flax + 6 tbsp water, rested) for a vegan version.
- For less refined sugar, reduce or omit the granulated sugar and increase mashed banana or maple syrup slightly, or use coconut sugar in place of brown sugar.
- Substitute part or all of the all-purpose flour with whole wheat or spelt flour for a heartier texture, or use a 1:1 gluten-free baking blend to make it gluten-free.
- Trade walnuts for pecans, almonds, or chocolate chips, and use honey or date syrup instead of maple if that’s more affordable or easier to find (flavor will change slightly).
You Must Know
- Doneness • If the top browns too fast: Tent loosely with foil once the loaf is deep golden and risen (around 30–35 minutes) so the center can reach doneness (toothpick mostly clean) without a dry crust. This keeps the interior moist while preventing over‑darkening.
- Troubleshoot • If your loaf sinks in the center: Check that your baking soda and baking powder are less than 6–9 months opened, and keep the pan in the middle rack the whole 50–60 minutes. Fresh leaveners and steady heat help the structure set so it doesn’t collapse.
- Flavor Boost • For extra maple and spice: Increase cinnamon up to 15 milliliters and swap 20–30 grams of the white sugar for more maple syrup, then extend the cook by 3–5 minutes if the center looks slightly glossy. More liquid sweetener deepens flavor but needs a bit more time to set.
- Scale • To double for two loaves: Use 2 pans and multiply all ingredients by 2, but start checking doneness at 55 minutes; two pans may need up to 65 minutes depending on your oven. Use the toothpick cue and a springy top, not just the clock.
- Make-Ahead • To enhance texture and slice cleanly: Cool until barely warm, then wrap the whole loaf tightly and leave at room temperature 8–12 hours before cutting. The crumb sets and moisture redistributes so slices are neater and feel softer.
Serving Tips
- Serve slightly warm with a pat of salted butter or cinnamon-honey butter.
- Pair with hot coffee, chai, or a maple latte for a cozy brunch.
- Top slices with Greek yogurt and fresh berries for a breakfast-style serving.
- Lightly toast leftover slices and drizzle with extra maple syrup.
- Plate with whipped cream and a dusting of cinnamon as a simple dessert.
Storage & Make-Ahead
This banana bread keeps well, tightly wrapped, in the fridge for up to 4–5 days.
It’s great for making ahead: bake, cool completely, then slice.
Wrap slices individually and freeze for up to 2–3 months.
Thaw at room temperature or rewarm gently in the toaster or oven.
Reheating
Reheat slices gently.
In microwave at 50% power for 15–25 seconds.
In oven wrapped in foil at 150°C (300°F) for 8–10 minutes.
Or warm briefly on a covered stovetop skillet.
Banana Bread in Pop Culture
Often when I think about banana bread, I don’t just picture a loaf on the counter—I see it tucked into movie kitchen scenes, sitcom brunch tables, and cozy café montages where someone slices into a golden, steam-soft crumb as rain taps the window.
I notice how directors use it like shorthand: the moment banana bread appears, the room softens, voices lower, and you can almost smell the caramelized fruit and cinnamon through the screen.
In my mind, banana bread usually signals:
- A quiet reconciliation scene, where a warm slice bridges an apology.
- A late-night study montage, crumbs beside a glowing laptop.
- A rainy-day reset, a character whisking batter while life slowly falls back into place.
Final Thoughts
Give this maple cinnamon banana bread a try and enjoy how the cozy spices, maple sweetness, and tender crumb come together in every slice.
Don’t hesitate to tweak it with your favorite add-ins—like chocolate chips, extra nuts, or whole wheat flour—to make it truly your own.
Frequently Asked Questions
Can I Bake This Banana Bread in a Muffin Tin Instead of a Loaf Pan?
Yes, you can. I’d pour the batter into lined muffin cups, two‑thirds full; bake at the same temperature for about 18–24 minutes, until domes turn golden, kitchen smells buttery‑spiced, centers springy to your touch.
How Do I Adapt This Recipe for High-Altitude Baking Conditions?
You’ll reduce leaveners slightly, add 1–2 tablespoons extra flour, and increase oven heat by about 10–15°C. I’d keep sugar the same, then watch aroma and color closely; your loaf’s crumb will stay tender, not sunken.
What’s the Best Way to Ship This Banana Bread Without It Drying Out?
I’d wrap your loaf tightly in plastic, then foil, nestle it in a snug box with crumpled parchment, and choose fast shipping so it arrives still tender, fragrant, and just a bit warm in imagination.
Can I Use This Batter to Make a Layered Banana Cake With Frosting?
Yes, you can, but I’d divide the batter into two pans, shorten the bake time, and let the layers cool completely. Then frost generously, letting sweet spice and maple perfume your whole kitchen.
Maple Cinnamon Banana Bread
Equipment
- 2 large mixing bowls
- 1 medium mixing bowl
- 1 Whisk
- 1 Wooden spoon or spatula
- 1 9×5-inch loaf pan
- 1 wire cooling rack
- 1 Measuring cups set
- 1 Measuring spoons set
Ingredients
- 3 piece ripe bananas mashed
- 80 milliliter maple syrup pure
- 100 gram granulated sugar
- 75 gram light brown sugar packed
- 115 gram unsalted butter melted and cooled
- 2 large eggs room temperature
- 80 milliliter milk room temperature
- 5 milliliter vanilla extract
- 250 gram all-purpose flour
- 5 milliliter baking soda
- 5 milliliter baking powder
- 3 milliliter fine salt
- 10 milliliter ground cinnamon
- 1 milliliter ground nutmeg optional
- 60 gram chopped walnuts optional
- 30 gram rolled oats optional for topping
- 15 milliliter maple syrup optional for brushing on top
Instructions
- Preheat the oven to 175°C (350°F) and grease or line a 9×5-inch loaf pan with parchment paper.
- In a large bowl mash the ripe bananas with a fork until mostly smooth.
- Add the melted cooled butter, maple syrup, granulated sugar, and brown sugar to the bananas and whisk until well combined.
- Whisk in the eggs one at a time, then add the milk and vanilla extract and mix until smooth.
- In a separate bowl whisk together the flour, baking soda, baking powder, salt, cinnamon, and nutmeg.
- Gently fold the dry ingredients into the wet mixture using a spatula until just combined and no dry streaks remain.
- Fold in the chopped walnuts if using, being careful not to overmix the batter.
- Pour the batter into the prepared loaf pan and smooth the top with a spatula.
- Sprinkle the rolled oats evenly over the top if using.
- Bake for 50 to 60 minutes or until a toothpick inserted in the center comes out clean or with just a few moist crumbs.
- Remove the pan from the oven and place it on a wire rack to cool for 10 minutes.
- After 10 minutes run a knife around the edges, turn the loaf out onto the wire rack, and let it cool for another 10 minutes.
- If desired brush the warm top lightly with maple syrup for extra shine and flavor before slicing and serving.
Notes

Cynthia Weatherford is a seasoned chef and culinary enthusiast who serves as the Recipe creator of Somonday. With decades of experience in the kitchen and a passion for exploring diverse cuisines, Cynthia brings a blend of creativity and technique to every dish. Known for transforming simple ingredients into show-stopping meals, Cynthia believes that cooking is an art form anyone can master. Dedicated to inspiring home cooks, Cynthia shares approachable recipes, pro tips, and culinary wisdom to make every meal memorable.